NOCH micro-motion Falling Tree "Fir Tree" Handleiding
- Type
- Handleiding

NOCH GmbH & Co. KG ∙ Lindauer Straße 49 ∙ D-88239 Wangen im Allgäu ∙ E-Mail: info@noch.de ∙ www.noch.de ∙ www.noch.com Stand 03/2023
21775 micro-motion Fallender Baum „Tanne“
micro-motion Falling Tree ‘Fir Tree’
micro-motion Arbre tombant « Sapin »
micro-motion Árbol cayendo “Abeto”
micro-motion vallende boom „Denne“
Gebrauchsanleitung:
Vor Gebrauch die Sicherheitshinweise und Anleitung genau lesen und beachten. Die
Anleitung unbedingt beim Produkt halten. Bei diesem Produkt handelt es sich um einen
Modellbau-Bastelartikel und nicht um ein Spielzeug.
Für die fachgerechte Anwendung bzw. Weiterverarbeitung ist Werkzeug und Zubehör wie
ein scharfes Bastelmesser, eine scharfe Schere und spezieller Kleber nötig.
Die fachgerechte Weiterverarbeitung dieses Modellbauproduktes birgt daher ein Verlet-
zungsrisiko! Das Produkt gehört aus diesem Grund nicht in die Hände von Kindern!
Dieses Produkt sowie Zubehör (Klebstoffe, Farben, Messer usw.) unbedingt außer
Reichweite von Kindern unter 3 Jahren halten. Lassen Sie Kinder nur unter fach-
kundiger Aufsicht von erwachsenen Modellbauern diese Bausätze bearbeiten.
Beim Basteln mit diesem Produkt unbedingt beachten: Nicht essen, trinken oder
rauchen. Farben und Klebstoffe nicht mit Augen, Haut oder Mund in Berührung bringen.
Dämpfe nicht einatmen. Von Zündquellen fernhalten. Die Anleitung und Hinweise des
Herstellers genau beachten. Erste Hilfe bei Augenkontakt: Auge unter fließendem
Wasser ausspülen und dabei offen halten. Umgehend ärztliche Hilfe konsultieren. Diese
Information gut aufbewahren.
Das Produkt darf nur mit einer Spannung von 10 – 16 V AC / DC betrieben werden.
Bitte beachten Sie die Sicherheitshinweise und Betriebsanleitung Ihrer Strom-
quelle, Ihres Trafos oder Ihres Steuergeräts!
Herzlichen Dank, dass Sie sich für ein hochwertiges Produkt von NOCH entschie-
den haben. Wir wünschen Ihnen viel Spaß damit.
Anschluss und Installation der micro-motion „Tanne“:
Achtung: Bitte Reihenfolge einhalten!
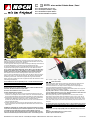
1. Servoanschluss: Bauen Sie den Servo an den vorgesehenen Halterungen mit zwei
Schrauben ein, befestigen Sie die Schrauben nicht zu fest. Zunächst den Stecker des
Servos auf die Platine stecken. Das braune Kabel muss dabei nach außen zeigen (Bild 1).
2. Stromanschluss: Der Anschluss erfolgt an den Lichtstrom- (Dauerstrom-) Ausgang eines
handels
üblichen Modellbahn-Trafos mit 16 V (Gleich- oder Wechselstrom).
Schließen Sie dazu die beiden Kabel der Platine an den Trafo an. Die Polarität muss
dabei nicht beachtet werden.
3. Auslösen des Baums: Der Taster muss eine Sekunde gedrückt werden. Beim Los-
lassen fällt der Baum. Aus Sicherheitsgründen fällt der Baum bei kurzem Druck des
Tasters nicht.
ACHTUNG: Die Lötkontakte des Schalters dürfen nicht mit dem Bahnstrom in Berüh-
rung kommen. Bei Verlängerung der Tasterkabel empfiehlt es sich, die beiden Kabel
zu verdrillen und diese Kabel dann getrennt von anderen Kabeln zu verlegen.
Den Taster-Anschluss niemals direkt mit dem Trafo verbinden! Platine nicht auf
elektrisch leitendem Untergrund betreiben! Kurzschluss- und Zerstörungsgefahr!
Instruction manual:
Read and follow these safety notes and instructions carefully before use. Please keep the
instructions with the product. This product is a modelling craft item and not a toy.
Tools and accessories such as a sharp craft knife, sharp scissors and special glue are
required for professional application and further processing.
Professional further processing of this modelling product therefore poses a risk of injury! For
this reason, the product is not suitable for children!
Keep this product and its accessories (adhesives, paints, knives, etc.) out of the
reach of children under three years of age. Only allow children to handle these kits
under the supervision of competent adult modellers.
When crafting with this product, it is important to note: do not eat, drink or smoke.
Avoid making contact between paints and adhesives and eyes, skin or mouth. Do not
inhale vapours. Keep away from sources of ignition. Follow the manufacturer’s instruc-
tions and notes carefully. First aid in case of contact with eyes: rinse eye under running
water while holding it open. Seek medical help immediately. Keep this information in a
safe place.
The product may only be operated with a voltage of 10–16 V AC/DC. Please observe
the safety notes and operating instructions for your power source, transformer or
control unit!
Thank you for choosing a high-quality product from NOCH. We hope you have fun
with it.
Connecting and installing the micro-motion ‘Fir Tree’:
Attention: please follow this sequence
Bild 1 ∙ Picture 1 ∙ Image 1 ∙ Imagen 1 ∙ Foto 1
braun

NOCH GmbH & Co. KG ∙ Lindauer Straße 49 ∙ D-88239 Wangen im Allgäu ∙ E-Mail: info@noch.de ∙ www.noch.de ∙ www.noch.com Stand 03/2023
1. Connecting the servo: install the servo on the provided brackets with two screws. Do
not overtighten the screws. First plug the servo connector onto the circuit board. The
brown cable must point outwards (picture 1).
2. Connecting the power: connection is made to the luminous flux (continuous current)
output on a commercially available model railway transformer with 16 V (direct or
alternating current).
To do this, connect the two cables on the circuit board to the transformer. Polarity
does not need to be taken into account.
3. Triggering the tree: the button must be pressed for one second. When released, the
tree falls. For safety reasons, the tree does not fall when the button is pressed briefly.
ATTENTION: the soldering contacts on the switch must not come into contact with
the traction current. When extending the cables from the button, it is recommen-
ded that the two cables be twisted and then laid separately from other cables.
Never connect the button directly to the transformer! Do not operate the circuit
board on an electrically conductive surface! Risk of short circuit and damage!
Mode d’emploi
Avant d‘utiliser ce produit, veuillez lire et suivre attentivement les consignes de sécurité
et le mode d‘emploi. Veuillez impérativement garder les instructions avec le produit. Cet
article est un produit de bricolage pour modélisme et n‘est pas un jouet. Pour le mon-
tage, des outils tels une lame aiguisée, des ciseaux aiguisés ainsi qu‘une colle spéciale
sont nécessaires. De ce fait, un risque de blessure est possible! Pour cette raison, tenir
ce produit hors de portée des enfants!
Tenir absolument ce produit et les accessoires (colle, peintures, lames etc.) hors
de portée des enfants de moins de 3 ans! Ne pas laisser les enfants assembler ces
kits sans surveillance d‘un adulte compétent.
Pendant l‘utilisation de ce produit, veuillez suivre les précautions suivantes: Ne pas
manger, boire ou fumer lors de la manipulation. Eviter tout contact avec les yeux, la peau
et la bouche. Ne pas inhaler les vapeurs. Tenir à l‘écart des sources inflammables. Veuillez
suivre attentivement le mode d‘emploi et les indications du fabricant. Premiers secours
en cas de contact avec les yeux: Rincer immédiatement et abondamment à l‘eau en les
maintenant ouverts et consulter un ophtalmologiste. Veuillez bien garder ces instructions.
Le produit ne doit être utilisé qu'avec une tension de 10 - 16 V AC / DC. Veuillez re-
specter les consignes de sécurité et le mode d'emploi de votre source de courant,
de votre transformateur ou de votre appareil de commande !
Nous vous remercions d‘avoir acheté un produit NOCH de haute qualité et vous
souhaitons beaucoup de plaisir lors de son utilisation.
Branchement et installation du « sapin » de la série micro-motion :
Attention : Veuillez respecter l'ordre suivant !
1. Raccordement du servo : Installez le servo sur les supports prévus à cet effet à
l'aide de deux vis, ne serez pas les vis trop fermement. Commencez par brancher le
connecteur du servo sur la platine. Le câble marron doit être dirigé vers l'extérieur
(image 1).
2. Raccordement électrique : Le branchement se fait à la sortie d'éclairage d'un
transformateur de 16 V (courant continu ou alternatif). Branchez les deux câbles
de la platine au transformateur. La polarité ne doit pas être respectée.
3. Déclenchement de l'arbre : Appuyez sur la touche pendant une seconde.
En relâchant la touche, l'arbre tombe. Pour des raisons de sécurité, l'arbre
ne tombe pas en seulement appuyant brièvement sur la touche.
Attention : Veillez à ce que les contacts à souder de l'interrupteur ne touchent pas
le courant des voies. Si les câbles de la touche doivent être prolongés, il convient
de torsader les deux câbles et de les poser séparément des autres fils. Ne jamais
brancher la touche directement au transformateur ! Ne pas opérer la platine sur
une surface conductrice ! Risque de court-circuit et de destruction !
Instrucciones de empleo:
Antes de utilizar este producto, leer atentamente las instrucciones de seguridad y el
modo de empleo. Asegúrese de conservar las instrucciones junto con el producto. Este
producto es un artículo de bricolaje para modelismo y no un juguete. Para la utiliza-
ción o elaboración posterior correcta se necesitan herramientas y accesorios como un
cuchillo afilado, tijeras puntiagudas y pegamento especial. El tratamiento correcto de
este producto posee riesgos escondidos de lesión.
¡Por eso mantener este producto fuera del alcance de los niños! ¡En ningún mo-
mento dejar el producto así como los accesorios (pegamento, colores, cuchillos,
etc.) al alcance de niños menores de 3 años! La utilización de este producto por
niños deberá realizarse solo bajo vigilancia de un adulto modelista.
Durante el bricolaje con este producto atender en todo caso las indicaciones siguien-
tes: no comer, beber ni fumar. Evitar el contacto de colores o pegamento con la piel,
boca y los ojos. Evitar la inhalación de vapores. No exponer a fuentes de calor. Seguir
exactamente las
instrucciones e indicaciones del fabricante. En caso de contacto con los ojos lavar con
abundante agua manteniendo los párpados abiertos y buscar atención medica inmediata-
mente.
Guardar estas instrucciones para futura referencia.
El producto sólo puede funcionar con una tensión de 10-16 V AC / DC. ¡Tenga en
cuenta las indicaciones de seguridad y las instrucciones de uso de su fuente de
alimentación, transformador o unidad de control!
Muchas gracias por haber elegido este producto de alta calidad de NOCH. ¡Le
deseamos que disfrute del árbol digital!
Conexión e instalación de la “Abeto” micro-motion:
Atención: Por favor observar el orden númerico!
1. Conexión del servo: Instale el servo en los soportes suministrados con dos tornillos,
no apriete demasiado los tornillos. Primero enchufe el conector del servo en la placa
de circuito. El cable marrón debe apuntar hacia afuera (imagen 1).
2. Conectar al suministro de corriente: La conexión se realiza a la salida de fuente (cor-
riente permanente) de un transformador de modelismo ferroviario de 16 V (CA / CC).
Para ello conectar los dos cables de la platina al transformador. No hay que respetar
la polaridad.
3. Activación del árbol: Apretar el pulsador durante un segundo. Al soltarlo el árbol cae.
Por razones de seguridad el árbol no cae cuando se pulsa el pulsador sólo
ligeramente.
ATENCIÓN: Los contactos de soldadura no deben entrar en contacto con el cor-
riente de las vías. Si se prolonga los cables del pulsador se recomienda trenzar
los dos cables y colocar estos cables separados de los otros. ¡Nunca conectar el
pulsador con el transformador en directo! ¡No use la platina sobre una superficie
conductora! ¡Peligro de cortocircuito y destrucción!
Handleiding:
Voor gebruik de veiligheidsvoorschriften en de handleiding goed lezen en opvolgen. De
gebruiksaanwijzing bij het product bewaren. Dit product is een modelbouw artikel en
geen speelgoed. Voor een correct gebruik resp. Behandelen is gereedschap zoals een
scherp hobby mes, een scherpe schaar en speciale lijm nodig. Het verwerken van dit
modelbouw product brengt daarom letselgevaar met zich mee!
Het product behoort in principe niet in handen van kinderen!
Dit product alsmede de accessoires (lijm, verf, mes, enz.) buiten bereik van kinderen
onder de 3 jaar houden. Laat kinderen alleen onder toezicht van een volwassenen deze
set behandelen.
Bij het werken met dit product: niet eten, niet drinken of roken. Contact met huid, mond
en ogen met verf en lijm vermijden. Dampen niet inademen. Van ontstekingsbronnen
weghouden. De handleiding van de fabrikant nauwlettend opvolgen Eerste hulp bij
oogcontact: de ogen met stromend water uitspoelen en daarbij open houden. Direct een
arts raadplegen Informatie goed bewaren.
Het product mag alleen worden gebruikt met een bedrijfsspanning van 10 - 16V
AC/DC. Lees vooral de veiligheidsvoorschriften en handleiding van de stroombron,
de trafo, of het besturingsapparaat.
Hartelijk dank dat u gekozen heeft voor een hoogwaardig product van NOCH. Wij
wensen u veel plezier ermee.
Aansluiten en installatie van de micro-motion „Denne“:
Let op: de stappen volgen!
1. Servo-aansluiting: Monteer de servo op de voorgeschreven plaats met twee schroe-
ven, niet al te vast. Plaats daarna de stekker van de servo op de print, de bruine draad
moet daarbij naar buiten staan (foto 1).
2. Stroom aansluiten: het aansluiten dient te gebeuren op de lichtstroom (continu
stroom) uitgang van een standaard modelspoortrafo met 16 V (gelijk- of wissel-
stroom). Sluit hiervoor de beide draden van de print aan op de trafo. Er hoeft niet gelt
te worden op de polariteit.
3. Werking van de boom: de drukknop moet één seconde worden ingedrukt. Bij het
loslaten valt de boom. Uit veiligheidsoverwegingen valt de boom niet bij het kort
indrukken van de drukknop.
LET OP: de soldeercontacten van de schakelaar mogen niet met de rijspanning in
aanraking komen. Bij verlenging van de draden naar de drukknop is het aan te
raden
de beide draden te twisten en gescheiden van andere draden aan te leggen.
De drukknop nooit direct met de trafo verbinden! Print niet op een elektrisch
geleidende ondergrond gebruiken! Gevaar voor kortsluiting en defect raken!
NOCH GmbH & Co. KG
Lindauer Straße 49
D-88239 Wangen im Allgäu
Tel.: +49 - 75 22 - 97 80-0
Fax: +49 - 75 22 - 97 80-80
E-Mail: inf[email protected]
www.noch.de · www.noch.com
www.noch.de / youtube
-
 1
1
-
 2
2


NOCH micro-motion Falling Tree "Fir Tree" Handleiding
- Type
- Handleiding
in andere talen
Gerelateerde artikelen
-
NOCH Fashion Shop Handleiding
-
-
-
-
-
-
-
-
-