
www.dell.com | support.dell.com
Dell™ Latitude™ Systems
Media Base Setup Guide
Installatiegids voor mediabasis
Guide de configuration Base média
Anleitung zur Inbetriebnahme der Media Base
Guida di installazione della base per supporti multimediali
Guía de configuración de la base para medios
Model PR09S


www.dell.com | support.dell.com
Dell™ Latitude™ Systems
Media Base Setup Guide
Model PR09S

Notes, Notices, and Cautions
NOTE: A NOTE indicates important information that helps you make better use of your computer.
NOTICE: A NOTICE indicates either potential damage to hardware or loss of data and tells you how to avoid the
problem.
CAUTION: A CAUTION indicates a potential for property damage, personal injury, or death.
Abbreviations and Acronyms
For a complete list of abbreviations and acronyms, see the
Dell™ Latitude™ D420 User’s Guide
(depending on
your operating system, double-click the
User’s Guide
icon on your desktop, or click the
Start
button,
→
Help
and Support
,
→
User and system guides,
→
User’s guides,
and then click
Dell Latitude User’s Guide
).
____________________
Information in this document is subject to change without notice.
© 2006 Dell Inc. All rights reserved.
Reproduction in any manner whatsoever without the written permission of Dell Inc. is strictly forbidden.
Trademarks used in this text: Dell and the DELL logo are trademarks of Dell Inc.; Microsoft and Windows are registered trademarks of Microsoft
Corporation.
Other trademarks and trade names may be used in this document to refer to either the entities claiming the marks and names or their products.
Dell Inc. disclaims any proprietary interest in trademarks and trade names other than its own.
Model PR09S
March 2006 P/N UT901 Rev. A00

Contents 3
Contents
CAUTION: Safety Instructions . . . . . . . . . . . . . . . . . . . . . . . . . . . 5
SAFETY: General Safety
. . . . . . . . . . . . . . . . . . . . . . . . . . . . 5
SAFETY: Power Safety
. . . . . . . . . . . . . . . . . . . . . . . . . . . . 6
Equipment Protection Instructions
. . . . . . . . . . . . . . . . . . . . . . . . 6
Protecting Against Electrostatic Discharge
. . . . . . . . . . . . . . . . . 7
About Your Media Base
. . . . . . . . . . . . . . . . . . . . . . . . . . . . . . 8
Left View
. . . . . . . . . . . . . . . . . . . . . . . . . . . . . . . . . . . 8
Right View
. . . . . . . . . . . . . . . . . . . . . . . . . . . . . . . . . . . 8
Back View
. . . . . . . . . . . . . . . . . . . . . . . . . . . . . . . . . . . 9
Top View
. . . . . . . . . . . . . . . . . . . . . . . . . . . . . . . . . . 11
Setting Up Your Media Base
. . . . . . . . . . . . . . . . . . . . . . . . . . . 12
Securing the Media Base
. . . . . . . . . . . . . . . . . . . . . . . . . . . . 13
Docking Your Computer
. . . . . . . . . . . . . . . . . . . . . . . . . . . . . 14
Undocking Your Computer
. . . . . . . . . . . . . . . . . . . . . . . . . . . . 15
Installing the Optical Drive
. . . . . . . . . . . . . . . . . . . . . . . . . . . 17
Removing the Optical Drive
. . . . . . . . . . . . . . . . . . . . . . . . . . . 18
Using External Drives
. . . . . . . . . . . . . . . . . . . . . . . . . . . . . . 18
Specifications
. . . . . . . . . . . . . . . . . . . . . . . . . . . . . . . . . . 19
Regulatory Notices
. . . . . . . . . . . . . . . . . . . . . . . . . . . . . . . . 21
FCC Notices (U.S. Only)
. . . . . . . . . . . . . . . . . . . . . . . . . . . 22
Industry Canada (Canada Only)
. . . . . . . . . . . . . . . . . . . . . . . 22
Industry Canada (Canada uniquement)
. . . . . . . . . . . . . . . . . . . 22
CE Notice (European Union)
. . . . . . . . . . . . . . . . . . . . . . . . 22
Předpisy CE (Evropská unie)
. . . . . . . . . . . . . . . . . . . . . . 22
CE-krav (Europæiske Union)
. . . . . . . . . . . . . . . . . . . . . . . . 23
CE-kennisgeving (Europese Unie)
. . . . . . . . . . . . . . . . . . . . . 23
CE teade (Euroopa Liit)
. . . . . . . . . . . . . . . . . . . . . . . . . . . 23
CE-ilmoitus (Euroopan unioni)
. . . . . . . . . . . . . . . . . . . . . . . 23
Réglementation CE (Union européenne)
. . . . . . . . . . . . . . . . . . 23
CE-Hinweis (Europäische Union)
. . . . . . . . . . . . . . . . . . . . . . 24

4 Contents
Σήµα CE (Ευρωπαϊκή Ένωση) . . . . . . . . . . . . . . . . . . . . . 24
CE jelzés (Európai Unió)
. . . . . . . . . . . . . . . . . . . . . . . . . . . 24
Avviso CE (Unione Europea)
. . . . . . . . . . . . . . . . . . . . . . . . 24
CE paziņojums (Eiropas Savienība)
. . . . . . . . . . . . . . . . . . 24
CE žyma (Europos S¹junga)
. . . . . . . . . . . . . . . . . . . . . . . . . 25
Avviż CE (Unjoni Ewropea)
. . . . . . . . . . . . . . . . . . . . . . . 25
Wymogi CE (Unia Europejska)
. . . . . . . . . . . . . . . . . . . . . . . 25
Aviso CE (União Europeia)
. . . . . . . . . . . . . . . . . . . . . . . . . 25
CE Poznámka (Európska únia)
. . . . . . . . . . . . . . . . . . . . . . . 25
Obvestilo CE (Evropska unija)
. . . . . . . . . . . . . . . . . . . . . . . . 26
Aviso CE (Comunidad Europea)
. . . . . . . . . . . . . . . . . . . . . . . 26
Meddelande om CE-märkning (Europeiska Unionen)
. . . . . . . . . . . 26
AB Bildirimi (Avrupa Birliği)
. . . . . . . . . . . . . . . . . . . . . . . 26
MIC 규정사항 ( 한국에 한함 )
. . . . . . . . . . . . . . . . . . . . . . 27
BSMI Notice (Taiwan Only)
. . . . . . . . . . . . . . . . . . . . . . . . . 28
BSMI 通告 (僅限於台灣)
. . . . . . . . . . . . . . . . . . . . . . . . 28
VCCI(日本のみ)
. . . . . . . . . . . . . . . . . . . . . . . . . . . . . 29
Información para NOM (únicamente para México)
. . . . . . . . . . . . 29

Media Base Setup Guide 5
CAUTION: Safety Instructions
Use the following safety guidelines to help ensure your own personal safety and to help protect your device (computer, port
replicator, media base, docking station, and similar devices) and working environment from potential damage.
SAFETY: General Safety
Observe the following safe-handling guidelines to ensure personal safety:
• When setting up the device for work, place it on a level surface.
• Do not attempt to service the device yourself, except as explained in your Dell™ documentation or in instructions otherwise
provided to you by Dell. Always follow installation and service instructions closely.
• To help avoid the potential hazard of electric shock, do not connect or disconnect any cables or perform maintenance or
reconfiguration of this product during an electrical storm. Do not use your media base during an electrical storm unless all
cables have been disconnected and the computer is operating on battery power.
• If your device includes an integrated or optional (PC Card) modem, disconnect the modem cable if an electrical storm is
approaching to avoid the remote risk of electric shock from lightning via the telephone line.
• Do not push any objects into air vents or openings of your device. Doing so can cause fire or electric shock by shorting out
interior components.
• Keep your device away from radiators and heat sources. Also, do not block cooling vents. Avoid placing loose papers
underneath your device; do not place your device in a closed-in wall unit or on a bed, sofa, or rug.
• Do not use your device in a wet environment, for example, near a bath tub, sink, or swimming pool or in a wet basement.
• Do not spill food or liquids on your computer.
• Before you clean your device, disconnect the device from the electrical outlet. Clean your device with a soft cloth dampened
with water. Do not use liquid or aerosol cleaners, which may contain flammable substances.
• Ensure that nothing rests on your AC adapter’s power cable and that the cable is not located where it can be tripped over or
stepped on.
• Do not store your computer in a low-airflow environment, such as a carrying case or a closed briefcase, while the computer is
turned on. Restricting airflow can damage the computer or cause a fire.
• Do not allow your portable computer to operate with the base resting directly on exposed skin for extended periods of time.
The surface temperature of the base will rise during normal operation (particularly when AC power is present). Allowing
sustained contact with exposed skin can cause discomfort or, eventually, a burn.
• PC Cards may become very warm during normal operation. Use care when removing PC Cards after their continuous
operation.
• This device may contain Optical Disk Drives (ODD), CD-ROM, CDR/W, DVD, etc., which have built-in laser devices.
These ODDs comply with safety requirements and are classified as "Class 1 Laser Products," under US DHHS Standard and
EN/IEC60825-1 Laser Safety Standard. These ODDs contain no user adjustments or serviceable or replaceable parts. To
prevent any risk of exposure to laser radiation, do not disable or open ODD assembly for any reason.
WARNING:
The cord on this product contains lead, a chemical known to the State of California to cause birth defects or other
reproductive harm.
Wash hands after handling.

6 Media Base Setup Guide
SAFETY: Power Safety
• If this product is provided with a 3-prong power cable, be sure to plug it into a properly grounded power source in order to
help prevent electric shock. Do not use adapter plugs or remove the grounding prong from the power cable plug. If you use a
power extension cable, use the appropriate type to mate with the adapter power cable plug.
• If you use an extension power cable with your AC adapter, ensure that the total ampere rating of the products plugged in to
the extension power cable does not exceed the ampere rating of the extension cable.
• Use only the Dell-provided AC adapter approved for use with this device. Use of another AC adapter may cause a fire or
explosion. See your User’s Guide or Owner’s Manual for AC adapter electrical ratings.
• If you are using a multiple-outlet power strip, use caution when plugging the AC adapter’s power cable into the power strip.
Some power strips may allow you to insert the plug incorrectly. Incorrect insertion of the power plug could result in
permanent damage to your device, as well as risk of electric shock and/or fire. Ensure that the ground prong of the power
plug is inserted into the mating ground contact of the power strip.
• Before you connect the device to an electrical outlet, check the AC adapter voltage rating to ensure that the required voltage
and frequency match the available power source.
• To remove the computer from all power sources, turn the computer off, disconnect the AC adapter from the electrical
outlet, and remove any battery installed in the battery bay or module bay.
• Place the AC adapter in a ventilated area, such as a desk top or on the floor, when you use it to run the computer or to charge
the battery. Do not cover the AC adapter with papers or other items that will reduce cooling; also, do not use the AC adapter
inside a carrying case.
• The AC adapter may become hot during normal operation of your computer. Use care when handling the adapter during or
immediately after operation.
• Norway and Sweden: Connect the power cable to a grounded electrical outlet only.
• Japan Only: Use only the Dell-provided AC power cable with the AC adapter. Use of any other power cable may damage the
device or AC adapter or may present risk of fire or electric shock.
Equipment Protection Instructions
Observe the following safe-handling guidelines to prevent damage to your equipment:
NOTICE: When taking the computer from low-temperature conditions into a warmer environment or from high-temperature
conditions into a cooler environment, allow the computer to acclimate to room temperature and for any condensation that may
have formed to evaporate before turning on power to avoid damage to the computer.
• Protect your device from environmental hazards such as dirt, dust, food, liquids, temperature extremes, and overexposure to
sunlight.
• Keep the device away from direct or excessive moisture and extremely hot or cold temperatures to ensure that the computer
is used within the specified operating range.
• Leave a 10.2 cm (4 in) minimum clearance on all vented sides of the device to permit the airflow required for proper
ventilation.
• Do not restrict airflow into the device by blocking any vents or air intakes.
CAUTION: When preparing your AC adapter for travel, wrap both of the cords around the adapter in the same direction as
shown in the following picture. Failure to wrap the cords in the correct direction can result in damage to the cords not covered
by the adapter warranty. Never use an AC adapter that shows signs of damage or excessive wear.

Media Base Setup Guide 7
Protecting Against Electrostatic Discharge
Electrostatic discharge (ESD) events can harm electronic components inside your computer. Under certain conditions, ESD may
build up on your body or an object, such as a peripheral, and then discharge into another object, such as your computer. To prevent
ESD damage, you should discharge static electricity from your body before you interact with any of your computer’s internal
electronic components, such as a memory module. You can protect against ESD by touching a metal grounded object (such as an
unpainted metal surface on your computer’s I/O panel) before you interact with anything electronic. When connecting a
peripheral (including handheld digital assistants) to your computer, you should always ground both yourself and the peripheral
before connecting it to the computer. In addition, as you work inside the computer, periodically touch an I/O connector to remove
any static charge your body may have accumulated.
You can also take the following steps to prevent damage from electrostatic discharge:
• When unpacking a static-sensitive component from its shipping carton, do not remove the component from the antistatic
packing material until you are ready to install the component. Just before unwrapping the antistatic package, be sure to
discharge static electricity from your body.
• When transporting a sensitive component, first place it in an antistatic container or packaging.
• Handle all electrostatic sensitive components in a static-safe area. If possible, use antistatic floor pads and work bench pads.

8 Media Base Setup Guide
About Your Media Base
Left View
COMPUTER RELEASE LEVER — Releases the computer from the media base if the media base is not secured by an
antitheft device.
USB
CONNECTOR — The USB 2.0-compliant connector allows you to connect USB devices such as printers,
cameras, etc.
AUDIO CONNECTOR — Lets you connect headphones and speakers.
UNDOCK BUTTON — Lets you undock your computer when your computer is operating.
Right View
OPTICAL DRIVE — Allows you to use CD and DVD media.
USB
CONNECTOR — The USB 2.0-compliant connector allows you to connect USB devices such as printers,
cameras, etc.
1 computer release lever 2 USB connector 3 audio connector
4 undock button
1 optical drive 2 USB connector
1 2 3 4
1 2

Media Base Setup Guide 9
Back View
1 USB connector 2 network connector 3 serial connector
4 parallel connector 5 digital video connector (DVI) 6 VGA video connector
7 Powered USB connector 8 AC adapter connector 9 security slot
Connector Description
NETWORK CONNECTOR — Connects the media base to a
network. The two lights next to the connector indicate link
status and activity for a wired network connection.
For information on using the network adapter, see the
documentation that came with your computer.
NOTICE: Do not plug a telephone cable into the network
connector.
USB 2.0
CONNECTORS — Connects up to four USB
2.0-compliant devices; including a powered USB.
PARALLEL CONNECTOR — Connects a parallel device, such as a
parallel printer.
VIDEO CONNECTOR — Connects an external VGA monitor.
NOTE: When your computer is docked, use the video
connector on the media base.
SERIAL CONNECTOR — Connects a serial device, such as a
serial mouse or a handheld device.
1 2 3 4 5 6 87 9

10 Media Base Setup Guide
SECURITY CABLE SLOT — Lets you attach a commercially available antitheft device to the media base. Instructions
for installing antitheft devices are usually included with the device. For more information, see "Securing the Media
Base" on page 13.
HEADPHONE/SPEAKER CONNECTOR — Connects headphones
or speakers. The connector is a stereo output connector.
AC
ADAPTER CONNECTOR — Connects an AC adapter to the
media base and to AC power to convert AC power to the DC
power required by the media base. You can connect the AC
adapter with your media base either turned on or off. For more
information, see "Setting Up Your Media Base" on page 12.
CAUTION: If you are using a multiple-outlet power strip,
use caution when you plug the AC adapter power cable
into the power strip. Some power strips may allow you to
insert the connector incorrectly. Incorrect insertion of the
power connector could result in permanent damage to your
media base as well as risk of electric shock and/or fire.
Ensure that you insert the ground prong of the power plug
into the mating ground contact of the power strip.
NOTICE: When you disconnect the AC adapter from the
media base, hold the adapter cable connector, not the cable
itself, and pull firmly but gently to avoid damaging the cable.
Connector Description

Media Base Setup Guide 11
Top View
1 docking connector
1

12 Media Base Setup Guide
Setting Up Your Media Base
CAUTION: The AC adapter works with electrical outlets worldwide. However, power connectors and power
strips vary among countries. Using an incompatible cable or improperly connecting the cable to the power strip
or electrical outlet may cause fire or equipment damage.
NOTICE: Always use the Dell AC adapter that came with the media base. If you use any other commercially
available AC adapter—or the AC adapter from earlier models of Dell computers—you may damage the media base
or the computer.
NOTICE: When you disconnect the Dell AC adapter cable from the computer or media base, grasp the connector,
not the cable itself, and pull firmly but gently to avoid damaging the cable. When you wrap the AC adapter cable,
ensure that you follow the angle of the connector on the AC adapter to avoid damaging the cable.
1
Connect the AC adapter to the AC adapter connector and to an electrical outlet.
2
Before you initially dock your computer, the operating system must complete its setup process. To
verify that the operating system has completed the setup process:
a
Ensure that the computer is not connected to the media base (docked).
b
Turn on the computer.
c
Verify that the Microsoft
®
Windows
®
desktop appears.
d
Shut down the computer through the Windows
Start
menu.

Media Base Setup Guide 13
Securing the Media Base
NOTE: If the computer is docked to the media base and an antitheft device is attached to the security cable slot on
the media base, you cannot undock the computer without first removing the antitheft device.
1
Attach a commercially available antitheft device to the security cable slot on the media base.
Antitheft devices usually include a segment of metal-stranded cable with an attached locking device and
associated key. For instructions on installing this kind of antitheft device, see the documentation that
accompanied the device.

14 Media Base Setup Guide
Docking Your Computer
NOTE: If you are docking your computer for the first time and have not completed the steps in "Setting Up Your
Media Base" on page 12, complete them before proceeding to the next step.
NOTE: After docking the computer for the first time, the computer battery or the computer AC adapter connection
can power the media base if the media base is not connected to an AC adapter.
NOTE: Your computer should be turned off only when you dock your computer for the first time.
1
Align the back of the computer with the back of the media base at approximately a 30 degree angle,
and lower the front of the computer onto the
media base
.
2
Gently press the computer onto the
media base
until it clicks and the computer is seated.
3
Turn on the computer.
The operating system recognizes the
media base
.
1 computer 2 media base
2
1

Media Base Setup Guide 15
Undocking Your Computer
1
Before you undock your computer, save and close any open files, and exit any open programs.
2
Set your computer power management settings so that the computer does not enter standby or
hibernate mode when you close (lower) the display:
Windows
XP
a
Click the
Start
button and click
Control Panel
.
b
Under
Pick a category
, click
Performance and Maintenance
.
c
Under
or pick a Control Panel icon
, click
Power Options
and click the
Advanced
tab.
d
Under the
When I close the lid of my portable computer
drop-down menu, select
Do nothing.
NOTICE: Never undock the computer without first preparing the computer for undocking. If you undock before
preparing the computer, you will lose data and the computer may not recover normal operation for several minutes,
if at all.
NOTICE: If the computer does not have a charged battery in the battery bay, you must shut down the computer
before undocking. If you undock the computer without a battery before shutting it down, you will lose data and the
computer may not recover normal operation for several minutes, if at all.
3
If your computer does not have a charged battery in the battery bay, shut down the computer through
the Windows
Start
menu.
4
If your computer has a charged battery in the battery bay, prepare the computer for undocking by doing
one of the following:
•Click the
Start
button and click
Undock Computer
.
OR
• Press the undock button on the left side of the
media base
for 1 second (see "Left View" on page 8).
The lights on the
media base
turn off and an
Undock Complete
message states that you can now
undock your computer.
5
If your media base is secured, remove the lock.
6
Pull the computer release lever forward (see "Left View" on page 8) to release the computer.

16 Media Base Setup Guide
7
Lift the back of the computer up and slide the computer out towards the back of the
media base
.

Media Base Setup Guide 17
Installing the Optical Drive
1
Save and close any open files or programs, and turn off the computer.
2
Insert the optical drive into the bay on the media base. (See "Right View" on page 8.)
3
Insert the securing screw that holds the optical drive in place.
4
Turn on the computer.
The operating system recognizes the new drive.

18 Media Base Setup Guide
Removing the Optical Drive
1
Save and close any open files or programs, and shut down the computer.
2
Remove the securing screw that secures the optical drive and use your screwdriver to slide the drive out
of the module bay. See "Right View" on page 8.
Using External Drives
You can use external drives such as a CD, CD-RW, or DVD/CD-RW drives by connecting the drive’s
USB cable to the powered USB connector on the media base. (See "Back View" on page 9.)
You can add or remove external drives while the computer is running or turned off. To remove or swap a
drive while the computer is running, double-click the Unplug or Eject Hardware icon on the Windows
taskbar and click the drive you want to eject. Then disconnect the drive from the media base.
NOTICE: To prevent damage to external drives, place them in a safe, dry place when they are not connected to the
computer. Avoid pressing down on them or placing heavy objects on top of them.

Media Base Setup Guide 19
Specifications
Physical
Height 12.8 mm (0.50 inches)
Width 292 mm (11.5 inches)
Depth 207 mm (8.15 inches)
Weight (without a drive in the module bay) 0.61 kg (1.35 lb)
AC Adapter
Input voltage 100–240 VAC
Input current (maximum) 1.5 A
Input frequency 50–60 Hz
Output current (maximum) 3.34 A (65-W AC adapter)
4.62 A (90-W AC adapter)
Output power 65 W
90W
Rated output voltage 19.5 VDC
Dimensions and weight (65-W AC adapter):
Height
28.3 mm (1.11 inches)
Width
57.8 mm (2.28 inches)
Depth
137.2 mm (5.40 inches)
Weight (with cables) 0.36 kg (.79 lb)
Dimensions and weight (90-W AC adapter):
Height
34.2 mm (1.35 inches)
Width
60.9 mm (2.39 inches)
Depth
153.42 mm (6.04 inches)
Weight (with cables) 0.46 kg (1.01 lb)
Temperature range:
Operating
0° to 35°C (32° to 95°F)
Storage
–40° to 60°C (–40° to 140°F)

20 Media Base Setup Guide
Ports and Connectors
Network connector RJ-45 port for 10/100/1000 Mbits/second
BaseTX Bus Master Ethernet
USB three 4-pin USB-2.0 compliant connectors
Powered USB one 9-pin USB-2.0 compliant connector
Parallel 25-hole connector; unidirectional,
bidirectional, or ECP
Video 15-hole connector
DVI connector 24-hole connector
Serial 9-pin connector; 16550C-compatible UART
with 16-byte buffer
Audio headphone/speaker (line-out) mini connector
Docking 280-pin connector

Media Base Setup Guide 21
Regulatory Notices
Electromagnetic Interference (EMI) is any signal or emission, radiated in free space or conducted along power or signal leads, that
endangers the functioning of a radio navigation or other safety service or seriously degrades, obstructs, or repeatedly interrupts a
licensed radio communications service. Radio communications services include but are not limited to AM/FM commercial
broadcast, television, cellular services, radar, air-traffic control, pager, and Personal Communication Services (PCS). These licensed
services, along with unintentional radiators such as digital devices, including computer systems, contribute to the electromagnetic
environment.
Electromagnetic Compatibility (EMC) is the ability of items of electronic equipment to function properly together in the
electronic environment. While this computer has been designed and determined to be compliant with regulatory agency limits for
EMI, there is no guarantee that interference will not occur in a particular installation. If this equipment does cause interference
with radio communications services, which can be determined by turning the equipment off and on, you are encouraged to try to
correct the interference by one or more of the following measures:
• Reorient the receiving antenna.
• Relocate the computer with respect to the receiver.
• Move the computer away from the receiver.
• Plug the computer into a different outlet so that the computer and the receiver are on different branch circuits.
If necessary, consult a Dell Support representative or an experienced radio/television technician for additional suggestions.
For additional regulatory information, see the owner’s manual or user’s guide for your computer.
Dell™ products are designed, tested, and classified for their intended electromagnetic environment. These electromagnetic
environment classifications generally refer to the following harmonized definitions:
• Class A is typically for business or industrial environments. Class B products may also be utilized in a Class A environment.
• Class B is typically for residential environments. Class A products should not be utilized in a Class B environment.
Information Technology Equipment (ITE), including peripherals, expansion cards, printers, input/output (I/O) devices, monitors,
and so on, that are integrated into or connected to the computer should match the electromagnetic environment classification of
the computer.
A Notice About Shielded Signal Cables: Use only shielded cables for connecting devices to any Dell device to reduce the
possibility of interference with radio communications services. Using shielded cables ensures that you maintain the appropriate
Electromagnetic Compatibility classification for the intended environment. For parallel printers, a cable is available from Dell.
If you prefer, you can order a cable from Dell on the World Wide Web at www.dell.com.
Dell has determined that this product is a Class B harmonized product. The following sections provide country-specific EMC/EMI
or product safety information.

22 Media Base Setup Guide
FCC Notices (U.S. Only)
For FCC information, see the appropriate documentation for your computer.
Industry Canada (Canada Only)
Industry Canada, Class B
NOTICE: The Industry Canada regulations provide that changes or modifications not expressly approved by Dell Inc. could void
your authority to operate this equipment.
Industry Canada (Canada uniquement)
Industry Canada, Classe B
AVIS : La réglementation d'Industry Canada précise que tout changement ou modification non expressément approuvé par Dell
peut annuler vos droits d'utilisation de cet équipement.
CE Notice (European Union)
This product has been determined to be in compliance with 73/23/EEC (Low Voltage Directive), 89/336/EEC (EMC Directive),
and amendments of the European Union.
European Union, Class B
This Dell device is classified for use in a typical Class B domestic environment.
A "Declaration of Conformity" in accordance with the preceding directives and standards has been made and is on file at Dell Inc.
Products Europe BV, Limerick, Ireland.
Předpisy CE (Evropská unie)
This Class B digital apparatus complies with Canadian ICES-003.
Cet appareil numérique de la Classe B est conforme à la norme NMB-003 du Canada.

Media Base Setup Guide 23
CE-krav (Europæiske Union)
CE-kennisgeving (Europese Unie)
CE teade (Euroopa Liit)
CE-ilmoitus (Euroopan unioni)
Réglementation CE (Union européenne)

24 Media Base Setup Guide
CE-Hinweis (Europäische Union)
Σήµα CE (Ευρωπαϊκή Ένωση)
CE jelzés (Európai Unió)
Avviso CE (Unione Europea)
CE paziņojums (Eiropas Savienība)

Media Base Setup Guide 25
CE žyma (Europos Sąjunga)
Avviż CE (Unjoni Ewropea)
Wymogi CE (Unia Europejska)
Aviso CE (União Europeia)
CE Poznámka (Európska únia)

26 Media Base Setup Guide
Obvestilo CE (Evropska unija)
Aviso CE (Comunidad Europea)
Meddelande om CE-märkning (Europeiska Unionen)
AB Bildirimi (Avrupa Birliği)

Media Base Setup Guide 27
MIC 규정사항 ( 한국에 한함 )
규정사항 ( 한국에 한함 )규정사항 ( 한국에 한함 )
규정사항 ( 한국에 한함 )
MIC, B 등급
등급등급
등급

28 Media Base Setup Guide
BSMI Notice (Taiwan Only)
If you find a mark on the regulatory label on the bottom, side, or back panel of your Dell™ computer, the following section
is applicable:
BSMI 通告
通告通告
通告 (
((
(僅限於台灣
僅限於台灣僅限於台灣
僅限於台灣)
))
)

Media Base Setup Guide 29
VCCI(
((
(日本
日本日本
日本のみ
のみのみ
のみ)
))
)
VCCI、クラス
クラスクラス
クラス B
Información para NOM (únicamente para México)
La información siguiente se proporciona en el dispositivo o dispositivos descritos en este documento, en cumplimiento con los
requisitos de la Norma oficial mexicana (NOM):
Exportador: Dell Inc.
One Dell Way
Round Rock, TX 78682
Importador: Dell México S.A. de C.V.
Paseo de la Reforma 2620 - 11° Piso
Col. Lomas Altas
11950 México, D.F.
Enviar a: Dell México S.A. de C.V.
al Cuidado de Kuehne & Nagel de México S. de R.L.
Avenida Soles No. 55
Col. Peñon de los Baños
15520 México, D.F.
Modelo Voltaje de
alimentación
Frecuencia Consumo eléctrico Voltaje de salida Intensidad de salida
PR09S 100–240 V CA 50–60 Hz 1,5A 19,5 V de CC 3,34A/4,62A

30 Media Base Setup Guide

www.dell.com | support.dell.com
Dell™ Latitude™ Systems
Installatiegids voor mediabasis
Model PR09S

Opmerkingen, kennisgevingen en waarschuwingen
OPMERKING: Een OPMERKING duidt belangrijke informatie aan voor een beter gebruik van de computer.
KENNISGEVING: Een KENNISGEVING duidt potentiële schade aan hardware of potentieel gegevensverlies aan en vertelt
u hoe het probleem kan worden vermeden.
WAARSCHUWING: Een WAARSCHUWING duidt het risico op schade aan eigendommen, lichamelijk letsel
of overlijden aan.
Afkortingen en acroniemen
Raadpleeg voor een volledige lijst van afkortingen en acroniemen de
Dell™ Latitude™ D420 Gebruikershandleiding
(afhankelijk van uw besturingssysteem dubbelklikt u hiervoor op het pictogram
Gebruikershandleiding
op het
bureaublad of klikt u op de knop
Start
,
→
op Help en ondersteuning
,
→
op User and system guides
(Gebruikers-
en systeemhandleidingen)
,
→
op User’s guides
(Gebruikershandleidingen)
,
en vervolgens op
Dell Latitude User’s Guide
).
____________________
De informatie in dit document kan zonder voorafgaande kennisgeving worden gewijzigd.
© 2006 Dell Inc. Alle rechten voorbehouden.
Verveelvoudiging van dit materiaal, op welke wijze dan ook, is alleen toegestaan na uitdrukkelijke schriftelijke toestemming van Dell Inc.
Handelsmerken in dit document: Dell en het DELL-logo zijn handelsmerken van Dell Inc.; Microsoft en Windows zijn gedeponeerde
handelsmerken van Microsoft Corporation.
Overige handelsmerken en handelsnamen kunnen in dit document gebruikt om te verwijzen naar entiteiten die het eigendomsrecht op de merken
claimen dan wel de namen van hun producten. Dell Inc. claimt op geen enkele wijze enig eigendomsrecht ten aanzien van andere merken
of handelsnamen dan haar eigen merken en handelsnamen.
Model PR09S
Maart 2006 P/N UT901 Rev. A00

Inhoudsopgave 33
Inhoudsopgave
WAARSCHUWING: Veiligheidsinstructies . . . . . . . . . . . . . . . . . . . 35
VEILIGHEID: Algemene veiligheid
. . . . . . . . . . . . . . . . . . . . . 35
VEILIGHEID: Stroomveiligheid
. . . . . . . . . . . . . . . . . . . . . . . 36
Beveiligingsinstructies voor apparatuur
. . . . . . . . . . . . . . . . . . . . 36
Beveiligen tegen elektrostatische ontlading
. . . . . . . . . . . . . . . . 37
De mediabasis
. . . . . . . . . . . . . . . . . . . . . . . . . . . . . . . . . . 38
Linkeraanzicht
. . . . . . . . . . . . . . . . . . . . . . . . . . . . . . . 38
Rechteraanzicht
. . . . . . . . . . . . . . . . . . . . . . . . . . . . . . 38
Achteraanzicht
. . . . . . . . . . . . . . . . . . . . . . . . . . . . . . . 39
Bovenaanzicht
. . . . . . . . . . . . . . . . . . . . . . . . . . . . . . . 41
De mediabasis instellen
. . . . . . . . . . . . . . . . . . . . . . . . . . . . . 42
De mediabasis bevestigen
. . . . . . . . . . . . . . . . . . . . . . . . . . . . 43
De computer vastkoppelen
. . . . . . . . . . . . . . . . . . . . . . . . . . . 44
De computer loskoppelen
. . . . . . . . . . . . . . . . . . . . . . . . . . . . 45
Het optische station installeren
. . . . . . . . . . . . . . . . . . . . . . . . . 47
Het optische station verwijderen
. . . . . . . . . . . . . . . . . . . . . . . . 48
Externe stations gebruiken
. . . . . . . . . . . . . . . . . . . . . . . . . . . 48
Specificaties
. . . . . . . . . . . . . . . . . . . . . . . . . . . . . . . . . . . 49
Informatie over regelgeving
. . . . . . . . . . . . . . . . . . . . . . . . . . . 51

34 Inhoudsopgave

Installatiegids voor mediabasis 35
WAARSCHUWING: Veiligheidsinstructies
Volg de onderstaande veiligheidsrichtlijnen om uw eigen veiligheid te garanderen en de computer (poortreplicator, mediabasis,
koppelingsstation en soortgelijke apparaten) en werkomgeving te beschermen tegen mogelijke schade.
VEILIGHEID: Algemene veiligheid
Neem de onderstaande richtlijnen voor veilig tewerk gaan goed door om uw eigen veiligheid te garanderen:
• Plaats het apparaat op een vlak oppervlak voordat u aan de slag gaat.
• Probeer niet zelf onderhoud te plegen aan het apparaat, behalve als dit is uitgelegd in de Dell™-documentatie of in instructies
meegeleverd door Dell. Volg de installatie- en onderhoudsinstructies altijd nauwkeurig op.
• Zorg dat u geen kabels aansluit of loskoppelt, onderhoud pleegt of dit product opnieuw configureert tijdens een onweersbui,
dit om elektrische schokken te voorkomen. Gebruik de mediabasis tijdens onweer alleen als alle kabels zijn losgekoppeld
en de computer op een batterij werkt.
• Als de computer een geïntegreerde of optionele (pc-kaart) modem heeft, koppelt u bij naderend onweer de modemkabel los
om het risico op elektrische schokken door bliksem via de telefoonlijn uit te sluiten.
• Plaats geen objecten in de ventilatieopeningen van de computer. Anders kan er brand ontstaan of kunt u elektrische schokken
krijgen door kortsluiting van interne onderdelen.
• Houd de computer uit de buurt van radiatoren en warmtebronnen. Zorg er bovendien voor dat de luchtopeningen niet
geblokkeerd zijn. Plaats geen losse vellen papier onder de computer; plaats de computer niet in een gesloten kast, op een bed,
bank of tapijt.
• Gebruik het apparaat niet in een vochtige omgeving, zoals bij een badkuip, gootsteen, zwembad of in een vochtige kelder.
• Pas op dat u geen eten of drinken op de computer morst.
• Haal de stekker uit het stopcontact voordat u de computer schoonmaakt. Maak het apparaat schoon met een zachte,
vochtige doek. Gebruik geen vloeibare reinigingsmiddelen of reinigingsmiddelen uit een spuitbus die ontvlambare stoffen
kunnen bevatten.
• Zorg ervoor dat er niets op de stroomkabel van de netadapter is geplaatst en dat er niemand over de kabel kan struikelen
of stappen.
• Plaats de computer niet in een omgeving waar weinig lucht beschikbaar is, zoals een tas of gesloten koffer, terwijl de computer
is ingeschakeld. Als u dat toch doet, loopt u risico op brand of beschadiging van de computer.
• Werk niet lange tijd aaneen met uw draagbare computer terwijl deze op uw blote benen rust. De oppervlaktetemperatuur
van de onderkant stijgt tijdens normaal gebruik (vooral wanneer de pc op wisselstroom werkt). Dit kan oncomfortabel zijn
en uiteindelijk zelfs een brandwond veroorzaken.
• PC-kaarten kunnen erg heet worden tijdens normaal gebruik. Wees voorzichtig bij het verwijderen van pc-kaarten die
langdurig gebruikt zijn.
• Het apparaat kan optische schijfstations (ODD's) bevatten, waaronder cd-rom-, cdr/w- en dvd-stations, waarin laserapparaten
zijn ingebouwd. Deze ODD's voldoen aan veiligheidsvereisten en zijn geclassificeerd als "Klasse 1-laserproducten" onder US
DHHS-norm en EN/IEC60825-1-laserveiligheidsnorm. Deze ODD's bevatten geen gebruikersaanpassingen, vervangbare
onderdelen of onderdelen die onderhoud nodig hebben. Ter voorkoming van blootstelling aan laserstraling mag u ODD's
in geen geval uitschakelen of openmaken.
WAARSCHUWING:
Het snoer van dit product bevat lood, een chemische stof waarvan in Californië bekend is dat deze
geboorteafwijkingen of andere voorplantingsproblemen veroorzaakt.
Was uw handen na hantering ervan
.

36 Installatiegids voor mediabasis
VEILIGHEID: Stroomveiligheid
• Als dit product is geleverd met een stroomkabel met 2-pinsstekker met randaardecontacten, moet u deze op een goed
geaarde stroombron aansluiten om elektrische schokken te voorkomen. Gebruik geen adapterstekkers en verwijder de
randaardecontacten niet uit de netstekker. Als u een verlengsnoer gebruikt, moet u een type gebruiken dat past op de
netstekker van de adapter.
• Als u de netadapter via een verlengsnoer aansluit, moet u ervoor zorgen dat het totale amperage van de apparaten die op
deze snoer zijn aangesloten, niet boven het amperage van het verlengsnoer komt.
• Gebruik alleen de door Dell geleverde netadapter die is goedgekeurd voor gebruik bij dit apparaat. Het gebruik van een
andere netadapter kan brand of ontploffingen veroorzaken. Zie de gebruikershandleiding of de eigenaarshandleiding voor
de elektrische specificaties van de netadapter.
• Als u een contactdoos met meerdere stopcontacten gebruikt, wees dan voorzichtig met het aansluiten van de stroomkabel
van de netadapter op de contactdoos. In sommige contactdozen kan de stekker verkeerd worden ingestoken. Dit kan resulteren
in permanente beschadiging van het apparaat en elektrische schokken en/of brand. Zorg ervoor dat u de randaardecontacten
van de stekker tegen de overeenkomende randaardecontacten van de contactdoos plaatst.
• Voordat u het apparaat op een stopcontact aansluit, moet u het voltage en de frequentie van de netadapter controleren
om er zeker van te zijn deze overeenkomen met die van de stroombron.
• Wanneer u de computer van alle stroombronnen wilt loskoppelen, schakelt u de computer uit, haalt u de stekker van de
netadapter uit het stopcontact en verwijdert u alle batterijen uit de batterij- of modulehouder.
• Plaats de netadapter in een geventileerde ruimte, zoals op een bureau of op de grond, wanneer u deze gebruikt om de
computer te laten werken of om de batterij op te laden. Leg geen papier of andere dingen op de netadapter waardoor de
koeling afneemt; gebruik de adapter ook niet in een tas.
• De netadapter kan tijdens normaal gebruik van de computer heet worden. Wees tijdens of direct na gebruik voorzichtig met
de adapter.
• Noorwegen en Zweden: Sluit de stroomkabel alleen aan op een geaard stopcontact.
• Alleen Japan: Gebruik alleen de door Dell geleverde netstroomkabel met de netadapter. Gebruikt u een andere stroomkabel,
dan kunt u het apparaat of de netadapter beschadigen en bestaat het risico op brand of elektrische schokken.
Beveiligingsinstructies voor apparatuur
Neem de onderstaande richtlijnen voor veilig tewerk gaan goed door om schade aan de apparatuur te voorkomen:
KENNISGEVING: Wanneer u de computer uit een omgeving met een lage temperatuur haalt en in een warmere omgeving
plaatst of andersom, moet u wachten totdat de computer aan de nieuwe temperatuur is gewend en totdat eventuele condens
verdampt is voordat u het apparaat inschakelt. Zo voorkomt u schade.
• Bescherm het apparaat tegen gevaren uit de omgeving, zoals vuil, stof, eten, drinken, zeer hoge of lage temperaturen en
overbelichting van zonlicht.
• Houd het apparaat uit de buurt van direct of te veel vocht en zeer hoge of lage temperaturen om ervoor te zorgen dat de
computer wordt gebruikt binnen het opgegeven gebruiksbereik.
• Houd 10,2 cm ruimte vrij aan alle geventileerde kanten van het apparaat om te zorgen dat er genoeg lucht kan worden
aangezogen voor ventilatie.
• Beperk de luchtstroom in het apparaat niet door luchtopeningen of luchtopnames te blokkeren.
WAARSCHUWING: Wanneer u de netadapter klaarmaakt voor vervoer, wikkelt u beide snoeren rondom de adapter in
dezelfde richting, zoals wordt aangegeven in de onderstaande afbeelding. Doet u dit niet, dan kan er schade ontstaan die niet
onder de adaptergarantie valt. Gebruik een netadapter nooit als u denkt dat deze beschadigd of overmatig versleten is.

Beveiligen tegen elektrostatische ontlading
Elektrostatische ontlading (ESD) kan de elektronische onderdelen in de computer beschadigen. Onder sommige omstandigheden kan
ESD zich ophopen op uw lichaam of op een object, zoals randapparatuur, en vervolgens ontladen in een ander object, zoals uw computer.
U voorkomt schade door ESD door uw lichaam van statische elektriciteit te ontdoen voordat u een van de interne elektrische onderdelen
van de computer aanraakt, zoals een geheugenmodule. U doet dit door een metalen geaard object aan te raken (zoals een ongeverfd
metalen oppervlak op het I/O-paneel van de computer) voordat u met elektronische onderdelen aan de slag gaat. Wanneer u een
randapparaat aansluit (bijvoorbeeld een draagbare digital assistant) op uw computer, moet u uzelf en het apparaat altijd aarden voordat
u het op de computer aansluit. Als u aan de interne onderdelen van de computer werkt, moet u bovendien regelmatig een I/O-connector
aanraken om eventueel opgehoopte statische elektriciteit van uw lichaam te verwijderen.
U kunt ook de volgende stappen volgen om schade door elektrostatische ontlading te voorkomen:
• Haal een voor statische elektriciteit gevoelig onderdeel pas uit de antistatische verpakking op het moment dat u het gaat
installeren. Zorg dat uw lichaam voor het uitpakken vrij is van statische elektriciteit.
• Plaats een gevoelig onderdeel voor transport eerst in een antistatische doos of andere verpakking.
• Hanteer alle elektrostatisch gevoelige onderdelen in een ruimte die vrij is van statische elektriciteit. Gebruik, indien
mogelijk, antistatische vloermatten en onderleggers.
Installatiegids voor mediabasis 37

38 Installatiegids voor mediabasis
De mediabasis
Linkeraanzicht
ONTKOPPELHENDEL — Hiermee koppelt u de computer los van de mediabasis als de mediabasis niet is vastgezet
met een antidiefstalvoorziening.
USB-
CONNECTOR — Met de USB 2.0-compatibele connector is het mogelijk USB-apparaten aan te sluiten,
zoals printers en camera's.
AUDIOCONNECTOR — Hiermee kunt u koptelefoons en speakers aansluiten.
ONTKOPPELKNOP — Hiermee koppelt u de computer los wanneer deze is ingeschakeld.
Rechteraanzicht
OPTISCH STATION — Hiermee kunt u cd-en dvd-media gebruiken.
USB-
CONNECTOR — Met de USB 2.0-compatibele connector is het mogelijk USB-apparaten aan te sluiten, zoals
printers en camera's.
1 ontkoppelhendel 2 USB-connector 3 audioconnector
4ontkoppelknop
1 optisch station 2 USB-connector
1 2 3 4
1 2

Achteraanzicht
1 USB-connector 2 netwerkconnector 3 seriële connector
4 parallelle connector 5 digitale videoconnector (DVI) 6 VGA-videoconnector
7 USB-connectoren met
stroomvoorziening
8 connector voor netadapter 9 beveiligingssleuf
Connector Beschrijving
NETWERKCONNECTOR — Hiermee sluit u de mediabasis aan
op een netwerk. De twee lampjes naast de connector geven de
koppelingsstatus en activiteit aan voor een bedrade
netwerkverbinding.
Raadpleeg voor informatie over het gebruik van de
netwerkadapter de met de computer meegeleverde
documentatie.
KENNISGEVING: Sluit geen telefoonkabel aan op de
netwerkconnector.
USB 2.0-
CONNECTOREN — Hierop kunt u maximaal vier met
USB 2.0-compatibele apparaten aansluiten; twee van de
connectoren leveren stroom.
PARALLELLE CONNECTOR — Hierop kunt u een parallel
apparaat aansluiten, zoals een parallelle printer.
VIDEOCONNECTOR — Hierop kunt u een externe VGA-monitor
aansluiten.
OPMERKING: Gebruik de videoconnector op de mediabasis
wanneer de computer is gekoppeld.
1 2 3 4 5 6 87 9
Installatiegids voor mediabasis 39

40 Installatiegids voor mediabasis
SLEUF VOOR BEVEILIGINGSKABEL — Hiermee bevestigt u een in de handel verkrijgbare antidiefstalvoorziening aan
de mediabasis. Instructies voor het installeren van antidiefstalvoorzieningen worden meestal met de voorziening
meegeleverd. Raadpleeg "De mediabasis bevestigen" op pagina 43 voor meer informatie.
SERIËLE CONNECTOR — Hierop kunt u een serieel apparaat
aansluiten, zoals een seriële muis of een ander handheld-apparaat.
CONNECTOR VOOR KOPTELEFOON/SPEAKERS — Hierop kunt
u een koptelefoon of speakers aansluiten. De connector is een
stereo-uitgangsconnector.
CONNECTOR VOOR NETADAPTER — Hiermee sluit u een
netadapter aan op de mediabasis en op het elektriciteitsnet om
wisselstroom om te zetten in gelijkstroom, wat vereist is voor de
mediabasis. U kunt de netadapter aansluiten met de mediabasis
in- of uitgeschakeld. Raadpleeg "De mediabasis instellen" op
pagina 42 voor meer informatie.
WAARSCHUWING: Als u een contactdoos met meerdere
stopcontacten gebruikt, wees dan voorzichtig met het
aansluiten van de stroomkabel van de netadapter op de
contactdoos. In sommige contactdozen kan de connector
verkeerd worden ingestoken. Dit kan resulteren in permanente
beschadiging van het apparaat en elektrische schokken en/of
brand. Zorg ervoor dat u de randaardecontacten van de stekker
tegen de overeenkomende randaardecontacten van de
contactdoos plaatst.
KENNISGEVING: Wanneer u de netadapter van de
mediabasis loskoppelt, moet u stevig maar voorzichtig aan
de connector van de adapterkabel trekken en niet aan de
kabel zelf, om schade aan de kabel te voorkomen.
Connector Beschrijving

Bovenaanzicht
1 koppelingsconnector
1
Installatiegids voor mediabasis
41

42 Installatiegids voor mediabasis
De mediabasis instellen
WAARSCHUWING: De netadapter werkt wereldwijd op electriciteitsnetten. Stroomaansluitingen en contactdozen
verschillen echter sterk per land. Wanneer u een incompatibele kabel gebruikt of de kabel onjuist op de contactdoos
of het stopcontact aansluit, kan er brand of schade aan de apparatuur ontstaan.
KENNISGEVING: Gebruik altijd de Dell-netadapter die bij de mediabasis is geleverd. Als u een andere in de
handel verkrijgbare netadapter gebruikt, of de netadapter van eerdere modellen van Dell-computers, kunt u de
mediabasis of de computer beschadigen.
KENNISGEVING: Wanneer u de netadapter van de computer of mediabasis loskoppelt, moet u stevig maar
voorzichtig aan de connector trekken en niet aan de kabel zelf, om schade aan de kabel te voorkomen. Wanneer
u de netadapterkabel inpakt, moet u ervoor zorgen dat u de hoek van de connector op de netadapter aanhoudt om
schade aan de kabel te voorkomen.
1
Sluit de netadapter aan op de connector voor de netadapter en op een stopcontact.
2
U kunt de computer pas vastkoppelen nadat het besturingssysteem het installatieproces heeft voltooid.
U controleert als volgt of het besturingssysteem het installatieproces heeft voltooid:
a
Zorg ervoor dat de computer niet op de mediabasis is aangesloten (vastgekoppeld).
b
Zet de computer aan.
c
Controleer of het bureaublad van Microsoft
®
Windows
®
verschijnt.
d
Sluit de computer af via het menu
Start
van Windows.

De mediabasis bevestigen
OPMERKING: Als de computer aan de mediabasis is vastgekoppeld en er een antidiefstalvoorziening aan de sleuf
voor de beveiligingskabel op de mediabasis is bevestigd, kunt u de computer pas loskoppelen nadat u de
antidiefstalvoorziening hebt verwijderd.
1
Sluit een in de handel verkrijgbare antidiefstalvoorziening aan op de sleuf voor de beveiligingskabel
op de mediabasis.
Antidiefstalvoorzieningen bestaan meestal uit met metaal omvlochten kabel met een bevestigd
vergrendelingsmechanisme en een bijbehorende sleutel. Raadpleeg voor instructies voor het installeren
van uw type antidiefstalvoorziening, de met de voorziening meegeleverde documentatie.
Installatiegids voor mediabasis 43

44 Installatiegids voor mediabasis
De computer vastkoppelen
OPMERKING: Als u de computer voor het eerst vastkoppelt en de stappen in "De mediabasis instellen" op pagina 42
niet hebt voltooid, moet u dit alsnog doen voordat u verdergaat met de volgende stap.
OPMERKING: Als u de computer voor het eerst hebt vastgekoppeld, kan de batterij of de netadapterverbinding
van de computer de mediabasis van stroom voorzien, als de mediabasis niet op een netadapter is aangesloten.
OPMERKING: U moet de computer alleen uitschakelen, wanneer u deze voor het eerst vastkoppelt.
1
Lijn de achterkant van de computer uit met die van de mediabasis onder een hoek van ongeveer
30 graden en laat de voorkant van de computer op de
mediabasis
zakken.
2
Druk de computer voorzichtig op de
mediabasis
totdat deze vastklikt.
3
Zet de computer aan.
Het besturingssysteem herkent de
mediabasis
.
1 computer 2 mediabasis
2
1

De computer loskoppelen
1
Sla voor het ontkoppelen van de computer eventuele geopende bestanden op en sluit deze, en sluit
eventuele geopende programma's af.
2
Stel de energiebeheerinstellingen zo in dat de computer niet in de stand-by- of slaapmodus gaat
wanneer u het scherm sluit (dichtklapt):
Windows
XP
a
Klik op de knop
Start
en daarna op
Configuratiescherm
.
b
Klik onder
Kies een categorie
op
Prestaties en onderhoud
.
c
Klik onder
of kies een pictogram...
op
Energiebeheer
en vervolgens op de tab
Geavanceerd
.
d
Selecteer in het vervolgkeuzemenu
Als ik het beeldscherm van de draagbare computer dichtklap
de optie
Geen actie ondernemen.
KENNISGEVING: Koppel de computer nooit los zonder de computer eerst voor ontkoppelen gereed te maken.
Doet u dit toch, dan verliest u gegevens en kan de computer enkele minuten niet, of soms helemaal niet meer,
normaal gebruikt worden.
KENNISGEVING: Als er geen opgeladen batterij in de houder zit, moet u de computer voor het ontkoppelen
uitschakelen. Doet u dit niet, dan verliest u gegevens en kan de computer enkele minuten niet, of soms helemaal
niet meer, normaal gebruikt worden.
3
Als er geen opgeladen batterij in de houder zit, moet u de computer uitschakelen via het menu
Start
van Windows.
4
Zit er wel een opgeladen batterij in de houder, dan moet u de computer voor het ontkoppelen
gereedmaken door een van de onderstaande bewerkingen uit te voeren:
• Klik op de knop
Start
en daarna op
Computer loskoppelen
.
OF
• Houd de ontkoppelknop op de linkerkant van de
mediabasis
1 seconde ingedrukt (zie "Linkeraanzicht"
op pagina 38). De lampjes op de
mediabasis
gaan uit en het bericht
Ontkoppelen voltooid
verschijnt met de mededeling dat u de computer nu kunt ontkoppelen.
5
Verwijder de vergrendeling zodra de mediabasis is bevestigd.
6
Haal de ontkoppelhendel naar voren (zie "Linkeraanzicht" op pagina 38) om de computer los te maken.
Installatiegids voor mediabasis 45

46 Installatiegids voor mediabasis
7
Til de achterkant van de computer op en schuif deze richting de achterkant van de
mediabasis
eraf.

Het optische station installeren
1
Sla eventuele geopende bestanden op en sluit alle programma's af, en schakel de computer uit.
2
Plaats het optische station in de houder op de mediabasis (zie "Rechteraanzicht" op pagina 38).
3
Breng de bevestigingsschroef aan om het optische station op zijn plaats te houden.
4
Zet de computer aan.
Het besturingssysteem herkent het nieuwe station.
Installatiegids voor mediabasis 47

48 Installatiegids voor mediabasis
Het optische station verwijderen
1
Sla eventuele geopende bestanden op en sluit alle programma's af, en schakel de computer uit.
2
Verwijder de schroef waarmee het optische station is bevestigd en gebruik de schroevendraaier om het
station uit de modulehouder te schuiven. Zie "Rechteraanzicht" op pagina 38.
Externe stations gebruiken
U kunt externe stations gebruiken, zoals cd-, cd-rw- of dvd/cd-rw-stations, door de USB-kabel van het station
aan te sluiten op een USB-connector met stroomvoorziening op de mediabasis (zie "Achteraanzicht" op
pagina 39).
Externe stations kunnen worden toegevoegd en verwijderd ongeacht of de computer is in- of uitgeschakeld.
Wanneer u een station wilt verwijderen of verwisselen wanneer de computer is ingeschakeld, dubbelklikt
u op het pictogram Hardware veilig verwijderen op de Windows-taakbalk en klikt u op het station dat
u wilt uitwerpen. Vervolgens ontkoppelt u het station van de mediabasis.
KENNISGEVING: U voorkomt schade aan externe stations door ze op een veilige, droge plaats te bewaren,
wanneer ze niet op de computer zijn aangesloten. Zorg dat u er niet hard op drukt en er geen zware voorwerpen
op plaatst.

Specificaties
Fysiek
Hoogte 12,8 mm
Breedte 292 mm
Diepte 207 mm
Gewicht (zonder een station in de
houder)
0,61 kg
Netadapter
Ingangsspanning 100–240 VAC
Ingangsstroom (maximum) 1,5 A
Ingangsfrequentie 50–60 Hz
Uitgangsstroom (maximum) 3,34 A (65W-netadapter)
4,62 A (90W-netadapter)
Uitgangsstroom 65 W
90W
Nominale uitgangsspanning 19,5 VDC
Afmetingen en gewicht
(65W-netadapter):
Hoogte
28,3 mm
Breedte
57,8 mm
Diepte
137,2 mm
Gewicht (met kabels) 0,36 kg
Afmetingen en gewicht
(90W-netadapter):
Hoogte
34,2 mm
Breedte
60,9 mm
Diepte
153,42 mm
Gewicht (met kabels) 0,46 kg
Temperatuurbereik:
Tijdens gebruik
0° t/m 35°C
Tijdens opslag
–40° t/m 60°C
Installatiegids voor mediabasis 49

50 Installatiegids voor mediabasis
Poorten en connectoren
Netwerkconnector RJ-45-poort voor 10/100/1000 Mbits/seconde
BaseTX Bus Master Ethernet
USB drie 4-pins met USB-2.0 compatibele
connectoren
USB met stroomvoorziening één 9-pins met USB-2.0 compatibele
connector
Parallel 25-gats connector; eenrichtings-,
tweerichtings- of ECP-
Video 15-gats connector
DVI-connector 24-gats connector
Serieel 9-pins connector; 16550C-compatibele
UART met buffer van 16-bytes
Audio miniconnector koptelefoon/speakers
(line-out)
Koppeling 280-pins connector

Informatie over regelgeving
Elektromagnetische storing (EMI) is elk signaal of uitzending die in de vrije ruimte wordt uitgestraald of geleid via stroom- of
signaalkabels, die het functioneren van een radionavigatie of andere veiligheidsdienst in gevaar brengt of een bevoegde
radiocommunicatiedienst ernstig verstoort of herhaaldelijk onderbreekt. Tot de radiocommunicatiediensten horen onder andere de
commerciële AM/FM-uitzendingen, televisie, mobiele-telefoondiensten, radar, luchtverkeersleiding, piepers en persoonlijke
communicatiediensten (PCS). Deze bevoegde diensten, samen met onbedoelde stralingsbronnen zoals digitale apparaten,
waaronder computersystemen, dragen bij aan de elektromagnetische omgeving.
Elektromagnetische compatibiliteit (EMC) is de mogelijkheid van elektronische apparaten om samen correct te functioneren in
deze elektromagnetische omgeving. Met het ontwerp van deze computer is weliswaar rekening gehouden met de beperkingen van
de regelgevingsdienst voor EMI; dit is echter geen garantie dat er bij bepaalde installaties geen storing zal optreden. Als deze
apparatuur storing veroorzaakt met radiocommunicatiediensten, wat u kunt vaststellen door de computer in en uit te schakelen,
moet u proberen deze storing te verhelpen door een van de onderstaande maatregelen uit te voeren:
• Richt de ontvangende antenne opnieuw.
• Plaats de computer ergens anders met betrekking tot de ontvanger.
• Plaats de computer uit de buurt van de ontvanger.
• Sluit de computer aan op een ander stopcontact, zodat de computer en de ontvanger zich op verschillende vertakkingen van
het stroomcircuit bevinden.
Raadpleeg indien nodig een vertegenwoordiger van Dell Support of een ervaren radio-/televisietechnicus voor meer suggesties.
Zie de eigenaarshandleiding of de gebruikershandleiding van de computer voor meer informatie over regelgeving.
Dell™-producten zijn ontworpen, getest en geclassificeerd voor hun bedoelde elektromagnetische omgeving. Deze classificaties
voor een elektromagnetische omgeving verwijzen normaal gesproken naar de volgende geharmoniseerde definities:
• Klasse A is kenmerkend voor zakelijke en industriële omgevingen. Klasse B-producten kunnen ook in een klasse B-omgeving
worden gebruikt.
• Klasse B is kenmerkend voor woonomgevingen. Klasse A-producten mogen niet in een klasse B-omgeving worden gebruikt.
Informatietechnologieapparatuur (ITE), zoals randapparatuur, uitbreidingskaarten, printers, invoer-/uitvoerapparatuur (I/O) en
monitors, die zijn ingebouwd in of aangesloten op de computer, moeten aan de classificatie voor elektromagnetische omgevingen
van de computer voldoen.
Een kennisgeving over afgeschermde signaalkabels: Gebruik alleen afgeschermde kabels voor het aansluiten van apparaten op
een willekeurig Dell-apparaat om het risico op storing met radiocommunicatiediensten te minimaliseren. Het gebruik van
afgeschermde kabels zorgt ervoor dat u de juiste classificatie voor compatibiliteit met de bedoelde elektromagnetische omgeving
behoudt. Voor parallelle printers is er een Dell-kabel beschikbaar. Als u wilt, kunt u een kabel bestellen via www.dell.com.
Dell heeft bepaald dat dit product een geharmoniseerd product uit klasse B is. De volgende secties bieden landspecifieke
EMC/EMI- of productveiligheidsinformatie.
Zie "Regulatory Notices" op pagina 21 voor meer informatie over regelgeving.
Installatiegids voor mediabasis 51

52 Installatiegids voor mediabasis

www.dell.com | support.dell.com
Dell™ Latitude™ Systems
Guide de configuration
Base média
Modèle PR09S

Remarques, avis et précautions
REMARQUE : Une REMARQUE fournit des informations importantes qui vous aident à mieux utiliser votre ordinateur.
AVIS : Un AVIS vous avertit d’un risque de dommage matériel ou de perte de données et vous indique comment éviter
le problème.
PRÉCAUTION : Une PRÉCAUTION indique un risque potentiel d'endommagement du matériel, de blessure corporelle
ou de mort.
Abréviations et sigles
Pour obtenir une liste complète des abréviations et des sigles, reportez-vous au
Guide d'utilisation Dell™ Latitude™
D420
(selon votre système d'exploitation, vous devez soit double-cliquer sur l'icône
Guide d'utilisation
de votre
bureau, soit sur le bouton
Démarrer
→
Centre d'aide et de support
,
→
Guides d'utilisation du système
→
Guides
d'utilisation
et cliquez sur
Guide d'utilisation Dell Latitude
).
____________________
Les informations contenues dans ce document sont sujettes à modification sans préavis.
© 2006 Dell Inc. Tous droits réservés.
La reproduction de ce document, de quelque manière que ce soit, sans l'autorisation écrite de Dell Inc. est strictement interdite.
Marques utilisées dans ce document : Dell et le logo DELL sont des marques déposées de Dell Inc. ; Microsoft et Windows sont des marques
déposées de Microsoft Corporation.
Les autres marques et noms de produits pouvant être utilisés dans ce document sont reconnus comme appartenant à leurs propriétaires respectifs.
Dell Inc. rejette tout intérêt propriétaire dans les marques et les noms commerciaux autres que les siens.
Modèle PR09S
Mars 2006 P/N UT901 Rév. A00

Sommaire 55
Sommaire
PRÉCAUTION : Consignes de sécurité. . . . . . . . . . . . . . . . . . . . . . 57
SECURITE : Sécurité générale
. . . . . . . . . . . . . . . . . . . . . . . 57
SECURITE : Sécurité d'alimentation
. . . . . . . . . . . . . . . . . . . . 58
Instructions de protection d'équipement
. . . . . . . . . . . . . . . . . . . . 58
Protection contre les décharges électrostatiques
. . . . . . . . . . . . . 59
A propos de la base média
. . . . . . . . . . . . . . . . . . . . . . . . . . . . 60
Vue de gauche
. . . . . . . . . . . . . . . . . . . . . . . . . . . . . . . 60
Vue de droite
. . . . . . . . . . . . . . . . . . . . . . . . . . . . . . . . 60
Vue arrière
. . . . . . . . . . . . . . . . . . . . . . . . . . . . . . . . . 61
Vue de haut
. . . . . . . . . . . . . . . . . . . . . . . . . . . . . . . . . 63
Configuration de votre base média
. . . . . . . . . . . . . . . . . . . . . . . 64
Mise en sécurité de la base média
. . . . . . . . . . . . . . . . . . . . . . . 65
Amarrage de votre ordinateur
. . . . . . . . . . . . . . . . . . . . . . . . . . 66
Désamarrage de votre ordinateur
. . . . . . . . . . . . . . . . . . . . . . . . 67
Installation de lecteur optique
. . . . . . . . . . . . . . . . . . . . . . . . . . 69
Retrait du lecteur optique
. . . . . . . . . . . . . . . . . . . . . . . . . . . . 70
Utilisation de lecteurs externes
. . . . . . . . . . . . . . . . . . . . . . . . . 70
Caractéristiques
. . . . . . . . . . . . . . . . . . . . . . . . . . . . . . . . . 71
Conformité réglementaire
. . . . . . . . . . . . . . . . . . . . . . . . . . . . 73

56 Sommaire

Guide de configuration Base média 57
PRÉCAUTION : Consignes de sécurité
Pour votre sécurité et pour protéger votre appareil (ordinateur, duplicateur de ports, base média, station d'accueil et autres
périphériques) ainsi que votre environnement de travail contre d'éventuels dommages, respectez les consignes de sécurité ci-dessous.
SECURITE : Sécurité générale
Respectez les règles de sécurité et de manipulation ci-dessous pour assurer votre sécurité :
• Lorsque vous installez le périphérique pour travailler, placez-le sur une surface plane.
• Ne tentez jamais de réparer l'appareil vous-même, sauf selon les instructions de votre documentation Dell™ ou autres
instructions fournies par ailleurs par Dell. Suivez toujours attentivement les instructions d'installation et d'entretien.
• Pour réduire le danger d'électrocution, n'effectuez aucun branchement ou débranchement pendant un orage électrique,
ni aucune opération de maintenance ou de reconfiguration de ce produit. N'utilisez jamais la base média pendant un orage
électrique, sauf si tous les câbles ont été déconnectés et l'ordinateur est alimenté par la batterie.
• Si votre périphérique comprend un modem intégré ou optionnel (carte PC), débranchez le modem de la ligne téléphonique
à l'approche d'un orage électrique afin d'éviter le risque (rare) de choc électrique causé par un éclair et transmis par la ligne
téléphonique.
• N'introduisez pas d'objets dans les entrées d'air ou autres ouvertures du périphérique. Cela risquerait de provoquer un
incendie ou un choc électrique dû à un court-circuit des composants internes.
• Eloignez votre périphérique des radiateurs et autres sources de chaleur. Veillez à ne pas bloquer les grilles de refroidissement.
Evitez de placer des papiers volants sous votre périphérique ; ne placez pas votre périphérique dans une unité murale fermée
ou sur un lit, un canapé ou un tapis.
• N'utilisez pas votre périphérique près de l'eau ou dans un environnement humide, par exemple près d'une baignoire,
d'un évier, d'une piscine ou dans un sous-sol humide.
• Ne renversez pas de liquides ni de nourriture sur votre ordinateur.
• Débranchez le périphérique de la prise électrique avant de le nettoyer. Nettoyez votre périphérique avec un tissu doux et
humecté avec de l'eau. N'utilisez pas de liquide ni d'aérosol nettoyants, ceux-ci peuvent contenir des substances
inflammables.
• Assurez-vous que rien ne repose sur le cordon d'alimentation de l'adaptateur secteur et que ce cordon n'est pas placé dans un
endroit où l'on pourrait marcher ou trébucher dessus.
• Ne placez pas l'ordinateur dans un environnement peu aéré, tel qu'une sacoche de transport ou une mallette, lorsque celui-ci
fonctionne. Ceci risque d'endommager l'ordinateur ou de provoquer un incendie.
• Évitez de poser votre ordinateur portable en fonctionnement sur vos genoux, à même la peau, pendant une période
prolongée. La température de la surface de la base augmente pendant le fonctionnement normal de l'ordinateur
(notamment s'il est alimenté par le secteur). Le contact prolongé avec la peau peut causer inconfort ou brûlure.
• Les cartes PC peuvent chauffer beaucoup en fonctionnement normal. Faites très attention lorsque vous les retirez après une
utilisation prolongée.
• Cet appareil peut intégrer des lecteurs de disque optique, CD-ROM, CDR/W, DVD, etc., contenant des lasers intégrés.
Ces lecteurs de disque optique sont conformes aux exigences de sécurité et classés comme
«produits laser de classe 1» dans
le cadre de la norme US DHHS et EN/IEC60825-1 de sécurité laser. Ces lecteurs optiques ne contiennent aucune pièce
réglable ni possibilité de réparation ou remplacement par l'utilisateur. Pour éviter tout risque d'exposition aux radiations
laser, ne démontez ou n'ouvrez jamais un lecteur optique pour quelque raison que ce soit.
ATTENTION :
Le cordon de ce produit contient du plomb, produit chimique connu de l'Etat de Californie comme pouvant causer
des malformations à la naisssance ou autres maladies de la reproduction.
Lavez-vous les mains après la manipulation.

58 Guide de configuration Base média
SECURITE : Sécurité d'alimentation
• Si ce produit est fourni avec un câble secteur à 3 broches, vérifiez qu'il est branché dans une prise avec mise à la terre correcte
pour éviter tout choc électrique. N'utilisez pas de fiche intermédiaire et ne coupez pas la broche de mise à la terre du câble
d'alimentation. Si vous utilisez une rallonge d'alimentation, utilisez le type approprié à la fiche du câble de l'adaptateur secteur.
• Si vous raccordez une rallonge à votre adaptateur secteur, assurez-vous que l'intensité totale du courant drainé par tous les
appareils raccordés à cette rallonge ne dépasse pas la limite de cette dernière.
• Utilisez uniquement l'adaptateur secteur fourni par Dell et homologué pour ce périphérique. L'utilisation d'un autre
adaptateur secteur peut provoquer un incendie ou une explosion. Consultez le Guide de l'utilisateur ou le Manuel du
propriétaire pour connaître les caractéristiques nominales de l'adaptateur électrique.
• Si vous utilisez une rampe d'alimentation, soyez prudent lorsque vous raccordez le câble d'alimentation de l'adaptateur secteur
à la rampe d'alimentation. Certaines rampes d'alimentation peuvent ne pas empêcher l'insertion d'une prise de façon incorrecte.
L'insertion incorrecte de la prise de courant peut provoquer un dommage irréparable sur votre périphérique ainsi qu'un risque
d'électrocution et/ou d'incendie. Assurez-vous que la broche de mise à la terre de la prise de courant est inséré dans le contact de
mise à la terre correspondant de la rampe d'alimentation.
• Avant de raccorder le périphérique à une prise électrique, assurez-vous que la tension du secteur est compatible avec la tension
d'entrée de l'adaptateur.
• Pour mettre l'ordinateur totalement hors tension, éteignez-le, débranchez l'adaptateur secteur de la prise électrique et retirez
toutes les batteries installées dans la baie de la batterie ou la baie modulaire.
• L'adaptateur secteur doit se trouver dans une zone aérée, par exemple sur un bureau ou sur le sol, lorsqu'il est utilisé pour
alimenter l'ordinateur ou pour charger la batterie. Ne recouvrez pas l'adaptateur secteur de papiers ou d'autres objets
susceptibles d'entraver le refroidissement. De même, n'utilisez pas l'adaptateur secteur dans une mallette de transport.
• L'adaptateur secteur peut être chaud lorsque vous utilisez votre ordinateur. Faites attention lorsque vous le manipulez pendant
ou après son fonctionnement.
• Norvège et Suède : Branchez le câble d'alimentation à une prise électrique avec terre exclusivement.
• Japon seulement : N'utilisez que le câble secteur fourni par Dell avec l'adaptateur secteur. L'utilisation de tout autre type de
câble d'alimentation peut endommager l'appareil ou l'adaptateur secteur et présente un risque d'incendie ou de choc électrique.
Instructions de protection d'équipement
Respectez les règles de manipulation sûre ci-dessous pour éviter d'endommager votre équipement :
AVIS : Lors du transport de l'ordinateur de zones de basse température vers un environnement plus chaud ou de zones à haute
température vers un environnement plus froid, laissez l'ordinateur s'acclimater à la température ambiante et laissez évaporer
la condensation qui peut se former avant de le mettre en route pour éviter d'endommager l'ordinateur.
• Protégez votre appareil des dangers de l'environnement, tels que la poussière, la saleté, les aliments, liquides, températures
extrêmes et exposition au soleil direct.
• Eloignez l'appareil de l'humidité directe ou excessive comme des températures extrêmement chaudes ou froides et
assurez-vous qu'il est utilisé dans la plage d'environnement spécifiée.
• Laissez un dégagement de 10,2 cm (4 po) au minimum sur les côtés ventilés de l'appareil pour permettre la circulation d'air
nécessaire.
• Ne limitez pas la circulation d'air sur l'appareil en obstruant les bouches ou entrées d'air.
PRÉCAUTION : Pour préparer votre adaptateur secteur pour un voyage, enroulez les deux cordons autour de l'adaptateur
dans le même sens comme indiqué sur la figure ci-dessous. Ne pas enrouler les cordons dans le sens correct peut les
endommager, ce défaut ne serait pas couvert par la garantie. N'utilisez jamais un adaptateur secteur présentant des signes
de défaut ou d'usure excessive.

Guide de configuration Base média 59
Protection contre les décharges électrostatiques
Les décharges électrostatiques (ESD) peuvent endommager les composants électroniques de votre ordinateur. Dans certains cas,
de l'électricité statique peut s'accumuler sur votre corps ou sur objet, par exemple un périphérique, puis de se décharger sur un autre
objet, comme votre ordinateur. Pour éviter les dommages électrostatiques, vous devez décharger l'électricité statique de votre corps
avant de toucher un des composants électroniques internes de votre ordinateur, par exemple un module mémoire. Vous pouvez vous
protéger contre les décharges électrostatiques en touchant un objet métallique à la masse (par exemple une surface métallique non
peinte sur le panneau d'entrée/sortie de votre ordinateur) avant de toucher quoi que ce soit d'électronique. Pour brancher un
périphérique (y comprise des assistants personnels numériques ou PDA) sur votre ordinateur, vous devez toujours vous mettre
à la masse vous et le périphérique avant de le relier à l'ordinateur. De plus, pour travailler à l'intérieur de l'ordinateur, touchez
régulièrement un connecteur d'entrée-sortie pour éliminer toute charge statique que votre corps peut avoir accumulée.
Vous pouvez également prendre les mesures suivantes pour éviter les dommages dus aux décharges électrostatiques :
• Lorsque vous déballez un composant sensible à l'électricité statique de son carton, ne le retirez pas de son emballage
antistatique avant d'être prêt à l'installer dans votre appareil. Juste avant d'ôter l'emballage antistatique, veillez à décharger
l'électricité statique de votre corps.
• Quand vous transportez un composant sensible, placez-le d'abord dans un emballage ou une boîte antistatique.
• Manipulez tous les composants sensibles dans une zone antistatique. Si possible, placez des tapis antistatiques au sol et sur
votre plan de travail.

60 Guide de configuration Base média
A propos de la base média
Vue de gauche
LEVIER DE LIBÉRATION DE L'ORDINATEUR — Sépare l'ordinateur de la base média si elle n'est pas verrouillée par un
dispositif antivol.
C
ONNECTEUR USB — Le connecteur USB compatible 2.0 permet de brancher des périphériques USB :
imprimantes, appareils photo, etc.
CONNECTEUR AUDIO — Permet de brancher des casques et haut-parleurs.
BOUTON DE DÉSAMARRAGE — Permet de désamarrer votre ordinateur pendant son fonctionnement.
Vue de droite
LECTEUR OPTIQUE — Permet d'utiliser des CD et DVD.
C
ONNECTEUR USB — Le connecteur USB compatible 2.0 permet de brancher des périphériques USB :
imprimantes, appareils photo, etc.
1 levier de libération de
l'ordinateur
2 Connecteur USB 3 connecteur audio
4 bouton de désamarrage
1 lecteur optique 2 Connecteur USB
1 2 3 4
1 2

Guide de configuration Base média 61
Vue arrière
1 Connecteur USB 2 connecteur réseau 3 connecteur série
4 connecteur parallèle 5 connecteur vidéo numérique
(DVI)
6 Connecteur vidéo VGA
7 Connecteur USB alimenté 8 connecteur d'adaptateur secteur 9 logement de sécurité
Connecteur Description
CONNECTEUR RÉSEAU — Permet de relier la base média à un
réseau. Les deux témoins près du connecteur signalent l'état de
la liaison et l'activité sur une connexion réseau filaire.
Pour plus d'informations sur l'utilisation de l'adaptateur réseau,
consultez la documentation livrée avec votre ordinateur.
AVIS : Ne branchez pas un câble téléphonique au
connecteur réseau.
C
ONNECTEURS USB 2.0 — Permet de brancher jusqu'à quatre
périphériques compatibles USB 2.0 ; y compris USB alimenté.
CONNECTEUR PARALLÈLE — Permet de connecter un
périphérique parallèle, tel qu'une imprimante parallèle.
CONNECTEUR VIDÉO — Permet de connecter un moniteur VGA
externe.
REMARQUE : Quand votre ordinateur est amarré, utilisez le
connecteur vidéo de la base média.
CONNECTEUR SÉRIE — Permet de connecteur un périphérique
série, tel qu'une souris ou un ordinateur de poche.
1 2 3 4 5 6 87 9

62 Guide de configuration Base média
EMPLACEMENT POUR CÂBLE DE SÉCURITÉ — Permet de rattacher à la base média un dispositif antivol disponible
dans le commerce. Les instructions d'installation du dispositif antivol sont d'habitude livrées avec le dispositif. Pour
plus d'informations, reportez-vous à la section «Mise en sécurité de la base média» à la page 65.
CONNECTEUR DE CASQUE/HAUT-PARLEUR — Permet de
brancher des casques ou haut-parleurs. Le connecteur est une
sortie stéréo.
CONNECTEUR D'ADAPTATEUR SECTEUR — Permet de brancher
un adaptateur secteur sur la base média et le câble secteur pour
alimenter la base média. Vous pouvez brancher l'adaptateur
secteur sur la base média, qu'elle soit en fonctionnement ou
non. Pour plus d'informations, reportez-vous à la section
«Configuration de votre base média» à la page 64.
PRÉCAUTION : Si vous utilisez une rampe d'alimentation,
soyez prudent lorsque vous raccordez le câble
d'alimentation de l'adaptateur secteur à la rampe
d'alimentation. Certaines rampes d'alimentation peuvent
permettre d'insérer le connecteur de façon incorrecte. Une
insertion incorrecte du connecteur peut endommager
irrémédiablement votre base média et causer un risque de
choc électrique ou d'incendie. Vérifiez que vous insérez la
broche de terre de la fiche d'alimentation dans la broche
de terre correspondante de la rampe d'alimentation.
AVIS : Quand vous débranchez l'adaptateur secteur de la
base média, maintenez correctement le connecteur du câble
adaptateur, et non pas le câble lui-même, tirez fermement
mais sans brutalité pour éviter d'endommager le câble.
Connecteur Description

Guide de configuration Base média 63
Vue de haut
1 connecteur pour station
1

64 Guide de configuration Base média
Configuration de votre base média
PRÉCAUTION : L'adaptateur secteur fonctionne avec les tensions secteur disponibles dans le monde entier.
Cependant, les connecteurs et les rampes d'alimentation varient selon les pays. L'utilisation d'un câble non
compatible ou le branchement incorrect du câble sur la rampe d'alimentation ou la prise secteur peut provoquer
un incendie ou endommager l'équipement.
AVIS : Utilisez toujours l'adaptateur secteur Dell livré avec la base média. Si vous utilisez un autre adaptateur
secteur du commerce — ou l'adaptateur secteur de modèles plus anciens d'ordinateur Dell — vous risquez
d'endommager la base média ou l'ordinateur.
AVIS : Pour débrancher le câble adaptateur secteur Dell de l'ordinateur ou de la base média, saisissez le connecteur
et non le câble lui-même, tirez fermement mais sans brutalité pour éviter d'endommager le câble. Pour enrouler
le câble de l'adaptateur secteur, vérifiez que vous suivez l'angle du connecteur de l'adaptateur pour éviter
d'endommager le câble.
1
Branchez l'adaptateur secteur au connecteur correspondant et sur une prise murale.
2
Avant d'amarrer pour la première fois votre ordinateur, le système d'exploitation doit terminer sa
procédure de configuration. Pour vérifier que le système d'exploitation a terminé la procédure de
configuration :
a
Vérifiez que l'ordinateur n'est pas relié à la base média (amarré).
b
Allumez l'ordinateur.
c
Vérifiez que le bureau Microsoft
®
Windows
®
apparaît.
d
Arrêtez l'ordinateur à l'aide du menu
Démarrer
de Windows.

Guide de configuration Base média 65
Mise en sécurité de la base média
REMARQUE : Si l'ordinateur est amarré à la base média et qu'un dispositif antivol soit relié au logement pour câble
de sécurité de la base média, il est impossible de désamarrer l'ordinateur sans d'abord retirer le dispositif antivol.
1
Fixez un dispositif antivol du commerce sur le logement de câble de sécurité de la base média.
Les dispositifs antivol comportent le plus souvent une longueur de câble métallique torsadé avec un
dispositif de verrouillage et une clé. Pour les instructions d'installation de ce type de dispositif antivol,
consultez la documentation livrée avec le dispositif.

66 Guide de configuration Base média
Amarrage de votre ordinateur
REMARQUE : Si vous amarrez votre ordinateur pour la première fois et n'avez pas achevé les étapes de la section
«Configuration de votre base média» à la page 64, effectuez-le avant de passer à l'étape suivante.
REMARQUE : Après amarrage de l'ordinateur pour la première fois, la batterie de l'ordinateur ou l'adaptateur
secteur de celui-ci peuvent alimenter la base média si elle n'est pas reliée à un adaptateur secteur.
REMARQUE : Votre ordinateur doit être éteint pour le première amarrage.
1
Alignez l'arrière de l'ordinateur sur l'arrière de la base média à environ 30 degrés d'inclinaison, abaissez
l'avant sur la
base média
.
2
Appuyez légèrement l'ordinateur sur la
base média
pour l'encliqueter et le faire reposer à fond.
3
Allumez l'ordinateur.
Le système d'exploitation reconnaît la
base média
.
1ordinateur 2 base média
2
1

Guide de configuration Base média 67
Désamarrage de votre ordinateur
1
Avant de désamarrer votre ordinateur, enregistrez et fermez les fichiers ouverts, quittez les programmes
ouverts.
2
Réglez les paramètres d'économie d'énergie de façon que l'ordinateur n'entre pas en mode veille ou
veille prolongée à la fermeture (abaissement) de l'écran :
Windows
XP
a
Cliquez sur le bouton
Démarrer
, puis sur
Panneau de configuration
.
b
Sous
Choisissez une catégorie
, cliquez sur
Performances et maintenance
.
c
Sous
ou choisissez une icône du Panneau de configuration
, cliquez sur
Options d'alimentation
puis cliquez sur
Avancé
.
d
Dans le menu
Lorsque je referme mon ordinateur portable
, sélectionnez
Ne rien faire.
AVIS : Ne désamarrez jamais l'ordinateur sans d'abord le préparer au désamarrage. Si vous le désamarrez avant
de le préparer, vous perdrez des données et il pourrait ne pas revenir au fonctionnement normal pendant plusieurs
minutes, s'il y revient.
AVIS : Si l'ordinateur n'a pas de batterie chargée dans la baie média, vous devez l'arrêter avant de le démarrer.
Si vous désamarrez l'ordinateur sans batterie avant de l'arrêter, vous perdrez des données et il pourrait ne pas
revenir au fonctionnement normal pendant plusieurs minutes, s'il y revient.
3
Si votre ordinateur n'a pas de batterie chargée dans la baie média, arrêtez-le par le menu
Démarrer
de
Windows.
4
Si votre ordinateur a une batterie chargée dans la baie média, préparez-le pour le désamarrage par une
des méthodes suivantes :
• Cliquez sur le bouton
Démarrer
, puis sur
Ejecter le PC
.
OU
• Appuyez sur le bouton de désamarrage à gauche de la
base média
pendant 1 seconde (reportez-vous
à «Vue de gauche» à la page 60). Les témoins de la
base média
s'éteignent et le message
Ejection
terminée
signale que vous pouvez désamarrer votre ordinateur.
5
Si votre base média est protégée par un dispositif antivol, retirez le verrou.
6
Tirez vers l'avant sur le levier de libération de l'ordinateur (reportez-vous à «Vue de gauche» à la
page 60) pour libérer l'ordinateur.

68 Guide de configuration Base média
7
Soulevez l'arrière de l'ordinateur et faites-le glisser vers l'avant de la
base média
.

Guide de configuration Base média 69
Installation de lecteur optique
1
Enregistrez et fermez les fichiers et programmes éventuellement ouverts, éteignez l'ordinateur.
2
Insérez le lecteur optique dans la baie de la base média. (Reportez-vous à «Vue de droite» à la page 60).
3
Insérez la vis de fixation du lecteur optique.
4
Allumez l'ordinateur.
Le système d'exploitation reconnaît le nouveau lecteur.

70 Guide de configuration Base média
Retrait du lecteur optique
1
Enregistrez et fermez les fichiers et programmes éventuellement ouverts, puis arrêtez l'ordinateur.
2
Déposez la vis de fixation du lecteur optique et utilisez le tournevis pour faire glisser le lecteur hors de
la baie de module. Reportez-vous à la section «Vue de droite» à la page 60.
Utilisation de lecteurs externes
Vous pouvez utiliser des lecteurs externes tels que lecteur de CD, CD-RW ou DVD/CD-RW en
branchant le câble USB du lecteur sur la connecteur USB alimenté de la base média. (Reportez-vous
à «Vue arrière» à la page 61).
Vous pouvez ajouter ou retirer des lecteurs externes pendant le fonctionnement de l'ordinateur ou quand
il est arrêté. Pour retirer ou échanger un lecteur pendant le fonctionnement de l'ordinateur, faites un
double-clic sur l'icône Déconnecter ou éjecter le matériel de la barre des tâches de Windows et cliquez
sur le lecteur à éjecter. Débranchez ensuite le lecteur de la base média.
AVIS : Pour éviter d'endommager les lecteurs externes, placez-les en lieu sûr et au sec quand ils ne sont pas
branchés sur l'ordinateur. Évitez d'exercer une pression quelconque ou de placer des objets lourds sur ces derniers.

Guide de configuration Base média 71
Caractéristiques
Physique
Hauteur 12,8 mm (0,50 pouce)
Largeur 292 mm (11,5 pouces)
Profondeur 207 mm (8,15 pouces)
Poids (sans lecteur dans la baie de
module)
0,61 kg (1,35 lb)
Adaptateur secteur
Tension d'entrée 100–240 VCA
Courant d'entrée (maximal) 1,5 A
Fréquence d'entrée 50–60 Hz
Courant de sortie (maximal) 3,34 A (adaptateur secteur 65 W)
4,62 A (adaptateur secteur 90 W)
Puissance 65 W
90 W
Tension de sortie nominale 19,5 Vcc
Dimensions et poids
(adaptateur secteur 65 W) :
Hauteur
28,3 mm (1,11 pouce)
Largeur
57,8 mm (2,28 pouces)
Profondeur
137,2 mm (5,40 pouces)
Poids (avec les câbles) 0,36 kg (0,79 lb)
Dimensions et poids
(adaptateur secteur 90 W) :
Hauteur
34,2 mm (1,35 pouce)
Largeur
60,9 mm (2,39 pouces)
Profondeur
153,42 mm (6,04 pouces)
Poids (avec les câbles) 0,46 kg (1,01 lb)
Plage de températures :
Fonctionnement
0° à 35° C (32° à 95° F)
Stockage
–40° à 60° C (–40° à 140° F)

72 Guide de configuration Base média
Ports et connecteurs
Connecteur réseau Port RJ-45 pour Ethernet Bus Master
10/100/1000 Mbits/seconde BaseTX
USB trois connecteurs 4 broches compatibles
USB 2.0
USB alimenté un connecteur à 9 broches conformes
à la norme USB 2.0
Parallèle connecteur 25 trous ; unidirectionnel,
bidirectionnel ou ECP (Extended
Capabilities Port - port à capacités étendues)
Vidéo connecteur 15 broches femelle
Connecteur DVI connecteur 24 broches femelle
Série connecteur 9 broches ; UART compatible
16550 avec tampon de 16 octets
Audio connecteur miniDIN pour casque/haut-
parleur (sortie ligne)
Amarrage Connecteur 280 broches

Guide de configuration Base média 73
Conformité réglementaire
Une interférence électromagnétique (EMI, Electromagnetic Interference) est un signal ou une émission, véhiculé(e) dans l'espace
libre ou par des conducteurs électriques ou de signaux, qui peut mettre en danger le fonctionnement d'une radionavigation ou
autre service de sécurité ou sérieusement dégrader, obstruer ou interrompre à maintes reprises un service de communications radio
autorisé. Les services de communications radio incluent, de manière non limitative, les services de radiodiffusion commerciale
AM/FM, la télévision, les services de téléphonie cellulaire, la radiodétection, le contrôle de la circulation aérienne, les récepteurs de
radio messagerie et les systèmes GSM. Ces services dûment autorisés, au même titre que les émetteurs de rayonnement non
intentionnels tels que les appareils numériques, y compris les systèmes informatiques, contribuent à l'environnement
électromagnétique.
La compatibilité électromagnétique est la capacité des éléments d'un équipement électronique à interagir correctement dans
l'environnement électronique. Bien que ce système informatique ait été conçu et déterminé comme conforme aux restrictions
établies par l'organisme de réglementation en ce qui concerne les EMI, il ne peut être garanti que des perturbations ne se
produiront pas au cours d'une installation donnée. Si l'équipement crée effectivement des interférences avec des services de
communications radio (ce qui peut être déterminé en l'éteignant et en l'allumant), l'utilisateur est encouragé à essayer de corriger
ce phénomène en prenant l'une ou l'ensemble des mesures suivantes :
• Réorientez l'antenne de réception.
• Repositionnez l'ordinateur en fonction du récepteur.
• Éloignez l'ordinateur du récepteur.
• Branchez l'ordinateur sur une autre prise pour faire en sorte que l'ordinateur et le récepteur se trouvent sur différents circuits
de dérivation.
Si nécessaire, consultez un membre de l'équipe du support de Dell ou un technicien radio/télévision expérimenté pour des
suggestions supplémentaires.
Pour plus d'informations sur la conformité réglementaire, consultez le manuel de l'utilisateur ou le guide de l'utilisateur de votre
ordinateur.
Les produits Dell™ sont conçus, testés et classés pour l'environnement électromagnétique dans lequel il est prévu de les utiliser.
Ces classifications font généralement référence aux définitions harmonisées suivantes :
• Classe A concerne les environnements professionnels ou industriels. Les produits de classe B peuvent aussi être utilisés dans
un environnement de classe A.
• Classe B concerne les environnements résidentiels. Les produits de classe A ne doivent pas être utilisés dans un
environnement de classe B.
Les appareils de traitement de l'information (ATI), notamment les périphériques, les cartes d'extension, les imprimantes, les
périphériques d'entrées/sorties (E/S), les moniteurs, etc., qu'ils soient intégrés ou connectés à l'ordinateur, doivent correspondre à la
classification de l'environnement électromagnétique de l'ordinateur.
Avis relatif aux câbles de transmission blindés : Utilisez uniquement des câbles blindés pour la connexion de périphériques à
tout dispositif Dell, ce afin de réduire le risque d'interférences avec des services de communications radio. L'utilisation de câbles
blindés permet de rester dans la classification EMC pour l'environnement prévu. Dell propose un câble pour les imprimantes
utilisant le port parallèle. Si vous le souhaitez, vous pouvez commander un câble sur le site Web de Dell, à l'adresse suivante :
www.dell.com.
Dell a conclu que ce produit est un produit harmonisé de classe B. Les sections ci-dessous proposent, de façon spécifique aux pays
ou zones géographiques, des informations EMC/EMI ou relatives à la sécurité des produits.
Pour plus d'informations sur les réglementations, reportez-vous «Regulatory Notices» à la page 21.

74 Guide de configuration Base média

www.dell.com | support.dell.com
Dell™ Latitude™ Systeme
Anleitung zur Inbetriebnahme
der Media Base
Model PR09S

Anmerkungen, Hinweise und Vorsichtshinweise
ANMERKUNG: Eine ANMERKUNG macht auf wichtige Informationen aufmerksam, mit denen Sie den Computer besser
einsetzen können.
HINWEIS: Ein HINWEIS warnt vor möglichen Beschädigungen der Hardware oder Datenverlust und zeigt, wie diese
vermieden werden können.
VORSICHT: Durch VORSICHT werden Sie auf Gefahrenquellen hingewiesen, die materielle Schäden, Verletzungen
oder sogar den Tod von Personen zur Folge haben können.
Abkürzungen und Akronyme
Eine vollständige Liste der Abkürzungen und Akronyme finden Sie im
Dell™ Latitude™ D420 Benutzerhandbuch
.
(Je nach installiertem Betriebssystem erfolgt der Zugriff darauf, indem Sie auf das Symbol
Benutzerhandbuch
auf Ihrem Desktop doppelklicken oder auf die Schaltfläche
Start
und anschließend auf
Hilfe und Support
→
Benutzer- und Systemhandbücher
→
Benutzerhandbücher
und dann auf
Dell Latitude Benutzerhandbuch
klicken.)
____________________
Die in diesem Dokument enthaltenen Informationen können ohne vorherige Ankündigung geändert werden.
© 2006 Dell Inc. Alle Rechte vorbehalten.
Die Vervielfältigung oder Wiedergabe in jeglicher Weise ist ohne schriftliche Genehmigung von Dell Inc. strengstens untersagt.
Marken in diesem Text: Dell und das DELL-Logo sind Marken von Dell Inc.; Microsoft und Windows sind eingetragene Marken von Microsoft
Corporation.
Alle anderen in dieser Dokumentation genannten Marken und Handelsbezeichnungen sind Eigentum der jeweiligen Hersteller und Firmen.
Dell Inc. verzichtet auf alle Besitzrechte an Marken und Handelsbezeichnungen, die nicht Eigentum von Dell sind.
Model PR09S
März 2006 P/N UT901 Rev. A00

Inhalt 77
Inhalt
VORSICHT: Sicherheitshinweise . . . . . . . . . . . . . . . . . . . . . . . . 79
SICHERHEIT: Allgemeine Sicherheitshinweise
. . . . . . . . . . . . . . . 79
SICHERHEIT: Sichere Handhabung der Stromversorgung
. . . . . . . . . 80
Hinweise zum Geräteschutz
. . . . . . . . . . . . . . . . . . . . . . . . . . . 80
Schutz vor elektrostatischer Entladung
. . . . . . . . . . . . . . . . . . 81
Wissenswertes zur Media Base
. . . . . . . . . . . . . . . . . . . . . . . . . 82
Linke Seitenansicht
. . . . . . . . . . . . . . . . . . . . . . . . . . . . . 82
Rechte Seitenansicht
. . . . . . . . . . . . . . . . . . . . . . . . . . . . 82
Rückansicht
. . . . . . . . . . . . . . . . . . . . . . . . . . . . . . . . . 83
Draufsicht
. . . . . . . . . . . . . . . . . . . . . . . . . . . . . . . . . . 85
Einrichten der Media Base
. . . . . . . . . . . . . . . . . . . . . . . . . . . 86
Sichern der Media Base
. . . . . . . . . . . . . . . . . . . . . . . . . . . . . 87
Andocken des Computers
. . . . . . . . . . . . . . . . . . . . . . . . . . . . 88
Ausdocken des Computers
. . . . . . . . . . . . . . . . . . . . . . . . . . . 89
Installieren des optischen Laufwerks
. . . . . . . . . . . . . . . . . . . . . . 91
Entfernen des optischen Laufwerks
. . . . . . . . . . . . . . . . . . . . . . . 92
Verwenden externer Laufwerke
. . . . . . . . . . . . . . . . . . . . . . . . . 92
Technische Daten
. . . . . . . . . . . . . . . . . . . . . . . . . . . . . . . . 93
Zulassungsinformationen
. . . . . . . . . . . . . . . . . . . . . . . . . . . . 95

78 Inhalt

Anleitung zur Inbetriebnahme der Media Base 79
VORSICHT: Sicherheitshinweise
Die folgenden Sicherheitshinweise dienen der persönlichen Sicherheit des Benutzers und schützen das Gerät (Computer, Port
Replicator, Media Base, Docking-Station u. ä.) und die Arbeitsumgebung vor möglichen Schäden.
SICHERHEIT: Allgemeine Sicherheitshinweise
Beachten Sie die folgenden Sicherheitshinweise, um die persönliche Sicherheit des Benutzers zu gewährleisten:
• Wenn Sie das Gerät aufstellen, um damit zu arbeiten, stellen Sie es auf einer ebenen Fläche ab.
• Nehmen Sie keine Wartungsarbeiten an dem Gerät auf eigene Faust vor, sondern halten Sie sich ausschließlich an die in
Ihrer Dell™-Dokumentation beschriebenen oder auf anderem Wege von Dell bereitgestellten Anweisungen. Beachten Sie
stets alle Installations- und Wartungsanweisungen genau.
• Um die mögliche Gefahr eines Stromschlags zu vermeiden, sollten Sie während eines Gewitters weder Kabel anschließen noch
abziehen oder eine Wartung oder Neukonfiguration am Gerät vornehmen. Verwenden Sie die Media Base nicht während
eines Gewitters, es sei denn, der Computer wird mit Akkustrom versorgt und ist nicht an das Stromnetz angeschlossen.
• Wenn Ihr Gerät mit einem integrierten oder optionalen (PC Card-)Modem ausgestattet ist, ziehen Sie das Modemkabel bei
Herannahen eines Gewitters ab, um die mit einem Blitzeinschlag verbundenen Gefahren zu vermeiden.
• Schieben Sie keine Gegenstände in die Lüftungsschlitze oder Öffnungen des Geräts. Aufgrund eines Kurzschlusses der
internen Komponenten kann dies zu einem Brand oder einem Stromschlag führen.
• Stellen Sie das Gerät nicht in der Nähe von Heizgeräten und anderen Wärmequellen auf. Achten Sie darauf, die
Belüftungsöffnungen nicht zu blockieren. Legen Sie kein Papier unter das Gerät und stellen Sie das Gerät nicht in einem
Schrank oder auf einem Bett, Sofa oder Teppich auf.
• Verwenden Sie das Gerät nicht in feuchten Umgebungen, z. B. in der Nähe einer Badewanne, eines Waschbeckens, eines
Schwimmbeckens oder in einem feuchten Keller.
• Verschütten Sie kein Essen oder Flüssigkeiten über das Gerät.
• Trennen Sie das Gerät vor dem Reinigen von der Steckdose. Reinigen Sie das Gerät mit einem weichen, leicht befeuchteten
Tuch. Verwenden Sie keine flüssigen Reinigungsmittel oder Sprühreiniger, die eventuell entflammbare Stoffe enthalten.
• Stellen Sie sicher, dass auf dem Stromkabel des Netzadapters kein Gegenstand abgestellt ist und nicht die Gefahr besteht,
über das Kabel zu stolpern oder darauf zu treten.
• Lassen Sie den Computer in Umgebungen mit fehlender Luftzirkulation wie zum Beispiel in einer Tragetasche oder in
einem geschlossenen Aktenkoffer nicht eingeschaltet. Ohne Luftzirkulation kann der Computer Schaden nehmen und sogar
ein Brand entstehen.
• Legen Sie den tragbaren Computer zum Arbeiten nicht über längere Zeit unmittelbar auf Ihren Beinen ab. Während des
normalen Betriebs erhitzt sich die Computerunterseite (vor allem bei Versorgung mit Netzstrom). Ein anhaltender Hautkontakt
kann unangenehm werden oder sogar zu Verbrennungen führen.
• PC Cards können während des normalen Betriebs sehr warm werden. Seien Sie vorsichtig, wenn Sie PC Cards nach längerem
Betrieb entfernen.
• Das Gerät kann optische Laufwerke, CD-ROM-, CDR/W- oder DVD-Laufwerke usw. mit integrierten Laservorrichtungen
enthalten. Diese optischen Laufwerke entsprechen den Sicherheitsanforderungen für Laserprodukte der Klasse 1 gemäß US
DHHS-Standard und EN/IEC60825-1, Sicherheit von Lasereinrichtungen. Für diese Laufwerke sind weder Eingriffe durch
den Benutzer noch die Wartung oder der Austausch von Teilen vorgesehen. Um eine Gefährdung durch Laserstrahlen zu
vermeiden, sollten Sie in keinem Fall ein optisches Laufwerk öffnen oder blockieren.
WARNUNG:
Das Kabel dieses Produkts enthält Blei, ein Stoff, der Informationen des Bundesstaates Kalifornien zufolge zu
Schäden an Neugeborenen oder anderen Beeinträchtigungen der reproduktiven Gesundheit führen kann.
Waschen Sie sich
die Hände, nachdem Sie Kontakt mit diesem Kabel hatten
.

80 Anleitung zur Inbetriebnahme der Media Base
SICHERHEIT: Sichere Handhabung der Stromversorgung
• Falls dieses Produkt mit einem Netzkabel mit 3-poligem Stecker ausgeliefert wird, achten Sie darauf, das Kabel an eine
ordnungsgemäß geerdete Stromquelle anzuschließen, um die Gefahr von Stromschlägen zu vermeiden. Verwenden Sie keine
Adapterstecker. Entfernen Sie auf keinen Fall den Massekontakt des Netzkabelsteckers. Verwenden Sie, falls erforderlich, nur
geeignete Schutzkontakt-Verlängerungskabel, die zum Stecker des Netzkabels passen.
• Wenn Sie ein Verlängerungskabel an den Netzadapter anschließen, stellen Sie sicher, dass der Nennstrom aller an das
Verlängerungskabel angeschlossenen Geräte nicht größer ist als der zulässige Nennstrom des Verlängerungskabels.
• Verwenden Sie nur den von Dell gelieferten Netzadapter, der für dieses Gerät zugelassen ist. Andernfalls besteht Brand- oder
Explosionsgefahr. Informationen zu den elektrischen Kenndaten des Netzadapters finden Sie im Benutzerhandbuch.
• Wenn Sie eine Mehrfach-Steckerleiste verwenden, gehen Sie beim Anschließen des Netzadapterkabels an die Steckerleiste
mit besonderer Vorsicht vor. In einige Steckerleisten können Stecker auch falsch eingesteckt werden. Dadurch könnte das
Gerät irreparabel beschädigt werden. Außerdem besteht Stromschlag- und/oder Brandgefahr. Stellen Sie sicher, dass der
Erdungskontakt am Netzstecker in den entsprechenden Kontakt der Steckerleiste eingesteckt ist.
• Stellen Sie vor Anschluss des Geräts an eine Steckdose sicher, dass die Betriebsspannung des Netzadapters mit der
Nennspannung und Frequenz der verfügbaren Stromquelle übereinstimmt.
• Um den Computer von allen Stromquellen zu trennen, schalten Sie ihn aus, trennen Sie den Netzadapter von der Steckdose
und entfernen Sie den (die) Akku(s) aus dem Akkufach und gegebenenfalls aus dem Modulschacht.
• Wenn Sie den Netzadapter zur Stromversorgung des Computers oder zum Aufladen des Akkus verwenden, legen Sie den
Netzadapter in einen gut belüfteten Bereich, z. B. auf einer Schreibtischoberfläche oder auf dem Boden. Achten Sie darauf,
dass auf dem Netzadapter weder Papier noch Gegenstände liegen, die die Kühlung beeinträchtigen. Verwenden Sie den
Netzadapter nicht in einer Tragetasche.
• Der Netzadapter kann bei normalem Betrieb des Computers heiß werden. Handhaben Sie den Netzadapter während des
Betriebs und unmittelbar danach mit Vorsicht.
• Für Norwegen und Schweden: Schließen Sie das Stromkabel nur an eine geerdete Steckdose an.
• Nur für Japan: Verwenden Sie für den Anschluss des Netzadapters ausschließlich das von Dell gelieferte Stromkabel. Die
Verwendung eines anderes Stromkabels kann zur Beschädigung des Geräts oder des Netzadapters führen oder Stromschlag-
und Brandgefahr bewirken.
Hinweise zum Geräteschutz
Beachten Sie die folgenden Sicherheitshinweise, um Schäden am Gerät zu vermeiden.
HINWEIS: Wenn Sie den Computer aus einer kälteren in eine wärmere Umgebung oder aus einer wärmeren Umgebung in eine
kältere bringen, warten Sie mit dem Einschalten, bis der Computer sich an die Raumtemperatur angepasst hat und
möglicherweise kondensierte Luftfeuchtigkeit verdunstet ist, um eine Beschädigung des Geräts zu vermeiden.
• Schützen Sie das Gerät vor schädlichen Umgebungseinflüssen wie Schmutz, Staub, Lebensmitteln, Flüssigkeiten, extremen
Temperaturen und übermäßigem Sonnenlicht.
• Setzen Sie das Gerät nicht direkter oder übermäßiger Feuchtigkeit und extrem heißen oder kalten Temperaturen aus, um
einen Betrieb innerhalb der festgelegten Grenzwerte sicherzustellen.
• Achten Sie darauf, an allen belüfteten Seiten des Geräts einen Mindestabstand von 10,2 cm einzuhalten, um den für eine
ordnungsgemäße Belüftung erforderlichen Luftstrom zu gewährleisten.
• Sorgen Sie für eine ungehinderte Luftzirkulation, indem Sie darauf achten, dass keine Lüfterschlitze oder Lufteinlässe
blockiert werden.

Anleitung zur Inbetriebnahme der Media Base 81
VORSICHT: Zur Vorbereitung für die Mitnahme auf Reisen sollten Sie beide Kabel des Netzadapters wie in der nachfolgenden
Abbildung gezeigt in derselben Richtung um den Netzadapter wickeln. Eine falsche Wickelung der Kabel kann zu ihrer
Beschädigung führen, für die keine Gewährleistung im Sinne der für den Netzadapter geltenden Garantiebestimmungen
übernommen wird. Verwenden Sie niemals einen Netzadapter, der Anzeichen von Beschädigungen oder übermäßiger Nutzung
aufweist.
Schutz vor elektrostatischer Entladung
Elektrostatische Entladungen (ESD) können die elektronischen Bauteile im Inneren des Computers beschädigen. Unter bestimmten
Bedingungen können sich statische elektrische Ladungen an Ihrem Körper oder einem Gegenstand, beispielsweise einem
Peripheriegerät, aufbauen und anschließend durch den Kontakt mit einem anderen Objekt, z. B. Ihrem Computer, entladen. Um
ESD-bedingte Schäden zu verhindern, sollten Sie die statische Elektrizität Ihres Körpers entladen, bevor Sie elektronische
Komponenten Ihres Computers, zum Beispiel Speichermodule, berühren. Sie können sich vor elektrostatischen Entladungen
schützen, indem Sie vor dem Kontakt mit elektronischen Komponenten ein geerdetes metallisches Objekt (z. B. eine unlackierte
metallische Fläche an der E/A-Leiste Ihres Computers) berühren. Beim Anschluss eines Peripheriegeräts (einschließlich PDAs) an
den Computer sollten Sie immer zuerst sich selbst und das Peripheriegerät erden, bevor Sie es anschließen. Wiederholen Sie
außerdem während der Arbeit im Inneren des Systems diese Erdung regelmäßig, um statische Aufladungen abzuleiten, die sich
mittlerweile im Körper aufgebaut haben könnten.
Beachten Sie auch folgende Hinweise, um Beschädigungen durch elektrostatische Entladung zu vermeiden:
• Entfernen Sie beim Auspacken einer elektrostatisch gefährdeten Komponente aus dem Versandkarton erst dann ihre
antistatische Verpackung, wenn Sie die Komponente installieren möchten. Vergewissern Sie sich, dass die statische
Elektrizität aus Ihrem Körper abgeleitet wurde, bevor Sie die antistatische Verpackung der Komponente öffnen.
• Verwenden Sie für den Transport einer empfindlichen Komponente einen antistatischen Behälter oder eine antistatische
Verpackung.
• Wählen Sie für das Arbeiten mit allen empfindlichen Komponenten eine gegen elektrostatische Aufladung gesicherte
Umgebung. Verwenden Sie nach Möglichkeit antistatische Fußboden- und Werkbankunterlagen.

82 Anleitung zur Inbetriebnahme der Media Base
Wissenswertes zur Media Base
Linke Seitenansicht
COMPUTER-ENTRIEGELUNGSHEBEL — Trennt den Computer von der Media Base, wenn diese nicht durch eine
Diebstahlschutzvorrichtung gesichert ist.
USB-A
NSCHLUSS — Der USB 2.0-konforme Anschluss ermöglicht es, USB-Geräte, wie z. B. Drucker, Kameras
usw., mit dem Gerät zu verbinden.
A
UDIOANSCHLUSS — Ermöglicht den Anschluss von Kopfhörern und Lautsprechern.
A
USDOCKTASTE — Ermöglicht es, den Computer im laufenden Betrieb vom Docking-Gerät auszudocken.
Rechte Seitenansicht
OPTISCHES LAUFWERK — Ermöglicht die Verwendung von CDs und DVDs.
USB-A
NSCHLUSS — Der USB 2.0-konforme Anschluss ermöglicht es, USB-Geräte, wie z. B. Drucker, Kameras
usw., mit dem Gerät zu verbinden.
1 Computer-Entriegelungshebel 2 USB-Anschluss 3 Audioanschluss
4Ausdocktaste
1 Optisches Laufwerk 2 USB-Anschluss
1 2 3 4
1 2

Anleitung zur Inbetriebnahme der Media Base 83
Rückansicht
1 USB-Anschluss 2 Netzwerkanschluss 3 Serieller Anschluss
4 Parallelanschluss 5 DVI-Anschluss 6 VGA-Monitoranschluss
7 Erweiterter USB-Anschluss 8 Netzadapteranschluss 9 Sicherheitskabeleinschub
Anschluss Beschreibung
N
ETZWERKANSCHLUSS — Dient dem Anschluss der Media
Base an ein Netzwerk. Die beiden Leuchtanzeigen neben dem
Anschluss signalisieren den Verbindungsstatus und Aktivitäten
einer kabelgebundenen Netzwerkverbindung.
Informationen zur Verwendung des Netzwerkadapters finden
Sie in der im Lieferumfang des Computers enthaltenen
Dokumentation.
HINWEIS: Schließen Sie kein Telefonkabel an den
Netzwerkanschluss an.
USB 2.0-A
NSCHLÜSSE — Für den Anschluss von maximal
vier USB 2.0-konformen Geräten (einschließlich eines erweiterten
USB-Anschlusses).
P
ARALLELANSCHLUSS — Für den Anschluss eines über eine
parallele Schnittstelle kommunizierenden Gerätes, beispielsweise
eines Druckers.
M
ONITORANSCHLUSS — Für den Anschluss eines externen
VGA-Monitors.
ANMERKUNG: Wenn Ihr Computer angedockt ist,
verwenden Sie den Monitoranschluss der Media Base.
1 2 3 4 5 6 87 9

84 Anleitung zur Inbetriebnahme der Media Base
SICHERHEITSKABELEINSCHUB — Hier lässt sich eine handelsübliche Diebstahlschutzvorrichtung an die Media
Base anschließen. Zum Lieferumfang einer Diebstahlschutzvorrichtung gehört in der Regel auch eine
entsprechende Installationsanleitung. Weitere Informationen finden Sie unter „Sichern der Media Base” auf
Seite 87.
S
ERIELLER ANSCHLUSS — Für den Anschluss eines über eine
serielle Schnittstelle kommunizierenden Geräts, beispielsweise
einer seriellen Maus oder eines Handheld-Geräts.
K
OPFHÖRER-/LAUTSPRECHERANSCHLUSS — Für den Anschluss
eines Kopfhörers oder einer Lautsprecheranlage. Die Buchse
dient als Stereoausgang.
N
ETZADAPTERANSCHLUSS — Für den Anschluss eines
Netzadapters, der die Media Base mit dem Stromnetz verbindet
und den Wechselstrom in den von der Media Base benötigten
Gleichstrom umwandelt. Sie können den Netzadapter bei ein-
oder ausgeschalteter Media Base anschließen. Weitere
Informationen finden Sie unter „Einrichten der Media Base”
auf Seite 86.
VORSICHT: Wenn Sie eine Mehrfach-Steckerleiste
verwenden, gehen Sie beim Anschließen des
Netzadapterkabels an die Steckerleiste mit besonderer
Vorsicht vor. In einige Steckerleisten können Stecker auch
falsch eingesteckt werden. Dadurch könnte die Media
Base irreparabel beschädigt werden. Außerdem besteht
Stromschlag- sowie Brandgefahr. Stellen Sie sicher, dass
der Erdungskontakt am Netzstecker in den entsprechenden
Kontakt der Steckerleiste eingesteckt ist.
HINWEIS: Ziehen Sie beim Trennen des Netzadapterkabels
von der Media Base am Kabelstecker und nicht am Kabel
selbst, und ziehen Sie diesen fest, aber nicht ruckartig ab,
damit das Kabel nicht beschädigt wird.
Anschluss Beschreibung

Anleitung zur Inbetriebnahme der Media Base 85
Draufsicht
1 Docking-Anschluss
1

86 Anleitung zur Inbetriebnahme der Media Base
Einrichten der Media Base
VORSICHT: Der Netzadapter funktioniert mit allen Steckdosen weltweit. Die Stecker oder Steckdosenleisten können
jedoch unterschiedlich sein. Wird ein falsches Kabel verwendet oder dieses nicht ordnungsgemäß an die Steckerleiste
oder die Steckdose angeschlossen, können ein Brand oder Schäden im System verursacht werden.
HINWEIS: Verwenden Sie ausschließlich den zusammen mit der Media Base gelieferten Netzadapter von Dell. Bei
Verwendung eines anderen handelsüblichen Netzadapters oder eines Netzadapters für ein älteres Computermodell von
Dell können Media Base und Computer beschädigt werden.
HINWEIS: Ziehen Sie beim Trennen des Netzadapterkabels vom Computer oder der Media Base am Kabelstecker
und nicht am Kabel selbst und ziehen Sie diesen fest, aber nicht ruckartig ab, damit das Kabel nicht beschädigt
wird. Beachten Sie beim Aufwickeln des Netzadapterkabels den Winkel des Kabelanschlusses am Netzadapter,
um eine Beschädigung des Kabels zu vermeiden.
1
Verbinden Sie den Netzadapter mit dem Netzadapteranschluss der Media Base und mit einer Steckdose.
2
Bevor Sie den Computer zum ersten Mal an die Media Base andocken, muss die Installation des
Betriebssystems abgeschlossen sein. So überprüfen Sie den ordnungsgemäßen Abschluss der
Betriebssysteminstallation:
a
Vergewissern Sie sich, dass der Computer nicht mit der Media Base verbunden ist.
b
Schalten Sie den Computer ein.
c
Überprüfen Sie, ob der Desktop von Microsoft
®
Windows
®
angezeigt wird.
d
Fahren Sie den Computer über das Menü
Start
von Windows herunter.

Anleitung zur Inbetriebnahme der Media Base 87
Sichern der Media Base
ANMERKUNG: Wenn der Computer an die Media Base angedockt und eine Diebstahlschutzvorrichtung am
Sicherungskabeleinschub der Media Base angebracht ist, können Sie den Computer nicht von der Media Base
ausdocken, ohne zuerst die Diebstahlschutzvorrichtung zu entfernen.
1
Befestigen Sie eine handelsübliche Diebstahlschutzvorrichtung am Sicherheitskabeleinschub der
Media Base.
Diebstahlschutzvorrichtungen bestehen in der Regel aus einem Metallkabel mit einem daran befestigten
Schloss und einem Schlüssel. Eine Anleitung zur Installation einer derartigen Diebstahlschutzvorrichtung
finden Sie in der Dokumentation, die mit der Vorrichtung geliefert wurde.

88 Anleitung zur Inbetriebnahme der Media Base
Andocken des Computers
ANMERKUNG: Wenn der Computer zum ersten Mal an die Media Base angedockt wird und die Schritte unter
„Einrichten der Media Base” auf Seite 86 noch nicht ausgeführt wurden, führen Sie diese erst aus, bevor Sie mit
dem nächsten Schritt fortfahren.
ANMERKUNG: Nach dem erstmaligen Andocken des Computers kann der Computerakku oder die
Netzadapterverbindung des Computers die Media Base mit Strom versorgen, wenn diese selbst nicht mit einem
Netzadapter verbunden ist.
ANMERKUNG: Der Computer sollte nur ausgeschaltet sein, wenn er zum ersten Mal an die Media Base
angedockt wird
1
Richten Sie die Rückseite des Computers an der Rückseite der Media Base in einem Neigungswinkel
von ungefähr 30° aus und setzen Sie durch Absenken der Vorderseite den Computer auf die
Media
Base
auf.
2
Drücken Sie den Computer vorsichtig in die
Media Base
-Unterlage, bis er hörbar einrastet und fest sitzt.
3
Schalten Sie den Computer ein.
Die
Media Base
wird vom Betriebssystem automatisch erkannt.
1 Computer 2 Media Base
2
1

Anleitung zur Inbetriebnahme der Media Base 89
Ausdocken des Computers
1
Achten Sie darauf, vor dem Ausdocken des Computers von der Media Base alle geöffneten Dateien zu
speichern und alle geöffneten Programme zu beenden.
2
Ändern Sie ggf. die Energieverwaltungs-Einstellungen des Computers, damit er beim Schließen
(Herunterklappen) des Bildschirms nicht in den Standby-Modus oder Ruhezustand wechselt:
Windows
XP
a
Klicken Sie auf die Schaltfläche
Start
und anschließend auf
Systemsteuerung
.
b
Klicken Sie unter
Wählen Sie eine Kategorie
auf
Leistung und Wartung
.
c
Klicken Sie unter
oder ein Systemsteuerungssymbol
auf
Energieoptionen
und anschließend auf
die Registerkarte
Erweitert
.
d
Wählen Sie unter
Beim Schließen des Laptops
im Dropdown-Menü die Option
Nichts unternehmen
.
HINWEIS: Trennen Sie niemals den Computer von der Docking-Station, ohne ihn zuerst für das Ausdocken
vorzubereiten. Andernfalls müssen Sie mit Datenverlust rechnen, und der Computer ist möglicherweise für die
Dauer von mehreren Minuten oder überhaupt nicht mehr in der Lage, in den normalen Betriebszustand
zurückzukehren.
HINWEIS: Wenn der Computer nicht über einen aufgeladenen Akku im Akkufach verfügt, müssen Sie den
Computer vor dem Ausdocken herunterfahren. Wenn Sie den Computer ohne Akku ausdocken, ohne ihn vorher
herunterzufahren, müssen Sie mit Datenverlust rechnen, und der Computer ist möglicherweise für die Dauer von
mehreren Minuten oder überhaupt nicht mehr in der Lage, in den normalen Betriebszustand zurückzukehren.
3
Wenn der Computer nicht über einen aufgeladenen Akku im Akkufach verfügt, fahren Sie den
Computer über das Menü
Start
von Windows herunter.
4
Wenn sich im Akkufach des Computers ein aufgeladener Akku befindet, bereiten Sie das Ausdocken
vor, indem Sie eine der folgenden Aktionen ausführen:
• Klicken Sie auf die Schaltfläche
Start
, und klicken Sie auf
Abdocken
.
ODER
• Klicken Sie für die Dauer einer Sekunde auf die Ausdocktaste an der linken Seite der
Media Base
(siehe „Linke Seitenansicht” auf Seite 82). Die Leuchtanzeigen der
Media Base
erlöschen und mit
einer Meldung des Inhalts
Abdocken abgeschlossen
wird angezeigt, dass Sie den Computer jetzt
trennen können.
5
Entfernen Sie die ggf. vorhandene Sicherungsvorrichtung an der Media Base.
6
Ziehen Sie den Computer-Entriegelungshebel nach vorne (siehe „Linke Seitenansicht” auf Seite 82),
um die Computerverriegelung zu öffnen.

90 Anleitung zur Inbetriebnahme der Media Base
7
Heben Sie den Computer an der Rückseite an, und ziehen Sie ihn rückwärts aus der
Media Base
.

Anleitung zur Inbetriebnahme der Media Base 91
Installieren des optischen Laufwerks
1
Speichern und schließen Sie alle geöffneten Dateien, beenden Sie alle geöffneten Programme und
fahren Sie den Computer herunter.
2
Setzen Sie das optische Laufwerk in den Modulschacht der Media Base ein. (Siehe „Rechte
Seitenansicht” auf Seite 82.)
3
Befestigen Sie die Sicherungsschraube, mit der das optische Laufwerk in seiner Position gehalten wird.
4
Schalten Sie den Computer ein.
Das neue Laufwerk wird vom Betriebssystem automatisch erkannt.

92 Anleitung zur Inbetriebnahme der Media Base
Entfernen des optischen Laufwerks
1
Speichern und schließen Sie alle geöffneten Dateien, beenden Sie alle geöffneten Programme und
fahren Sie den Computer herunter.
2
Entfernen Sie die Sicherungsschraube zur Fixierung des optischen Laufwerks und ziehen Sie das
Laufwerk unter Zuhilfenahme des Schraubenziehers aus dem Modulschacht. Siehe „Rechte
Seitenansicht” auf Seite 82.
Verwenden externer Laufwerke
Um ein externes Laufwerk, beispielsweise ein Disketten-, CD-, CD-RW- oder DVD/CD-RW-Laufwerk,
anzuschließen, verbinden Sie das Laufwerkkabel mit dem erweiterten USB-Anschluss der Media Base.
(Siehe „Rückansicht” auf Seite 83.)
Sie können externe Laufwerke während des laufenden Betriebs oder im abgeschalteten Zustand des
Computers hinzufügen oder entfernen. Um ein Laufwerk während des laufenden Betriebs zu entfernen
oder auszutauschen, doppelklicken Sie in der Taskleiste von Windows auf das Symbol Hardware sicher
entfernen und klicken dann auf das zu entfernende Laufwerk. Trennen Sie anschließend das Laufwerk
von der Media Base.
HINWEIS: Bewahren Sie externe Laufwerke an einem sicheren, trockenen Ort auf, wenn sie nicht mit dem
Computer verbunden sind, um Beschädigungen zu vermeiden. Drücken Sie nicht mit Gewalt auf die Laufwerke
und legen Sie keine schweren Gegenstände darauf ab.

Anleitung zur Inbetriebnahme der Media Base 93
Technische Daten
Abmessungen und Gewicht
Höhe 12,8 mm
Breite 292 mm
Tiefe 207 mm
Gewicht (ohne Laufwerk im
Modulschacht)
0,61 kg
Netzadapter
Eingangsspannung 100-240 V Wechselspannung
Eingangsstrom (maximal) 1,5 A
Eingangsfrequenz 50-60 Hz
Ausgangsstrom (maximal) 3,34 A (65-W-Netzadapter):
4,62 A (90-W-Netzadapter):
Ausgangsleistung 65 W
90 W
Ausgangsnennspannung 19,5 V Gleichspannung
Abmessungen und Gewicht (65-W-
Netzadapter):
Höhe
28,3 mm
Breite
57,8 mm
Tiefe
137,2 mm
Gewicht (mit Kabeln) 0,36 kg
Abmessungen und Gewicht (90-W-
Netzadapter):
Höhe
34,2 mm
Breite
60,9 mm
Tiefe
153,42 mm
Gewicht (mit Kabeln) 0,46 kg
Temperaturbereich:
Während des Betriebs
0°C bis 35°C
Bei Lagerung
-40°C bis 60°C

94 Anleitung zur Inbetriebnahme der Media Base
Anschlüsse und Stecker
Netzwerkanschluss RJ-45-Anschluss für 10/100/1000 BaseTX
Bus Master Ethernet
USB-Anschluss Drei 4-polige USB -2.0-konforme Anschlüsse
Erweiterter USB-Anschluss Ein 9-poliger USB -2.0-konformer Anschluss
Parallel 25-poliger Anschluss, unidirektional,
bidirektional oder ECP
Video 15-poliger Anschluss
DVI-Anschluss 24-poliger Anschluss
Seriell 9-poliger Anschluss; 16550C-kompatibler
UART mit 16-Byte-Pufferspeicher
Audio Kopfhörer-/Lautsprecheranschluss
(Leitungsausgang, Mini-Anschluss)
Docking 280-poliger Anschluss

Anleitung zur Inbetriebnahme der Media Base 95
Zulassungsinformationen
Elektromagnetische Interferenz (EMI) ist ein Signal oder eine Emission, die in den freien Raum abgegeben bzw. entlang von
Strom- oder Signalleitungen geleitet wird und den Betrieb der Funknavigation oder anderer Sicherheitsgeräte beeinträchtigt bzw.
deren Qualität extrem verschlechtert, behindert oder wiederholt lizenzierte Funkdienste unterbricht. Funkdienste umfassen
kommerziellen MW-/UKW-Radio- und Fernsehrundfunk, Funktelefondienste, Radar, Flugsicherung, Anrufmelder und Dienste für
personenbezogene Kommunikation (PCS [Personal Communication Services]), sind jedoch nicht nur auf diese beschränkt. Diese
lizenzierten Dienste sowie die unbeabsichtigte Abstrahlung durch andere, z. B. digitale Geräte (unter anderem auch
Computersysteme), tragen zum Aufbau elektromagnetischer Felder bei.
Unter elektromagnetischer Verträglichkeit (EMV) versteht man die Fähigkeit elektronischer Bauteile, in einer elektronischen
Umgebung störungsfrei zu funktionieren. Zwar wurde dieses Computersystem so konzipiert, dass es die von den
Aufsichtsbehörden vorgegebenen Grenzwerte für EMI erfüllt; dennoch kann nicht ausgeschlossen werden, dass bei bestimmten
Installationen nicht doch Störungen auftreten. Wenn dieses Gerät die Funkkommunikation durch Interferenzen beeinträchtigt,
was durch Ein- und Ausschalten des Gerätes festgestellt werden kann, wird der Benutzer aufgefordert, die Störungen durch eine
oder mehrere der folgenden Maßnahmen zu beheben:
• Richten Sie die Empfangsantenne neu aus.
• Ändern Sie die Position des Computers gegenüber dem Empfänger.
• Vergrößern Sie den Abstand zwischen Computer und Empfänger.
• Schließen Sie den Computer an eine andere Steckdose an, so dass Computer und Empfänger über verschiedene Stromkreise
versorgt werden.
Wenden Sie sich gegebenenfalls an einen Mitarbeiter des Dell Supports oder an einen erfahrenen Radio- und Fernsehtechniker.
Weitere Informationen zu den Betriebsbestimmungen finden Sie im Benutzerhandbuch, das im Lieferumfang des Computers
enthalten ist.
Dell™-Produkte werden für die elektromagnetische Umgebung, in der sie eingesetzt werden sollen, konzipiert, getestet und
klassifiziert. Diese elektromagnetischen Umgebungs-Klassifikationen beziehen sich im Allgemeinen auf die nachstehenden
abgestimmten Definitionen:
• Klasse A ist für gewerbliche und industrielle Umgebungen bestimmt. Produkte der Klasse B können auch in einer den
Bestimmungen der Klasse A genügenden Umgebung eingesetzt werden.
• Klasse B ist für Wohnbereiche bestimmt. Produkte der Klasse A sollten nicht in einer den Bestimmungen der Klasse B
genügenden Umgebung eingesetzt werden.
Alle zugehörigen Datenverarbeitungsgeräte (Information Technology Equipment, ITE), wie zum Beispiel Peripheriegeräte,
Erweiterungskarten, Drucker, Ein- und Ausgabegeräte, Bildschirme usw., die in das System integriert oder an das System
angeschlossen sind, sollten der EMI-Klassifikation des Computersystems entsprechen.
Hinweis zu abgeschirmten Signalkabeln: Verwenden Sie für den Anschluss von Peripheriegeräten an Dell-Geräte ausschließlich
abgeschirmte Kabel, um Störungen von Funkdiensten weitgehend auszuschließen. Durch abgeschirmte Kabel wird
sichergestellt, dass die entsprechende EMV-Klassifizierung für die vorgesehene Einsatzumgebung eingehalten wird. Ein Kabel
für Paralleldrucker erhalten Sie bei Dell. Sie können ein solches Kabel auch über die globale Website von Dell unter
www.dell.com bestellen.
Dell hat sich vergewissert, dass dieses Produkt den Bestimmungen von Klasse B entspricht. Die folgenden Abschnitte enthalten
länderspezifische Hinweise zu EMV/EMI oder zur Produktsicherheit.
Weitere Informationen zu Betriebsbestimmungen finden Sie unter „Regulatory Notices” auf Seite 21.

96 Anleitung zur Inbetriebnahme der Media Base

www.dell.com | support.dell.com
Dell™ Latitude™ Systems
Guida di installazione della base
per supporti multimediali
Modello PR09S

N.B., avvisi e attenzione
N.B. Un N.B. indica informazioni importanti che contribuiscono a migliorare l'utilizzo del computer.
AVVISO: Un AVVISO indica un danno potenziale all'hardware o perdita di dati e spiega come evitare il problema.
ATTENZIONE: Un messaggio di ATTENZIONE indica un rischio di danni materiali, lesioni personali o morte.
Abbreviazioni e acronimi
Per un elenco completo delle abbreviazioni e degli acronimi, consultare la
Guida dell’utente di Dell™ Latitude™
D420
(in funzione del sistema operativo, fare doppio clic sull’icona
Guida dell’utente
sul desktop o fare clic sul
pulsante
Start
,
→
Guida in linea e supporto tecnico
,
→
Guide dell'utente e di sistema,
→
Manuali dell’utente
e quindi fare clic su
Guida dell'utente di Dell Latitude
).
____________________
Le informazioni contenute in questo documento sono soggette a modifica senza preavviso.
© 2006 Dell Inc. Tutti i diritti riservati.
È severamente vietata la riproduzione, con qualsiasi strumento, senza l'autorizzazione scritta di Dell Inc.
Marchi commerciali utilizzati in questo testo: Dell e il logo DELL sono marchi della Dell Inc.; Microsoft e Windows sono marchi registrati
di Microsoft Corporation.
Altri marchi e nomi commerciali possono essere utilizzati in questo documento sia in riferimento alle aziende che rivendicano il marchio e i nomi
che ai prodotti stessi. Dell Inc. nega qualsiasi partecipazione di proprietà relativa a marchi e nomi commerciali diversi da quelli di sua proprietà.
Modello PR09S
Marzo 2006 P/N UT901 Rev. A00

Sommario 99
Sommario
ATTENZIONE: Istruzioni di sicurezza . . . . . . . . . . . . . . . . . . . . . 101
SICUREZZA: Sicurezza generale
. . . . . . . . . . . . . . . . . . . . . 101
SICUREZZA: Sicurezza dell'alimentazione
. . . . . . . . . . . . . . . . 102
Istruzioni sulla protezione del dispositivo
. . . . . . . . . . . . . . . . . . 102
Protezione dalle scariche elettrostatiche
. . . . . . . . . . . . . . . . 103
Informazioni sulla base per supporti multimediali
. . . . . . . . . . . . . . 104
Vista sinistra
. . . . . . . . . . . . . . . . . . . . . . . . . . . . . . . 104
Vista destra
. . . . . . . . . . . . . . . . . . . . . . . . . . . . . . . . 104
Vista posteriore
. . . . . . . . . . . . . . . . . . . . . . . . . . . . . . 105
Vista dall'alto
. . . . . . . . . . . . . . . . . . . . . . . . . . . . . . . 107
Installazione della base per supporti multimediali
. . . . . . . . . . . . . . 108
Fissaggio della base per supporti multimediali
. . . . . . . . . . . . . . . . 109
Inserimento del computer nell'alloggiamento
. . . . . . . . . . . . . . . . 110
Disinserimento dall'alloggiamento del computer
. . . . . . . . . . . . . . 111
Installazione dell'unità ottica
. . . . . . . . . . . . . . . . . . . . . . . . . 113
Rimozione dell'unità ottica
. . . . . . . . . . . . . . . . . . . . . . . . . . 114
Utilizzo di unità esterne
. . . . . . . . . . . . . . . . . . . . . . . . . . . . 114
Specifiche
. . . . . . . . . . . . . . . . . . . . . . . . . . . . . . . . . . . 115
Avvisi normativi
. . . . . . . . . . . . . . . . . . . . . . . . . . . . . . . . 117

100 Sommario

Guida di installazione della base per supporti multimediali 101
ATTENZIONE: Istruzioni di sicurezza
Per proteggere il vostro dispositivo (computer, replicatore di porte, base per supporti multimediali, alloggiamento di espansion
e e periferiche simili) e l'ambiente di lavoro da eventuali danni e per la sicurezza personale, attenersi alle istruzioni sulla sicurezza
riportate di seguito.
SICUREZZA: Sicurezza generale
Per la propria protezione, attenersi alle istruzioni sulla sicurezza riportate di seguito:
• Prima di iniziare a usare il dispositivo, posizionarlo su una superficie piana.
• Non cercare di effettuare riparazioni da soli, se non specificatamente indicato nella documentazione Dell™ o in altre
istruzioni ricevute da Dell. Seguire sempre attentamente le istruzioni di installazione e manutenzione.
• Per evitare potenziali rischi di scariche elettriche, non collegare o scollegare cavi, né eseguire operazioni di manutenzione
o riconfigurazione di questo prodotto durante un temporale. Non usare la base per supporti multimediali durante un
temporale, a meno che tutti i cavi siano stati scollegati e il computer sia alimentato esclusivamente a batteria.
• Se il dispositivo è dotato di modem integrato o opzionale (scheda PC), scollegare il cavo del modem al sopraggiungere
di temporali per evitare il rischio, sia pure remoto, di scariche elettriche causate da fulmini e trasmesse attraverso la linea
telefonica.
• Non inserire alcun oggetto nelle prese d'aria o in altre fessure del dispositivo. Ciò potrebbe causare un cortocircuito dei
componenti interni, con conseguenti incendi o scariche elettriche.
• Tenere il dispositivo lontano da termosifoni e fonti di calore e non ostruire le prese di raffreddamento. Non appoggiare
il dispositivo su pile di carta, non racchiuderlo tra pareti e non collocarlo sopra letti, divani o tappeti.
• Non utilizzare il dispositivo in un ambiente umido, ad esempio in prossimità di una vasca da bagno, di un lavandino o di una
piscina oppure in un seminterrato umido.
• Non versare cibo o liquidi sul computer.
• Prima di eseguire la pulizia del dispositivo, scollegarlo dalla presa elettrica. Pulire il dispositivo con un panno morbido
inumidito con acqua. Non usare detergenti spray o liquidi che potrebbero contenere sostanze infiammabili.
• Accertarsi che non vi siano oggetti appoggiati sopra il cavo di alimentazione dell'adattatore c.a. e che il cavo non sia
di intralcio o possa essere calpestato.
• Non conservare il computer in un ambiente con ridotta ventilazione, come una custodia o una valigetta chiusa, mentre
è acceso. Una ridotta ventilazione può provocare incendi o danneggiare il computer.
• Non usare il computer portatile appoggiando la base a contatto diretto con la pelle per periodi prolungati. La temperatura
superficiale della base aumenta durante il normale funzionamento, specialmente se il computer è alimentato a c.a.. Il
contatto prolungato con la pelle potrebbe causare fastidio o, in casi estremi, bruciature.
• Le schede PC possono diventare molto calde durante il normale funzionamento. In caso di funzionamento prolungato,
rimuovere le schede PC con cautela.
• Questo dispositivo può contenere unità per dischi ottici (Optical Disk Drive, ODD), CD-ROM, CDR/W, DVD, ecc., che
dispongono di unità laser integrate. Queste unità ottiche sono conformi ai requisiti di sicurezza e sono classificate come
"Prodotto laser di Classe 1" secondo lo standard US DHHS e lo standard per la sicurezza laser EN/IEC60825-1. Le unità
ottiche non contengono alcun componente che può essere regolato, riparato o sostituito dall'utente. Per impedire qualsiasi
rischio di esposizione ai raggi laser, non disattivare o aprire l'unità ottica per alcun motivo.
AVVERTENZA:
Il cavo di questo prodotto contiene piombo, un elemento chimico noto nello Stato della California per provocare
difetti congeniti a nascituri o altri problemi legati alla riproduzione.
Lavarsi le mani dopo avere toccato il cavo.

102 Guida di installazione della base per supporti multimediali
SICUREZZA: Sicurezza dell'alimentazione
• Se questo prodotto viene fornito con un cavo di alimentazione tripolare, accertarsi di inserirlo in una presa dotata di messa
a terra per evitare scariche elettriche. Non usare adattatori per spine né rimuovere il polo di messa a terra dalla spina del cavo
di alimentazione. Se si utilizza un cavo di prolunga, utilizzarne uno di tipo appropriato, il cui connettore abbia le stesse
caratteristiche di quello del cavo di alimentazione dell'adattatore.
• Se si usa un cavo di alimentazione di prolunga unitamente all'adattatore c.a., accertarsi che l'assorbimento totale di corrente
dei dispositivi collegati non superi la portata di corrente nominale del cavo di prolunga.
• Usare esclusivamente l'adattatore c.a. fornito da Dell e approvato per l'uso con questo periferico. L'uso di un adattatore
c.a. diverso potrebbe provocare incendi o esplosioni. Consultare la Guida dell'utente o il Manuale dell'utente per la
classificazione elettrica dell'adattatore c.a.
• Se si sta usando una ciabatta per presa multipla, fare attenzione mentre si inserisce il cavo di alimentazione dell'adattatore
c.a. nella ciabatta. Alcune ciabatte potrebbero non consentire l'inserimento corretto della spina del cavo di alimentazione,
con conseguenti possibili danni permanenti al dispositivo e rischio di scariche elettriche e/o incendi. Accertarsi che il polo
di messa a terra della spina sia inserito nel corrispondente foro di contatto di messa a terra della ciabatta.
• Prima di collegare il dispositivo a una presa elettrica, controllare il valore della tensione dell'adattatore c.a. per accertarsi che
la tensione e la frequenza richieste corrispondano a quelle della rete.
• Per scollegare il computer dalla rete elettrica, spegnerlo, scollegare l'adattatore c.a. dalla presa elettrica e rimuovere le eventuali
batterie installate nell'apposito alloggiamento o nell'alloggiamento per moduli.
• Quando si usa l'adattatore c.a. per alimentare il computer o caricare la batteria, posizionarlo in una zona ventilata, ad esempio
sul piano di una scrivania o sul pavimento. Non coprire l'adattatore c.a. con fogli o altri oggetti che potrebbero limitarne il
raffreddamento. Non usare inoltre l'adattatore c.a. lasciandolo all'interno della custodia per il trasporto.
• L'alimentatore c.a. potrebbe surriscaldarsi durante il normale funzionamento del computer. Prestare la massima attenzione
nel maneggiare l'adattatore durante e immediatamente dopo il funzionamento.
• Norvegia e Svezia: collegare il cavo di alimentazione soltanto a una presa dotata di messa a terra.
• Solo Giappone: con l'adattatore c.a. usare soltanto il cavo di alimentazione c.a. fornito da Dell. L'uso di altri cavi di
alimentazione potrebbe danneggiare la periferica o l'adattatore c.a. o manifestare rischi di incendio o scosse elettriche.
Istruzioni sulla protezione del dispositivo
Attenersi alle seguenti istruzioni di sicurezza per prevenire danni al dispositivo:
AVVISO: Quando il computer passa da condizioni di bassa temperatura a un ambiente più caldo o da condizioni di temperatura
elevata a un ambiente più freddo, attendere che il computer raggiunga la temperatura ambiente e l'evaporazione della condensa
eventualmente formatasi prima di accenderlo per evitare di danneggiare il computer.
• Proteggere il dispositivo dagli agenti ambientali, quali sporco, polvere, alimenti, liquidi, temperature eccessivamente basse
o elevate e dall'esposizione diretta ai raggi solari.
• Non collocare il dispositivo in ambienti particolarmente umidi o estremamente caldi o freddi per garantire che il computer
venga utilizzato nel rispetto dell'intervallo di funzionamento consigliato.
• Lasciare uno spazio di almeno 10,2 cm su tutti i lati del dispositivo per consentire un'adeguata ventilazione.
• Non ridurre il flusso d'aria verso il dispositivo bloccando le prese d'aria o i fori di ventilazione.
ATTENZIONE: Quando si prepara l'adattatore c.a. per il trasporto, avvolgere entrambi i cavi intorno all'adattatore nella stessa
direzione, come mostrato nella figura seguente. Un avvolgimento in una direzione non corretta può provocare danni ai cavi non coperti
dalla garanzia dell'adattatore. Non utilizzare mai un adattatore c.a. che mostra segni di danni o eccessiva usura.

Guida di installazione della base per supporti multimediali 103
Protezione dalle scariche elettrostatiche
Le scariche elettrostatiche (ESD) possono danneggiare i componenti elettronici all'interno del computer. In alcune condizioni,
le scariche elettrostatiche possono accumularsi nel corpo dell'utente o in un oggetto, come una periferica, e quindi scaricarsi su un
altro oggetto, come il computer. Per evitare danni da scariche elettrostatiche, scaricare l'elettricità statica dal corpo prima di toccare
qualsiasi componente elettronico interno del computer, ad esempio un modulo di memoria. È possibile evitare scariche elettrostatiche
toccando un oggetto metallico messo a massa (come una superficie metallica non verniciata del pannello di I/O del computer) prima
di toccare qualsiasi componente elettronico. Quando si collega una periferica (compreso un computer palmare) al proprio computer,
è sempre consigliabile scaricare l'elettricità statica dal proprio corpo e mettere a mettere a massa la periferica, prima di collegarla al
computer. Inoltre, mentre si lavora sui componenti interni al computer, toccare di tanto in tanto un connettore di I/O per scaricare
qualsiasi carica elettrostatica eventualmente accumulata dal proprio corpo.
Per evitare danni causati dalle scariche elettrostatiche è anche possibile adottare le seguenti precauzioni:
• Quando si estrae dalla confezione un componente sensibile all'elettricità statica, non rimuoverlo dall'involucro antistatico fino al
momento dell'installazione. Prima di aprire l'involucro antistatico, accertarsi di avere scaricato l'elettricità statica dal corpo.
• Prima di trasportare un componente sensibile all'elettricità statica, riporlo in un contenitore o involucro antistatico.
• Maneggiare tutti i componenti sensibili alle cariche elettrostatiche in una zona protetta dall'elettricità statica. Se possibile,
usare tappeti per il pavimento e coperture della console antistatici.

104 Guida di installazione della base per supporti multimediali
Informazioni sulla base per supporti multimediali
Vista sinistra
LEVA DI SBLOCCAGGIO DEL COMPUTER — Sblocca il computer dalla base per supporti multimediali, se non
è collegata tramite il dispositivo antifurto.
PORTA USB — Porta compatibile con USB 2.0 che permette di collegare periferiche USB come stampanti,
fotocamere, ecc.
CONNETTORE AUDIO — Permette di collegare cuffie e altoparlanti.
PULSANTE DI DISINSERIMENTO — Permette di disinserire il computer quando è in funzionamento.
Vista destra
UNITÀ OTTICA — Permette di utilizzare supporti di tipo CD e DVD.
PORTA USB — Porta compatibile con USB 2.0 che permette di collegare periferiche USB come stampanti,
fotocamere, ecc.
1 leva di sbloccaggio del
computer
2 porta USB 3 connettore audio
4 pulsante di disinserimento
1 unità ottica 2 porta USB
1 2 3 4
1 2

Guida di installazione della base per supporti multimediali 105
Vista posteriore
1 porta USB 2 porta di rete 3 porta seriale
4 porta parallela 5 connettore DVI 6 porta video VGA
7 porta USB alimentata 8 porta dell'adattatore c.a. 9 slot di sicurezza
Porta Descrizione
PORTA DI RETE — Collega la base per supporti multimediali
a una rete. I due indicatori accanto alla porta indicano lo stato
del collegamento e l'attività di una connessione di rete fissa.
Per informazioni sull'uso dell'adattatore di rete, consultare
la documentazione fornita con il computer.
AVVISO Non collegare la linea telefonica alla porta di rete.
PORTE USB 2.0 — Consentono di collegare fino a quattro
periferiche compatibili con USB-2.0; è compresa una porta USB
alimentata.
PORTA PARALLELA — Consente di collegare una periferica
parallela, come una stampante parallela.
PORTA VIDEO — Consente di collegare un monitor VGA
esterno.
N.B. Quando il computer è inserito nell'alloggiamento di
espansione, utilizzare la porta video della base per supporti
multimediali.
PORTA SERIALE — Consente di collegare una periferica seriale,
come un mouse seriale o un palmare.
1 2 3 4 5 6 87 9

106 Guida di installazione della base per supporti multimediali
SLOT PER CAVO DI SICUREZZA — Consente di collegare alla base per supporti multimediali un dispositivo antifurto
(reperibile in commercio). Le istruzioni per l'installazione dei dispositivi antifurto sono generalmente fornite
unitamente al dispositivo. Per ulteriori informazioni, consultare "Fissaggio della base per supporti multimediali"
a pagina 109.
CONNETTORE CUFFIE/ALTOPARLANTE — Consente di collegare
cuffie o altoparlanti. Il connettore è di tipo stereo.
PORTA DELL'ADATTATORE C.A.—Consente di collegare un
adattatore c.a. alla base per supporti multimediali e alla presa
di rete c.a. per convertire l'alimentazione c.a. nell'alimentazione c.c.
richiesta dalla base per supporti multimediali. È possibile collegare
l'adattatore c.a. quando la base per supporti multimediali è accesa
o spenta. Per ulteriori informazioni, consultare "Installazione della
base per supporti multimediali" a pagina 108.
ATTENZIONE: Se si sta usando una ciabatta per presa
multipla, fare attenzione mentre si collega il cavo di
alimentazione dell'adattatore c.a. alla ciabatta. Alcune
ciabatte potrebbero non consentire l'inserimento corretto del
connettore, con conseguenti possibili danni permanenti alla
base per supporti multimediali e rischio di scariche
elettriche e/o incendi. Accertarsi che il polo di messa a terra
della spina sia inserito nel corrispondente foro di contatto di
messa a terra della ciabatta.
AVVISO: Quando si scollega l'adattatore c.a. dalla base per
supporti multimediali, fare presa sul connettore (non sul
cavo) e tirare con decisione ma delicatamente, per non
danneggiarlo.
Porta Descrizione

Guida di installazione della base per supporti multimediali 107
Vista dall'alto
1 connettore di inserimento
1

108 Guida di installazione della base per supporti multimediali
Installazione della base per supporti multimediali
ATTENZIONE: L'adattatore c.a. è compatibile con le prese elettriche di qualsiasi paese. I connettori per
l'alimentazione e le ciabatte variano invece da paese a paese. L'uso di un cavo incompatibile o non
correttamente collegato alla ciabatta o alla presa elettrica potrebbe provocare incendi o il danneggiamento
dell'apparecchiatura.
AVVISO: Utilizzare sempre l'adattatore c.a. di Dell fornito con la base per supporti multimediali. Se si utilizza un
altro adattatore c.a. disponibile sul mercato o un adattatore di modelli precedenti di computer Dell, è possibile
danneggiare la base per supporti multimediali o il computer.
AVVISO: Quando si scollega il cavo dell'adattatore c.a. Dell dal computer o dalla base per supporti multimediali,
fare presa sul connettore (non sul cavo) e tirare con decisione ma delicatamente, per non danneggiarlo. Quando
si avvolge il cavo dell'adattatore c.a., accertarsi di seguire la forma del connettore sull'adattatore c.a. per non
danneggiare il cavo.
1
Collegare il cavo dell'adattatore c.a. alla porta dell'adattatore c.a. e a una presa elettrica.
2
Prima di inserire il computer per la prima volta, completare l'installazione del sistema operativo.
Per verificare che il sistema operativo sia stato installato correttamente:
a
accertarsi che il computer non sia collegato alla base per supporti multimediali (inserito).
b
accendere il computer.
c
verificare che venga visualizzato il desktop di Microsoft
®
Windows
®
.
d
arrestare il computer tramite il menu
Start
di Windows.

Guida di installazione della base per supporti multimediali 109
Fissaggio della base per supporti multimediali
N.B. se il computer è inserito nella base per supporti multimediali e se allo slot per cavo di sicurezza della base per
supporti multimediali è collegato un dispositivo antifurto, non è possibile disinserire il computer senza avere
rimosso il dispositivo antifurto.
1
Fissare un dispositivo antifurto reperibile in commercio allo slot per cavo di sicurezza sulla base per
supporti multimediali.
In genere, i dispositivi antifurto sono dotati di un tratto di cavo metallico a cui è collegato un lucchetto
con chiave. Per istruzioni sull'installazione di questo tipo di dispositivo antifurto, consultare la
documentazione fornita con il dispositivo stesso.

110 Guida di installazione della base per supporti multimediali
Inserimento del computer nell'alloggiamento
N.B. Se si sta inserendo il computer per la prima volta e non sono state completate le operazioni descritte in
"Installazione della base per supporti multimediali" a pagina 108, eseguirle prima di passare alla fase successiva.
N.B. Dopo avere inserito il computer per la prima volta, la batteria o l'adattatore a.c. del computer può alimentare
la base per supporti multimediali se quest'ultima non è collegata a un adattatore c.a.
N.B. La prima volta che si inserisce il computer, è necessario che sia spento.
1
Allineare la parte posteriore del computer con la parte posteriore della base per supporti multimediali
mantenendo il computer inclinato di circa 30 gradi e abbassare la parte anteriore del computer sulla
base per supporti multimediali
.
2
Premere delicatamente il computer sulla
base per supporti multimediali
fino a quando non si blocca in
posizione con un clic.
3
Accendere il computer.
Il sistema operativo riconosce la
base per supporti multimediali
.
1 computer 2 base per supporti
multimediali
2
1

Guida di installazione della base per supporti multimediali 111
Disinserimento dall'alloggiamento del computer
1
Prima di disinserire il computer, salvare e chiudere i file aperti e uscire da tutte le applicazioni in
esecuzione.
2
Configurare le impostazioni del risparmio energia in modo tale che il computer non attivi le modalità
di standby o di sospensione quando si chiude (si abbassa) lo schermo:
Windows
XP
a
Fare clic sul pulsante
Start
e quindi su
Pannello di controllo
.
b
In
Scegliere una categoria
, fare clic su
Prestazioni e manutenzione
.
c
In
Scegliere un'icona del Pannello di controllo
, fare clic su
Opzioni risparmio energia
e quindi
sulla scheda
Avanzate
.
d
Nel menu a discesa
Se viene chiuso il coperchio del computer
, selezionare
Non intervenire.
AVVISO: Non disinserire mai il computer senza prima prepararlo per l'operazione di disinserimento. Se si
disinserisce il computer senza prepararlo, i dati verranno persi e il computer potrebbe non riprendere il
funzionamento normale per alcuni minuti o definitivamente.
AVVISO: Se il computer non dispone di una batteria carica nell'alloggiamento, è necessario spegnere il computer
prima di disinserirlo. Se si disinserisce il computer senza una batteria prima di spegnerlo, i dati verranno persi
e il computer potrebbe non riprendere il funzionamento normale per alcuni minuti o definitivamente.
3
Se il computer non dispone di una batteria carica nell'alloggiamento, spegnere il computer con il menu
Start
di Windows.
4
Se il computer dispone di una batteria carica nell'alloggiamento, preparare il computer per
il disinserimento eseguendo una delle seguenti operazioni:
• Fare clic sul pulsante
Start
e quindi su
Disinserisci PC
.
OPPURE
• Premere il pulsante di disinserimento sul lato di sinistra della
base per supporti multimediali
per
1 secondo (vedere "Vista sinistra" a pagina 104). Gli indicatori sulla
base per supporti multimediali
si spengono e un messaggio
Disinserimento dall'alloggiamento di espansione completato
conferma
che è ora possibile disinserire il computer.
5
Se la base per supporti multimediali è fissata al computer con il cavo di sicurezza, rimuovere il cavo.
6
Tirare in avanti la leva di sbloccaggio (vedere "Vista sinistra" a pagina 104) per liberare il computer.

112 Guida di installazione della base per supporti multimediali
7
Sollevare la parte posteriore del computer ed estrarlo facendolo scorrere verso la parte posteriore della
base per supporti multimediali
.

Guida di installazione della base per supporti multimediali 113
Installazione dell'unità ottica
1
Salvare e chiudere i file aperti e i programmi in esecuzione; quindi spegnere il computer.
2
Inserire l
'
unità ottica nell'alloggiamento sulla base per supporti multimediali. (Vedere "Vista destra"
a pagina 104.)
3
Inserire la vite di protezione che blocca l
'
unità ottica in posizione.
4
Accendere il computer.
Il sistema operativo riconosce la nuova unità.

114 Guida di installazione della base per supporti multimediali
Rimozione dell'unità ottica
1
Salvare e chiudere i file aperti e i programmi in esecuzione; quindi spegnere il computer.
2
Rimuovere la vite di protezione che blocca l'unità ottica e usare il cacciavite per estrarre l'unità
dall'alloggiamento. Vedere "Vista destra" a pagina 104.
Utilizzo di unità esterne
È possibile utilizzare unità esterne come un'unità CD, CD-RW o DVD/CD-RW collegando il cavo USB
dell'unità alla porta USB alimentata sulla base per supporti multimediali. (Vedere "Vista posteriore"
a pagina 105).
È possibile aggiungere o rimuovere unità esterne sia con il computer in funzione che spento. Per rimuovere
o scambiare un'unità mentre il computer è in funzione, fare doppio clic sull'icona Scollegamento
o rimozione di una periferica hardware nella barra delle applicazioni di Windows e fare clic sull'unità
che si desidera espellere. Quindi scollegare l'unità dalla base per supporti multimediali.
AVVISO: Per evitare danni alle unità esterne quando non sono collegate al computer riporle in un luogo sicuro
e asciutto. Non esercitare forza o appoggiare oggetti pesanti sulle periferiche.

Guida di installazione della base per supporti multimediali 115
Specifiche
Caratteristiche fisiche
Altezza 12,8 mm
Larghezza 292 mm
Profondità 207 mm
Peso (senza unità nell'alloggiamento) 0,61 kg
Adattatore c.a.
Tensione di ingresso 100–240 V c.a.
Corrente di ingresso (massima) 1,5 A
Frequenza di ingresso 50–60 Hz
Corrente di uscita (massima) 3,34 A (adattatore c.a. da 65-W)
4,62 A (adattatore c.a. da 90-W)
Alimentazione di uscita 65 W
90 W
Tensione nominale di uscita 19,5 V c.c.
Dimensioni e peso
(adattatore c. a. da 65-W):
Altezza
28,3 mm
Larghezza
57,8 mm
Profondità
137,2 mm
Peso (con i cavi) 0,36 kg
Dimensioni e peso
(adattatore c. a. da 90-W):
Altezza
34,2 mm
Larghezza
60,9 mm
Profondità
153,42 mm
Peso (con i cavi) 0,46 kg
Intervallo della temperatura:
di funzionamento
da 0 °C a 35 °C
di magazzino
da –40 °C a 60 °C

116 Guida di installazione della base per supporti multimediali
Porte e connettori
Porta di rete porta RJ-45 per Ethernet Bus Master
10/100/1000 Mbit/secondo Base TX
USB tre porte a 4 piedini conformi a USB -2.0
USB alimentata una porta a 9 piedini conforme a USB -2.0
Parallela porta a 25 piedini femmina unidirezionale,
bidirezionale o ECP
Video porta a 15 piedini femmina
Connettore DVI connettore a 24 piedini femmina
Seriale porta a 9 piedini, UART compatibile 16550C
con buffer di 16 byte
Audio miniconnettore per cuffia/altoparlante (uscita)
Connettore di inserimento connettore a 280 piedini

Guida di installazione della base per supporti multimediali 117
Avvisi normativi
Il termine interferenza elettromagnetica (IEM) si riferisce a un qualsiasi segnale o emissione, irradiato nello spazio o trasmesso
tramite cavi di alimentazione o di segnale, che può compromettere il funzionamento di dispositivi di navigazione radio o servizi di
sicurezza di altro tipo, o che in modo significativo disturba, attenua o interrompe ripetutamente un servizio di radiocomunicazione
a norma di legge. I servizi di radiocomunicazione comprendono, a titolo esemplificativo e non limitativo, trasmissioni commerciali
AM/FM, televisione, servizi cellulari, radar, controllo del traffico aereo, cercapersone e servizi personali di comunicazione (PCS).
Tali servizi a norma di legge, unitamente alle emissioni involontarie provenienti da dispositivi digitali quali i computer,
contribuiscono alla formazione dell'ambiente elettromagnetico.
La compatibilità elettromagnetica (CEM) è la capacità dei dispositivi elettronici di operare contemporaneamente in modo corretto
nell'ambiente elettromagnetico. Nonostante questo computer sia stato progettato per rispettare i limiti IEM previsti dall'autorità
normativa e tale compatibilità sia stata verificata, non vi è alcuna garanzia che non si verifichino interferenze in una particolare
situazione. Qualora la presente apparecchiatura provocasse interferenze con servizi di radiocomunicazione, verificabili accendendo
e spegnendo l'apparecchiatura, si consiglia di cercare di rimediare all'inconveniente mediante una o più delle seguenti misure.
• Orientare diversamente l’antenna di ricezione.
• Cambiare la posizione del computer rispetto all'apparecchio ricevente.
• Allontanare il computer dall'apparecchio ricevente.
• Collegare il computer ad una presa di corrente diversa, in modo che il computer e l'apparecchio ricevente si trovino su
diverse sezioni del circuito elettrico.
Se necessario, per ottenere ulteriori consigli, consultare un rappresentante dell'assistenza tecnica Dell o un tecnico radio/TV
specializzato.
Per ulteriori informazioni sulle normative, consultare il manuale dell’utente o la guida dell’utente del proprio computer.
I prodotti Dell™ sono progettati, collaudati e classificati per l'ambiente elettromagnetico di utilizzo. Le classificazioni
dell'ambiente elettromagnetico si riferiscono in genere alle seguenti definizioni armonizzate:
• la Classe A corrisponde generalmente ad ambienti commerciali o industriali i prodotti di Classe B possono essere utilizzati
anche in un ambiente di Classe A.
• la Classe B corrisponde generalmente ad ambienti residenziali. i prodotti di Class A non devono essere utilizzati in un
ambiente di Classe B.
Le apparecchiature informatiche (ITE), comprese le periferiche, le schede di espansione, le stampanti, le periferiche di
input/output, i monitor, ecc., che sono integrate o collegate al computer devono appartenere alla stessa classe elettromagnetica del
computer.
Avviso sui cavi di trasmissione schermati: per ridurre la possibilità di interferenze con servizi di radiocomunicazione, usare
esclusivamente cavi schermati per collegare periferiche a qualsiasi dispositivo Dell. L'impiego di cavi schermati garantisce la
conformità con la classe di compatibilità elettromagnetica prevista per l'ambiente di utilizzo. Dell fornisce un apposito cavo per
stampanti parallele. È anche possibile ordinare il cavo presso Dell tramite Internet, all'indirizzo www.dell.com.
Dell ha verificato che questo è un prodotto di Classe B. Le sezioni seguenti forniscono informazioni CEM/IEM o sulla sicurezza del
prodotto relative a un Paese.
Per ulteriori avvisi sulle normative, vedere "Regulatory Notices" a pagina 21.

118 Guida di installazione della base per supporti multimediali

www.dell.com | support.dell.com
Dell™ Latitude™ Systems
Guía de configuración de la
base para medios
Modelo PP09S

Notas, avisos y precauciones
NOTA: Una NOTA proporciona información importante que le ayuda a utilizar su equipo de la mejor manera posible.
AVISO: Un AVISO indica la posibilidad de daños al hardware o pérdida de datos y le explica cómo evitar el problema.
PRECAUCIÓN: Una PRECAUCIÓN indica un posible daño material, lesión corporal o muerte.
Abreviaturas y acrónimos
Para obtener una lista completa de abreviaturas y acrónimos, consulte la
Guía del usuario de Dell™ Latitude™
D420
(dependiendo de su sistema operativo, haga doble clic en el icono
Guía del usuario
del escritorio, o haga
clic en el botón
Inicio
→
Ayuda y soporte técnico
→
Guías del usuario y del sistema
→
Guías del usuario
y,
a continuación, haga clic en
Guía del usuario de Dell Latitude
).
____________________
La información contenida en este documento puede modificarse sin previo aviso.
© 2006 Dell Inc. Todos los derechos reservados.
Queda estrictamente prohibido realizar cualquier tipo de reproducción sin el consentimiento por escrito de Dell Inc.
Marcas comerciales utilizadas en este texto: Dell y el logo de DELL son marcas comerciales de Dell Inc.; Microsoft y Windows son marcas
comerciales registradas de Microsoft Corporation.
Este documento puede incluir otras marcas comerciales y nombres comerciales para referirse a las entidades que son propietarias de los mismos
o a sus productos. Dell Inc. renuncia a cualquier interés sobre la propiedad de marcas y nombres comerciales que no sean los suyos.
Modelo PP09S
Marzo 2006 P/N UT901 Rev. A00

Contenido 121
Contenido
PRECAUCIÓN: Instrucciones de seguridad . . . . . . . . . . . . . . . . . . 123
SEGURIDAD: Seguridad general
. . . . . . . . . . . . . . . . . . . . . 123
SEGURIDAD: Seguridad de la alimentación eléctrica
. . . . . . . . . . 124
Instrucciones para la protección del equipo
. . . . . . . . . . . . . . . . . 124
Protección contra descargas electrostáticas
. . . . . . . . . . . . . . 125
Acerca de la base para medios
. . . . . . . . . . . . . . . . . . . . . . . . 126
Vista izquierda
. . . . . . . . . . . . . . . . . . . . . . . . . . . . . . 126
Vista derecha
. . . . . . . . . . . . . . . . . . . . . . . . . . . . . . . 126
Vista posterior
. . . . . . . . . . . . . . . . . . . . . . . . . . . . . . . 127
Vista superior
. . . . . . . . . . . . . . . . . . . . . . . . . . . . . . . 129
Configuración de la base para medios
. . . . . . . . . . . . . . . . . . . . 130
Fijación de la base para medios
. . . . . . . . . . . . . . . . . . . . . . . . 131
Acoplamiento del equipo
. . . . . . . . . . . . . . . . . . . . . . . . . . . 132
Desacoplamiento del equipo
. . . . . . . . . . . . . . . . . . . . . . . . . 133
Instalación de la unidad óptica
. . . . . . . . . . . . . . . . . . . . . . . . 135
Extracción de la unidad óptica
. . . . . . . . . . . . . . . . . . . . . . . . 136
Uso de unidades externas
. . . . . . . . . . . . . . . . . . . . . . . . . . . 136
Especificaciones
. . . . . . . . . . . . . . . . . . . . . . . . . . . . . . . . 137
Información reglamentaria
. . . . . . . . . . . . . . . . . . . . . . . . . . 139

122 Contenido

Guía de configuración de la base para medios 123
PRECAUCIÓN: Instrucciones de seguridad
Aplique las siguientes pautas de seguridad para garantizar su seguridad personal y proteger el equipo (ordenador, replicador de puertos,
base para medios, estación de acoplamiento y otros dispositivos similares), así como el entorno de trabajo frente a posibles daños.
SEGURIDAD: Seguridad general
Respete las siguientes indicaciones de manipulación para garantizar su seguridad personal:
• Cuando prepare el equipo para trabajar, colóquelo en una superficie plana.
• No trate de llevar a cabo reparaciones usted mismo, a no ser que así se especifique en la documentación de Dell™ o en otras
instrucciones que éste le facilite. Siga siempre las instrucciones de instalación y reparación tal y como se indica.
• Para evitar el peligro potencial de una descarga eléctrica, no conecte o desconecte ningún cable ni lleve a cabo ningún proceso
de mantenimiento o reconfiguración de este producto durante una tormenta eléctrica. No utilice la base para medios durante
una tormenta con aparato eléctrico a menos que previamente se hayan desconectado todos los cables y el equipo funcione
con la alimentación proporcionada por la batería.
• Si el equipo incluye un módem integrado u opcional (tarjeta PC), desconecte el cable del módem cuando se aproxime una
tormenta con aparato eléctrico para evitar el riesgo potencial de descarga eléctrica producida por un rayo a través de la línea
telefónica.
• No introduzca ningún objeto en las aberturas o rejillas de ventilación del equipo. Si lo hace, podría ocasionar un incendio
o una descarga eléctrica producidos por un cortocircuito en los componentes internos.
• Mantenga alejado el equipo de los radiadores u otras fuentes de calor. Asimismo, no bloquee las rejillas de ventilación. Evite
poner papeles bajo el equipo; no lo coloque en una unidad empotrada en la pared ni sobre una cama, un sofá o una alfombra.
• No utilice el equipo en un entorno húmedo, por ejemplo, cerca de una bañera, un lavabo, un fregadero, una piscina o en un
sótano con humedad.
• No derrame comida o líquido sobre el equipo.
• Antes de limpiar el equipo, desconéctelo de la toma de corriente. Limpie el equipo con un paño suave humedecido con agua.
No utilice limpiadores en aerosol o líquidos, que podrían contener sustancias inflamables.
• Asegúrese de que no haya nada sobre el cable de alimentación del adaptador de CA y de que éste no esté en un sitio donde se
pueda pisar o sea fácil tropezar con él.
• Mientras el equipo esté encendido, no lo guarde en un entorno con flujo de aire limitado, como por ejemplo, un maletín de
transporte o un maletín cerrado. La circulación restringida de aire podría dañar el equipo o provocar un incendio.
• No utilice el equipo portátil con la base en contacto directo con la piel durante periodos prolongados de tiempo. La
temperatura de la superficie de la base aumentará durante el funcionamiento normal (sobre todo si se utiliza alimentación
de CA). El contacto continuado con la piel puede provocar malestar o incluso quemaduras.
• Las tarjetas PC pueden calentarse mucho durante el funcionamiento normal. Tenga cuidado al extraer las tarjetas PC
después de un funcionamiento prolongado.
• Este dispositivo puede contener unidades de disco ópticas (ODD), CD-ROM, CDR/W, DVD, etc., que tienen dispositivos
láser integrados. Estas unidades ópticas cumplen con los requisitos de seguridad y están clasificadas como “Productos láser
de clase 1”, según la norma DHHS de EE.UU. y la norma de seguridad para dispositivos láser EN/IEC60825-1. Estas
unidades ópticas no contienen piezas que pueda ajustar, revisar o sustituir el usuario. Para evitar riesgos de exposición a la
radiación láser, en ningún caso desmonte o abra la unidad óptica.
ADVERTENCIA:
El cable de este producto contiene plomo, un producto químico que, en el Estado de California, se ha probado
que puede ser perjudicial durante el embarazo.
Lávese las manos después de manipularlo
.

124 Guía de configuración de la base para medios
SEGURIDAD: Seguridad de la alimentación eléctrica
• Si el producto se entrega con un cable de alimentación de 3 clavijas, asegúrese de enchufarlo en una toma de corriente con
toma a tierra para evitar posibles descargas eléctricas. No utilice adaptadores ni retire la clavija de toma a tierra del enchufe
de la toma de alimentación. Si utiliza un alargador, use el tipo apropiado para que coincida con el enchufe del cable de
alimentación del adaptador.
• Si utiliza un alargador con el adaptador de CA, compruebe que el valor nominal en amperios de los productos enchufados al
alargador no sobrepase el valor nominal en amperios de éste.
• Utilice únicamente el adaptador de CA proporcionado por Dell que se ha aprobado para su uso con este equipo. El uso de
otro tipo de adaptador de CA puede implicar un riesgo de incendio o explosión. Consulte la guía del usuario o el manual del
propietario para comprobar los valores nominales eléctricos del adaptador de CA.
• Si utiliza una regleta de enchufes, proceda con precaución a conectar el cable de alimentación de CA del adaptador a la
regleta. En algunas regletas es posible introducir incorrectamente el enchufe. La introducción incorrecta del enchufe puede
provocar daños irreparables en el equipo, además del riesgo de descarga eléctrica o incendio. Asegúrese de que la clavija de
toma a tierra del enchufe de alimentación está insertada en la conexión de toma a tierra de la regleta.
• Antes de conectar el equipo a una toma de corriente, asegúrese de que el valor nominal de tensión y la frecuencia del
adaptador de CA coinciden con los de la fuente de alimentación disponible.
• Para interrumpir la alimentación del equipo, apáguelo, desconecte el adaptador de CA de la toma de corriente eléctrica
y extraiga la batería del compartimento de la batería o del compartimento para módulos.
• Cuando utilice el adaptador de CA para suministrar alimentación al equipo o para cargar la batería, sitúelo en un área
ventilada, como un escritorio o en el suelo. No cubra el adaptador de CA con papeles u otros objetos que reduzcan la
ventilación; no utilice el adaptador de CA dentro de un maletín.
• Es posible que el adaptador de CA se caliente durante el funcionamiento normal del equipo. Tenga cuidado al manipular el
adaptador mientras utiliza el equipo o inmediatamente después de utilizarlo.
• Noruega y Suecia: Conecte el cable de alimentación solo a un enchufe con toma a tierra.
• Solo Japón: Con el adaptador de CA, utilice solamente el cable de alimentación de CA entregado por Dell. El uso de
cualquier otro cable puede dañar el equipo o el adaptador de CA o incluso entrañar riesgo de incendio o descarga eléctrica.
Instrucciones para la protección del equipo
Observe las pautas de seguridad siguientes para evitar daños en el equipo:
AVISO: Cuando traslade el equipo de un sitio donde la temperatura sea baja a un entorno más cálido o de un sitio donde la
temperatura sea muy alta a un entorno más frío, espere a que el equipo se adapte a la temperatura ambiente y que se evapore
cualquier condensación que se haya podido formar antes de encenderlo con objeto de evitar posibles daños.
• Proteja el equipo de los factores medioambientales como la suciedad, el polvo, la comida, los líquidos, las temperaturas
extremas y las sobreexposiciones a la luz solar.
• Mantenga el equipo alejado de la humedad directa o excesiva y de las temperaturas extremadamente frías o calientes para
asegurar que se utiliza dentro de los márgenes de funcionamiento especificados.
• Deje un espacio libre mínimo de 10,2 cm (4 pulgadas) alrededor del equipo con el fin de permitir que fluya el aire necesario
para una correcta ventilación.
• No impida el flujo de aire en el dispositivo bloqueando las aberturas o entradas de aire.
PRECAUCIÓN: Cuando prepare el adaptador de CA para un viaje, enrolle los dos cables alrededor del adaptador en la
dirección que se muestra en la siguiente imagen. De no hacerlo así, se pueden ocasionar daños en los cables que no cubre la
garantía del adaptador. No utilice nunca un adaptador de CA que presente señales de daños o un uso excesivo.

Guía de configuración de la base para medios 125
Protección contra descargas electrostáticas
Las descargas electrostáticas (ESD [Electrostatic Discharge]) pueden dañar los componentes electrónicos del interior del equipo. En
determinadas condiciones, se pueden acumular cargas electrostáticas en el propio cuerpo o en algún objeto, como un periférico,
para después descargarse en otro objeto, como el equipo. Para prevenir daños producidos por la electricidad estática, descárguese de
la electricidad estática antes de tocar algún componente electrónico del equipo, como por ejemplo un módulo de memoria. Se
puede proteger contra las descargas tocando un objeto metálico con masa (como una superficie metálica sin pintar del panel de E/S
del equipo) antes de manipular ningún componente electrónico. Al conectar un periférico (incluyendo equipos digitales de mano)
al ordenador, debería descargar siempre tanto su propia estática como la del periférico antes de conectarlo al equipo. Además,
mientras esté trabajando en el interior del equipo, toque periódicamente un conector de E/S para eliminar la carga estática que haya
podido acumular el cuerpo.
Asimismo, puede realizar lo siguiente para prevenir los posibles daños por descargas electrostáticas:
• Cuando esté desempaquetando un componente sensible a la (electricidad) estática, no retire el componente del material de
embalaje antiestático hasta que no considere que está preparado para instalar el componente. Justo antes de abrir el
embalaje antiestático, asegúrese de descargar la electricidad estática de su cuerpo.
• Cuando transporte un componente sensible a la electricidad estática, colóquelo en un contenedor o embalaje antiestático.
• Maneje todos los componentes sensibles a la electricidad estática en un área protegida contra ésta. Si es posible, utilice
tapetes antiestáticos sobre el piso y sobre la mesa.

126 Guía de configuración de la base para medios
Acerca de la base para medios
Vista izquierda
PALANCA DE LIBERACIÓN DEL EQUIPO: Libera el equipo de la base para medios si ésta no está sujeta mediante un
dispositivo antirrobo.
C
ONECTOR USB: El conector compatible USB 2.0 le permite conectar dispositivos USB como impresoras, cámaras, etc.
CONECTOR DE AUDIO: Le permite conectar auriculares y altavoces.
BOTÓN DE DESACOPLAMIENTO: Le permite desacoplar el equipo cuando se encuentra funcionando.
Vista derecha
UNIDAD ÓPTICA: Le permite usar CD y DVD.
CONECTOR USB: El conector compatible USB 2.0 le permite conectar dispositivos USB como impresoras, cámaras, etc.
1 Palanca de liberación del
equipo
2 Conector USB 3 Conector de audio
4 Botón de desacoplamiento
1 Unidad óptica 2 Conector USB
1 2 3 4
1 2

Guía de configuración de la base para medios 127
Vista posterior
1 Conector USB 2 Conector de red 3 Conector serie
4 Conector paralelo 5 Conector de vídeo digital
(DVI)
6 Conector de vídeo VGA
7 Conector USB alimentado 8 Conector del adaptador de CA 9 Ranura de seguridad
Conector Descripción
CONECTOR DE RED: Conecta la base para medios a una red. Las
dos luces que se encuentran junto al conector indican el estado
de la conexión y la actividad de una conexión de red por cable.
Para obtener información sobre el uso del adaptador de red,
consulte la documentación incluida con el equipo.
AVISO: No conecte un cable de teléfono al conector de red.
CONECTORES USB 2.0: Conecta hasta cuatro dispositivos
compatibles USB 2.0-, incluyendo un USB alimentado.
CONECTOR PARALELO: Conecta un dispositivo paralelo, como
una impresora en paralelo.
CONECTOR DE VÍDEO: Conecta un monitor externo VGA.
NOTA: Cuando el equipo esté acoplado, utilice el conector
de vídeo de la base para medios.
CONECTOR SERIE: Conecta un dispositivo serie, como un ratón
serie o un dispositivo manual.
1 2 3 4 5 6 87 9

128 Guía de configuración de la base para medios
RANURA PARA CABLE DE SEGURIDAD: Sirve para conectar al equipo un dispositivo antirrobo disponible en el
mercado. Las instrucciones para la instalación de los dispositivos antirrobo están incluidas normalmente con el
dispositivo. Para obtener más información, consulte el apartado “Fijación de la base para medios” en la página 131.
CONECTOR PARA AURICULARES/ALTAVOCES: Conecta unos
auriculares o unos altavoces. Se trata de un conector de salida
estéreo.
CONECTOR DEL ADAPTADOR DE CA: Conecta el adaptador de
CA a la base para medios y a la alimentación de corriente alterna
para convertirla en la corriente continua que necesita. Puede
conectar el adaptador de CA independientemente de que la
base para medios esté encendida o apagada. Para obtener más
información, consulte el apartado “Configuración de la base
para medios” en la página 130.
PRECAUCIÓN: Si utiliza una regleta de enchufes, proceda
con precaución cuando conecte el cable de alimentación
de CA del adaptador a la regleta. En algunas regletas es
posible introducir incorrectamente el conector. La
introducción incorrecta del conector de corriente puede
provocar daños irreparables en la base para medios,
además del riesgo que supone de descarga eléctrica
o incendio. Asegúrese de que la clavija de toma a tierra del
enchufe de alimentación está insertada en la conexión
a toma de tierra de la regleta.
AVISO: Cuando desconecte el cable del adaptador de CA
de la base para medios, sujete el conector (no el cable)
y tire de él firmemente pero con cuidado, procurando no
dañar el cable.
Conector Descripción

Guía de configuración de la base para medios 129
Vista superior
1 Conector de acoplamiento
1

130 Guía de configuración de la base para medios
Configuración de la base para medios
PRECAUCIÓN: El adaptador de CA funciona con tomas de alimentación eléctrica de todo el mundo. No obstante,
los conectores de alimentación y los enchufes múltiples varían de un país a otro. El uso de un cable incompatible
o la conexión incorrecta del cable al enchufe múltiple o a la toma de alimentación eléctrica puede dañar el
equipo o provocar un incendio.
AVISO: Utilice siempre el adaptador de CA de Dell que se incluye con la base para medios. Si usa cualquier otro
adaptador de CA disponible en los comercios, o el adaptador de modelos de equipos Dell anteriores, podrá dañar
la base para medios o el equipo.
AVISO: Cuando desconecte el cable del adaptador de CA del equipo o de la base para medios, sujete el conector
(no el cable) y tire de él firmemente pero con cuidado, procurando no dañar el cable. Cuando enrolle el cable del
adaptador, asegúrese de seguir el ángulo del conector para evitar que se dañe el cable.
1
Conecte el adaptador de AC a su conector y al enchufe eléctrico.
2
Antes de acoplar inicialmente el equipo, el sistema operativo deberá haber completado su proceso de
configuración. Para ello:
a
Asegúrese de que el equipo no está conectado a la base para medios (acoplado).
b
Enciéndalo.
c
Compruebe que aparece el escritorio de Microsoft
®
Windows
®
.
d
Apague el equipo mediante el menú
Inicio
de Windows.

Guía de configuración de la base para medios 131
Fijación de la base para medios
NOTA: Si el equipo está acoplado a la base para medios y tiene un dispositivo antirrobo fijado a la ranura del cable
de seguridad, no podrá desacoplarlo sin primero quitar el dispositivo antirrobo.
1
Fije un dispositivo antirrobo de los que se venden en los establecimientos comerciales a la ranura del
cable de seguridad de la base para medios.
Los dispositivos antirrobo incluyen normalmente un segmento de cable de metal trenzado y un dispositivo
de bloqueo con llave. Para obtener instrucciones sobre la instalación de este tipo de dispositivos antirrobo,
consulte la documentación que acompaña al dispositivo.

132 Guía de configuración de la base para medios
Acoplamiento del equipo
NOTA: Si va a acoplar el dispositivo por primera vez y aún no ha completado los pasos reflejados en
“Configuración de la base para medios” en la página 130, complételos antes de continuar con el siguiente paso.
NOTA: Después de acoplar el equipo por primera vez, la batería o el adaptador de CA de éste podrán alimentar la
base para medios en el caso de que no esté conectada a un adaptador de CA.
NOTA: El equipo deberá estar apagado solo cuando lo acople por primera vez.
1
Alinee la parte posterior del equipo con la parte posterior de la base para medios en un ángulo
aproximado de 30 grados y baje la parte delantera del equipo sobre la
base para medios
.
2
Presione suavemente el equipo sobre la
base para medios
hasta que haga clic y quede fijo.
3
Enciéndalo.
El sistema operativo reconocerá la
base para medios
.
1 Equipo 2 Base para medios
2
1

Guía de configuración de la base para medios 133
Desacoplamiento del equipo
1
Antes de desacoplar el equipo, guarde y cierre los archivos abiertos y salga de todos los programas activos.
2
Configure los parámetros de administración de energía del equipo para que no entre en el modo de
espera o de hibernación al cerrar (bajar) la pantalla:
Windows
XP
a
Haga clic en el botón
Inicio
y en
Panel de control
.
b
En
Elija una categoría
, haga clic en
Rendimiento y mantenimiento
.
c
En
o elija un icono del Panel de control
, haga clic en
Opciones de energía
y en la ficha
Opciones
avanzadas
.
d
En el menú desplegable
Al cerrar la tapa de mi equipo portátil
, seleccione
No hacer nada.
AVISO: No desacople nunca el equipo sin prepararlo primero para ello. Si lo desacopla antes de hacerlo, perderá
datos y el equipo podrá no recuperar el normal funcionamiento durante varios minutos, si lo hace.
AVISO: Si el equipo no tiene una batería cargada en su compartimento, deberá apagarlo antes de desacoplarlo. Si
lo desacopla sin batería antes de apagarlo, perderá datos y el equipo podrá no recuperar el normal funcionamiento
durante varios minutos, si lo hace.
3
Si el equipo no tiene batería en su compartimento, apáguelo mediante el menú
Inicio
de Windows.
4
Si el equipo tiene la batería cargada en su compartimento, prepárelo para el desacoplamiento mediante
uno de los siguientes métodos:
• Haga clic en el botón
Inicio
y en
Desacoplar equipo
.
O
• Pulse un segundo el botón de desacoplar situado en la parte izquierda de la
base para medios
(consulte el apartado “Vista izquierda” en la página 126). Se apagarán las luces de la
base para
medios
y aparecerá el mensaje
Desacoplamiento completo
que indica que ahora puede desacoplar el
equipo.
5
Si la base para medios está fijada, libere el bloqueo.
6
Tire hacia fuera de la palanca de liberación del equipo (consulte el apartado “Vista izquierda” en la
página 126) para liberarlo.

134 Guía de configuración de la base para medios
7
Levante la parte posterior del equipo y deslícelo hacia la parte posterior de la
base para medios
.

Guía de configuración de la base para medios 135
Instalación de la unidad óptica
1
Guarde y cierre los archivos o programas que estén abiertos y apague el equipo.
2
Inserte la unidad óptica en el compartimento de la base para medios. (Consulte el apartado “Vista
derecha” en la página 126.)
3
Inserte el tornillo que sujeta la unidad óptica.
4
Encienda el equipo.
El sistema operativo reconocerá la nueva unidad.

136 Guía de configuración de la base para medios
Extracción de la unidad óptica
1
Guarde y cierre los archivos que estén abiertos, salga de todas las aplicaciones y apague el equipo.
2
Retire el tornillo que sujeta la unidad óptica y utilice el destornillador para sacarla del compartimento
para módulos. Consulte el apartado “Vista derecha” en la página 126.
Uso de unidades externas
Se pueden utilizar unidades externas como unidades de CD, CD-RW o DVD/CD-RW conectando el
cable USB al conector USB alimentado que se encuentra en la base para medios. (Consulte el apartado
“Vista posterior” en la página 127.)
Puede agregar o quitar unidades externas mientras que el equipo esté funcionando o apagado. Para quitar
o intercambiar unidades mientras que el equipo esté funcionando, haga doble clic en el icono Desconectar
o quitar hardware de la barra de tareas de Windows y después haga clic en la unidad que desee quitar.
A continuación desconecte la unidad de la base para medios.
AVISO: Para evitar dañar las unidades externas, guárdelas en un lugar seguro y seco cuando no estén conectadas
al equipo. Evite presionarlas o colocar objetos pesados encima de ellas.

Guía de configuración de la base para medios 137
Especificaciones
Aspectos físicos
Altura 12,8 mm (0,5 pulgadas)
Anchura 292 mm (11,5 pulgadas)
Fondo 207 mm (8,15 pulgadas)
Peso (sin ninguna unidad en el
compartimento para módulos)
0,61 kg (1,35 lb)
Adaptador de CA
Tensión de entrada 100–240 VCA
Intensidad de entrada (máxima) 1,5 A
Frecuencia de entrada 50–60 Hz
Corriente de salida (máxima) 3,34 A (adaptador de CA de 65-W)
4,62 A (adaptador de CA de 90-W)
Potencia de salida 65 W
90W
Tensión nominal de salida 19,5 VCC
Dimensiones y peso
(adaptador de CA de 65 W):
Altura
28,3 mm (1,11 pulgadas)
Anchura
57,8 mm (2,28 pulgadas)
Fondo
137,2 mm (5,4 pulgadas)
Peso (con cables) 0,36 kg (0,79 lb)
Dimensiones y peso
(adaptador de CA de 90 W):
Altura
34,2 mm (1,35 pulgadas)
Anchura
60,9 mm (2,39 pulgadas)
Fondo
153,42 mm (6,04 pulgadas)
Peso (con cables) 0,46 kg (1,01 lb)
Intervalo de temperatura:
En funcionamiento
0° a 35°C (32° a 95°F)
En almacenamiento
–40° a 60°C (–40° a 140°F)

138 Guía de configuración de la base para medios
Puertos y conectores
Conector de red Puerto RJ-45 para Ethernet de bus maestro
10/100/1000 Mbits/segundo BaseTX
USB Tres conectores de 4 patas compatibles con
USB 2.0
USB alimentado Un conector de 9 patas compatible con
USB 2.0
Paralelo Conector de 25 orificios; unidireccional,
bidireccional o ECP
Vídeo Conector de 15 orificios
Conector DVI Conector de 24 orificios
Serie Conector de 9 patas; compatible con el estándar
16550C UART con búfer de 16 bytes
Audio Miniconector (line-out) para auriculares/altavoces
Acoplamiento Conector de 280 patas

Guía de configuración de la base para medios 139
Información reglamentaria
Interferencia electromagnética (EMI) es cualquier señal o emisión, radiada en el espacio libre o conducida mediante cables con
energía o señal, que pone en peligro el funcionamiento de los servicios de radionavegación o de otros servicios de seguridad o bien
que degrada u obstruye considerablemente, o interrumpe repetidamente, los servicios de comunicaciones por radio autorizados.
Los servicios de comunicaciones por radio incluyen, sin excluir otras posibilidades, las emisoras comerciales de AM/FM, televisión,
servicios celulares, radar, control de tráfico aéreo, buscapersonas y servicios de comunicaciones personales (PCS). Estos servicios
autorizados, junto con los emisores de radiaciones involuntarios, como los dispositivos digitales, entre los que se incluyen los
sistemas informáticos, contribuyen a la formación del entorno electromagnético.
La compatibilidad electromagnética (EMC) es la capacidad de los elementos de los equipos electrónicos para funcionar juntos
correctamente en el entorno electrónico. Mientras que, por un lado, este equipo ha sido diseñado para cumplir con los límites del
organismo regulador de las interferencias electromagnéticas, no hay garantía, por otro, de que se produzcan interferencias en alguna
instalación en particular. Si este equipo ocasiona interferencias con los servicios de comunicación por radio, lo cual se puede
determinar apagando y encendiendo el equipo, se aconseja intentar corregir la interferencia poniendo en práctica una o más de las
medidas siguientes:
• Cambie la orientación de la antena de recepción.
• Vuelva a ubicar el equipo en relación al receptor.
• Aumente la separación entre el equipo y el receptor.
• Conecte el equipo a un enchufe en un circuito diferente, de tal forma que el ordenador y el receptor estén conectados en
distintos circuitos derivados.
Si es necesario, consulte a un representante del servicio técnico de Dell o a un técnico con experiencia en radio/televisión para
obtener consejos adicionales.
Para obtener más información reglamentaria, consulte el manual del propietario o la guía del usuario del equipo.
Los productos de Dell™ están diseñados, probados y clasificados para su uso en el entorno electromagnético. Las clasificaciones del
entorno electromagnético se refieren por lo general a las siguientes definiciones armonizadas:
• La clase A es normalmente para los entornos comerciales e industriales. Los productos de clase B también se pueden utilizar
en el entorno de clase A.
• La clase B es normalmente para los entornos residenciales. Los productos de clase A no se deberán utilizar en el entorno de
clase B.
Los equipos de tecnología de la información (ITE), incluyendo periféricos, tarjetas de expansión, impresoras, dispositivos de
entrada/salida (E/S) y otros similares, que se encuentren integrados o conectados al equipo deberán coincidir con su clasificación de
entorno electromagnético.
Aviso acerca los cables de señal apantallados: Utilice solamente cables apantallados para conectar dispositivos a cualquier equipo
Dell con objeto de reducir la posibilidad de interferencias con los servicios de comunicaciones por radio. Con estos cables se
asegura que se mantiene la correcta clasificación de compatibilidad electromagnética para el entorno previsto. Hay cables Dell
para las impresoras en paralelo. Si lo prefiere, puede solicitar un cable de Dell en el sitio Web www.dell.com.
Dell ha determinado que este producto pertenece a la clase B. Las siguientes secciones ofrecen EMC/EMI específicas por países
o información acerca de la seguridad de los productos.
Para obtener más información reglamentaria, consulte el apartado “Regulatory Notices” en la página 21.

140 Guía de configuración de la base para medios
-
 1
1
-
 2
2
-
 3
3
-
 4
4
-
 5
5
-
 6
6
-
 7
7
-
 8
8
-
 9
9
-
 10
10
-
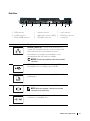 11
11
-
 12
12
-
 13
13
-
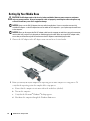 14
14
-
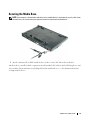 15
15
-
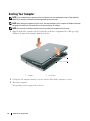 16
16
-
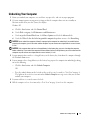 17
17
-
 18
18
-
 19
19
-
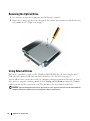 20
20
-
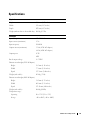 21
21
-
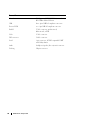 22
22
-
 23
23
-
 24
24
-
 25
25
-
 26
26
-
 27
27
-
 28
28
-
 29
29
-
 30
30
-
 31
31
-
 32
32
-
 33
33
-
 34
34
-
 35
35
-
 36
36
-
 37
37
-
 38
38
-
 39
39
-
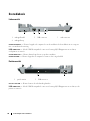 40
40
-
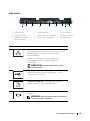 41
41
-
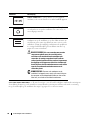 42
42
-
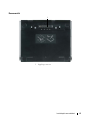 43
43
-
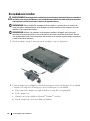 44
44
-
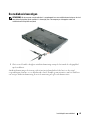 45
45
-
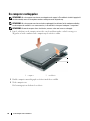 46
46
-
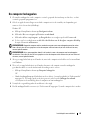 47
47
-
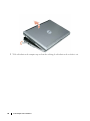 48
48
-
 49
49
-
 50
50
-
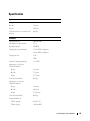 51
51
-
 52
52
-
 53
53
-
 54
54
-
 55
55
-
 56
56
-
 57
57
-
 58
58
-
 59
59
-
 60
60
-
 61
61
-
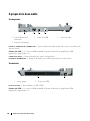 62
62
-
 63
63
-
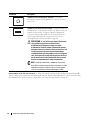 64
64
-
 65
65
-
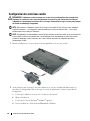 66
66
-
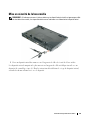 67
67
-
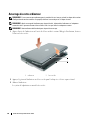 68
68
-
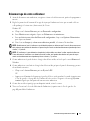 69
69
-
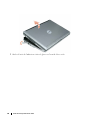 70
70
-
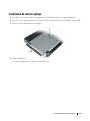 71
71
-
 72
72
-
 73
73
-
 74
74
-
 75
75
-
 76
76
-
 77
77
-
 78
78
-
 79
79
-
 80
80
-
 81
81
-
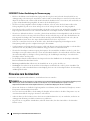 82
82
-
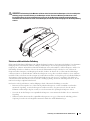 83
83
-
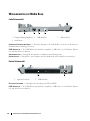 84
84
-
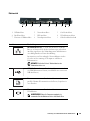 85
85
-
 86
86
-
 87
87
-
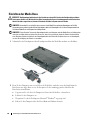 88
88
-
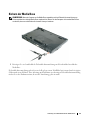 89
89
-
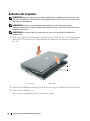 90
90
-
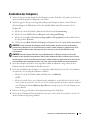 91
91
-
 92
92
-
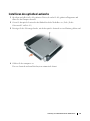 93
93
-
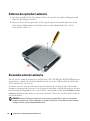 94
94
-
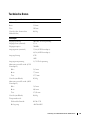 95
95
-
 96
96
-
 97
97
-
 98
98
-
 99
99
-
 100
100
-
 101
101
-
 102
102
-
 103
103
-
 104
104
-
 105
105
-
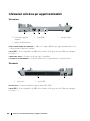 106
106
-
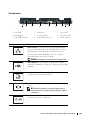 107
107
-
 108
108
-
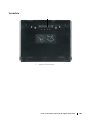 109
109
-
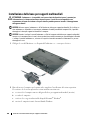 110
110
-
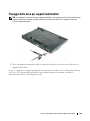 111
111
-
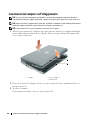 112
112
-
 113
113
-
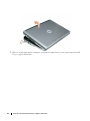 114
114
-
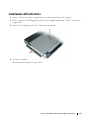 115
115
-
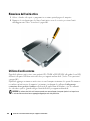 116
116
-
 117
117
-
 118
118
-
 119
119
-
 120
120
-
 121
121
-
 122
122
-
 123
123
-
 124
124
-
 125
125
-
 126
126
-
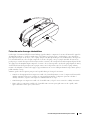 127
127
-
 128
128
-
 129
129
-
 130
130
-
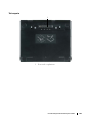 131
131
-
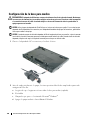 132
132
-
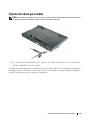 133
133
-
 134
134
-
 135
135
-
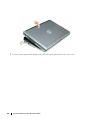 136
136
-
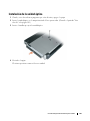 137
137
-
 138
138
-
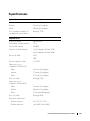 139
139
-
 140
140
-
 141
141
-
 142
142


in andere talen
- italiano: Dell Latitude D430 Guida Rapida
- français: Dell Latitude D430 Guide de démarrage rapide
- español: Dell Latitude D430 Guía de inicio rápido
- Deutsch: Dell Latitude D430 Schnellstartanleitung