IDEAL STANDARD K727267 Mounting Frame Handleiding
- Type
- Handleiding

DE
N
L
FR
inbauanleitung
Installation
instructions
lnbouwhandleiding
Notice
de
mise
en ceuvre
i
montaggio
8x
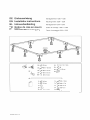
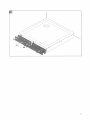
Montagerahmen 1200 x 1200
Mounting frame 1200 x 1200
Montageramen 1200 x 1200
Cadre de 1
20Q
X 1 200
Telaio di montaggio 1200 x 1200
45mm
4x
@ 6.4 x
12
x 1.6
mm
~
4x
8x
/M10
x 103
mm
4x
~
S8
4x
✓
5x50mm
4x
8x
M10x77mm
4x
~
8x
M10 x
51
mm
16x
®
M10
x 5
mm
4x
1x
45mm
1x
x
103
mm
1x
32mm
1x
M10><77mm
1x<Q>
1x
M10 x
51
mm
1x0
1x
®
M10
x 5
mm
3x
4.5 x
15
mm
1x
03700284104116 J Rev 04

2

Stahlduschwanne/
Stee!
shower
tray
I
Stalen
douchebak
/
Receveur
de
douche
en
acier•/
Piatto
doccia
in
acciaio
Acrylduschwanne/ Acrylic shower tray / Acryl douchebak / Receveur de douche en acrylique / Piatto
doccia
in
acrilico
3

83-109
mm
M10
x
51
mm
109-134
mm
M10
x 77 mm
134-160
mm
4

1.
4.
4.5"
15
mm
><
103mm\
M10
><
77
mm
;,,-
⇒
Y =
15-40
mm
M10><51
mm
J
ltP.JJ
Y:15-25mm
⇒
Y:25-40mm
⇒
32mm
0
i5
45mm
5

Stahlduschwanne/
Steei
shower
in
acciaio
/
Stalen
douchebak
I
Receveur
de
douche
en
acier
I
Piatto
doccia
Acrylduschwanne/ Acrylic shower tray / Acryl douchebak / Receveur de douche en acrylique / Piatto
doccia
in
acrilico
6

7

8

1.®
9

10

11

12
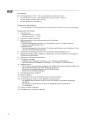
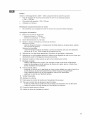
Verwendung
Den ))Montagerahmen 1200 x 1200« ausschließlich wie folgt verwenden:
" Für den Einbau von Acryl- oder Stahlduschwannen bis 1200 x 1200 mm.
" Kleinste mögliche Größe 750 x 750 mm.
" Für den Einsatz im Innenbereich.
Hinweise zur Verarbeitung
" Die einschlägigen Verarbeitungsrichtlinien der beteiligten Gewerke sind
zu
berücksichtigen.
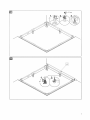
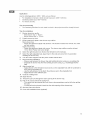
Hinweise für den Einbau
i l Aluprofil kürzen.
-Stahlduschwanne: x 90 mm.
Acrylduschwanne: x - 75 mm.
i2
Schrauben handfest anziehen.
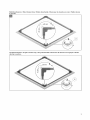
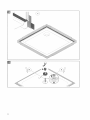
i3
Befestigungsteller auf dem Wannenunterboden befestigen.
Stahlduschwanne:
-Den Befestigungsteller aufkleben. Die Klebestelle muss frei von Staub, Schmutz,
Wasser und Fettrückständen sein.
Acrylduschwanne:
-Den Befestigungsteller festschrauben. Der Wannenunterboden muss mindestens 15 mm
stark sein. Schraubenlänge beachten.
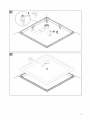
i4 Geeignete Gewindestange wählen. Falls erforderlich, Gewindestange kürzen.
i5
Geeigneten Stellfuß wählen. Stellfuß zur Seite legen und erst unmittelbar vor Montage der
Duschwanne aufschrauben.
i6
Mittelstützen auf Bodenkontakt drehen.
i7 Empfohlene Montage:
-Abdichtung zum Baukörper vornehmen,
z.B.
mit Wannenranddichtband.
-Die Duschwanne zum Baukörper entkoppeln, z.
B.
mit Dämm- und Schutzband.
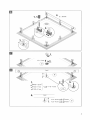
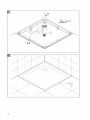
i8
Mittelfuß fixieren.
-Silikon auf die Gewindestange auftragen und Stellfuß auf die Gewindestange drehen,
bis
die Unterseite bündig mit der Gewindestange abschließt.
-Klebepad mit der Selbstklebefolie auf den Stellfuß kleben.
-Silikon
auf
das Klebepad auftragen.
i9
Dichtigkeitsprüfung durchführen.
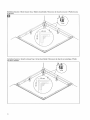
i 10 Silikon auftragen.
i
11
Die Zugschnur durch die Ablauföffnung der Duschwanne führen.
il2
An
der Zugschnur ziehen, um den Mittelfuß herauszudrehen.
-
Der
Mittelfuß hat den Boden erreicht, wenn beim Ziehen ein deutlicher Widerstand
spürbar
ist.
-Die Zugschnur abschneiden und durch die Ablauföffnung der Duschwanne
zurückschieben.
i 13 Fugen mit Silikon schließen.
il
4 Montagerahmen verkleiden (optional).

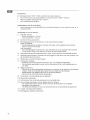
Application
Use the »Montagerahmen 1200 x 1200« only as follows:
..
For installation
of
acrylic or steel shower trays up to 1200 x 1200
mm
.
.,
Smallest possible size: 750 x 750 mm.
..
For indoor use only.
Tips
for
processing
" The standard guidelines for each trade involved in the project should be closely followed.
Tips
for
installation
i I Shorten aluminium profile.
-Steel shower tray: x - 90 mm.
-Acrylic shower tray: x 75 mm.
i2
Tighten screws by hand.
i3
Fasten attachment plate to the shower tray subfloor.
Steel shower tray:
-Fasten the attachment plate with adhesive. The surface must
be
free of dust, dirt, water
and oily residue.
Acrylic shower tray:
-Fasten the attachment plate with screws. The shower tray subfloor must
be
at least
15 mm thick. Please note screw length.
i4
Select the right threaded rod. Shorten the threaded
rod
if necessary.
i5
Select the right adjustable feet, place them to the side and screw them
in
just before
installing the shower tray.
i6
Turn the centre supports until they have contact with the floor.
i7
Recommended installation:
-Place a seal between the shower tray and building structure using, e.g. a sealing strip.
-Separate the shower tray from the building structure using, e.g., insulating/protective
tape.
i8
Attach centre foot.
-Apply silicone to the threaded rod and screw on the adjustable foot until the underside is
flush with the threaded rod.
-Use the self-adhesive foil to attach the adhesive pad
to
the adjustable foot.
-Apply silicone to the adhesive pad.
i9 Conduct a leakage test.
i 10 Apply silicone.
il
1 Thread the pull cord through the drain opening of the shower tray.
i 12 Pull on the cord to extend the centre foot.
-The centre foot has reached the floor when a strong resistance can
be
feit when pulling
the cord.
-Cut the pull cord and push it back into the drain opening of the shower tray.
i
13
Seal the joints with silicone.
i 14 Cover the installation frame (optional}.
13

14
Toepassing
De
))Montagerahmen 1200 x 1200« uitsluitend als volgt
,vc;;,o,;:,;:,c;
..
Voor het inbouwen van douchebakken van staal of acryl tot 1200 x 1200 mm.
" Kleinst mogelijke afrnetingen 750 x 750 mm.
" Voor toepassing binnenshuis.
Aanwijzingen voor
de
verwerking
" Houd rekening met de desbetreffende
\/PrwP1r"
werkzaamheden.
Aanwijzingen
voor
de
inbouw
i l Aluprofiei inkorten.
-Stalen douchebak: x -90 mm.
Acryl douchebak: x - 75 mm.
i2
Schroeven stevig aandraaien.
die van
Bevestigingsplaat aan de onderkant van de douchebak bevestigen.
Stalen douchebak:
op de
De bevestigingsplaat vastlijmen.
De
plek waar deze wordt vastgelijrnd moet stofvrij,
schoon, droog
en
vetvrij zijn.
Acryl douchebak:
De bevestigingsplaat vastschroeven. De onderkant van de douchebak moet minstens
15
mm
dik zijn. Zorg ervoor dat de schroeven de juiste !engte hebben.
i4 Geschikte staaf met schroefdraad kiezen. Indien nodig, staaf met schroefdraad inkorten.
i5
Geschikte stelvoet kiezen. Stelvoet even opzij leggen en pas direct voor het monteren van
de douchebak erop schroeven.
i6 Middensteun op bodemcontact draaien.
i7 Aanbevolen montage:
-Afdichting van het bouwelement uitvoeren, bijv. met waterdicht afdichtband.
-De douchebak gescheiden houden van het bouwelement, bijv. met isolatiestroken en
pvc-band.
i8
Middenvoet fixeren.
-Siliconenkit op schroefdraadstaaf aanbrengen
en
stelvoet op de staaf met schroefdraad
draaien, totdat de onderzijde goed aansluit met de staaf met schroefdraad.
-Kleefkussentje met zelfklevende folie op de stelvoet plakken.
-Siliconenkit op het kleefkussentje aanbrengen.
i9
Controleren of de aansluiting goed is afgedicht.
i 10 Siliconenkit aanbrengen.
i
11
Het treksnoer door de afvoeropening van de douchebak doen.
i 12 Aan het treksnoer trekken, om de middenvoet uit te draaien.
-De middenvoet heeft de bodem bereikt, wanneer bij het trekken een duidelijke
weerstand is
te
bespeuren.
-Het treksnoer afknippen
en
door de uitvoeropening van de douchebak terugschuiven.
i
13
Voegen met siliconenkit afsluiten.
i 14 Montageraam afdekken (optioneel).

Emploi
Utiliser la ))Montagerahmen 1200 x 1200« uniquement de la maniere suivante :
„ Pour le montage de receveurs de douche en acier
ou
en
acrylique jusqu'a
1 200 x 1 200 mm.
" Plus petite taille possible : 750 x 750 mm.
..
Utilisation en interieur.
Remarques
concemant
la
mise
en
amvre
• Se conformer aux consignes de mise
en
ceuvre des corps de metier
Consignes d'installation
i l Raccourcir le profil en aluminium.
-receveur
en
acier : x -
90
mm.
-receveur
en
acrylique : x -
75
mm.
i2
Serrer fermement les vis a la main.
i3
Monter le disque de fixation sur le fand du receveur.
Receveur en acier :
-coller le disque de fixation. L'emplacement doit etre depourvu de poussieres, saletes,
eau et traces de graisse.
Receveur en acrylique :
visser fermement le disque de fixation.
Le
fond
du
receveur doit avoir une epaisseur
minimum de 15 mm. Tenir campte de la longueur des vis.
i4
Selectionner une tige filetee appropriee. Raccourcir
la
tige filetee
si
necessaire.
i5
Selectionner
un
pied reglable approprie. Mettre le pied reglable de cöte et ne le visser que
directement avant le montage du receveur de douche.
i6 Devisser le pied
du
milieu jusqu'a ce qu'il soit
en
contact avec le fond.
i7 Montage conseille :
realiser l'etancheite avec la paroi, par exemple a l'aide d'une bande d'etancheite.
-operer
le
decouplage entre le receveur de douche et
la
paroi, par ex. a l'aide d'une
bande d'isolation et
de
protection.
i8 Fixer le pied du milieu.
appliquer
du
silicone sur
la
tige filetee et visser le pied reglable sur celle-ci jusqu'a ce
que le dessous du pied soit exactement
au
meme niveau que
la
tige filetee.
-coller l'element tampon sur le pied reglable a l'aide
du
film autocollant.
appliquer du sllicone sur l'element tampon.
i9 Verifier l'etancheite.
il
O Appliquer du silicone.
i
11
Faire passer le cordon de traction par l'ecoulement du receveur.
il2
Tirer sur le cordon afin de devisser le pied du milieu.
-
le
pied du milieu est en contact avec le sol lorsqu'une resistance vive se fait sentir.
-couper le cordon et le faire rentrer par l'ecoulement du receveur.
i 13 Fermer les joints avec
du
silicone.
il4
Habiller le cadre de montage (en option}.
15

16
Utilizzo
Usare 1200 x 1200)) esclusivamente come segue:
..
Per
il
montaggio di piatti doccia in acciaio o in acrilico fino a 1200 x 1200 mm.
..
Dimensioni minime: 750 x 750 mm.
" Solo in ambienti intemi.
Avvertenze d'uso
„ Osservare le raccomandazioni
Consigli per
il
montaggio
i l Accorciare
il
profilo
in
alluminio.
-Piatto doccia
in
acciaio: x -90 mm.
-Piatto doccia
in
acrilico: x -75 mm.
i2
Avvitare le viti senza esagerare.
i3
Fissare
il
piatto
di
fissaggio
al
fondo del piatto doccia.
Piatto doccia in acciaio:
-lncollare
il
piatto
di
fissaggio.
II
punto d'incollaggio deve essere privo
di
sporco, polvere,
acqua e resti
di
grasso.
Piatto doccia in acrilico:
-Fissare con viti
il
piatto
di
fissaggio.
II
fondo del piatto doccia deve avere uno spessore di
almeno 15 mm. Fare attenzione alla lunghezza delle viti.
i4
Selezionare una barra filettata adatta e accorciarla se necessario.
i5
Selezionare un piedino
di
posizionamento adatto. Metterlo
da
parte e avvitarlo solo subito
prima di montare
il
piatto doccia.
i6
Ruotare i supporti centrali a contatto con
il
pavimento.
i7
Raccomandazioni per
il
montaggio:
-lmpermeabilizzazione rispetto alla struttura edilizia, p. es. con un nastro idrorepellente
per bordo vasca.
-Disaccoppiamento acustico del piatto doccia dalla struttura edilizia,
p.
es. con
un
nastro
protettivo e insonorizzante.
i8
Fissare
il
piedino centrale.
Applicare del silicone sulla barra filettata e girare
il
piedino di posizionamento sulla barra
filettata fino a portare
il
lato inferiore a livello della barra.
-lncollare
il
pad adesivo con la pellicola autoadesiva sul piedino
di
posizionamento.
-Applicare del silicone sul pad adesivo.
i9 Eseguire una prova
di
tenuta stagna.
i 10 Applicare
il
silicone.
i
11
Far passare la cordicella attraverso l'apertura
di
scarico del piatto doccia.
i 12 Tirare la cordicella per svitare
il
piedino centrale.
-
II
piedino centrale ha raggiunto
il
pavimento quando tirando
la
cordicella si sente una
forte resistenza.
Tagliare la cordicella e spingerla indietro attraverso l'apertura di scarico del piatto doccia.
il3
Chiudere i giunti con silicone.
i 14 Applicare
il
rivestimento del telaio
di
montaggio (optional).
-
 1
1
-
 2
2
-
 3
3
-
 4
4
-
 5
5
-
 6
6
-
 7
7
-
 8
8
-
 9
9
-
 10
10
-
 11
11
-
 12
12
-
 13
13
-
 14
14
-
 15
15
-
 16
16


IDEAL STANDARD K727267 Mounting Frame Handleiding
- Type
- Handleiding