
User and Maintenance
Instructions
Range
(Electric)
Handleiding Voor
Bediening En Onderhoud
Kuzine
(Elektrisch)
Betriebs- und
Wartungsanleitung
Küchenofen
(Elektrisch)
Manuel d’Utilisation et de
Maintenance
Cuisiniere
(Électrique)

2
Table of Contents / Inhoudsopgave /
Inhaltsverzeichnis / Table des Matières
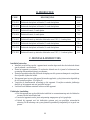
I. ENGLISH ………………………………………………………………. 3
A. Description
B. Products
C. Mounting Instructions
D. Operator Instructions and Attention Points
E. Figures
F. Product Drawings
G. Electrical Connection Drawing
II. NEDERLANS ………………………………………………………… 20
A. Beschrijving
B. Producten
C. Montage-Instructies
D. Instructies van de bediener en aandachtspunten
E. Figuur
F. Producttekeningen
G. Elektrische Aansluittekeningen
III. DEUTSCH …………………………………………………………….. 38
A. Beschreibung
B. Produkte
C. Installationsanleitung
D. Benutzerhinweise und zu Beachtende Punkte
E. Abbildung
F. Produktzeichnungen
G. Elektrische Anschlusszeichnung
IV. FRANÇAIS …………………………………………………………… 55
A. Explications
B. Des Produits
C. Instructions de Montage
D. Instructions a L’utilisateur et Points a Considérer
E. Les Figures
F. Dessins des Produits
G. Dessin de connexion électrique

3
User and Maintenance
Instructions
Range (Electric)

4
A.DESCRIPTION
Our dear customer,
Your preferred COMBISTEEL is nature and technology friendly. We thank you for your choice.
COMBISTEEL has been produced with the understanding of "Total Quality" in modern production
facilities.
Important Safety Information
Carefully read this guide and keep it for future review.
WARNING: Installation of the devices must be done by an authorized service person.
WARNING: Equipment must be grounded.
WARNING: If the surface is cracked, immediately disconnect the appliance or appropriate part of
the appliance from the supply.
Indicates that there is a risk of personal injury or property damage.
Explosion / fire hazard.
The instructions in this manual contain important information on the safe mounting, usage,
cleaning and maintenance of the device. Thus, keep the manual at a place easily accessible
by the person who will use the machine, and the technician.
Mounting, electrical connection and maintenance works of the device should be
performed by a specialist authorized in this subject and in accordance with the instructions
of the manufacturer company.
Electrical connection of the device should be arranged according to the tables and
electrical diagram given in this manual.
Manufacturer Company accepts no responsibility for the final damages incurred in
humans or properties that are caused by any procedure not conforming to the instruction
manual, or maintenance or technical interventions that are not performed by authorized
people.
The instructions for appliances with hob surfaces of glass-ceramic or similar material shall
state that aluminium foil and plastic vessels are not to be placed on the hot surfaces.
They shall also state that these surfaces are not to be used for storage
Metallic objects such as kitchen utensils, cutlery etc. shall not be placed on the hob surface
within the cooking zones since they could get hot;
Take care when operating the appliance, as rings, watches and similar objects worn by the
user could get hot when in close proximity to the hob surface;
Only use vessels of the type and size recommended.

5
B. PRODUCTS
C. MOUNTING INSTRUCTION
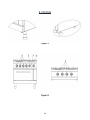
Placement
Installation and adjustment of the device should be carried out by technical staff of the
Authorized Service.
Place the device at a place min. 10cm away from the side or back wall to prevent excessive
temperature rises.
Place the device beneath a filtered exhaust hood in order to eliminate smell and fume that
may be emitted during cooking.
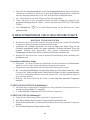
Device should be placed on a flat surface by suitably balancing on the four adjustable legs.
(Figure A)
Remove the protective nylon on the device. Clean the adhesive particles left on the device
with a suitable cleaner.
Never leave flammable material near the device.
Electrical Connection
Connect the device to the electrical installation according to the electrical standards of the
relevant country.
Feed the device with suitable network voltage written on the information plate.
Connect to the electrical installation over a suitable automatic fuse. Fix the said fuse on a
place that is easily accessible in case of a danger.
The cable connecting the device to the electrical installation should be at least type H05
RNF.
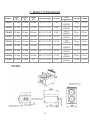
CODE
DESCRIPTION
SERIE
7178.0015
Electric hob, tabletop model, 2 round plates
600
7178.0020
Electric hob, tabletop model, 4 round plates
600
7178.0425
Electric range, 2 round plates
700
7178.0430
Electric range, 4 round plates
700
7178.0435
Electric range on static electric oven GN 2/1, 4 round plates
700
7178.0215
Electric hob, tabletop model, 2 round plates
700-S
7178.0220
Electric hob, tabletop model, 4 round plates
700-S
7178.3035
Electric range on static electric oven GN 2/1, 4 square plates
900

6
Before connecting the electrical inlet cable to the inlet clamp on the device, connect the
cable by passing it through the inlet coupling. And then tighten the coupling cover in a
manner that does not allow cable return.
Electrical inlet is indicated with a label on the device.
If the device will be used in a commercial kitchen, apply a correct grounding system. Here,
consider DIN VDE D100 Article 540.
Grounding screw " " is indicated with a label behind the device.
D. OPERATOR INSTRUCTIONS AND ATTENTION POINTS
With the aim of eliminating the protection oil on it, operate the device and ovens at
maximum level for a while. Then, cover with vegetable oil again.
Clean the accumulated food residues that are burned and carbonized on the cooking surface
and oven with a suitable tool everyday at the end of operation. If the said daily maintenance
is not performed, accumulated burned food residues may cause a decline in cooking
efficiency by creating a crust on the plates
Do not operate the oven with its back funnel mouldings removed or closed. The instruction
concerning persons (including children) with reduced physical, sensory or mental
capabilities, or lack of experience and knowledge is not applicable.
BEFORE USE
Electrical system check
After mounting, check the controlling members and heaters by operating at different
temperatures.
After the installation and maintenance, check the heating power of device.
During first operation, device will emit fume and smell for a short period. This fume and
smell is the result of the insulation material and the substances such as oil, etc. on the metal
sheet surfaces. This is not dangerous and will disappear by itself.
During the first use of the device should be run in the highest degree of operating for a period
of 1 hour
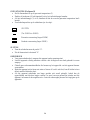
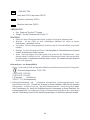
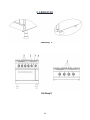
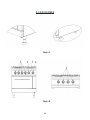
STARTING-UP COOKERS (Figure B)
Each plate has 6 adjustable Temperature value. Desired Temperature level is set with
relevant button (1).
1 is the lowest Temperature and 6 is the highest Temperature.
STARTING-UP OVEN (Figure B)
Adjust the thermostat to desired temperature (2).
Adjust cooking area (4), you will see that the indicator light is on.
When the indicator (3) light is off, it means that the oven has reached the desired
temperature.
Positions of change over switch is below:

7
TURN OFF
(Top 1500W Lower 4500W)
Lower Heater (Up 4500W)
Top Heater (Down 4500W)
TURN OFF
Turn the switch to position "0".
Turn the thermostat to position "0".
MAINTENANCE
Do not perform maintenance when the device is loaded with electrical power.
Before it cools down completely, wipe the device with a cloth immersed in warm soapy
water.
Do not use cleaning substances and tools that may cause scratches on device surface.
Do not clean the device with water or vapour pressure. Otherwise, you may cause electrical
plate failure.
If the device will not be used for a long period, coat the surfaces with a thin layer of
Vaseline. In case of any dangerous condition with the device, notify to the authorized
service. Never let unauthorized people to interfere in the device.
Compatibility Information
This device is designed and manufactured in accordance with the following directives and
standards.
marking directive, 93/68/EEC
TS EN 60335-1:2012/AC
TS EN 60335-2-36:2002
Related to CE Directive(s):
2014/35/EU (Low Voltage)
Limitation of Liability: All technical information contained in this manual, operating
instructions, operation and maintenance of the device, contains the latest information on your
device. The manufacturer accepts no responsibility for damage or injury which may result from
failure to follow the instructions in this manual, use outside of the intended use, unauthorized
repair, unauthorized modifications to the device, or use of spare parts not approved by the
manufacturer.

8
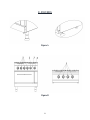
E. FIGURES
Figure A
Figure B

9
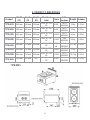
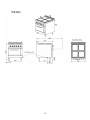
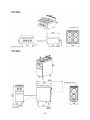
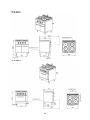
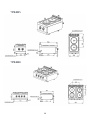
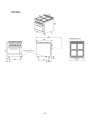
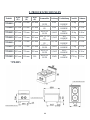
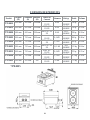
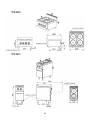
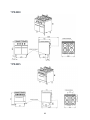
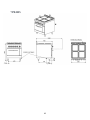
F. PRODUCT DRAWINGS
Product
Width
(W)
Depth
(D)
Height
(H)
Electrical
Inlet
Power
Cable
Sections
Weight
Volume
7178.0015
400 mm
600 mm
300 mm
230V AC 1N
PE
4 kW
3x1.5
H05RNF
18 kg
0.18
m³
7178.0020
600 mm
600 mm
300 mm
400V AC 3N
PE
8 kW
5x2.5
H05RNF
28 kg
0.28
m³
7178.0425
400 mm
700 mm
900 mm
400V AC 3N
PE
4,6 kW
5x2.5
H05RNF
46 kg
0.46
m³
7178.0430
800 mm
700 mm
900 mm
400V AC 3N
PE
9,2 kW
5x4
H05RNF
84 kg
0.84
m³
7178.0435
800 mm
700 mm
900 mm
400V AC 3N
PE
15,2
kW
5x4
H05RNF
122 kg
0.84
m³
7178.0215
400 mm
700 mm
300 mm
400V AC 3N
PE
4,6 kW
5x2.5
H05RNF
23 kg
0.21
m³
7178.0220
800 mm
700 mm
300 mm
400V AC 3N
PE
9,2 kW
5x2.5
H05RNF
54,5 kg
0.36
m³
7178.3035
800 mm
900 mm
900
400V AC 3N
PE
18 kW
5x4
H05RNF
170 kg
1.05
m³
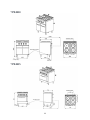
7178.0015

10
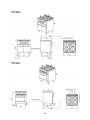
7178.0020
7178.0425

11
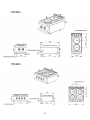
7178.0430
7178.0435

12
7178.0215
7178.0220

13
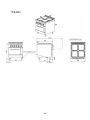
7178.3035

14
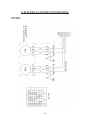
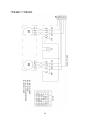
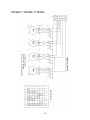
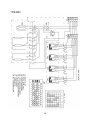
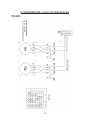
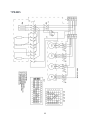
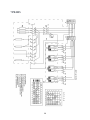
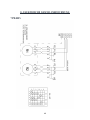
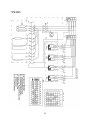
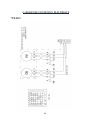
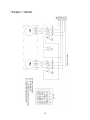
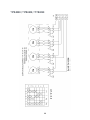
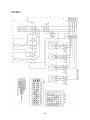
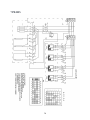
G.ELECTRICAL CONNECTION DRAWING
7178.0015

15
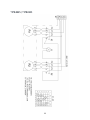
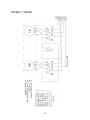
7178.0425 / 7178.0215

16
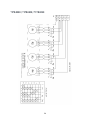
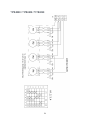
7178.0020 / 7178.0430 / 7178.0220

17
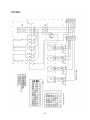
7178.0435

18
7178.3035

19
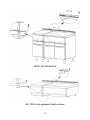
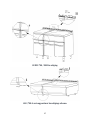
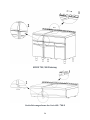
SERIE 700 / 900 Fixation
600 / 700-S series equipment fixation scheme

20
Handleiding Voor Bediening
En Onderhoud
Kuzine (Elektrisch)

21
A. BESCHRIJVING
Beste klanten,
Uw gewenste COMBISTEEL-product is natuur- en technologievriendelijk. Wij danken u voor uw
keuze.
COMBISTEEL is vervaardigd met het begrip ''Volledige Kwaliteit'' in zijn moderne
productiefaciliteiten.
Belangrijke veiligheidsinformatie
Lees deze handleiding aandachtig door en bewaar deze voor toekomstige beoordelingen.
WAARSCHUWING: De apparaten moeten worden geïnstalleerd door een
gekwalificeerdeonderhoudsmonteur.
WAARSCHUWING: De apparatuur moet worden geaard.
Geeft aan dat er een risico bestaat op persoonlijk letsel of materiële schade.
Explosie / brandgevaar.
De instructies in deze handleiding bevatten belangrijke informatie over de installatie op een
veillige manier, het gebruik, de reiniging en het onderhoud van het apparaat. Houd de
handleiding daarom binnen handbereik van de gebruiker en technicus.
De fabrikant kan niet aansprakelijk worden gesteld voor schade als gevolg van het uitvoeren
van procedures die niet in overeenstemming zijn met de instructies voor gebruik of met
onderhoud of technische interventies uitgevoerd door onbevoegde personen.
De elektrische aansluitingen van het apparaat moet worden verstrekt volgens de tabellen en
het elektrisch schema in deze handleiding.
De fabrikant kan niet aansprakelijk worden gesteld voor schade als gevolg van het uitvoeren
van procedures die niet in overeenstemming zijn met de instructies voor gebruik of met
onderhoud of technische interventies uitgevoerd door onbevoegde personen.

22
B. PRODUCTEN
C. MONTAGE-INSTRUCTIES
Installatie Instructies
Installatie en afstelling van het apparaat moet worden uitgevoerd door de technische dienst
van de erkende servicedienst.
Plaats het apparaat op minstens 10 centimeter afstand van de zijwand of achterwand om
overmatige temperatuurstijging te voorkomen.
Plaats het apparaat onder een gefilterde afzuigkap om alle geuren en dampen te verwijderen
die vrijkomen tijdens het koken.
Het apparaat moet op een vlak oppervlak worden geplaatst, op de juiste manier afgesteld op
de vier verstelbare poten. (Zie figuur A)
Verwijder de beschermende nylonlaag op het apparaat. Verwijder eventuele plakkerige
deeltjes op het apparaat met een geschikte reiniger.
Laat nooit ontvlambaar materiaal achter rond het apparaat.
Elektrische Aansluiting
Sluit het apparaat aan op de elektrische installatie in overeenstemming met de elektrische
normen van het betreffende land.
Voorzie het apparaat van de juiste netspanning aangegeven op het typeplaatje.
Verbind het apparaat met het elektrische systeem met een geschikte automatische
zekering. Zet de zekering vast op een plaats die gemakkelijk toegankelijk is in geval van
gevaar.
CODE
BESCHRIJVING
SERIE
7178.0015
Elektrische kookplaat, tafelmodel, 2 ronde kookplaten
600
7178.0020
Elektrische kookplaat, tafelmodel, 4 ronde kookplaten
600
7178.0425
Elektrisch fornuis, 2 ronde platen
700
7178.0430
Elektrisch fornuis, 4 ronde platen
700
7178.0435
Elektrisch fornuis op statische elektrische oven GN 2/1, 4 ronde platen
700
7178.0215
Elektrische kookplaat, tafelmodel, 2 ronde kookplaten
700-S
7178.0220
Elektrische kookplaat, tafelmodel, 4 ronde kookplaten
700-S
7178.3035
Elektrisch fornuis op statische elektrische oven GN 2/1, 4 vierkant platen
900

23
De kabel die het apparaat met de elektrische installatie verbindt, moet van het type H05
RNF zijn.
Sluit de kabel aan via de ingangskoppeling, voordat u de voedingskabel aansluit op de
elektrische ingangsklem op het apparaat, Draai vervolgens het koppelingsdeksel vast
zodat de kabel niet terugkeert.
De elektrische input wordt aangegeven door middel van een label op het apparaat.
Als het apparaat in een commerciële keuken gaat worden gebruikt, zorg dan voor een
geschikt aardingssysteem. Houdt hier in gedachte artikel DIN VDE D100 Artikel 540.
De aardingsschroef " " wordt weergegeven met een label op de achterkant van het
apparaat.
D. INSTRUCTIES VAN DE BEDIENER EN
AANDACHTSPUNTEN
VOOR GEBRUIK
Laat het apparaat en de ovens gedurende een bepaalde tijd maximaal draaien om de
beschermende olie te verwijderen. Bedek vervolgens opnieuw met plantaardige olie.
Reinig verbrande en verkoolde voedselresten die zich aan het einde van elke dag in de
gootsteen ophopen met een geschikt hulpmiddel. Als dat onderhoud niet wordt uitgevoerd,
kunnen de verzamelde voedselresten afzettingen op het vel vormen, waardoor het
kookrendement wordt verminderd.
Gebruik de oven niet wanneer de achterste straalpijpstroken niet beschikbaar of gesloten
zijn.
Elektrische systeem controle
Controleer na voltooiing van de installatie de bedieningselementen en verwarmingen door
ze bij verschillende temperaturen te gebruiken.
Controleer na installatie en onderhoud het verwarmingsvermogen van het apparaat.
Tijdens het eerste gebruik zal er gedurende korte tijd rook en een lichte geur uit het apparaat
komen. Deze rook en lichte geur zijn de gevolgen veroorzaakt door isolatiematerialen en
dergelijke zoals olie op de metalen plaatoppervlakken. Dit is niet gevaarlijk en zal vanzelf
eindigen.
Tijdens het eerste gebruik van het apparaat, werk op de hoogste temperatuur gedurende een
periode van 1 uur.
STARTEN VAN KOOKGEREEDSCHAP (Zie figuur B)
Elke plaat heeft 6 vooraf ingestelde temperatuurwaarden. Het gewenste temperatuurniveau
wordt bepaald door de overeenkomstige knop (1).
1 is de laagste temperatuur en 6 is de hoogste temperatuur.

24
OVEN STARTEN (Zie figuur B)
Stel de thermostaat in op de gewenste temperatuur (2).
Nadat u de kookzone (4) hebt ingesteld, ziet u het indicatielampje branden.
Als het indicatielampje (3) uit is, betekent dit dat de oven de gewenste temperatuur heeft
bereikt.
De schakelaarposities op de schakelaar zijn als volgt:
SLUITEN
(Tot 1500W tot 4500W)
Bovenste verwarming (hoger 4500W)
Onderste verwarming (lager 4500W)
SLUITEN
Draai de schakelaar naar de positie "0".
Zet de thermostaat in de stand "0".
ONDERHOUD
Voer geen onderhoud uit wanneer het apparaat onder spanning staat.
Laat het apparaat volledig afkoelen voordat u het afveegt met een doek gedrenkt in warm
zeepsop.
Gebruik geen schoonmaakmiddelen die krassen op het oppervlak van het apparaat kunnen
veroorzaken.
Maak het apparaat niet schoon met water of stoom. Als u dit wel doet, kan dit leiden tot een
defect aan de elektrische plaat.
Als het apparaat gedurende een lange periode niet wordt gebruikt, bedek dan de
oppervlakken met een dun laagje vaseline. In geval van een gevaarlijke situatie met het
apparaat, informeer de bevoegde service. Laat een onbevoegde persoon niet ingrijpen op de
apparaten.

25
Informatie over compatibiliteit
Dit apparaat is ontworpen en vervaardigd in overeenstemming met de volgende richtlijnen en
normen.
markeringsrichtlijn, 93/68 / EEG
TS EN 60335-1:2012/AC
TS EN 60335-2-36:2002
CE-gerelateerd Instructie(s):
2014/35 / EU (laagspanning)
Aansprakelijkheidsbeperking: Alle technische informatie, bedieningsinstructies en bedienings-
en onderhoudsinformatie in deze handleiding bevatten de meest actuele informatie over uw
apparaat. De fabrikant aanvaardt geen aansprakelijkheid voor schade of letsel veroorzaakt door
het niet volgen van de instructies in deze handleiding, gebruik van het apparaat voor het
beoogde doel, ongeoorloofde reparatie of aanpassing of gebruik van reserveonderdelen die niet
zijn goedgekeurd door de fabrikant.

26
E. FIGUUR
Figuur A
Figuur B

27
F. PRODUCTTEKENINGEN
Product
Diepte
(W)
Breedte
(D)
Hoogte
(H)
Elektrischeingang
Vermogen
Kabel
Componenten
Gewicht
Volume
7178.0015
400 mm
600 mm
300 mm
230V AC 1N PE
4 kW
3x1.5
H05RNF
18 kg
0.18
m³
7178.0015
400 mm
600 mm
300 mm
230V AC 1N PE
4 kW
3x1.5
H05RNF
18 kg
0.18
m³
7178.0020
600 mm
600 mm
300 mm
400V AC 3N PE
8 kW
5x2.5
H05RNF
28 kg
0.28
m³
7178.0425
400 mm
700 mm
900 mm
400V AC 3N PE
4,6 kW
5x2.5
H05RNF
46 kg
0.46
m³
7178.0430
800 mm
700 mm
900 mm
400V AC 3N PE
9,2 kW
5x4
H05RNF
84 kg
0.84
m³
7178.0435
800 mm
700 mm
900 mm
400V AC 3N PE
15,2 kW
5x4
H05RNF
122 kg
0.84
m³
7178.0215
400 mm
700 mm
300 mm
400V AC 3N PE
4,6 kW
5x2.5
H05RNF
23 kg
0.21
m³
7178.0220
800 mm
700 mm
300 mm
400V AC 3N PE
9,2 kW
5x2.5
H05RNF
54,5 kg
0.36
m³
7178.3035
800 mm
900 mm
900
400V AC 3N PE
18 kW
5x4
H05RNF
170 kg
1.05
m³
7178.0015

28
7178.0020
7178.0425

29
7178.0430
7178.0435

30
7178.0215
7178.0220

31
7178.3035

32
G. ELEKTRISCHE AANSLUİTTEKENINGEN
7178.0015

33
7178.0425 / 7178.0215

34
7178.0020 / 7178.0430 / 7178.0220

35
7178.0435

36
7178.3035

37
SERIE 700 / 900 Bevestiging
600 / 700-S serie apparatuur bevestigings schema

38
Betriebs- und
Wartungsanleitung
Küchenofen (Elektrisch)

39
A.BESCHREIBUNG
Sehr geehrter Kunde,
Das von Ihnen bevorzugte COMBISTEEL-Produkt ist umwelt- und technologiefreundlich. Wir
bedanken uns für Ihre Wahl.
COMBISTEEL wurde mit dem "Full Quality"- Verständnis in modernen Produktionsanlagen
hergestellt.
Wichtige Sicherheitsinformationen
Lesen Sie dieses Handbuch sorgfältig durch und bewahren Sie es für zukünftige
Anwendungen auf.
WARNUNG: Die Geräte müssen von einem autorisierten Servicetechniker installiert werden.
WARNUNG: Das Gerät muss geerdet sein.
Weist darauf hin, dass die Gefahr von Personen- oder Sachschäden besteht.
Explosions- / Brandgefahr.
Die Anweisungen in diesem Handbuch enthalten wichtige Informationen zur sicheren
Installation, Betrieb, Reinigung und Wartung des Geräts. Bewahren Sie das Handbuch
daher in Reichweite des Bedieners und des Technikers auf.
Die Installation, der elektrische Anschluss und die Wartung des Geräts müssen von einer
autorisierten Fachkraft gemäß den Anweisungen des Herstellers durchgeführt werden.
Die elektrischen Anschlüsse des Geräts müssen gemäß den Tabellen und Schaltplänen in
diesem Handbuch erfolgen.
Der Hersteller haftet nicht für Schäden an Personen oder Gegenständen, die sich aus der
Durchführung von Handhabungen ergeben, die nicht der Gebrauchsanweisung
entsprechen, oder aus Wartungsarbeiten oder technischen Eingriffen, die von unbefugten
Personen durchgeführt werden.

40
B. PRODUCKTE
C. INSTALLATIONSANLEITUNG
Aufstellen
Die Installation und Einstellung des Geräts muss vom Technischen Service des
autorisierten Kundendienstes durchgeführt werden.
Stellen Sie das Gerät mindestens 10 cm von der Seitenwand oder Rückwand entfernt auf,
um einen übermäßigen Temperaturanstieg zu vermeiden.
Stellen Sie das Gerät unter eine gefilterte Abzugshaube, um Gerüche und Dämpfe zu
entfernen, die während des Betriebes freigesetzt werden können.
Das Gerät sollte auf eine ebene Fläche gestellt und auf die vier einstellbaren Füße
eingestellt werden. (Abbildung A)
Entfernen Sie die Schutzfolie des Gerätes. Entfernen Sie anhaftende Partikel mit einem
geeigneten Reinigungsmittel.
Lassen Sie niemals brennbares Material in der Nähe des Gerätes.
Elektrischer Anschluss
Schließen Sie das Gerät an die Elektroinstallation gemäß den elektrischen Normen des
jeweiligen Landes an.
Versorgen Sie das Gerät mit der auf dem Typenschild angegebenen Netzspannung.
Schließen Sie das Gerät mit einer geeigneten automatischen Sicherung an das elektrische
System an. Bringen Sie die Sicherung an einem Ort an, der im Gefahrenfall leicht
zugänglich ist.
Das Kabel, welches das Gerät mit der Stromzufuhr verbindet, muss vom Typ H05 RNF
sein.
CODE
BEZEICHNUNG
SERIE
7178.0015
Elektrokochfeld, Tischmodell, 2 runde Platten
600
7178.0020
Elektrokochfeld, Tischmodell, 4 runde Platten
600
7178.0425
Elektrobackofen, 2 runde Platten
700
7178.0430
Elektrobackofen, 4 runde Platten
700
7178.0435
Elektroherd auf statischem Elektrobackofen GN 2/1, 4 runde platten
700
7178.0215
Elektrokochfeld, Tischmodell, 2 runde Platten
700-S
7178.0220
Elektrokochfeld, Tischmodell, 4 runde Platten
700-S
7178.3035
Elektroherd auf statischem Elektrobackofen GN 2/1, 4 quadrat platten
900

41
Bevor Sie das Stromeingangskabel an die Stromeingangsklemme am Gerät anschließen,
schließen Sie das Kabel an, indem Sie es durch die Eingangskupplung führen. Ziehen Sie
dann die Kupplungsabdeckung so fest, dass das Kabel nicht zurücklaufen kann.
Die Stromzufuhr ist mit einem Etikett am Gerät gekennzeichnet.
Wenn das Gerät in einer gewerblichen Küche verwendet werden soll, wenden Sie ein
geeignetes Erdungssystem an. Halten Sie hier die Norm nach DIN VDE D100 Artikel
540 ein.
Der Erdungsbolzen " " ist auf einem Hinweisschild auf der Rückseite des Geräts
gekennzeichnet.
D. BENUTZERHINWEISE UND ZU BEACHTENDE PUNKTE
HINWEISE FÜR DEN BENUTZER
Betreiben Sie das Gerät und die Öfen eine Zeit lang auf Maximum, um den Öl-Schutzfilm
zu entfernen. Danach nochmals mit Pflanzenöl bestreichen.
Verbrannte und verkohlte Speisereste, die sich am Ende eines jeden Tages auf der
Ofenplatte angesammelt haben, mit einem geeigneten Werkzeug entfernen. Wenn die
genannte Wartung nicht durchgeführt wird, können angesammelte Speisereste
Ablagerungen auf dem Blech bilden, wodurch die Effizienz verringert wird.
Betreiben Sie den Ofen nicht, wenn die hinteren Düsenöffnungen nicht vorhanden oder
geschlossen sind.
Kontrolle der elektrischen Anlage
Überprüfen Sie nach Abschluss der Installation die Steuerelemente und Heizelemente,
indem Sie sie das Gerät bei unterschiedlichen Temperaturen betreiben.
Überprüfen Sie nach Installation und Wartung die Heizleistung des Gerätes.
Bei der ersten Inbetriebnahme tritt kurzzeitig Rauch und ein leichter Geruch aus dem
Gerät aus. Der Rauch und der leichte Geruch sind die Folgen, die durch Isoliermaterialien
wie Öl usw. auf Metalloberflächen verursacht werden. Dies ist nicht gefährlich und wird
sich von selbst auflösen.
Während des ersten Gebrauchs des Geräts 1 Stunde lang unter maximaler Temperatur
betreiben.
STARTEN DER KOCHFELDER (Abbildung B)
Jede Platte hat 6 voreingestellte Temperaturwerte. Das gewünschte Temperaturniveau wird
mit dem jeweiligen Regler (1) eingestellt.
1 ist die niedrigste Temperatur und 6 ist die höchste Temperatur.
STARTEN DES OFENS (Abbildung B)
Stellen Sie den Thermostat auf die gewünschte Temperatur ein (2).
Nach dem Einstellen der Kochzone (4) leuchtet die Kontrollleuchte auf.
Wenn die Kontrollleuchte (3) nicht leuchtet, hat der Backofen die gewünschte Temperatur
erreicht.
Die Schalterstellungen am Regler sind wie folgt:

42
ABSCHALTEN
(nach oben 1500 W nach unten 4500 W)
Unterhitze (nach unten 4500W)
Oberhitze (nach oben 4500W)
ABSCHALTEN
Den Regler auf Position "0" bringen.
Bringen Sie den Thermostat auf Position "0".
WARTUNG
Führen Sie keine Wartungsarbeiten durch, wenn das Gerät unter Spannung steht.
Wischen Sie das Gerät vor dem vollständigen Abkühlen mit einem in warmes
Seifenwasser getauchten Tuch ab.
Verwenden Sie keine Reinigungsmittel, die Kratzer auf der Geräteoberfläche verursachen
könnten.
Reinigen Sie das Gerät nicht mit Wasser- oder Dampfdruck. Andernfalls kann es zu einem
Ausfall der elektrischen Platte kommen.
Wenn das Gerät längere Zeit nicht benutzt wird, decken Sie die Oberflächen mit einer
dünnen Schicht Vaselinöl ein. Bei gefährlichen Situationen mit dem Gerät unverzüglich
den autorisierten Kundendienst benachrichtigen. Lassen Sie niemals unbefugte Personen
in das Gerät eingreifen.
Informationen zur Kompatibilität
Dieses Gerät wurde gemäß den folgenden Richtlinien und Normen entwickelt und hergestellt.
Kennzeichnungsrichtlinie 93/68 / EEC
TS EN 60335-1:2012/AC
TS EN 60335-2-36:2002
CE-bezogene Richtlinie(n):
2014/35 / EU (Niederspannung)
Haftungsbeschränkung: Alle technischen Informationen, Bedienungsanleitungen sowie
Informationen über den Betrieb und Wartung in diesem Handbuch enthalten die neuesten
Informationen zu Ihrem Gerät. Der Hersteller übernimmt keine Verantwortung für Schäden
oder Verletzungen, die durch die Nichtbeachtung der Anweisungen in diesem Handbuch, die
bestimmungsgemäße Verwendung des Geräts, nicht autorisierte Reparaturen oder Änderungen
oder die Verwendung von nicht vom Hersteller genehmigten Ersatzteilen verursacht wurden.

43
E. ABBILDUNG
Abbildung A
Abbildung B

44
F. PRODUKTZEICHNUNGEN
7178.0015
Produkt
Breite
(W)
Tiefe
(D)
Höhe
(H)
Stromzufuhr
Leistung
Verkabelung
Gewicht
Volumen
7178.0015
400 mm
600 mm
300 mm
230V AC
1N PE
4 kW
3x1.5
H05RNF
18 kg
0.18
m³
7178.0020
600 mm
600 mm
300 mm
400V AC 3N
PE
8 kW
5x2.5
H05RNF
28 kg
0.28
m³
7178.0425
400 mm
700 mm
900 mm
400V AC
3N PE
4,6 kW
5x2.5
H05RNF
46 kg
0.46
m³
7178.0430
800 mm
700 mm
900 mm
400V AC 3N
PE
9,2 kW
5x4
H05RNF
84 kg
0.84
m³
7178.0435
800 mm
700 mm
900 mm
400V AC 3N
PE
15,2 kW
5x4
H05RNF
122 kg
0.84
m³
7178.0215
400 mm
700 mm
300 mm
400V AC
3N PE
4,6 kW
5x2.5
H05RNF
23 kg
0.21
m³
7178.0220
800 mm
700 mm
300 mm
400V AC
3N PE
9,2 kW
5x2.5
H05RNF
54,5 kg
0.36
m³
7178.3035
800 mm
900 mm
900
400V AC
3N PE
18 kW
5x4
H05RNF
170 kg
1.05
m³

45
7178.0020
7178.0425

46
7178.0430
7178.0435

47
7178.0215
7178.0220

48
7178.3035

49
G. ELEKTRISCHE ANSCHLUSSZEICHNUNG
7178.0015

50
7178.0425 / 7178.0215

51
7178.0020 / 7178.0430 / 7178.0220

52
7178.0435

53
7178.3035

54
SERIE 700 / 900 Fixierung
Gerätefixierungsschema der Serie 600 / 700-S

55
Manuel d’Utilisation et de
Maintenance
Cuisiniere (Électrique)

56
A. EXPLICATIONS
Chère, cher client,
Votre produit COMBISTEEL préféré est respectueux de l’environnement et technologique. Nous
vous remercions pour votre choix.
COMBISTEEL est fabriqué conformément d’une compréhension de la "Pleine Qualité" dans les
installations de fabrication modernes.
Informations importantes sur la sécurité
Lisez attentivement ce manuel et conservez-le pour se référer ultérieurement .
AVERTISSEMENT :L’installation des appareils doit être effectuée par un personnel de service
agréé.
AVERTISSEMENT : L’équipement doit être mis à la terre.
Cela signifie qu'il existe un risque de blessure ou de dommage matériel.
Risque d’explosion et d’incendie.
Les instructions de ce manuel contiennent des informations importantes sur l’installation,
l’utilisation, le nettoyage et la maintenance en toute sécurité de l’appareil. Par conséquent,
conservez le manuel à portée de l'utilisateur et du technicien.
L'installation, le raccordement électrique et la maintenance de l'appareil doivent être
effectués par un spécialiste agréé conformément aux instructions du fabricant.
Les raccordements électriques de l'appareil doivent être installés conformément aux
tableaux et au schéma électrique fournis dans ce manuel.
Le fabricant ne pourra être tenu responsable des dommages finaux résultant de la
réalisation de toute procédure non conforme aux instructions d’utilisation ou
d'interventions de maintenance ou techniques effectuées par des personnes non agréées.

57
B. DES PRODUITS
C. INSTRUCTIONS DE MONTAGE
Installation
L’installation et le réglage de l’appareil doivent être effectués par l’équipe technique du
service agréé.
Placez l'appareil à au moins 10 cm du mur latéral ou arrière pour éviter toute augmentation
excessive de chaleur.
Placez l'appareil sous une hotte aspirante filtrée pour éliminer les odeurs et les vapeurs
pouvant se dégager pendant la cuisson.
L’appareil doit être placé sur une surface plane en ajustant sur ses quatre pieds réglables.
(Figure A)
Retirez la couche de protection en nylon de l'appareil. Éliminez toutes les particules
collantes sur l'appareil avec un nettoyant approprié.
Ne jamais laisser de matériaux inflammables autour de l'appareil.
Raccordement Électrique
Raccordez l'appareil à l'installation électrique conformément aux normes électriques du
pays.
Alimentez l’appareil avec la tension appropriée telle indiquée sur le panneau signalétique.
Raccordez l’appareil au système électrique avec un fusible automatique approprié. Fixez
le fusible mentionné dans un endroit facilement accessible en cas de danger.
Le type du câble de raccordement de l’appareil à l’installation électrique doit être au moins
H05 RNF.
CODE
LA DESCRIPTION
SERIÉ
7178.0015
Table de cuisson électrique, modèle de table, 2 plaques rondes
600
7178.0020
Table de cuisson électrique, modèle de table, 4 plaques rondes
600
7178.0425
Cuisinière électrique, 2 plaques rondes
700
7178.0430
Cuisinière électrique, 4 plaques rondes
700
7178.0435
Cuisinière électrique sur four électrique statique GN 2/1, 4 plaques rondes
700
7178.0215
Table de cuisson électrique, modèle de table, 2 plaques rondes
700-S
7178.0220
Table de cuisson électrique, modèle de table, 4 plaques rondes
700-S
7178.3035
Cuisinière électrique sur four électrique statique GN 2/1, 4 carré rondes
900

58
Avant de raccorder le câble d’alimentation au collier d’entrée électrique de l’appareil,
raccordez le câble en passant par le couplage d’entrée. Ensuite, serrez fermement le capot
de couplage sans permettre le retour du câble.
L’entrée électrique est indiquée sur l’appareil avec une étiquette.
Si l'appareil doit être utilisé dans une cuisine professionnelle, appliquez un système de
mise à la terre approprié. Notez ici DIN VDE D100 Article 540.
Le boulon de mise à la terre " " est indiqué avec une étiquette à l'arrière de l'appareil.
D. INSTRUCTIONS A L’UTILISATEUR ET POINTS A
CONSIDÉRER
Faites fonctionner l’appareil et les fours au maximum pendant un certain temps pour
éliminer l’huile protectrice. Ensuite, recouvrez d'une fine couche d'huile végétale.
Nettoyez les résidus d'aliments brûlés et carbonisés qui se sont accumulés sur l'évier de
cuisine à la fin de chaque journée avec un ustensile approprié. Si ladite maintenance n'est
pas effectuée, les résidus d'aliments accumulés peuvent former des dépôts sur la plaque,
réduisant ainsi l'efficacité de la cuisson.
Ne pas faire fonctionner le four lorsque les rebords arrière ne sont pas présents ou fermés.
AVANT L’UTILISATION
Vérification du système électrique
Une fois l’installation terminée, vérifiez les éléments de commande et les éléments
chauffants en les faisant fonctionner à des températures différentes.
Après l'installation et la maintenance, vérifiez la puissance de chauffage de l'appareil.
Pendant la première utilisation, une fumée et une odeur légère se dégageront de
l’appareil pendant une courte durée. La fumée et l’odeur légère susmentionnées sont les
conséquences des matériaux isolants tels que l'huile, etc., sur les surfaces en tôle
métallique. Ce n'est pas dangereux et disparaitra lui-même.
Pour la première utilisation, faites fonctionner l'appareil avec la plus haute performance
pendant une heure.
ALLUMER LES CUISINIERES (Figure B)
Chaque plaque a 6 valeurs de température préréglées. Le niveau de température souhaité
est déterminé par le bouton correspondant (1).
1 est la température la plus basse et 6, la température la plus élevée.
ALLUMER LE FOUR (Figure B)
Réglez le thermostat à la température souhaitée (2).
Après avoir réglé la zone de cuisson (4) vous verrez le voyant allumé.
Si le voyant (3) s’éteint, cela signifie que le four a atteint à la température souhaitée.
Les positions de changement sur l’interrupteur sont ci-dessous :

59
ÉTEINDRE
(Supérieur 1500W inférieur 4500W)
Élément chauffant inférieur (Inférieur 4500W)
Élément chauffant supérieur (Supérieur 4500W )
ÉTEINDRE
Tournez l’interrupteur à la position "0".
Tournez le thermostat à la position "0".
MAINTENANCE
Ne pas effectuer de maintenance lorsque l’appareil est alimenté par courant électrique.
Avant de refroidir complètement, essuyez l'appareil avec un chiffon imbibé d'eau tiède
savonneuse.
Ne pas utiliser de produits de nettoyage susceptibles de rayer la surface de l'appareil.
Ne pas nettoyer l’appareil avec de l’eau ou de la vapeur à haute pression. Sinon cela
pourrait provoquer un dysfonctionnement du panneau électrique.
Si l'appareil ne sera pas utilisé pendant une longue période, recouvrez les surfaces avec une
fine couche de vaseline. En cas de situation dangereuse de l’appareil, contactez le service
agréé. Ne laisser jamais des personnes non agréées à intervenir l'appareil.
Information sur la conformité
Cet appareil a été conçu et fabriqué conformément aux directives et normes suivantes.
Directive de marquage, 93/68/ CEE
TS EN 60335-1:2012/AC
TS EN 60335-2-36 :2002
Directive(s) concernant
CE: 2014/35/UE (Basse Tension)
Restrictions d’obligation : Toutes les informations techniques, les instructions de mise en
service et les informations d'utilisation et de maintenance contenues dans ce manuel contiennent
les informations les plus récentes sur votre appareil. Le fabricant ne pourra être tenu responsable
des dommages ou blessures personnelles résultant de la réalisation de toute procédure non
conforme aux instructions d’utilisation, de toute utilisation, réparation ou modification non
autorisée de l’appareil ou utilisation de pièces de rechange non approuvées par le fabricant.

60
E. LES FIGURES
Figure A
Figure B

61
F.DESSINS DES PRODUITS
Produit
Largeur
(W)
Profondeur
(D)
Hauteur
(H)
Source de
Courant
Puissance
Câblage
Poids
Volume
7178.0015
400 mm
600 mm
300 mm
230V AC
1N PE
4 kW
3x1.5
H05RNF
18 kg
0.18
m³
7178.0015
400 mm
600 mm
300 mm
230V AC
1N PE
4 kW
3x1.5
H05RNF
18 kg
0.18
m³
7178.0020
600 mm
600 mm
300 mm
400V AC 3N
PE
8 kW
5x2.5
H05RNF
28 kg
0.28
m³
7178.0425
400 mm
700 mm
900 mm
400V AC
3N PE
4,6 kW
5x2.5
H05RNF
46 kg
0.46
m³
7178.0430
800 mm
700 mm
900 mm
400V AC 3N
PE
9,2 kW
5x4
H05RNF
84 kg
0.84
m³
7178.0435
800 mm
700 mm
900 mm
400V AC 3N
PE
15,2 kW
5x4
H05RNF
122 kg
0.84
m³
7178.0215
400 mm
700 mm
300 mm
400V AC
3N PE
4,6 kW
5x2.5
H05RNF
23 kg
0.21
m³
7178.0220
800 mm
700 mm
300 mm
400V AC
3N PE
9,2 kW
5x2.5
H05RNF
54,5 kg
0.36
m³
7178.3035
800 mm
900 mm
900
400V AC
3N PE
18 kW
5x4
H05RNF
170 kg
1.05
m³
7178.0015

62
7178.0020
7178.0425

63
7178.0430
7178.0435

64
7178.0215
7178.0220

65
7178.3035

66
G. DESSIN DE CONNEXION ÉLECTRIQUE
7178.0015

67
7178.0425 / 7178.0215

68
7178.0020 / 7178.0430 / 7178.0220

69
7178.0435

70
7178.3035

71
Fixation SÉRIE 700 / 900
600 / 700-S Schéma de fixation de périphérique série

72
Combisteel BV
Office: Lichtschip 63, 3991 CP, Houten, The
Netherlands
Warehouse: Verlengde Gildenweg 20, 8304 BK,
Emmeloord, The Netherlands
TEL: +31 (0)30 285 00 90
E-mail: info@combisteel.com
www.combisteel.com
-
 1
1
-
 2
2
-
 3
3
-
 4
4
-
 5
5
-
 6
6
-
 7
7
-
 8
8
-
 9
9
-
 10
10
-
 11
11
-
 12
12
-
 13
13
-
 14
14
-
 15
15
-
 16
16
-
 17
17
-
 18
18
-
 19
19
-
 20
20
-
 21
21
-
 22
22
-
 23
23
-
 24
24
-
 25
25
-
 26
26
-
 27
27
-
 28
28
-
 29
29
-
 30
30
-
 31
31
-
 32
32
-
 33
33
-
 34
34
-
 35
35
-
 36
36
-
 37
37
-
 38
38
-
 39
39
-
 40
40
-
 41
41
-
 42
42
-
 43
43
-
 44
44
-
 45
45
-
 46
46
-
 47
47
-
 48
48
-
 49
49
-
 50
50
-
 51
51
-
 52
52
-
 53
53
-
 54
54
-
 55
55
-
 56
56
-
 57
57
-
 58
58
-
 59
59
-
 60
60
-
 61
61
-
 62
62
-
 63
63
-
 64
64
-
 65
65
-
 66
66
-
 67
67
-
 68
68
-
 69
69
-
 70
70
-
 71
71
-
 72
72


CombiSteel 7178.0020 Handleiding
- Categorie
- Bevestigingssets
- Type
- Handleiding
in andere talen
- English: CombiSteel 7178.0020 User manual
- français: CombiSteel 7178.0020 Manuel utilisateur
- Deutsch: CombiSteel 7178.0020 Benutzerhandbuch