
How to connect this drive to a computer?
How to use the software with this drive?
• Wie verwendet man dieses Laufwerks an den PC?
Verwendung der Software mit diesem Laufwerk
• Raccordement de cet appareil à mon ordinateur
Comment utiliser les logiciels de cet appareil?
• Come collegare questa unità al computer?
Come usare il software con questa unità?
• Hoe sluit ik dit station op mijn computer aan?
Hoe gebruik ik de programma's?
• ¿Cómo conectar esta unidad al ordenador?
¿Cómo utilizar el software con esta unidad?
Jak zainstalować ten napęd w komputerze PC?
Jak używać tego oprogramowania z tym napędem?
For ED52CDRW Drives
using
Nero 5.5
Version 1.1
9305 125 2300.2
Pagina wordt geladen...

3
Installazione Come collegare il ED52 al computer? 5
Come svolgere installazioni particolari 19
Copia Come copiare un dischi? 31
Dati Come creare un dischi di dati? 37
Musica Come creare un dischi Audio? 45
Garanzia Come si accede alle informazioni
sulla garanzia memorizzate? 51
Installeren Hoe sluit ik de ED52 op mijn computer aan? 5
Aansluiten in speciale gevallen 19
Kopiëren Hoe kopieer ik een disc? 31
Data Hoe maak ik zelf een data-disc? 37
Muziek Hoe maak ik zelf een muziek-disc? 45
Garantie Waar vind ik informatie over de garantie? 51
Instalación ¿Cómo conectar ED52 al ordenador? 5
¿Cómo conectar opciones especiales? 19
Copia ¿Cómo copiar un disco? 31
Datos ¿Cómo crear un disco de datos? 37
Música ¿Cómo crear un disco de audio? 45
Garantía ¿Cómo encontrar información sobre la garantía? 51
Instalowanie W jaki sposób podłączyć napęd ED52 do komputera? 5
Informacje specjalne na temat podłączania 19
Kopiowanie Jak kopiować dysk? 31
Dane Jak utworzyć dysk z danymi? 37
Muzyka Jak utworzyć dysk audio? 45
Gwarancji Jak odszukać na dysku z programem Nero
informacje dotyczące gwarancji? 51
I
NL
E
Indice - Inhoud - Índice - Spis treści
PL
Pagina wordt geladen...
Pagina wordt geladen...
Pagina wordt geladen...

7
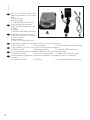
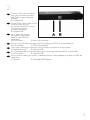
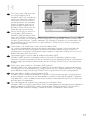
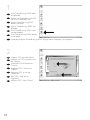
At the left side, you will find the
plugs you need for connecting
your ED52 to your computer.
A: Power.
B: HiSpeed USB.
Auf der linken Seite finden Sie die
Anschlüsse, die Sie zum
Anschließen des ED52 an Ihren
Computer benötigen.
A: Stromversorgung.
B: HiSpeed USB.
Sur la gauche figurent les
connecteurs requis pour
brancher votre ED52 à
l’ordinateur.
A:Alimentation. B: Port USB haut débit.
Sul lato sinistro, si trovano le connessioni per collegare il ED52 al vostro computer.
A:Alimentazione. B: USB ad alta velocità.
Links vindt u de pluggen waarmee u de ED52 op uw computer kunt aansluiten.
A:Voedingsspanning. B: HiSpeed USB.
En el lado izquierdo verá los conectores que necesita para conectar ED52 al ordenador.
A:Alimentación. B: HiSpeed USB.
Z lewej strony znajdują się wtyczki, za pomocą których należy podłączyć urządzenie ED52 do
komputera.
A: Zasilanie. B: Przewód USB HiSpeed.
2
UK
D
F
I
NL
E
PL
Pagina wordt geladen...
Pagina wordt geladen...

10
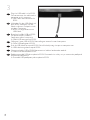
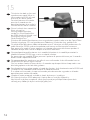
Connect the power cable and
plug it in a wall outlet.
Schließen Sie das Stromversor-
gungskabel an und verbinden Sie es
mit der Wandsteckdose.
Connectez le câble d’alimentation
et branchez-le à une prise secteur.
Collegate il cavo di alimentazione
ed inseritelo in una presa elettrica
a muro.
Sluit de voedingskabel aan op de
ED52 en op een stopcontact.
Conecte el cable de alimentación y enchúfelo en una toma de corriente.
Podłącz przewód zasilający i włóż wtyczkę do gniazda sieciowego.
5
UK
D
F
I
NL
E
PL
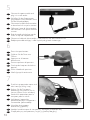
Press the open button.
Drücken Sie die Taste zum
Öffnen.
Appuyez sur le bouton
d’ouverture.
Premere pulsante di apertura.
Druk op de knop om de lade te
openen.
Pulse el botón de apertura.
Naciśnij przycisk otwierania.
6
UK
D
F
I
NL
E
PL
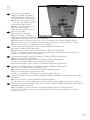
Find the transportation cover and
take it out (by lifting it up).
Suchen Sie die Transport-
abdeckung und nehmen Sie sie
heraus (indem Sie sie anheben).
Soulevez la protection pour le
transport pour la retirer.
Individuate il coperchio
protettivo durante il trasporto e
rimuovetelo (sollevandolo)
Verwijder de transport-
bescherming (optillen).
Localice la cubierta para el transporte y extráigala (tirando de ella).
Znajdź pokrywę transportową i wyjmij ją (unosząc do góry).
7
UK
D
F
I
NL
E
PL

11
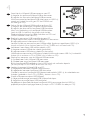
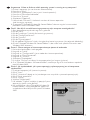
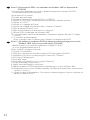
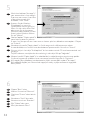
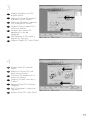
If you are using Windows
Millennium Edition,Windows
2000 or Windows XP, connect
the USB cable to the computer.
➜ Skip this step if you are using
Windows 98 Second Edition.
If you do not know which
operating system you are using,
please go to the chapter
"How to install specials", item 1.
Wenn Sie mit dem
Betriebssystem Windows
Millennium Edition,Windows
2000 oder Windows XP arbeiten,
verbinden Sie das USB-Kabel mit dem Computer.
➜ Überspringen Sie diesen Schritt, wenn Sie mit Windows 98 Second Edition arbeiten.
Wenn Sie nicht wissen, mit welchem Betriebssystem Sie arbeiten, gehen Sie bitte zu dem
Kapitel "Wie installiert man Besonderheiten", Position 1.
Si vous utilisez Windows Millennium,Windows 2000 ou Windows XP,
connectez le câble USB à l’ordinateur.
➜ Ignorez cette étape si vous utilisez Windows 98 Deuxième Édition.
Si vous ne savez pas quel est votre système d’exploitation, reportez-vous à la section 1 du
chapitre « Installation d’éléments spéciaux ».
In ambiente Windows Millennium Edition,Windows 2000 o Windows XP,
collegate il cavo USB al computer.
➜ Saltate questo passaggio se utilizzate Windows 98 Second Edition.
Se non siete certi del tipo di sistema operativo utilizzato,
consultate il capitolo "Come svolgere installazioni particolari", argomento 1.
Gebruikt u Windows Millennium Edition,Windows 2000 of Windows XP,
dan sluit u de USB-kabel op uw computer aan.
➜ Sla deze stap over als u Windows 98 Second Edition gebruikt.
Weet u niet welk besturingssysteem u hebt,
kijk dan in het hoofdstuk "Aansluiten in speciale gevallen" bij deel 1.
Si utiliza Windows Millennium Edition,Windows 2000 o Windows XP, conecte el cable USB al
ordenador.
➜ Omita este paso si utiliza Windows 98 Second Edition.
Si ignora cuál es su sistema operativo, consulte "Cómo instalar opciones especiales", punto 1.
Jeśli używasz systemu Windows Millennium Edition, Windows 2000 lub Windows XP, podłącz
przewód USB do komputera.
➜ W przypadku systemu Windows 98 Second Edition punkt ten należy pominąć.
Jeśli nie wiesz jakiego używasz systemu, przejdź do części "Informacje specjalne na temat
instalacji", punkt 1.
8
UK
D
F
I
NL
E
PL
Pagina wordt geladen...

13
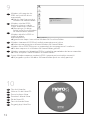
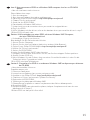
Press the open button.
➜ When you are using
Windows 98 Second Edition,
insert the Nero disc in the
CDROM device of your
computer. If you have no
CD-ROM device, please refer
to the Chapter "How to install
specials", item 2 and/or 3).
Drücken Sie die Taste zum
Öffnen.
➜ Wenn Sie das Betriebssystem Windows 98 Second Edition benutzen, legen Sie die Nero-
CD in das CDROM-Laufwerk Ihres Computer ein.Wenn Sie kein CDROM-Laufwerk
haben, sehen Sie im Kapitel "Installation in besonderen Fällen", Position 2 und/oder 3 nach.
Appuyez sur le bouton d’ouverture.
➜ Si vous utilisez Windows 98 Deuxième Édition, insérez le disque Nero dans le lecteur de
CD-ROM de votre ordinateur.
Sinon, reportez-vous aux sections 2 et/ou 3 du chapitre « Installation d’éléments spéciaux ».
Premere pulsante di apertura.
➜ In Windows 98 Second Edition, inserite il disco di Nero nell'unità CDROM del computer.
Se non è installata un'unità CDROM, consultate il capitolo "Come svolgere installazioni
particolari", argomento 2 e/o 3.
Druk op de knop om de lade te openen.
➜ Als u Windows 98 Second Edition gebruikt, open dan een CD-ROM-station van uw
computer. Hebt u geen CD-ROM-station, kijk dan in het hoofdstuk
"Aansluiten in speciale gevallen" bij deel 2 en/of 3.
Pulse el botón de apertura.
➜ Si utiliza Windows 98 Second Edition, introduzca el disco de Nero en el dispositivo de
CDROM del ordenador. Si no dispone de CD-ROM, consulte el capítulo "Cómo instalar
opciones especiales", punto 2 y/o 3).
Naciśnij przycisk otwierania.
➜ W przypadku systemu Windows 98 Second Edition, włóż płytę z programem Nero do
napędu płyt CD-ROM zainstalowanego w komputerze. Jeśli komputer nie jest wyposażony
w napęd płyt CD-ROM, należy zapoznać się z rozdziałem "Informacje specjalne na temat
instalacji", punkt 2 oraz/lub 3).
11
UK
D
F
I
NL
E
PL
Insert the Nero Disc in the
ED52.
Legen Sie die Nero-CD in das
ED52-Laufwerk ein.
Insérez le disque Nero dans le
ED52.
Inserite il disco di Nero nel ED52.
Leg de Nero-CD in de ED52.
Introduzca el disco de Nero en
ED52.
Włóż płytę Nero Disc do
urządzenia ED52.
12
UK
D
F
I
NL
E
PL
Pagina wordt geladen...

15
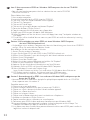
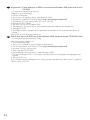
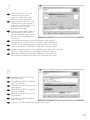
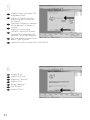
This step is only valid when you
are using Windows 98 SE.
Windows 98 SE will need drivers.
When the ‘Add New hardware
Wizard’ asks where the drivers
can be found, tick the checkbox
‘Specify a location’ and use the
browse button to point to the
directory ‘Philips Drivers’ on the
Nero disc you have inserted.
Dieser Schritt gilt nur, wenn Sie
mit Windows 98SE arbeiten:
Windows 98SE benötigt Treiber.
Wenn der "Add New Hardware
Wizard" (Assistent zum Hinzufügen neuer Hardware) Sie fragt, wo die Treiber zu finden sind,
kreuzen Sie das Kästchen "Specify a location" (Ein Verzeichnis angeben) an und benutzen Sie
die Schaltfläche zum Durchsuchen, um das Verzeichnis "Philips Drivers" auf der eingelegten
Nero Disc anzugeben.
Cette étape n’est valable que si vous utilisez Windows 98SE:
Ce système d’exploitation nécessite des pilotes spécifiques. Lorsque l’ «Assistant Ajout de
nouveau matériel» vous demande où se trouvent les pilotes, cochez la case «Définir un
emplacement» et cliquez sur «Parcourir» pour indiquer le répertoire «Philips Drivers» sur le
disque Nero que vous avez inséré.
Questo passaggio si riferisce solo all'ambiente Windows 98SE:
Windows 98SE richiede l'installazione di driver. Quando l'"Installazione guidata nuovo
hardware" richiede la posizione dei driver, marcate la casella "Specifica percorso" ed utilizzate il
pulsante Sfoglia per accedere alla directory dei driver Philips "Philips Drivers" del disco Nero
inserito.
Deze stap is alleen nodig als u Windows 98SE gebruikt:
Windows 98SE heeft stuurprogramma's nodig.Als de wizard "Nieuwe hardware toevoegen"
naar de plaats van stuurprogramma's vraagt, markeer dan "Een locatie specificeren" en ga dan
via de Bladeren-knop naar de map "Philips Drivers" op de Nero-CD die u hebt geplaatst.
Este paso sólo es válido si utiliza Windows 98 SE:
Windows 98 SE necesita controladores. Cuando el "Asistente para agregar nuevo hardware"
pregunte dónde se encuentran los controladores, marque la casilla de verificación "Especificar
una ubicación" y utilice el botón Examinar para indicar el directorio "Philips Drivers" del disco
de Nero que ha introducido.
Ten krok obowiązuje wyłącznie przy korzystaniu z Windows 98SE:
Windows 98SE wymagają sterowników. Kiedy "Kreator dodawania nowego sprzętu" poprosi o
podanie położenia sterowników, należy zaznaczyć pole "Podaj lokalizację") i użyć przycisku
przeglądania do wskazania katalogu "Sterowniki Philips" na włożonym dysku Nero.
14
UK
D
F
I
NL
E
PL

16
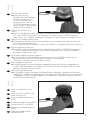
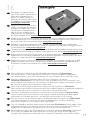
This device has both a silent and
a performance mode.When in
silent mode, the ED52 will read
and write at a lower speed.
To switch between the modes,
press for 2 seconds on the
open/close button when a disc is
inserted and the cover is closed.
Dieses Laufwerk kann sowohl im
Silent- als auch im
Leistungsmodus betrieben
werden. Im Silent-Modus führt
das ED52-Laufwerk Schreib- und
Lesezugriffe mit geringerer
Geschwindigkeit aus.
Zwischen den beiden Betriebsarten kann umgeschaltet werden, indem man die Open/Close-
Taste bei eingelegter CD und geschlossener Abdeckung 2 Sekunden lang gedrückt hält.
Ce périphérique offre deux modes de fonctionnement : silencieux et haute performance. En
mode silencieux, l’ED52 exécute les opérations de lecture et d’écriture plus lentement.
Pour passer d’un mode à l’autre, appuyez sur le bouton d’ouverture/fermeture pendant 2
secondes lorsque vous insérez un disque et fermez le couvercle.
Questo dispositivo può funzionare sia in modalità silenziosa sia in modalità prestazioni. In
modalità silenziosa, l'ED52 legge e scrive a velocità inferiore.
Per passare da una modalità all'altra, premete il pulsante di apertura/chiusura per 2 secondi a
disco inserito e coperchio chiuso.
Dit apparaat beschikt zowel over een stille als een snelle modus. In de stille modus leest en
schrijft de ED52 op een lagere snelheid.
Om een andere modus te kiezen, drukt u 2 seconden op de open/sluiten-knop nadat u een
disc hebt geplaatst en de lade hebt gesloten.
Este dispositivo tiene ambos modos, el modo de silencio y el de funcionamiento. La ED52 leerá
y escribirá a una velocidad inferior durante el modo de silencio.
Si un disco está insertado y la tapa está cerrada, pulse durante dos segundos en el botón
open/close para cambiar de modo.
Urządzenie może pracować w dwóch trybach: dyskretnym i wydajnym.
Wtrybie dyskretnym ED52 odczytuje i zapisuje dane z mniejszą szybkością.
Aby zmienić tryb pracy urządzenia, należy przytrzymać przycisk open/close przez dwie
sekundy, przy włożonym dysku i zamkniętej pokrywie.
15
UK
D
F
I
NL
E
PL
Pagina wordt geladen...
Pagina wordt geladen...
Pagina wordt geladen...
Pagina wordt geladen...

21
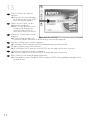
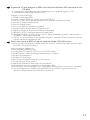
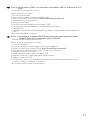
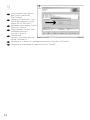
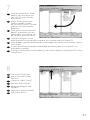
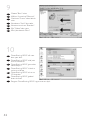
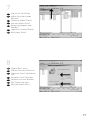
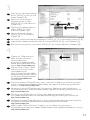
Argomento 1:How to find out which operating system is running on my computer?
1.Avviate il computer (se non lo avete ancora acceso).
2. Fate clic su "Start".
3. Fate clic su "Impostazioni" (non in tutti i sistemi operativi).
4. Fate clic sul "Pannello di controllo".
5. Fate clic su "Sistema".
6. Selezionate "Proprietà".
7. Nella scheda "Generale" è indicata la versione di sistema operativo
(vedi immagine seguente).
8. Se compare "Microsoft Windows 98 Second Edition", dovrete seguire le osservazioni
particolari relative a Windows 98SE.
Deel 1:Hoe kijk ik na welk besturingssysteem op mijn computer wordt gebruikt?
1. Start de computer op als dat nog niet is gebeurd.
2. Klik op "Start".
3. Klik op "Instellingen" (niet bij alle besturingssystemen).
4. Klik op "Configuratiescherm".
5. Klik op "Systeem".
6. Klik op "Eigenschappen".
7. Bij het tabblad "Algemeen" vindt u het gebruikte besturingssysteem (zie volgende afbeelding).
8.Als dat "Microsoft Windows 98 Second Edition" is, dan moet u de speciale instructies voor
Windows 98SE uitvoeren.
Punto 1: Cómo averiguar el sistema operativo que ejecuta el ordenador
1. Encienda el ordenador si está apagado.
2. Haga clic en "Inicio".
3. Haga clic en "Configuración" (no en todos los sistemas operativos).
4. Haga clic en "Panel de control".
5. Haga clic en "Sistema".
6. Seleccione "Propiedades".
7. En la ficha "General" se indica el sistema operativo (ver imagen siguiente).
8. Si ve "Microsoft Windows 98 Second Edition", tendrá que seguir las instrucciones especiales
para Windows 98SE.
Punkt 1: Jak się dowiedzieć, jaki system operacyjny wykorzystywany jest w komputerze
użytkownika?
1. Uruchom komputer, jeśli jeszcze nie pracuje.
2. Kliknij "Start".
3. Kliknij "Ustawienia" (opcja ta nie jest dostępna we wszystkich systemach operacyjnych).
4. Kliknij "Panel sterowania".
5. Kliknij "System".
6. Wybierz "Właściwości".
7. Na zakładce "Ogólne" znajduje się pozycja System
operacyjny (patrz rycina poniżej).
8. Jeśli zawiera ona nazwę "Microsoft Windows 98
Second Edition", należy postępować zgodnie ze
wskazówkami określonymi dla systemu Windows
98SE.
I
NL
E
PL
Pagina wordt geladen...

23
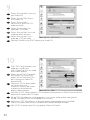
Argomento 2:Come collegare un ED52 ad un computer Windows 98SE sprovvisto di unità
CD-ROM
• E' necessario un altro computer, con installata un'unità in grado di leggere un CD.
In caso contrario, consultate l'argomento 3.
Svolgete i seguenti passaggi:
1.Avviate un altro computer.
2. Inserite il disco di Nero per il ED52 nell'unità CDROM.
3. Fate clic su "Exit" (Esci) quando compare lo schermo d'installazione di Nero.
4. Fate clic su "Risorse del computer".
5. Fate clic sul logo "Nero".
6. Fate un clic destro e selezionate "Esplora".
7.Accedete alla cartella dei driver "Philips Drivers".
8. Copiate il contenuto di questa cartella su un dischetto.
9. Collegate il ED52 al vostro computer Windows 98SE.
10. Quando Windows richiede i driver, inserite il floppy prodotto al punto 7 e confermate a
Windows l'uso di questo dischetto.
11. I driver verranno installati. Ora è possibile utilizzare il vostro ED52 per installare il software
tramite il disco d'installazione Install.
Deel 2:Hoe sluit ik de ED52 aan op een computer zonder CD-ROM-station?
• U zult een andere computer moeten gebruiken, die een eenheid heeft voor het lezen vanaf
CD-ROM's. Zie anders bij deel 3.
Voer de volgende stappen uit:
1. Start de andere computer op.
2. Leg de Nero-CD voor de ED52 in het CD-ROM-station.
3. Klik op "Verlaten" zodra het Nero-installatiescherm verschijnt.
4. Klik op "Deze computer".
5. Klik op het "Nero"-logo.
6. Klik met de rechtermuisknop en kies "Verkennen".
7. Ga naar de map "Philips drivers".
8. Kopieer de inhoud van deze map naar een diskette.
9. Sluit de ED52 aan op uw computer met Windows 98SE.
10.Als Windows om stuurprogramma's vraagt, plaats dan de diskette en kies die in Windows.
11. De stuurprogramma's worden geïnstalleerd. U kunt uw ED52 nu gebruiken om de
software met behulp van de Install-disc te installeren.
I
NL
Pagina wordt geladen...
Pagina wordt geladen...

26
Argomento 3:Come collegare un ED52 ad un computer Windows 98SE sprovvisto di unità
CD-ROM
• E' necessario accedere ad Internet
Svolgete i seguenti passaggi:
1.Avviate il computer.
2.Aprite Internet Explorer (od un altro browser Web).
3.Accedete al sito Web PCStuff di Philips: http://www.philips.com/pcstuff
4. Selezionate "Drivers and manuals" (Driver e manuali).
5. Ricercate ED52CDRW.
6. Scaricate i driver per Windows 98SE.
7. Scompattate il file zip dei driver ed annotate la posizione dove avete salvato i file.
8. Collegate il ED52.
9. Quando Windows richiede i driver, specificate la posizione in cui avete salvato i driver al
punto 7.
10. Il ED52 ora funziona correttamente.
Deel 3:Hoe sluit ik de ED52 aan op een Windows 98SE-computer zonder CD-ROM-station?
• U hebt een Internet-verbinding nodig
Voer de volgende stappen uit:
1. Start de computer op.
2. Start Internet Explorer (of een andere web browser).
3. Ga naar de website met Philips PCStuff: http://www.philips.com/pcstuff
4. Kies daar "Drivers and manuals".
5. Zoek naar de ED52CDRW.
6. Download de stuurprogramma's voor Windows 98SE.
7. Pak de stuurprogramma's uit (Unzip) en onthoud waar u de uitgepakte stuurprogramma's
opslaat.
8. Sluit de ED52 aan.
9.Als Windows om stuurprogramma's vraagt, geef dan de locatie aan die in stap 7 is gebruikt.
10. Nu werkt uw ED52.
I
NL
Pagina wordt geladen...
Pagina wordt geladen...
Pagina wordt geladen...
Pagina wordt geladen...
Pagina wordt geladen...
Pagina wordt geladen...

33
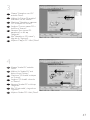
Choose the device in which you
want to put your source disc.
Wählen Sie das Gerät, in das Sie
die Quell-Disk einlegen möchten.
Choisissez le lecteur dans lequel
le disque source sera introduit.
Scegliere il dispositivo su cui si
desidera inserire il disco
sorgente.
Selecteer het station dat de disk
met het bronmateriaal bevat.
Elija el dispositivo en el que va a
colocar el disco original.
Wybierz urządzenie, w którym umieszczona zostanie płyta źródłowa.
4
UK
D
F
I
NL
E
Choose "Copy a CD" and click
"Next".
Wählen Sie "Eine CD kopieren"
und klicken Sie auf "Weiter".
Choisissez "Copier un CD" et
cliquez sur "Suivant".
Scegliere "Copia un CD" e fare
clic su "Success".
Selecteer "Een CD kopiëren" en
klik op "Volgende".
Elija "Copiar un CD" y haga clic
en "Siguiente".
Wybierz "Copy a CD"ikliknij "Next".
3
UK
D
F
I
NL
E
PL
PL
Pagina wordt geladen...
Pagina wordt geladen...
Pagina wordt geladen...

37
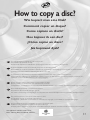
How to make a Data disc?
Wie erstellt man eine Daten-Disk?
Comment créer un disque de données?
Come creare un dischi di dati?
Hoe maak ik zelf een data-disc?
¿Cómo crear un disco de datos?
Jak utworzyć dysk z danymi
UK
This manual shows you an example of how to make a Data disc.
This product is for personal use only.
Unauthorized duplication and distribution of copyrighted materials is a violation of copyright law.
D
In diesem Handbuch wird an einem Beispiel gezeigt, wie eine Daten-Disk erstellt wird.
Dieses Produkt ist nur für den persönlichen Gebrauch. Die ungenehmigte Vervielfältigung und der Vertrieb von urheberrechtlich
geschützten Materialien stellt eine Verletzung des Urheberrechts dar.
F
Ce manuel illustre la procédure de création d’un disque de données.
Ce produit est à usage personnel exclusivement.Toute duplication et diffusion non autorisée de matières soumises au droit
d’auteur et de copie (copyright) constituent une violation de la loi sur les droits d’auteur et de copie (copyright).
I
Questo manuale contiene informazioni su come creare un dischi di dati.
Questo prodotto è destinato ad un uso esclusivamente personale.
La duplicazione e la distribuzione di materiali protetti dal diritto d'autore rappresentano una violazione della legge sul copyright.
NL
Deze handleiding beschrijft het maken van een data-disc.
Dit product is alleen bedoeld voor eigen gebruik.
Het zonder toestemming vermenigvuldigen en verspreiden van auteursrechtelijk beschermd materiaal is wettelijk verboden.
E
Este manual muestra un ejemplo de cómo crear un disco de datos.
Este producto es para uso personal exclusivamente.
La duplicación y distribución no autorizada de materiales con copyright es una violación de las leyes del copyright.
PL
W tym podręczniku opisano przykładową procedurę tworzenia dysku z danymi.
Produkt ten jest przeznaczony wyłącznie do użytku osobistego.
Nieautoryzowane powielanie i dystrybucja materiałów chronionych prawami autorskimi stanowi naruszenie praw autorskich.
The application software used here is:
Nero - Burning Rom from Ahead Software
Pagina wordt geladen...
Pagina wordt geladen...

40
Choose "Finish".
Wählen Sie "Fertig".
Cliquez sur "Terminer".
Scegliere "Fini".
Klik op "Voltooien".
Elija "Finalizar".
Wybierz "Finish".
6
UK
D
F
I
NL
E
Choose "Create a new data-CD?"
and choose "Next".
Wählen Sie "Neue Daten-CD
zusammenstellen?" und wählen
Sie "Weiter".
Choisissez "Compiler un nouveau
CD de données?" et cliquez sur
"Suivant".
Scegliere "Crea un nuovo
CD dati?" e fare clic su "Success".
Selecteer "Een nieuwe data CD
aanmaken?" en klik op "Volgende".
Elija "¿Compilar un Nuevo CD de
datos?" y elija "Siguiente".
Wybierz "Create a new data-CD?" i kliknij "Next".
5
UK
D
F
I
NL
E
PL
PL

41
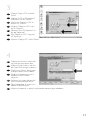
Drag the selected file(s) and/or
folder(s) you want to have on
your new CD to the left side
of the screen.
Ziehen Sie die gewünschten
Dateien und/oder Ordner,
die Sie auf Ihrer neuen CD haben
möchten, zur linken Seite des
Bildschirms.
Faites glisser le ou les fichiers ou
dossiers sélectionnés que vous
voulez copier sur le nouveau CD
dans la partie gauche de l’écran.
Trascinare sulla parte sinistra
dello schermo il/i file e/o cartella/e selezionati che si desidera avere sul nuovo CD.
Sleep de door u geselecteerde bestanden en/of mappen die u op de cd wilt branden naar het
linkervenster.
Arrastre los archivos y/o carpetas seleccionados que desee grabar en su nuevo CD a la
izquierda de la pantalla.
Przeciągnij wybrane plik(i) oraz/lub folder(y), które chcesz zapisać na nowej płycie CD na lewą
stronę ekranu.
7
UK
D
F
I
NL
E
PL
Click on the "Write" icon.
Klicken Sie auf das Symbol
"Brennen".
Cliquez sur l'icône "Graver".
Fare clic sull'icona "Scrivi".
Klik op het pictogram voor
"Branden".
Haga clic en el icono "Grabar".
Kliknij ikonę "Write".
8
UK
D
F
I
NL
E
PL

42
9
Choose "Burn" twice.
Wählen Sie zweimal "Brennen".
Choisissez "Graver" deux fois de
suite.
Selezionare "Scrivi" due volte.
Selecteer twee keer "Branden".
Elija "Grabar" dos veces.
Kliknij dwukrotnie "Burn".
UK
D
F
I
NL
E
PL
"Nero Burning ROM" will now
burn your disc.
"Nero Burning ROM" wird jetzt
Ihre Disk brennen.
"Nero Burning ROM" grave alors
votre disque.
"Nero Burning ROM " inizierà a
scrivere sul disco.
"Nero Burning ROM" zal nu uw
CD branden.
"Nero Burning ROM" grabará
ahora el disco.
Program "Nero Burning ROM" nagra teraz ten dysk.
10
UK
D
F
I
NL
E
PL

43
Click "OK". Congratulations,
your CD is ready now.
Choose "Discard".
Klicken Sie auf "OK". Gratulation,
Ihre CD ist jetzt fertig.
Wählen Sie "Verwerfen".
Cliquez sur OK.
Le CD est à présent terminé.
Cliquez sur "Rejeter".
Fare click su "OK".
Congratulazioni, il CD ora è
pronto. Scegliere "Elimina".
Klik op "OK". Na afloop van het
brandproces is uw nieuwe cd klaar voor gebruik. Klik op "Verwijderen".
Haga clic en "OK". Felicitaciones, su CD está preparado para ser utilizado. Elija "Descabar".
Kliknij "OK".Gratulacje, płyta CD jest gotowa. Wybierz "Discard".
11
UK
D
F
I
NL
E
PL
Pagina wordt geladen...

45
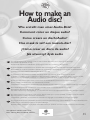
How to make an
Audio disc?
Wie erstellt man einer Audio-Disk?
Comment créer un disque audio?
Come creare un dischi Audio?
Hoe maak ik zelf een muziek-disc?
¿Cómo crear un disco de audio?
Jak utworzyć dysk audio
UK
This manual shows you an example of how to make an Audio disc which can be played in any CD-Player
This product is for personal use only.
Unauthorized duplication and distribution of copyrighted materials is a violation of copyright law.
D
In diesem Handbuch wird beschrieben, wie eine Audio-Disk erstellt wird, die von jedem CD-Player abgespielt werden kann.
Dieses Produkt ist nur für den persönlichen Gebrauch. Die ungenehmigte Vervielfältigung und der Vertrieb von urheberrechtlich
geschützten Materialien stellt eine Verletzung des Urheberrechts dar.
F
Ce manuel illustre la procédure de création d’un disque audio qui pourra être lu sur n’importe lecteur de CD.
Ce produit est à usage personnel exclusivement.Toute duplication et diffusion non autorisée de matières soumises au droit
d’auteur et de copie (copyright) constituent une violation de la loi sur les droits d’auteur et de copie (copyright).
I
Questo manuale contiene informazioni su come creare un dischi Audio che potrà essere letto da un CD-Player.
Questo prodotto è destinato ad un uso esclusivamente personale.
La duplicazione e la distribuzione di materiali protetti dal diritto d'autore rappresentano una violazione della legge sul copyright.
NL
Deze handleiding beschrijft het maken van een muziek-disc om in een normale cd-speler af te spelen.
Dit product is alleen bedoeld voor eigen gebruik.
Het zonder toestemming vermenigvuldigen en verspreiden van auteursrechtelijk beschermd materiaal is wettelijk verboden.
E
Este manual muestra un ejemplo de cómo crear un disco de audio que se puede reproducir en cualquier lector de compact
disc. Este producto es para uso personal exclusivamente.
La duplicación y distribución no autorizada de materiales con copyright es una violación de las leyes del copyright.
PL
W tym podręczniku opisano przykładową procedurę tworzenia dysku audio, który można odtwarzać w każdym odtwarzaczu CD.
Produkt ten jest przeznaczony wyłącznie do użytku osobistego.
Nieautoryzowane powielanie i dystrybucja materiałów chronionych prawami autorskimi stanowi naruszenie praw autorskich.
The application software used here is:
Nero - Burning Rom from Ahead Software
Pagina wordt geladen...

47
Choose "Audio CD" and click
"Next".
Wählen Sie "Audio-CD" und
klicken Sie auf "Weiter".
Choisissez "CD Audio" et cliquez
sur "Suivant".
Scegliere "CD Audio" e fare clic
su "Success".
Selecteer "Audio-CD" en klik op
"Volgende".
Elija "CD de audio" y haga clic en
"Siguiente".
Wybierz "Audio CD" i kliknij "Next".
4
UK
D
F
I
NL
E
PL
Choose "Compile a new CD"
and click "Next".
Wählen Sie "Neue CD erstellen"
und klicken Sie auf "Weiter".
Choisissez "Compiler un nouveau
CD" et cliquez sur "Suivant".
Scegliere "Crea un nuovo CD" e
fare clic su "Success".
Selecteer "Een nieuwe CD
compileren" en klik op
"Volgende".
Elija "Compilar un CD nuevo" y
haga clic en "Siguiente".
Wybierz "Copy a CD"ikliknij "Next".
3
UK
D
F
I
NL
E
PL

48
Drag the audio files (*.wav) you
want to have on your new audio
disc to the left side.
Ziehen Sie die Audiodateien
(*.wav), die Sie auf Ihrer neuen
Audio-CD haben möchten, zur
linken Seite.
Effectuez un glisser–déposer pour
transférer les fichiers audio (*.wav)
à enregistrer sur le disque dans la
partie gauche de la fenêtre.
Trascinare sul lato sinistro i file
audio (*.wav) che si desiderano
avere sul nuovo disco audio.
Sleep de geluidsbestanden (*.wav) die u op de cd wilt branden naar het linkervenster.
Arrastre los archivos de audio (*.wav) que desee copiar en su nuevo disco de audio a la
izquierda.
Przeciągnij pliki audio (*.wav), które chcesz skopiować na nową płytę, na lewą stronę ekranu.
6
UK
D
F
I
NL
E
PL
Choose "Finish".
Wählen Sie "Fertig".
Cliquez sur "Terminer".
Scegliere "Fini".
Klik op "Voltooien".
Elija "Finalizar".
Wybierz "Finish".
5
UK
D
F
I
NL
E
PL

49
Click on the "Write" icon.
Klicken Sie auf das Symbol
"Brennen".
Cliquez sur l'icône "Graver".
Fare clic sull'icona "Scrivi".
Klik op het pictogram voor
"Branden".
Haga clic en el icono "Grabar".
Kliknij ikonę "Write".
7
UK
D
F
I
NL
E
PL
8
Choose "Burn" twice.
Wählen Sie zweimal "Brennen".
Choisissez "Graver" deux fois de
suite.
Selezionare "Scrivi" due volte.
Selecteer twee keer "Branden".
Elija "Grabar" dos veces.
Kliknij dwukrotnie "Burn".
UK
D
F
I
NL
E
PL
Pagina wordt geladen...
Pagina wordt geladen...

52
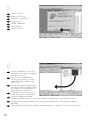
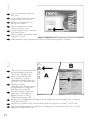
Click on the "My Computer" icon
on your desktop (A) or click
"Start", "My Computer" (B).
Klicken Sie auf das Symbol
"My Computer" auf Ihrer
Oberfläche (A) oder klicken Sie
auf "Start", "My Computer" (B).
Cliquez sur l’icône
'Poste de travail' de votre bureau
(A) ou cliquez sur 'Démarrer'
puis 'Poste de travail' (B).
Fare clic sull'icona "Risorse del
computer" nel desktop (A)
oppure fare clic su "Start",
"Risorse del computer" (B)
Klik op het bureaublad op het pictogram "Deze computer" (A) of klik op "Start" en dan op
"Deze computer" (B).
Haga clic en el icono "Mi PC" del escritorio (A) o bien haga clic en "Inicio" y "Mi PC" (B).
Kliknij ikonę "Mój komputer" znajdującą się na pulpicie (A) lub kliknij przycisk "Start" i wskaż
polecenie "Mój komputer" (B).
2
UK
D
F
I
NL
E
PL
Insert the Nero disc again, and
click "exit".
Legen Sie die Nero Disk wieder
ein und klicken Sie auf "Exit".
Réinsérez le disque Nero et
cliquez sur "Quitter".
Inserire nuovamente il disco
Nero e fare clic su "esci".
Leg de Nero-CD weer in de lade
en klik op "Sluiten".
Vuelva a colocar el disco de Nero
y haga clic en "salir".
Włóż ponownie dysk z programem Nero, a następnie kliknij przycisk "Zakończ".
1
UK
D
F
I
NL
E
PL
Pagina wordt geladen...
Pagina wordt geladen...
Pagina wordt geladen...
Pagina wordt geladen...
Documenttranscriptie
How to connect this drive to a computer? How to use the software with this drive? • Wie verwendet man dieses Laufwerks an den PC? Verwendung der Software mit diesem Laufwerk • Raccordement de cet appareil à mon ordinateur Comment utiliser les logiciels de cet appareil? • Come collegare questa unità al computer? Come usare il software con questa unità? • Hoe sluit ik dit station op mijn computer aan? Hoe gebruik ik de programma's? • ¿Cómo conectar esta unidad al ordenador? ¿Cómo utilizar el software con esta unidad? Jak zainstalować ten napęd w komputerze PC? Jak używać tego oprogramowania z tym napędem? For ED52CDRW Drives using Nero 5.5 Version 1.1 9305 125 2300.2 Indice - Inhoud - Índice - Spis treści I Installazione Copia Dati Musica Garanzia NL Installeren Kopiëren Data Muziek Garantie E Instalación Copia Datos Música Garantía PL Instalowanie Kopiowanie Dane Muzyka Gwarancji Come collegare il ED52 al computer? Come svolgere installazioni particolari Come copiare un dischi? Come creare un dischi di dati? Come creare un dischi Audio? Come si accede alle informazioni sulla garanzia memorizzate? 5 19 31 37 45 Hoe sluit ik de ED52 op mijn computer aan? Aansluiten in speciale gevallen Hoe kopieer ik een disc? Hoe maak ik zelf een data-disc? Hoe maak ik zelf een muziek-disc? Waar vind ik informatie over de garantie? 5 19 31 37 45 51 ¿Cómo ¿Cómo ¿Cómo ¿Cómo ¿Cómo ¿Cómo 5 19 31 37 45 51 conectar ED52 al ordenador? conectar opciones especiales? copiar un disco? crear un disco de datos? crear un disco de audio? encontrar información sobre la garantía? W jaki sposób podłączyć napęd ED52 do komputera? Informacje specjalne na temat podłączania Jak kopiować dysk? Jak utworzyć dysk z danymi? Jak utworzyć dysk audio? Jak odszukać na dysku z programem Nero informacje dotyczące gwarancji? 51 5 19 31 37 45 51 3 2 UK D F I NL E PL At the left side, you will find the plugs you need for connecting your ED52 to your computer. A: Power. B: HiSpeed USB. Auf der linken Seite finden Sie die Anschlüsse, die Sie zum Anschließen des ED52 an Ihren Computer benötigen. A: Stromversorgung. B: HiSpeed USB. Sur la gauche figurent les connecteurs requis pour brancher votre ED52 à l’ordinateur. A: Alimentation. B: Port USB haut débit. Sul lato sinistro, si trovano le connessioni per collegare il ED52 al vostro computer. A: Alimentazione. B: USB ad alta velocità. Links vindt u de pluggen waarmee u de ED52 op uw computer kunt aansluiten. A:Voedingsspanning. B: HiSpeed USB. En el lado izquierdo verá los conectores que necesita para conectar ED52 al ordenador. A: Alimentación. B: HiSpeed USB. Z lewej strony znajdują się wtyczki, za pomocą których należy podłączyć urządzenie ED52 do komputera. A: Zasilanie. B: Przewód USB HiSpeed. 7 5 UK D F I NL E PL Connect the power cable and plug it in a wall outlet. Schließen Sie das Stromversorgungskabel an und verbinden Sie es mit der Wandsteckdose. Connectez le câble d’alimentation et branchez-le à une prise secteur. Collegate il cavo di alimentazione ed inseritelo in una presa elettrica a muro. Sluit de voedingskabel aan op de ED52 en op een stopcontact. Conecte el cable de alimentación y enchúfelo en una toma de corriente. Podłącz przewód zasilający i włóż wtyczkę do gniazda sieciowego. 6 UK D F I NL E PL Press the open button. Drücken Sie die Taste zum Öffnen. Appuyez sur le bouton d’ouverture. Premere pulsante di apertura. Druk op de knop om de lade te openen. Pulse el botón de apertura. Naciśnij przycisk otwierania. 7 UK D F I NL E PL 10 Find the transportation cover and take it out (by lifting it up). Suchen Sie die Transportabdeckung und nehmen Sie sie heraus (indem Sie sie anheben). Soulevez la protection pour le transport pour la retirer. Individuate il coperchio protettivo durante il trasporto e rimuovetelo (sollevandolo) Verwijder de transportbescherming (optillen). Localice la cubierta para el transporte y extráigala (tirando de ella). Znajdź pokrywę transportową i wyjmij ją (unosząc do góry). 8 UK D F I NL E PL If you are using Windows Millennium Edition,Windows 2000 or Windows XP, connect the USB cable to the computer. ➜ Skip this step if you are using Windows 98 Second Edition. If you do not know which operating system you are using, please go to the chapter "How to install specials", item 1. Wenn Sie mit dem Betriebssystem Windows Millennium Edition,Windows 2000 oder Windows XP arbeiten, verbinden Sie das USB-Kabel mit dem Computer. ➜ Überspringen Sie diesen Schritt, wenn Sie mit Windows 98 Second Edition arbeiten. Wenn Sie nicht wissen, mit welchem Betriebssystem Sie arbeiten, gehen Sie bitte zu dem Kapitel "Wie installiert man Besonderheiten", Position 1. Si vous utilisez Windows Millennium,Windows 2000 ou Windows XP, connectez le câble USB à l’ordinateur. ➜ Ignorez cette étape si vous utilisez Windows 98 Deuxième Édition. Si vous ne savez pas quel est votre système d’exploitation, reportez-vous à la section 1 du chapitre « Installation d’éléments spéciaux ». In ambiente Windows Millennium Edition,Windows 2000 o Windows XP, collegate il cavo USB al computer. ➜ Saltate questo passaggio se utilizzate Windows 98 Second Edition. Se non siete certi del tipo di sistema operativo utilizzato, consultate il capitolo "Come svolgere installazioni particolari", argomento 1. Gebruikt u Windows Millennium Edition,Windows 2000 of Windows XP, dan sluit u de USB-kabel op uw computer aan. ➜ Sla deze stap over als u Windows 98 Second Edition gebruikt. Weet u niet welk besturingssysteem u hebt, kijk dan in het hoofdstuk "Aansluiten in speciale gevallen" bij deel 1. Si utiliza Windows Millennium Edition,Windows 2000 o Windows XP, conecte el cable USB al ordenador. ➜ Omita este paso si utiliza Windows 98 Second Edition. Si ignora cuál es su sistema operativo, consulte "Cómo instalar opciones especiales", punto 1. Jeśli używasz systemu Windows Millennium Edition, Windows 2000 lub Windows XP, podłącz przewód USB do komputera. ➜ W przypadku systemu Windows 98 Second Edition punkt ten należy pominąć. Jeśli nie wiesz jakiego używasz systemu, przejdź do części "Informacje specjalne na temat instalacji", punkt 1. 11 11 UK D F I NL E PL Press the open button. ➜ When you are using Windows 98 Second Edition, insert the Nero disc in the CDROM device of your computer. If you have no CD-ROM device, please refer to the Chapter "How to install specials", item 2 and/or 3). Drücken Sie die Taste zum Öffnen. ➜ Wenn Sie das Betriebssystem Windows 98 Second Edition benutzen, legen Sie die NeroCD in das CDROM-Laufwerk Ihres Computer ein.Wenn Sie kein CDROM-Laufwerk haben, sehen Sie im Kapitel "Installation in besonderen Fällen", Position 2 und/oder 3 nach. Appuyez sur le bouton d’ouverture. ➜ Si vous utilisez Windows 98 Deuxième Édition, insérez le disque Nero dans le lecteur de CD-ROM de votre ordinateur. Sinon, reportez-vous aux sections 2 et/ou 3 du chapitre « Installation d’éléments spéciaux ». Premere pulsante di apertura. ➜ In Windows 98 Second Edition, inserite il disco di Nero nell'unità CDROM del computer. Se non è installata un'unità CDROM, consultate il capitolo "Come svolgere installazioni particolari", argomento 2 e/o 3. Druk op de knop om de lade te openen. ➜ Als u Windows 98 Second Edition gebruikt, open dan een CD-ROM-station van uw computer. Hebt u geen CD-ROM-station, kijk dan in het hoofdstuk "Aansluiten in speciale gevallen" bij deel 2 en/of 3. Pulse el botón de apertura. ➜ Si utiliza Windows 98 Second Edition, introduzca el disco de Nero en el dispositivo de CDROM del ordenador. Si no dispone de CD-ROM, consulte el capítulo "Cómo instalar opciones especiales", punto 2 y/o 3). Naciśnij przycisk otwierania. ➜ W przypadku systemu Windows 98 Second Edition, włóż płytę z programem Nero do napędu płyt CD-ROM zainstalowanego w komputerze. Jeśli komputer nie jest wyposażony w napęd płyt CD-ROM, należy zapoznać się z rozdziałem "Informacje specjalne na temat instalacji", punkt 2 oraz/lub 3). 12 UK D F I NL E PL Insert the Nero Disc in the ED52. Legen Sie die Nero-CD in das ED52-Laufwerk ein. Insérez le disque Nero dans le ED52. Inserite il disco di Nero nel ED52. Leg de Nero-CD in de ED52. Introduzca el disco de Nero en ED52. Włóż płytę Nero Disc do urządzenia ED52. 13 14 UK D F I NL E PL This step is only valid when you are using Windows 98 SE. Windows 98 SE will need drivers. When the ‘Add New hardware Wizard’ asks where the drivers can be found, tick the checkbox ‘Specify a location’ and use the browse button to point to the directory ‘Philips Drivers’ on the Nero disc you have inserted. Dieser Schritt gilt nur, wenn Sie mit Windows 98SE arbeiten: Windows 98SE benötigt Treiber. Wenn der "Add New Hardware Wizard" (Assistent zum Hinzufügen neuer Hardware) Sie fragt, wo die Treiber zu finden sind, kreuzen Sie das Kästchen "Specify a location" (Ein Verzeichnis angeben) an und benutzen Sie die Schaltfläche zum Durchsuchen, um das Verzeichnis "Philips Drivers" auf der eingelegten Nero Disc anzugeben. Cette étape n’est valable que si vous utilisez Windows 98SE: Ce système d’exploitation nécessite des pilotes spécifiques. Lorsque l’ «Assistant Ajout de nouveau matériel» vous demande où se trouvent les pilotes, cochez la case «Définir un emplacement» et cliquez sur «Parcourir» pour indiquer le répertoire «Philips Drivers» sur le disque Nero que vous avez inséré. Questo passaggio si riferisce solo all'ambiente Windows 98SE: Windows 98SE richiede l'installazione di driver. Quando l'"Installazione guidata nuovo hardware" richiede la posizione dei driver, marcate la casella "Specifica percorso" ed utilizzate il pulsante Sfoglia per accedere alla directory dei driver Philips "Philips Drivers" del disco Nero inserito. Deze stap is alleen nodig als u Windows 98SE gebruikt: Windows 98SE heeft stuurprogramma's nodig. Als de wizard "Nieuwe hardware toevoegen" naar de plaats van stuurprogramma's vraagt, markeer dan "Een locatie specificeren" en ga dan via de Bladeren-knop naar de map "Philips Drivers" op de Nero-CD die u hebt geplaatst. Este paso sólo es válido si utiliza Windows 98 SE: Windows 98 SE necesita controladores. Cuando el "Asistente para agregar nuevo hardware" pregunte dónde se encuentran los controladores, marque la casilla de verificación "Especificar una ubicación" y utilice el botón Examinar para indicar el directorio "Philips Drivers" del disco de Nero que ha introducido. Ten krok obowiązuje wyłącznie przy korzystaniu z Windows 98SE: Windows 98SE wymagają sterowników. Kiedy "Kreator dodawania nowego sprzętu" poprosi o podanie położenia sterowników, należy zaznaczyć pole "Podaj lokalizację") i użyć przycisku przeglądania do wskazania katalogu "Sterowniki Philips" na włożonym dysku Nero. 15 15 UK D F I NL E PL 16 This device has both a silent and a performance mode.When in silent mode, the ED52 will read and write at a lower speed. To switch between the modes, press for 2 seconds on the open/close button when a disc is inserted and the cover is closed. Dieses Laufwerk kann sowohl im Silent- als auch im Leistungsmodus betrieben werden. Im Silent-Modus führt das ED52-Laufwerk Schreib- und Lesezugriffe mit geringerer Geschwindigkeit aus. Zwischen den beiden Betriebsarten kann umgeschaltet werden, indem man die Open/CloseTaste bei eingelegter CD und geschlossener Abdeckung 2 Sekunden lang gedrückt hält. Ce périphérique offre deux modes de fonctionnement : silencieux et haute performance. En mode silencieux, l’ED52 exécute les opérations de lecture et d’écriture plus lentement. Pour passer d’un mode à l’autre, appuyez sur le bouton d’ouverture/fermeture pendant 2 secondes lorsque vous insérez un disque et fermez le couvercle. Questo dispositivo può funzionare sia in modalità silenziosa sia in modalità prestazioni. In modalità silenziosa, l'ED52 legge e scrive a velocità inferiore. Per passare da una modalità all'altra, premete il pulsante di apertura/chiusura per 2 secondi a disco inserito e coperchio chiuso. Dit apparaat beschikt zowel over een stille als een snelle modus. In de stille modus leest en schrijft de ED52 op een lagere snelheid. Om een andere modus te kiezen, drukt u 2 seconden op de open/sluiten-knop nadat u een disc hebt geplaatst en de lade hebt gesloten. Este dispositivo tiene ambos modos, el modo de silencio y el de funcionamiento. La ED52 leerá y escribirá a una velocidad inferior durante el modo de silencio. Si un disco está insertado y la tapa está cerrada, pulse durante dos segundos en el botón open/close para cambiar de modo. Urządzenie może pracować w dwóch trybach: dyskretnym i wydajnym. W trybie dyskretnym ED52 odczytuje i zapisuje dane z mniejszą szybkością. Aby zmienić tryb pracy urządzenia, należy przytrzymać przycisk open/close przez dwie sekundy, przy włożonym dysku i zamkniętej pokrywie. I NL E PL Argomento 1: How to find out which operating system is running on my computer? 1. Avviate il computer (se non lo avete ancora acceso). 2. Fate clic su "Start". 3. Fate clic su "Impostazioni" (non in tutti i sistemi operativi). 4. Fate clic sul "Pannello di controllo". 5. Fate clic su "Sistema". 6. Selezionate "Proprietà". 7. Nella scheda "Generale" è indicata la versione di sistema operativo (vedi immagine seguente). 8. Se compare "Microsoft Windows 98 Second Edition", dovrete seguire le osservazioni particolari relative a Windows 98SE. Deel 1: Hoe kijk ik na welk besturingssysteem op mijn computer wordt gebruikt? 1. Start de computer op als dat nog niet is gebeurd. 2. Klik op "Start". 3. Klik op "Instellingen" (niet bij alle besturingssystemen). 4. Klik op "Configuratiescherm". 5. Klik op "Systeem". 6. Klik op "Eigenschappen". 7. Bij het tabblad "Algemeen" vindt u het gebruikte besturingssysteem (zie volgende afbeelding). 8. Als dat "Microsoft Windows 98 Second Edition" is, dan moet u de speciale instructies voor Windows 98SE uitvoeren. Punto 1: Cómo averiguar el sistema operativo que ejecuta el ordenador 1. Encienda el ordenador si está apagado. 2. Haga clic en "Inicio". 3. Haga clic en "Configuración" (no en todos los sistemas operativos). 4. Haga clic en "Panel de control". 5. Haga clic en "Sistema". 6. Seleccione "Propiedades". 7. En la ficha "General" se indica el sistema operativo (ver imagen siguiente). 8. Si ve "Microsoft Windows 98 Second Edition", tendrá que seguir las instrucciones especiales para Windows 98SE. Punkt 1: Jak się dowiedzieć, jaki system operacyjny wykorzystywany jest w komputerze użytkownika? 1. Uruchom komputer, jeśli jeszcze nie pracuje. 2. Kliknij "Start". 3. Kliknij "Ustawienia" (opcja ta nie jest dostępna we wszystkich systemach operacyjnych). 4. Kliknij "Panel sterowania". 5. Kliknij "System". 6. Wybierz "Właściwości". 7. Na zakładce "Ogólne" znajduje się pozycja System operacyjny (patrz rycina poniżej). 8. Jeśli zawiera ona nazwę "Microsoft Windows 98 Second Edition", należy postępować zgodnie ze wskazówkami określonymi dla systemu Windows 98SE. 21 I NL Argomento 2: Come collegare un ED52 ad un computer Windows 98SE sprovvisto di unità CD-ROM • E' necessario un altro computer, con installata un'unità in grado di leggere un CD. In caso contrario, consultate l'argomento 3. Svolgete i seguenti passaggi: 1. Avviate un altro computer. 2. Inserite il disco di Nero per il ED52 nell'unità CDROM. 3. Fate clic su "Exit" (Esci) quando compare lo schermo d'installazione di Nero. 4. Fate clic su "Risorse del computer". 5. Fate clic sul logo "Nero". 6. Fate un clic destro e selezionate "Esplora". 7. Accedete alla cartella dei driver "Philips Drivers". 8. Copiate il contenuto di questa cartella su un dischetto. 9. Collegate il ED52 al vostro computer Windows 98SE. 10. Quando Windows richiede i driver, inserite il floppy prodotto al punto 7 e confermate a Windows l'uso di questo dischetto. 11. I driver verranno installati. Ora è possibile utilizzare il vostro ED52 per installare il software tramite il disco d'installazione Install. Deel 2: Hoe sluit ik de ED52 aan op een computer zonder CD-ROM-station? • U zult een andere computer moeten gebruiken, die een eenheid heeft voor het lezen vanaf CD-ROM's. Zie anders bij deel 3. Voer de volgende stappen uit: 1. Start de andere computer op. 2. Leg de Nero-CD voor de ED52 in het CD-ROM-station. 3. Klik op "Verlaten" zodra het Nero-installatiescherm verschijnt. 4. Klik op "Deze computer". 5. Klik op het "Nero"-logo. 6. Klik met de rechtermuisknop en kies "Verkennen". 7. Ga naar de map "Philips drivers". 8. Kopieer de inhoud van deze map naar een diskette. 9. Sluit de ED52 aan op uw computer met Windows 98SE. 10. Als Windows om stuurprogramma's vraagt, plaats dan de diskette en kies die in Windows. 11. De stuurprogramma's worden geïnstalleerd. U kunt uw ED52 nu gebruiken om de software met behulp van de Install-disc te installeren. 23 I NL 26 Argomento 3: Come collegare un ED52 ad un computer Windows 98SE sprovvisto di unità CD-ROM • E' necessario accedere ad Internet Svolgete i seguenti passaggi: 1. Avviate il computer. 2. Aprite Internet Explorer (od un altro browser Web). 3. Accedete al sito Web PCStuff di Philips: http://www.philips.com/pcstuff 4. Selezionate "Drivers and manuals" (Driver e manuali). 5. Ricercate ED52CDRW. 6. Scaricate i driver per Windows 98SE. 7. Scompattate il file zip dei driver ed annotate la posizione dove avete salvato i file. 8. Collegate il ED52. 9. Quando Windows richiede i driver, specificate la posizione in cui avete salvato i driver al punto 7. 10. Il ED52 ora funziona correttamente. Deel 3: Hoe sluit ik de ED52 aan op een Windows 98SE-computer zonder CD-ROM-station? • U hebt een Internet-verbinding nodig Voer de volgende stappen uit: 1. Start de computer op. 2. Start Internet Explorer (of een andere web browser). 3. Ga naar de website met Philips PCStuff: http://www.philips.com/pcstuff 4. Kies daar "Drivers and manuals". 5. Zoek naar de ED52CDRW. 6. Download de stuurprogramma's voor Windows 98SE. 7. Pak de stuurprogramma's uit (Unzip) en onthoud waar u de uitgepakte stuurprogramma's opslaat. 8. Sluit de ED52 aan. 9. Als Windows om stuurprogramma's vraagt, geef dan de locatie aan die in stap 7 is gebruikt. 10. Nu werkt uw ED52. 3 UK D F I NL E PL Choose "Copy a CD" and click "Next". Wählen Sie "Eine CD kopieren" und klicken Sie auf "Weiter". Choisissez "Copier un CD" et cliquez sur "Suivant". Scegliere "Copia un CD" e fare clic su "Success". Selecteer "Een CD kopiëren" en klik op "Volgende". Elija "Copiar un CD" y haga clic en "Siguiente". Wybierz "Copy a CD" i kliknij "Next". 4 UK D F I NL E PL Choose the device in which you want to put your source disc. Wählen Sie das Gerät, in das Sie die Quell-Disk einlegen möchten. Choisissez le lecteur dans lequel le disque source sera introduit. Scegliere il dispositivo su cui si desidera inserire il disco sorgente. Selecteer het station dat de disk met het bronmateriaal bevat. Elija el dispositivo en el que va a colocar el disco original. Wybierz urządzenie, w którym umieszczona zostanie płyta źródłowa. 33 How to make a Data disc? Wie erstellt man eine Daten-Disk? Comment créer un disque de données? Come creare un dischi di dati? Hoe maak ik zelf een data-disc? ¿Cómo crear un disco de datos? Jak utworzyć dysk z danymi UK D F I NL E PL This manual shows you an example of how to make a Data disc. This product is for personal use only. Unauthorized duplication and distribution of copyrighted materials is a violation of copyright law. In diesem Handbuch wird an einem Beispiel gezeigt, wie eine Daten-Disk erstellt wird. Dieses Produkt ist nur für den persönlichen Gebrauch. Die ungenehmigte Vervielfältigung und der Vertrieb von urheberrechtlich geschützten Materialien stellt eine Verletzung des Urheberrechts dar. Ce manuel illustre la procédure de création d’un disque de données. Ce produit est à usage personnel exclusivement.Toute duplication et diffusion non autorisée de matières soumises au droit d’auteur et de copie (copyright) constituent une violation de la loi sur les droits d’auteur et de copie (copyright). Questo manuale contiene informazioni su come creare un dischi di dati. Questo prodotto è destinato ad un uso esclusivamente personale. La duplicazione e la distribuzione di materiali protetti dal diritto d'autore rappresentano una violazione della legge sul copyright. Deze handleiding beschrijft het maken van een data-disc. Dit product is alleen bedoeld voor eigen gebruik. Het zonder toestemming vermenigvuldigen en verspreiden van auteursrechtelijk beschermd materiaal is wettelijk verboden. Este manual muestra un ejemplo de cómo crear un disco de datos. Este producto es para uso personal exclusivamente. La duplicación y distribución no autorizada de materiales con copyright es una violación de las leyes del copyright. W tym podręczniku opisano przykładową procedurę tworzenia dysku z danymi. Produkt ten jest przeznaczony wyłącznie do użytku osobistego. Nieautoryzowane powielanie i dystrybucja materiałów chronionych prawami autorskimi stanowi naruszenie praw autorskich. The application software used here is: Nero - Burning Rom from Ahead Software 37 5 UK D F I NL E PL Choose "Create a new data-CD?" and choose "Next". Wählen Sie "Neue Daten-CD zusammenstellen?" und wählen Sie "Weiter". Choisissez "Compiler un nouveau CD de données?" et cliquez sur "Suivant". Scegliere "Crea un nuovo CD dati?" e fare clic su "Success". Selecteer "Een nieuwe data CD aanmaken?" en klik op "Volgende". Elija "¿Compilar un Nuevo CD de datos?" y elija "Siguiente". Wybierz "Create a new data-CD?" i kliknij "Next". 6 UK D F I NL E PL 40 Choose "Finish". Wählen Sie "Fertig". Cliquez sur "Terminer". Scegliere "Fini". Klik op "Voltooien". Elija "Finalizar". Wybierz "Finish". 7 UK D F I NL E PL Drag the selected file(s) and/or folder(s) you want to have on your new CD to the left side of the screen. Ziehen Sie die gewünschten Dateien und/oder Ordner, die Sie auf Ihrer neuen CD haben möchten, zur linken Seite des Bildschirms. Faites glisser le ou les fichiers ou dossiers sélectionnés que vous voulez copier sur le nouveau CD dans la partie gauche de l’écran. Trascinare sulla parte sinistra dello schermo il/i file e/o cartella/e selezionati che si desidera avere sul nuovo CD. Sleep de door u geselecteerde bestanden en/of mappen die u op de cd wilt branden naar het linkervenster. Arrastre los archivos y/o carpetas seleccionados que desee grabar en su nuevo CD a la izquierda de la pantalla. Przeciągnij wybrane plik(i) oraz/lub folder(y), które chcesz zapisać na nowej płycie CD na lewą stronę ekranu. 8 UK D F I NL E PL Click on the "Write" icon. Klicken Sie auf das Symbol "Brennen". Cliquez sur l'icône "Graver". Fare clic sull'icona "Scrivi". Klik op het pictogram voor "Branden". Haga clic en el icono "Grabar". Kliknij ikonę "Write". 41 9 UK D F I NL E PL Choose "Burn" twice. Wählen Sie zweimal "Brennen". Choisissez "Graver" deux fois de suite. Selezionare "Scrivi" due volte. Selecteer twee keer "Branden". Elija "Grabar" dos veces. Kliknij dwukrotnie "Burn". 10 UK D F I NL E PL 42 "Nero Burning ROM" will now burn your disc. "Nero Burning ROM" wird jetzt Ihre Disk brennen. "Nero Burning ROM" grave alors votre disque. "Nero Burning ROM " inizierà a scrivere sul disco. "Nero Burning ROM" zal nu uw CD branden. "Nero Burning ROM" grabará ahora el disco. Program "Nero Burning ROM" nagra teraz ten dysk. 11 UK D F I NL E PL Click "OK". Congratulations, your CD is ready now. Choose "Discard". Klicken Sie auf "OK". Gratulation, Ihre CD ist jetzt fertig. Wählen Sie "Verwerfen". Cliquez sur OK. Le CD est à présent terminé. Cliquez sur "Rejeter". Fare click su "OK". Congratulazioni, il CD ora è pronto. Scegliere "Elimina". Klik op "OK". Na afloop van het brandproces is uw nieuwe cd klaar voor gebruik. Klik op "Verwijderen". Haga clic en "OK". Felicitaciones, su CD está preparado para ser utilizado. Elija "Descabar". Kliknij "OK". Gratulacje, płyta CD jest gotowa. Wybierz "Discard". 43 How to make an Audio disc? Wie erstellt man einer Audio-Disk? Comment créer un disque audio? Come creare un dischi Audio? Hoe maak ik zelf een muziek-disc? ¿Cómo crear un disco de audio? Jak utworzyć dysk audio UK D F I NL E PL This manual shows you an example of how to make an Audio disc which can be played in any CD-Player This product is for personal use only. Unauthorized duplication and distribution of copyrighted materials is a violation of copyright law. In diesem Handbuch wird beschrieben, wie eine Audio-Disk erstellt wird, die von jedem CD-Player abgespielt werden kann. Dieses Produkt ist nur für den persönlichen Gebrauch. Die ungenehmigte Vervielfältigung und der Vertrieb von urheberrechtlich geschützten Materialien stellt eine Verletzung des Urheberrechts dar. Ce manuel illustre la procédure de création d’un disque audio qui pourra être lu sur n’importe lecteur de CD. Ce produit est à usage personnel exclusivement.Toute duplication et diffusion non autorisée de matières soumises au droit d’auteur et de copie (copyright) constituent une violation de la loi sur les droits d’auteur et de copie (copyright). Questo manuale contiene informazioni su come creare un dischi Audio che potrà essere letto da un CD-Player. Questo prodotto è destinato ad un uso esclusivamente personale. La duplicazione e la distribuzione di materiali protetti dal diritto d'autore rappresentano una violazione della legge sul copyright. Deze handleiding beschrijft het maken van een muziek-disc om in een normale cd-speler af te spelen. Dit product is alleen bedoeld voor eigen gebruik. Het zonder toestemming vermenigvuldigen en verspreiden van auteursrechtelijk beschermd materiaal is wettelijk verboden. Este manual muestra un ejemplo de cómo crear un disco de audio que se puede reproducir en cualquier lector de compact disc. Este producto es para uso personal exclusivamente. La duplicación y distribución no autorizada de materiales con copyright es una violación de las leyes del copyright. W tym podręczniku opisano przykładową procedurę tworzenia dysku audio, który można odtwarzać w każdym odtwarzaczu CD. Produkt ten jest przeznaczony wyłącznie do użytku osobistego. Nieautoryzowane powielanie i dystrybucja materiałów chronionych prawami autorskimi stanowi naruszenie praw autorskich. The application software used here is: Nero - Burning Rom from Ahead Software 45 3 UK D F I NL E PL Choose "Compile a new CD" and click "Next". Wählen Sie "Neue CD erstellen" und klicken Sie auf "Weiter". Choisissez "Compiler un nouveau CD" et cliquez sur "Suivant". Scegliere "Crea un nuovo CD" e fare clic su "Success". Selecteer "Een nieuwe CD compileren" en klik op "Volgende". Elija "Compilar un CD nuevo" y haga clic en "Siguiente". Wybierz "Copy a CD" i kliknij "Next". 4 UK D F I NL E PL Choose "Audio CD" and click "Next". Wählen Sie "Audio-CD" und klicken Sie auf "Weiter". Choisissez "CD Audio" et cliquez sur "Suivant". Scegliere "CD Audio" e fare clic su "Success". Selecteer "Audio-CD" en klik op "Volgende". Elija "CD de audio" y haga clic en "Siguiente". Wybierz "Audio CD" i kliknij "Next". 47 5 UK D F I NL E PL Choose "Finish". Wählen Sie "Fertig". Cliquez sur "Terminer". Scegliere "Fini". Klik op "Voltooien". Elija "Finalizar". Wybierz "Finish". 6 UK D F I NL E PL 48 Drag the audio files (*.wav) you want to have on your new audio disc to the left side. Ziehen Sie die Audiodateien (*.wav), die Sie auf Ihrer neuen Audio-CD haben möchten, zur linken Seite. Effectuez un glisser–déposer pour transférer les fichiers audio (*.wav) à enregistrer sur le disque dans la partie gauche de la fenêtre. Trascinare sul lato sinistro i file audio (*.wav) che si desiderano avere sul nuovo disco audio. Sleep de geluidsbestanden (*.wav) die u op de cd wilt branden naar het linkervenster. Arrastre los archivos de audio (*.wav) que desee copiar en su nuevo disco de audio a la izquierda. Przeciągnij pliki audio (*.wav), które chcesz skopiować na nową płytę, na lewą stronę ekranu. 7 UK D F I NL E PL Click on the "Write" icon. Klicken Sie auf das Symbol "Brennen". Cliquez sur l'icône "Graver". Fare clic sull'icona "Scrivi". Klik op het pictogram voor "Branden". Haga clic en el icono "Grabar". Kliknij ikonę "Write". 8 UK D F I NL E PL Choose "Burn" twice. Wählen Sie zweimal "Brennen". Choisissez "Graver" deux fois de suite. Selezionare "Scrivi" due volte. Selecteer twee keer "Branden". Elija "Grabar" dos veces. Kliknij dwukrotnie "Burn". 49 1 UK D F I NL E PL Insert the Nero disc again, and click "exit". Legen Sie die Nero Disk wieder ein und klicken Sie auf "Exit". Réinsérez le disque Nero et cliquez sur "Quitter". Inserire nuovamente il disco Nero e fare clic su "esci". Leg de Nero-CD weer in de lade en klik op "Sluiten". Vuelva a colocar el disco de Nero y haga clic en "salir". Włóż ponownie dysk z programem Nero, a następnie kliknij przycisk "Zakończ". 2 UK D F I NL E PL 52 Click on the "My Computer" icon on your desktop (A) or click "Start", "My Computer" (B). Klicken Sie auf das Symbol "My Computer" auf Ihrer Oberfläche (A) oder klicken Sie auf "Start", "My Computer" (B). Cliquez sur l’icône 'Poste de travail' de votre bureau (A) ou cliquez sur 'Démarrer' puis 'Poste de travail' (B). Fare clic sull'icona "Risorse del computer" nel desktop (A) oppure fare clic su "Start", "Risorse del computer" (B) Klik op het bureaublad op het pictogram "Deze computer" (A) of klik op "Start" en dan op "Deze computer" (B). Haga clic en el icono "Mi PC" del escritorio (A) o bien haga clic en "Inicio" y "Mi PC" (B). Kliknij ikonę "Mój komputer" znajdującą się na pulpicie (A) lub kliknij przycisk "Start" i wskaż polecenie "Mój komputer" (B).-
 1
1
-
 2
2
-
 3
3
-
 4
4
-
 5
5
-
 6
6
-
 7
7
-
 8
8
-
 9
9
-
 10
10
-
 11
11
-
 12
12
-
 13
13
-
 14
14
-
 15
15
-
 16
16
-
 17
17
-
 18
18
-
 19
19
-
 20
20
-
 21
21
-
 22
22
-
 23
23
-
 24
24
-
 25
25
-
 26
26
-
 27
27
-
 28
28
-
 29
29
-
 30
30
-
 31
31
-
 32
32
-
 33
33
-
 34
34
-
 35
35
-
 36
36
-
 37
37
-
 38
38
-
 39
39
-
 40
40
-
 41
41
-
 42
42
-
 43
43
-
 44
44
-
 45
45
-
 46
46
-
 47
47
-
 48
48
-
 49
49
-
 50
50
-
 51
51
-
 52
52
-
 53
53
-
 54
54
-
 55
55
-
 56
56


Philips ED52CDRWK/00 de handleiding
- Type
- de handleiding
- Deze handleiding is ook geschikt voor
in andere talen
Gerelateerde papieren
-
Philips ED16DVDRK/00 Handleiding
-
-
-
-
-
Philips SPD3800CC/05 Handleiding
-
-
-
Philips SPD3500CC/05 Handleiding
-
