Volkswagen 2K3 017 200 Installation Instructions Manual
- Type
- Installation Instructions Manual

Einbauanleitung
Caddy 2004 ➤
Caddy Maxi 2008 ➤
Heckscheibenschutzgitter, Fahrzeuge
mit Flügeltüren
2K3 017 200
Ausgabe 05.2008
Volkswagen Zubehör

Inhaltsverzeichnis
1 Allgemeines . . . . . . . . . . . . . . . . . . . . . . . . . . . . . . . . . . . . . . . . . . . . . . . . . . . . . . . . . . . . . . . . 1
1.1 Allgemeine Informationen zu dieser Einbauanleitung . . . . . . . . . . . . . . . . . . . . . . . . . . . . . . . . 1
2 Lieferumfang . . . . . . . . . . . . . . . . . . . . . . . . . . . . . . . . . . . . . . . . . . . . . . . . . . . . . . . . . . . . . . . . 2
2.1 Lieferumfang Heckscheibenschutzgitter 2K3 017 200 . . . . . . . . . . . . . . . . . . . . . . . . . . . . . . . . 2
3 Heckscheibenschutzgitter einbauen . . . . . . . . . . . . . . . . . . . . . . . . . . . . . . . . . . . . . . . . . . . . . . 3
Volkswagen Zubehör
Dieses Werk ist urheberrechtlich geschützt.
Jede Verwertung ist ohne Zustimmung des Urhebers unzulässig.
Copyright © 2008 Volkswagen Zubehör GmbH, Dreieich

1 Allgemeines
1.1 Allgemeine Informationen zu dieser
Einbauanleitung
Hinweis
Wir empfehlen Ihnen, den Einbau von einem Fachbetrieb
durchführen zu lassen.
Dieses Heft enthält wichtige Informationen und Warnungen zum
Umgang mit dem Fahrzeug. Weitere Informationen, die Sie zur
eigenen Sicherheit und zur Sicherheit Ihrer Mitfahrer wissen
sollten, befinden sich in Ihrem Bordbuch.
Volkswagen Zubehör arbeitet ständig an der Weiterentwicklung
aller Produkte. Bitte haben Sie Verständnis dafür, dass deshalb
jederzeit Änderungen des Lieferumfangs in Form, Ausstattung
und Technik möglich sind. Die Angaben über Lieferumfang,
Aussehen und Funktionen der Produkte entsprechen dem
Informationsstand zum Zeitpunkt des Redaktionsschlusses. Aus
den Angaben, Abbildungen und Beschreibungen dieser
Anleitung können keine Ansprüche hergeleitet werden.
ACHTUNG!
Texte mit diesem Symbol enthalten Informationen zu Ihrer
Sicherheit und weisen Sie auf mögliche Unfall- und
Verletzungsgefahren hin.
Vorsicht!
Texte mit diesem Symbol machen Sie auf mögliche Schäden
an Ihrem Fahrzeug aufmerksam.
Hinweis
Texte mit diesem Symbol enthalten zusätzliche Informationen.
Volkswagen Zubehör
1. Allgemeines 1

2 Lieferumfang
2.1 Lieferumfang Heckscheibenschutzgitter
2K3 017 200
Stückliste
Pos. Bezeichnung Stück
1 Heckscheibenschutzgitter, rechts 1
2 Gummiauflage 16
3 Gummipuffer 16
4 Schraube 32
5 Heckscheibenschutzgitter, links 1
Volkswagen Zubehör
2 2. Lieferumfang

3 Heckscheibenschutzgitter einbauen
Benötigte Spezialwerkzeuge, Prüf- und Meßgeräte sowie
Hilfsmittel
♦ Kreuzschlitzschraubendreher
♦ Körner
♦ Hammer
♦ Bohrmaschine
♦ Bohrer, 3 mm
♦ zusätzliches Hilfsmittel: säurefreies Schmierfett
Hinweis
Wir empfehlen Ihnen, den Einbau mit Hilfe einer zweiten Person
durchzuführen.
– Drücken Sie die Gummiauflage -2- in die Bohrung des
Heckscheibenschutzgitters -1- bzw. -5-.
– Drücken Sie den Gummipuffer -3-, von unten, in die Bohrung
des Heckscheibenschutzgitters.
Führen Sie diese Tätigkeiten an jedem Befestigungspunkt durch
(8 Stück pro Seite).
– Bringen Sie das Heckscheibenschutzgitter -1- bzw. -5- in
Einbauposition.
Hinweis
Beim Körnen der Bohrlöcher muss das Heckscheibenschutzgitter
an allen Verschraubungspunkten -Pfeile- spielfrei anliegen, um
spätere Klappergeräusche zu verhindern.
Volkswagen Zubehör
3. Heckscheibenschutzgitter einbauen 3

– Körnen Sie an allen Verschraubungspunkten die Bohrlöcher
vor, drücken Sie dabei gleichzeitig das
Heckscheibenschutzgitter gegen die Heckklappe -Pfeil-.
– Nehmen Sie anschließend das Heckscheibenschutzgitter von
der Heckklappe ab.
– Bohren Sie alle Körnerpunkte, vorsichtig, mit einem 3 mm ∅
Bohrer auf.
Hinweis
Vermeiden Sie, dass beim Bohren Borspäne in das Bohrloch
fallen. Bestreichen Sie die Bohrerspitze mit Schmierfett, um die
entstehenden Bohrspäne aufzufangen.
– Bringen Sie das Heckscheibenschutzgitter -1- bzw. -5- in
Einbauposition.
Volkswagen Zubehör
4 3. Heckscheibenschutzgitter einbauen

– Drehen Sie die Schrauben -4- an jedem Befestigungspunkt bis
ca. zur Hälfte hinein, um einen spannungsfreien Sitz des
Heckscheibenschutzgitters zu gewährleisten.
– Drehen Sie sämtliche Schrauben -4- fest.
– Führen Sie den Korrosionsschutz gemäß ELSA
(Elektronisches Service Auskunftssystem) ⇒
Reparaturleitfaden Lack durch.
ACHTUNG!
Korrosionsschäden, die durch eine unsachgemäße Montage
entstehen, werden nicht durch VW-Garantie gegen
Durchrostung abgedeckt.
Volkswagen Zubehör
3. Heckscheibenschutzgitter einbauen 5

3
6

Installation instructions
Caddy 2004 ➤
Caddy Maxi 2008 ➤
Protective grille for rear window,
vehicles with wing doors
2K3 017 200
Version 05.2008
Volkswagen Accessories

Contents
1 General . . . . . . . . . . . . . . . . . . . . . . . . . . . . . . . . . . . . . . . . . . . . . . . . . . . . . . . . . . . . . . . . . . . . 1
1.1 General information for these installation instructions . . . . . . . . . . . . . . . . . . . . . . . . . . . . . . . . 1
2 Scope of delivery . . . . . . . . . . . . . . . . . . . . . . . . . . . . . . . . . . . . . . . . . . . . . . . . . . . . . . . . . . . . 2
2.1 Scope of delivery for protective grille for rear window 2K3 017 200 . . . . . . . . . . . . . . . . . . . . . . 2
3 Installing protective grille for rear window . . . . . . . . . . . . . . . . . . . . . . . . . . . . . . . . . . . . . . . . . . 3
Volkswagen Accessories
All rights reserved.
No reproduction without prior agreement from publisher.
Copyright © 2008 Volkswagen Zubehör GmbH, Dreieich

1 General
1.1 General information for these
installation instructions
Note
We recommend that the work be carried out by a specialist
workshop.
This booklet contains important information and warnings on
using your vehicle. Refer to your Owner's Manual for further
information concerning your safety and the safety of your
passengers.
Volkswagen Accessories are continually working on the further
development of all products. Please appreciate that we must
therefore reserve the right to alter any part of the vehicle and its
equipment or technical specifications at any time. The details
concerning scope of delivery, design and function of the product
refer to the information available at the time of publication. No
legal commitment can be derived from the information,
illustrations or descriptions in this manual.
WARNING!
Texts with this symbol contain information on safety. They help
protect you from accidents and injury.
Caution!
Texts with this symbol draw your attention to potential sources
of damage to your vehicle.
Note
Texts with this symbol contain additional information.
Volkswagen Accessories
1. General 1

2 Scope of delivery
2.1 Scope of delivery for protective grille for
rear window 2K3 017 200
Parts list
Item Description Qty.
1 Protective grille for rear right window 1
2 Rubber fittings 16
3 Rubber buffer 16
4 Bolt 32
5 Protective grille for rear left window 1
Volkswagen Accessories
2 2. Scope of delivery

3 Installing protective grille for rear
window
Required special tools, testers, measuring instruments and
auxiliary items
♦ Phillips-type screwdriver
♦ Centre punch
♦ Hammer
♦ Drill
♦ Drill bit, 3 mm
♦ Additional material: Acid-free grease
Note
We recommend that the installation be carried out with the
assistance of a second person.
– Press rubber fitting -2- into hole of rear window protective grille
-1- or -5-.
– From back, press rubber buffer -3- into hole of rear window
protective grille.
Perform this task at each of the securing points (Qty. 8 each side)
– Position rear window protective grille -1- or -5- in installation
position.
Note
When centre punching position of holes, ensure rear window
protective grille is positioned so that there is no free play (making
full contact) at securing points -arrows- to prevent rattling noises.
Volkswagen Accessories
3. Installing protective grille for rear window 3

– Centre punch position of securing point holes, push rear lid
protective grille against rear lid -arrow- when doing this.
– Then remove rear lid protective grille from rear lid.
– Carefully drill out holes where marked (centre punch mark)
using 3 mm drill bit.
Note
Prevent drilling swarf from falling into holes. Coat end of drill bit
with grease to collect resulting drill swarf.
– Position rear window protective grille -1- or -5- in installation
position.
Volkswagen Accessories
4 3. Installing protective grille for rear window

– First screw bolts -4- in only approx. half-way at each securing
point, to ensure stress-free installation of the rear window
protective grille.
– Then tighten all bolts -4-.
– Perform corrosion protective measures according to
instructions in ELSA (electronic repair information system) ⇒
Paint workshop manual .
WARNING!
Corrosion damage caused by improper installation is not
covered by the VW warranty on perforation rusting.
Volkswagen Accessories
3. Installing protective grille for rear window 5

3
6

Instructions de pose
Caddy 2004 ➤
Caddy Maxi 2008 ➤
Grilles de protection des lunettes
arrière, véhicules avec portes-papillon
2K3 017 200
Edition 05.2008
Accessoires homologués Volkswagen

Sommaire
1 Généralités . . . . . . . . . . . . . . . . . . . . . . . . . . . . . . . . . . . . . . . . . . . . . . . . . . . . . . . . . . . . . . . . 1
1.1 Informations générales sur ces instructions de pose . . . . . . . . . . . . . . . . . . . . . . . . . . . . . . . . 1
2 Etendue de livraison . . . . . . . . . . . . . . . . . . . . . . . . . . . . . . . . . . . . . . . . . . . . . . . . . . . . . . . . . . 2
2.1 Etendue de livraison Grilles de protection des lunettes arrière 2K3 017 200 . . . . . . . . . . . . . . 2
3 Pose de la grille de protection des lunettes arrière . . . . . . . . . . . . . . . . . . . . . . . . . . . . . . . . . . 3
Accessoires homologués Volkswagen
Cet ouvrage est protégé par la législation sur les droits d’auteur.
Toute utilisation sans accord de l’auteur est interdite.
Copyright © 2008 Volkswagen Zubehör GmbH, Dreieich

1 Généralités
1.1 Informations générales sur ces
instructions de pose
Remarque
Nous vous conseillons de confier la pose à un atelier spécialisé.
Cette brochure contient des informations et mises en garde
importantes sur l'utilisation de votre véhicule. Vous trouverez
aussi, dans votre Livre de Bord, d'autres informations à connaître
concernant votre propre sécurité et celle de vos passagers.
Volkswagen Zubehör œuvre en permanence au
perfectionnement de tous ses produits. Vous comprendrez que
nous nous réservons le droit d'apporter à tout moment des
modifications au matériel livré, qu'il s'agisse de sa forme, de son
équipement ou de sa technique. Les indications concernant
l'ensemble de livraison, l'aspect extérieur et les fonctions des
produits sont conformes aux informations disponibles au moment
de la clôture de la rédaction Vous ne sauriez de ce fait vous
prévaloir des indications, figures et descriptions figurant dans le
présent supplément de la Notice d'Utilisation.
ATTENTION !
Les textes suivis de ce symbole contiennent des informations
concernant votre sécurité et vous informent des risques
d'accidents et blessures éventuels.
Attention !
Les textes suivis de ce symbole attirent votre attention sur les
dommages que votre véhicule est susceptible de subir.
Remarque
Les textes suivis de ce symbole comportent des informations
supplémentaires.
Accessoires homologués Volkswagen
1. Généralités 1

2 Etendue de livraison
2.1 Etendue de livraison Grilles de
protection des lunettes arrière 2K3 017
200
Liste de pièces
Pos. Désignation Pièce
1 Grille de protection des lunettes arrière,
à droite
1
2 Support de caoutchouc 16
3 Tampon en caoutchouc 16
4 Vis 32
5 Grille de protection des lunettes arrière,
à gauche
1
Accessoires homologués Volkswagen
2 2. Etendue de livraison

3 Pose de la grille de protection des
lunettes arrière
Outils spéciaux, appareils de contrôle et de mesure ainsi
qu'auxiliaires nécessaires
♦ Tournevis cruciforme
♦ Pointeau
♦ Marteau
♦ Foreuse
♦ Foret, 3 mm
♦ Auxiliaire supplémentaire : Lubrifiant sans acide
Remarque
Nous vous conseillons de poser le système de plancher avec
l'aide d'une autre personne.
– Enfoncez le tampon en caoutchouc -2- dans le trou de la grille
de protection de lunettes arrière -1- et/ou -5-.
– Enfoncez le support en caoutchouc -3-, par le bas, dans le trou
de la grille de protection de lunettes arrière.
Procédez de la même façon à chaque point de fixation (8 de
chaque côté).
– Mettez la grille de protection de lunettes arrière -1- et/ou -5-
en position de pose.
Remarque
Lors du pointage des trous, la grille de protection de lunettes
arrière doit être appliquée sans jeu sur tous les points de vissage
-Flèche-, afin d'éviter des cliquetis par la suite.
Accessoires homologués Volkswagen
3. Pose de la grille de protection des lunettes arrière 3

– Procédez au prépointage des trous à tous les points de
vissage, ce faisant, poussez simultanément la grille de
protection de lunettes arrière contre le hayon -Flèche-.
– Ensuite, retirez la grille de protection de lunettes arrière du
hayon.
– Forez tous les coups de pointeau, prudemment, avec un foret
de 3 mm ∅.
Remarque
En forant, évitez que des copeaux de forage tombent dans la
forure. Enduisez de graisse la pointe du foret pour retenir les
copeaux de forage.
– Mettez la grille de protection de lunettes arrière -1- et/ou -5-
en position de pose.
Accessoires homologués Volkswagen
4 3. Pose de la grille de protection des lunettes arrière

– Vissez les vis -4- à chaque point de fixation jusqu'à la moitié
environ en vue d'assurer une fixation sans contrainte de la
grille de protection de lunettes arrière.
– Serrez toutes les vis -4- à fond.
– Effectuez la protection contre la corrosion suivant ELSA
(système électronique de service technique) ⇒ Guide de
dépannage Peinture .
ATTENTION !
Les dégâts dus à la corrosion résultant d'un montage incorrect,
ne sont pas couverts par la garantie VW contre la corrosion.
Accessoires homologués Volkswagen
3. Pose de la grille de protection des lunettes arrière 5

3
6

Istruzione di montaggio
Caddy 2004 ➤
Caddy Maxi 2008 ➤
Griglie di protezione per lunotto
posteriore, veicoli con porte a battente
2K3 017 200
Edizione 05.2008
Accessori Volkswagen

Indice
1 In generale . . . . . . . . . . . . . . . . . . . . . . . . . . . . . . . . . . . . . . . . . . . . . . . . . . . . . . . . . . . . . . . . 1
1.1 Informazioni generali relative alle presenti istruzioni di montaggio . . . . . . . . . . . . . . . . . . . . . . 1
2 Volume di fornitura . . . . . . . . . . . . . . . . . . . . . . . . . . . . . . . . . . . . . . . . . . . . . . . . . . . . . . . . . . 2
2.1 Volume di fornitura griglia di protezione per lunotto posteriore 2K3 017 200 . . . . . . . . . . . . . . 2
3 Montaggio della griglia di protezione per lunotto posteriore . . . . . . . . . . . . . . . . . . . . . . . . . . . . 3
Accessori Volkswagen
Quest’opera è protetta a norma della legge sul diritto d’autore.
Qualsiasi utilizzo è vietato senza l’autorizzazione di chi ne detiene i diritti.
Copyright © 2008 Volkswagen Zubehör GmbH, Dreieich

1 In generale
1.1 Informazioni generali relative alle
presenti istruzioni di montaggio
Avvertenza
Per il montaggio si consiglia di rivolgersi ad un'officina
specializzata.
Il presente fascicolo contiene importanti informazioni e
avvertenze sull'uso del veicolo. Ulteriori informazioni per la
sicurezza del conducente e dei passeggeri sono contenute nel
libro di bordo.
Tutti i prodotti Volkswagen Accessories sono sottoposti ad un
costante processo di perfezionamento. Ci riserviamo pertanto la
facoltà di apportare delle modifiche che possono interessare la
forma, l'equipaggiamento e le caratteristiche tecniche del veicolo
consegnato. Le informazioni relative a volume di fornitura,
estetica e funzioni dei prodotti rispondono alla situazione in
termini di informazione all'epoca di chiusura della redazione. Non
è possibile far valere alcun diritto sulla base dei dati, delle
illustrazioni e delle spiegazioni contenute nel presente manuale.
ATTENZIONE!
I testi contraddistinti da questo simbolo contengono
informazioni sulla vostra sicurezza e danno indicazioni relative
a possibili pericoli di infortuni e di lesione.
Precauzione!
I testi contraddistinti da questo simbolo segnalano il rischio di
danni al veicolo.
Avvertenza
I testi preceduti da questo simbolo contengono informazioni
ulteriori ed approfondimenti di vario genere.
Accessori Volkswagen
1. In generale 1

2 Volume di fornitura
2.1 Volume di fornitura griglia di protezione
per lunotto posteriore 2K3 017 200
Distinta dei pezzi
Pos. Denominazione pezzi
1 Griglia di protezione per lunotto
posteriore, a destra
1
2 Supporto in gomma 16
3 Respingente in gomma 16
4 Vite 32
5 Griglia di protezione per lunotto
posteriore, a sinistra
1
Accessori Volkswagen
2 2. Volume di fornitura

3 Montaggio della griglia di protezione
per lunotto posteriore
Attrezzi speciali, tester e apparecchi di misura nonché mezzi
ausiliari necessari
♦ Cacciavite con punta a croce
♦ Bulino
♦ Martello
♦ Trapano
♦ Punta da trapano, 3 mm
♦ mezzi ausiliari supplementari: grasso lubrificante esente da
acidi
Avvertenza
Il montaggio dovrebbe essere effettuato con l'ausilio di una
seconda persona.
– Premere il supporto in gomma -2- nel foro della griglia di
protezione per lunotto posteriore -1- ovvero -5-.
– Premere il respingente in gomma -3- dal basso nel foro della
griglia di protezione per lunotto posteriore.
Eseguire queste operazioni per ogni punto di fissaggio (8 per ogni
lato).
– Portare la griglia di protezione per lunotto posteriore -1- ovvero
-5- in posizione di montaggio.
Avvertenza
Quando si procede alla bulinatura dei fori, la griglia di protezione
per lunotto posteriore deve venire a poggiare senza gioco su tutti
i punti di avvitamento -frecce- al fine di evitare rumori causati da
vibrazioni.
Accessori Volkswagen
3. Montaggio della griglia di protezione per lunotto posteriore 3

– Bisogna bulinare preliminarmente i fori in tutti i punti di
avvitamento premendo contemporaneamente la griglia di
protezione contro il portellone posteriore -freccia-.
– Successivamente staccare la griglia di protezione dal
portellone posteriore.
– Forare tutti i punti incisi con una punta da trapano, ∅ 3 mm,
agendo con cautela.
Avvertenza
Durante l'operazione evitare che i trucioli cadano nel foro.
Trattare la punta del trapano con il grasso lubrificante per
raccogliere i trucioli che si formano.
– Portare la griglia di protezione per lunotto posteriore -1- ovvero
-5- in posizione di montaggio.
Accessori Volkswagen
4 3. Montaggio della griglia di protezione per lunotto posteriore

– Avvitare le viti -4- in ogni punto di fissaggio fino a circa la metà
per garantire un accoppiamento senza tensioni della griglia di
protezione per lunotto posteriore.
– Avvitare saldamente tutte le viti -4-.
– Eseguire la protezione anticorrosiva in conformità con l'ELSA
(Sistema Elettronico di Service e Informazione) ⇒ Guida
Riparazioni Vernice .
ATTENZIONE!
Danni da corrosione risultanti da un montaggio non
appropriato non sono coperti dalla garanzia VW contro la
corrosione perforante.
Accessori Volkswagen
3. Montaggio della griglia di protezione per lunotto posteriore 5

3
6

Monteringsanvisning
Caddy 2004 ➤
Caddy Maxi 2008 ➤
Bakruteskyddsgaller, bilar med
bakdrrar
2K3 017 200
Utgva 05.2008
Volkswagen tillbehör

Innehållsförteckning
1 Allmnt . . . . . . . . . . . . . . . . . . . . . . . . . . . . . . . . . . . . . . . . . . . . . . . . . . . . . . . . . . . . . . . . . . . . 1
1.1 Allmnna informationer fr denna monteringsanvisning . . . . . . . . . . . . . . . . . . . . . . . . . . . . . . . . 1
2 Leveransomfattning . . . . . . . . . . . . . . . . . . . . . . . . . . . . . . . . . . . . . . . . . . . . . . . . . . . . . . . . . . 2
2.1 Leveransomfattning fr bakruteskyddsgaller 2K3 017 200 . . . . . . . . . . . . . . . . . . . . . . . . . . . . . . 2
3 Bakruteskyddsgaller, montera . . . . . . . . . . . . . . . . . . . . . . . . . . . . . . . . . . . . . . . . . . . . . . . . . . 3
Volkswagen tillbehör
Detta verk är upphovsrättsligt skyddat.
Får ej kopieras utan tillstånd av upphovsrättsinnehavaren.
Copyright © 2008 Volkswagen Zubehör GmbH, Dreieich

1 Allmnt
1.1 Allmnna informationer fr denna
monteringsanvisning
Observera
Vi rekommenderar att lta utfra monteringen av en auktoriserad
verkstad.
Detta hfte innehller viktiga informationer och varningar fr
handhavandet av bilen. Ytterligare informationer fr din egen
skerhet och fr skerheten fr dina medpassagerare som du br veta
finns i din instruktionsbok.
Volkswagen tillbehr arbetar stndigt med fortsatt utveckling av alla
produkter. Ha drfr frstelse fr att alltid ndringar vad det gller
leveransomfattningens form, utrustning och teknik r mjliga.
Uppgifterna vad det gller produkternas utseende och funktion
motsvarar de freliggande informationerna vid tidpunkten fr
presslggningen. Uppgifter, bilder och beskrivningar i denna
monteringsanvisning kan drfr inte lggas till grund fr ansprk.
VIKTIGT
Texter med denna symbol innehller informationer fr din skerhet
och hnvisar till mjliga olycksfalls- och skaderisker.
Se upp!
Texter med denna symbol gr dig uppmrksam p mjliga skador
p din bil.
Observera
Texter med denna symbol innehller ytterligare informationer.
Volkswagen tillbehör
1. Allmnt 1

2 Leveransomfattning
2.1 Leveransomfattning fr
bakruteskyddsgaller 2K3 017 200
Leveransomfattning
Pos Beteckning Antal
1 Bakruteskyddsgaller, hger 1
2 Gummiunderlgg 16
3 Gummiunderlgg 16
4 Skruv 32
5 Bakruteskyddsgaller, vnster 1
Volkswagen tillbehör
2 2. Leveransomfattning

3 Bakruteskyddsgaller, montera
Erforderliga specialverktyg, kontroll- och mtinstrument samt
hjlpmedel
♦ Kryssprskruvmejsel
♦ Krnare
♦ Hammare
♦ Borrmaskin
♦ borr, ∅ 3mm
♦ Ytterligare hjlpmedel: Syrafritt smrjfett
Observera
Vi rekommenderar att genomfra monteringen med hjlp av en 2:a
person.
– Tryck in gummimellanlgget -2- i hlet i bakruteskyddsgallret
-1- resp -5-.
– Tryck in gummimellanlgget -3- underifrn i hlet i
bakruteskyddsgallret.
Genomfr detta arbetsfrlopp vid varje fstpunkt (8 st per sida).
– Stll bakruteskyddsgallret -1- resp -5- i monteringsposition.
Observera
Vid krnslagningen av borrhlen mste bakruteskyddsgallret ligga an
spelfritt vid alla frskruvningspunkter -pilar- fr att undvika
klapprande oljud.
Volkswagen tillbehör
3. Bakruteskyddsgaller, montera 3

– Krnsl borrhlen vid alla frskruvningspunkter, tryck drvid
samtidigt bakruteskyddsgallret mot bakdrren -pil-.
– Ta anslutande av bakruteskyddsgallret frn bakluckan.
– Borra frsiktigt upp alla krnpunkter med ett ∅ 3mm borr.
Observera
Undvik vid borrningen att borrspn ramlar in i borrhlet. Stryk in
borrets spets med smrjfett fr att fnga upp borrspnen.
– Stll bakruteskyddsgallret -1- resp -5- i monteringsposition.
Volkswagen tillbehör
4 3. Bakruteskyddsgaller, montera

– Skruva i skruvarna -4- till hlften vid varje fstpunkt fr att skerstlla
att bakruteskyddsgallret sitter fritt frn spnningar.
– Dra fast samtliga skruvar -4-.
– Genomfr korrosionsskyddet enligt ELSA (Elektronisches
Service Auskunftssystem) ⇒ Reparationshandboken lack .
VIKTIGT
Korrosionsskador som uppstr p grund av osakkunnig
montering tcks inte av VW-garantin mot genomrostning.
Volkswagen tillbehör
3. Bakruteskyddsgaller, montera 5

3
6

Inbouwaanwijzing
Caddy 2004 ➤
Caddy Maxi 2008 ➤
Beschermrooster achterklep, wagens
met vleugelportieren
2K3 017 200
Uitgave 05.2008
Volkswagen accessoires

Inhoudsopgave
1 Algemeen . . . . . . . . . . . . . . . . . . . . . . . . . . . . . . . . . . . . . . . . . . . . . . . . . . . . . . . . . . . . . . . . . . 1
1.1 Algemene informatie over deze montagehandleiding . . . . . . . . . . . . . . . . . . . . . . . . . . . . . . . . 1
2 Leveringsomvang . . . . . . . . . . . . . . . . . . . . . . . . . . . . . . . . . . . . . . . . . . . . . . . . . . . . . . . . . . . . 2
2.1 Leveringsomvang beschermrooster achterklep 2K3 017 200 . . . . . . . . . . . . . . . . . . . . . . . . . . 2
3 Beschermrooster achterklep inbouwen . . . . . . . . . . . . . . . . . . . . . . . . . . . . . . . . . . . . . . . . . . . . 3
Volkswagen accessoires
Dit boek is door de auteurswet beschermd.
Zonder toestemming van de rechthebbende is elk gebruik ongeoorloofd.
Copyright © 2008 Volkswagen Zubehör GmbH, Dreieich

1 Algemeen
1.1 Algemene informatie over deze
montagehandleiding
Aanwijzing
Wij adviseren deze montage door een Volkswagen-specialist te
laten uitvoeren.
In deze brochure vindt u belangrijke informatie en
waarschuwingen over hoe u met uw wagen om kunt gaan. De
overige informatie die u moet kennen voor uw eigen veiligheid en
voor de veiligheid van uw passagiers, vindt u in uw
wagendocumentatie.
Volkswagen Toebehoor werkt voortdurend aan de verdere
ontwikkeling van alle producten. Wij vragen u om begrip, dat om
deze reden wijzigingen van de leveringsomvang in de vorm,
uitvoering en techniek mogelijk zijn. De gegevens inzake omvang
van de levering, uitzicht en functies van de producten komen
overeen met de stand van de informatie bij afsluiting van de
redactie. Aan de gegevens, afbeeldingen en beschrijvingen in dit
instructieboekje kunnen geen rechten worden ontleend.
LET OP!
In teksten met dit symbool staat informatie over uw veiligheid.
Deze teksten wijzen u op mogelijk gevaar voor ongevallen en
verwondingen.
Waarschuwing!
Teksten met dit symbool attenderen u op mogelijke schade
aan uw wagen.
Aanwijzing
In teksten met dit symbool staat extra informatie.
Volkswagen accessoires
1. Algemeen 1

2 Leveringsomvang
2.1 Leveringsomvang beschermrooster
achterklep 2K3 017 200
Lijst van onderdelen
Nr. Aanduiding Onderdeel
1 Beschermrooster achterklep, rechts 1
2 Rubberstutten 16
3 Rubber buffer 16
4 Schroef 32
5 Beschermrooster achterklep, links 1
Volkswagen accessoires
2 2. Leveringsomvang

3 Beschermrooster achterklep
inbouwen
Benodigde speciale werktuigen, test- en meettoestellen en
hulpmiddelen
♦ Kruiskopschroevendraaier
♦ Center
♦ Hamer
♦ Boormachine
♦ Boor, 3 mm
♦ extra hulpmiddel: zuurvrij smeervet
Aanwijzing
We bevelen u aan het inbouwen uit te voeren met de hulp van
een tweede persoon.
– Druk de rubberstutten -2- in het boorgat van het
beschermrooster achterklep -1- resp. -5-.
– Druk de rubber buffer -3- van onderen in het boorgat van het
beschermrooster achterklep.
Voer deze werkzaamheden aan ieder bevestigingspunt uit (8
stuks aan iedere zijde).
– Breng het beschermrooster achterklep -1- resp. -5- in de
montagepositie.
Aanwijzing
Bij het centreren van de boorgaten moet het beschermrooster
achterklep zonder speling op alle schroefpunten -pijlen- liggen om
later rammelende geluiden te voorkomen.
Volkswagen accessoires
3. Beschermrooster achterklep inbouwen 3

– De boorgaten bij alle schroefpunten van tevoren centreren,
daarbij tegelijkertijd het beschermrooster achterklep tegen de
achterklep drukken -pijl-.
– Vervolgens het beschermrooster achterklep van de achterklep
verwijderen.
– Boor alle centreerpunten voorzichtig met een boor van 3 mm
∅.
Aanwijzing
Voorkom dat er boorspanen in het boorgat vallen. Het boorpunt
met smeervet bestrijken om de boorspanen op te vangen.
– Breng het beschermrooster achterklep -1- resp. -5- in de
montagepositie.
Volkswagen accessoires
4 3. Beschermrooster achterklep inbouwen

– Draai de bouten -4- van ieder bevestigingspunt ca. tot de helft
vast om een spanningvrije zitting van het beschermrooster
achterklep te waarborgen.
– Alle bouten -4- vastdraaien.
– Corrosiebescherming volgens ELSA (Elektronisches Service
Auskunftssystem / elektronisch service informatiesysteem) ⇒
Reparatiebrochure lak uitvoeren.
LET OP!
Corrosieschade die door onvakkundige montage ontstaat
wordt niet door de VW garantie tegen roesten gedekt.
Volkswagen accessoires
3. Beschermrooster achterklep inbouwen 5

3
6

Instrucciones de montaje
Caddy 2004 ➤
Caddy Maxi 2008 ➤
Rejilla protectora de luneta trasera,
vehículos con puertas de alas
2K3 017 200
Edición 05/2008
Accesorios Volkswagen

Índice
1 Observaciones generales . . . . . . . . . . . . . . . . . . . . . . . . . . . . . . . . . . . . . . . . . . . . . . . . . . . . . . 1
1.1 Informaciones generales relativas a estas Instrucciones de montaje . . . . . . . . . . . . . . . . . . . . 1
2 Volumen de suministro . . . . . . . . . . . . . . . . . . . . . . . . . . . . . . . . . . . . . . . . . . . . . . . . . . . . . . . . 2
2.1 Conjunto de suministro de rejilla protectora de luneta trasera 2K3 017 200 . . . . . . . . . . . . . . . . 2
3 Montaje de rejilla protectora de luneta trasera . . . . . . . . . . . . . . . . . . . . . . . . . . . . . . . . . . . . . . 3
Accesorios Volkswagen
Este Manual está protegido por la legislación sobre los derechos de autor.
Queda prohibida su utilización, bajo cualquier forma, sin el permiso del autor.
Copyright © 2008 Volkswagen Zubehör GmbH, Dreieich

1 Observaciones generales
1.1 Informaciones generales relativas a
estas Instrucciones de montaje
Nota
Le recomendamos que el montaje lo realice un taller
especializado.
Este cuaderno contiene informaciones y advertencias
importantes relacionadas con el vehículo. En los otros cuadernos
de la documentación de a bordo aparecen otras informaciones
importantes de las que el conductor y sus acompañantes
deberían estar informados por su propia seguridad.
Volkswagen Accesorios trabaja permanentemente en el
desarrollo de todos los productos. Por lo tanto le rogamos que
comprenda que el volumen de suministro puede verse sujeto a
modificaciones en lo que a la forma, el equipamiento y la técnica
se refiere. Los datos relativos al conjunto de suministro, el
aspecto y las funciones de los productos corresponden al nivel
de información disponible en el momento del cierre de redacción.
Por esta razón no puede derivarse derecho alguno basándose
en los datos, ilustraciones y descripciones de este manual.
¡ATENCIÓN!
Los textos con este símbolo contienen información acerca de
su seguridad e indican posibles riesgos de accidente y
lesiones.
¡Precaución!
Los textos en los que se encuentra este símbolo le avisan de
que se pueden producir daños en su vehículo.
Nota
Los textos con este símbolo contienen información adicional.
Accesorios Volkswagen
1. Observaciones generales 1

2 Volumen de suministro
2.1 Conjunto de suministro de rejilla
protectora de luneta trasera 2K3 017
200
Lista de piezas
Pos. Denominación Unidades
1 Rejilla protectora de luneta trasera,
lado derecho
1
2 Suplemento de goma 16
3 Taco de goma 16
4 Tornillo 32
5 Rejilla protectora de luneta trasera,
lado izquierdo
1
Accesorios Volkswagen
2 2. Volumen de suministro

3 Montaje de rejilla protectora de
luneta trasera
Herramientas especiales, equipos de verificación y medición, así
como dispositivos auxiliares necesarios
♦ Destornillador de estrella
♦ Granete
♦ Martillo
♦ Taladro
♦ Broca, 3 mm
♦ Medio auxiliar adicional: Grasa lubricante libre de ácido
Nota
Le recomendamos que realice el montaje de la ayuda de un
segundo operario.
– Presione el suplemento de goma -2- en el orificio de la rejilla
protectora de la luneta trasera -1- y -5-.
– Presione el taco de goma -3- desde abajo en el orificio de la
rejilla protectora de la luneta trasera.
Realice estas actividades en cada uno de los puntos de fijación
(8 unidades en cada lado).
– Coloque la rejilla protectora de la luneta trasera -1- ó -5- en la
posición de montaje.
Nota
Al granetear los orificios para taladrar, la rejilla protectora de la
luneta trasera debe tocar en todos los puntos de atornillado
-flechas- sin que tenga juego, para evitar posterior ruidos de
tableteo.
Accesorios Volkswagen
3. Montaje de rejilla protectora de luneta trasera 3

– Granetee en todos los puntos de atornillado los orificios de
taladrado presionando al mismo tiempo la rejilla protectora de
la luneta trasera contra el portón trasero -flecha-.
– Después, retire la rejilla protectora de la luneta trasera del
portón trasero.
– Taladre todos los puntos marcados, con cuidado, con una
broca de ∅ 3 mm.
Nota
Al taladrar, evite que las virutas caigan en el orificio taladrado.
Aplique un poco de grasa lubricante en la punta de la broca para
recoger las virutas que se produzcan.
– Coloque la rejilla protectora de la luneta trasera -1- ó -5- en la
posición de montaje.
Accesorios Volkswagen
4 3. Montaje de rejilla protectora de luneta trasera

– Enrosque los tornillos -4- en cada punto de fijación hasta la
mitad, para garantizar un asiento sin tensiones de la rejilla
protectora de la luneta trasera.
– Apriete todos los tornillos -4-.
– Aplique la protección anticorrosión según el Manual ELSA
(Servicio de información electrónico de postventa) ⇒ Manual
de Reparaciones Pintura .
¡ATENCIÓN!
Los daños por corrosión provocados por un montaje
inadecuado no serán cubiertos por la garantía de VW contra
perforación por corrosión
Accesorios Volkswagen
3. Montaje de rejilla protectora de luneta trasera 5

3
6

Montážní návod
Caddy 2004 ➤
Caddy Maxi 2008 ➤
Ochranné mřížky zadních skel, vozidla
s křídlovými dveřmi
2K3 017 200
Vydání 05.2008
Volkswagen příslušenství

Obsah
1 Všeobecně . . . . . . . . . . . . . . . . . . . . . . . . . . . . . . . . . . . . . . . . . . . . . . . . . . . . . . . . . . . . . . . . 1
1.1 Všeobecné informace k tomuto montážnímu návodu . . . . . . . . . . . . . . . . . . . . . . . . . . . . . . . . 1
2 Rozsah dodávky . . . . . . . . . . . . . . . . . . . . . . . . . . . . . . . . . . . . . . . . . . . . . . . . . . . . . . . . . . . . 2
2.1 Rozsah dodávky ochranných mřížek zadních skel 2K3 017 200 . . . . . . . . . . . . . . . . . . . . . . . . 2
3 Montáž ochranné mřížky zadního skla . . . . . . . . . . . . . . . . . . . . . . . . . . . . . . . . . . . . . . . . . . . . 3
Volkswagen příslušenství
Toto dílo je chráněno autorským právem.
JJakékoli využití bez souhlasu autora je nepřípustné.
Copyright © 2008 Volkswagen Zubehör GmbH, Dreieich

1 Všeobecně
1.1 Všeobecné informace k tomuto
montážnímu návodu
Upozornění
Doporučujeme Vám nechat provést montáž v odborném servisu.
Tento sešit obsahuje důležité informace a varování k zacházení
s vozidlem. Další informace, které byste měli vědět pro vlastní
bezpečnost a bezpečnost Vašich spolucestujících, se nacházejí
ve Vaší palubní knize.
Oddělení Volkswagen Zubehör pracuje neustále na dalším vývoji
všech výrobků. Mějte prosím pochopení pro to, že kdykoliv
mohou nastat změny ve formě, vybavení a technologii výrobků.
Údaje o rozsahu dodávky, vzhledu a funkcích výrobků odpovídají
informačnímu stavu v době redakční uzávěrky. Z údajů, obrázků
a popisů v tomto návodu nelze vyvozovat žádné nároky.
POZOR!
Texty s tímto symbolem obsahují informace pro Vaši
bezpečnost a upozorňují na možná nebezpečí nehody a
poranění.
Pozor!
Texty s tímto symbolem Vás upozorňují na riziko poškození
Vašeho vozidla.
Upozornění
Texty s tímto symbolem obsahují dodatečné informace.
Volkswagen příslušenství
1. Všeobecně 1

2 Rozsah dodávky
2.1 Rozsah dodávky ochranných mřížek
zadních skel 2K3 017 200
Kusovník
Poz. Název dílu Ks.
1 Ochranná mřížka zadního skla, pravá 1
2 Gumová podložka 16
3 Gumový doraz 16
4 Šroub 32
5 Ochranná mřížka zadního skla, levá 1
Volkswagen příslušenství
2 2. Rozsah dodávky

3 Montáž ochranné mřížky zadního
skla
Potřebné speciální nářadí, kontrolní a měřicí přístroje a pomocné
prostředky
♦ Křížový šroubovák
♦ Důlčík
♦ Kladívko
♦ Vrtačka
♦ Vrták, 3 mm
♦ dodatečná pomůcka: mazací tuk neobsahující kyseliny
Upozornění
Doporučujeme Vám provádět montáž za pomoci druhé osoby.
– Zamáčkněte gumovou podložku -2- do otvoru ochranné
mřížky zadního skla -1- resp. -5-.
– Zamáčkněte gumový doraz -3-, zespodu, do otvoru ochranné
mřížky zadního skla.
Tento pracovní krok proveďte u každého upevňovacího bodu (8
kusů na jedné straně).
– Ustavte ochrannou mřížku zadního skla -1- resp. -5- do
montážní polohy.
Upozornění
Při důlčíkování otvorů pro vrtání musí ochranná mřížka zadního
skla na všech místech šroubových spojů -šipky- bez vůle přiléhat,
aby později nedocházelo ke klepavým zvukům.
Volkswagen příslušenství
3. Montáž ochranné mřížky zadního skla 3

– Označte důlčíkem otvory pro vrtání na všech místech
šroubových spojů, přitom současně přitlačte ochrannou
mřížku zadního skla proti zadním dveřím -šipka-.
– Následně sejměte ochrannou mřížku zadního skla ze zadních
dveří.
– Všechny body označené důlčíkem opatrně vyvrtejte vrtákem
∅ 3 mm.
Upozornění
Zabraňte tomu, aby při vrtání zapadly kovové třísky do vrtaného
otvoru. Pro zachycení kovových třísek potřete špičku vrtáku
mazacím tukem.
– Ustavte ochrannou mřížku zadního skla -1- resp. -5- do
montážní polohy.
Volkswagen příslušenství
4 3. Montáž ochranné mřížky zadního skla

– Aby bylo zajištěno usazení ochranné mřížky zadního skla bez
pnutí, nejdříve zašroubujte šrouby -4- v každém upevňovacím
bodu cca do poloviny.
– Následně všechny šrouby -4- pevně zašroubujte.
– Proveďte antikorozní ochranu podle ELSA (Elektronisches
Service Auskunftssystem) ⇒ Dílenská příručka Lak .
POZOR!
Záruka VW proti prorezivění se nevztahuje na škody
způsobené korozí, která vznikla z důvodu neodborně
provedené montáže.
Volkswagen příslušenství
3. Montáž ochranné mřížky zadního skla 5

3
6

取付説明書
Caddy 2004 ➤
Caddy Maxi 2008 ➤
リアウィンドウガード、スイングドア
付き車両
2K3 017 200
発行 2008 年 5 月
フォルクスワーゲン・アクセサリ

目次
1 一般 . . . . . . . . . . . . . . . . . . . . . . . . . . . . . . . . . . . . . . . . . . . . . . . . . . . . . . . . . . . . . . . . . . . . . . 1
1.1 本取付説明書に関する一般的な情報 . . . . . . . . . . . . . . . . . . . . . . . . . . . . . . . . . . . . . . . . . . . . . . 1
2 納入範囲 . . . . . . . . . . . . . . . . . . . . . . . . . . . . . . . . . . . . . . . . . . . . . . . . . . . . . . . . . . . . . . . . . . 2
2.1 リアウィンドウガード 2K3 017 200 の納入範囲 . . . . . . . . . . . . . . . . . . . . . . . . . . . . . . . . . . . . 2
3 リアウィンドウガードの取付け . . . . . . . . . . . . . . . . . . . . . . . . . . . . . . . . . . . . . . . . . . . . . . . . 3
フォルクスワーゲン・アクセサリ
本説明書は著作権保護の適用を受けています。
著者の同意なく本説明書を利用することを禁じます。
Copyright © 2008 Volkswagen Zubehör GmbH, Dreieich

1 一般
1.1 本取付説明書に関する一般的な情報
注意事項
取付けは専門の修理工場に依頼することをお奨めします。
本書には車両の取扱いに関する重要な情報と警告が含まれてい
ます。お客様ご自身や同乗者の方の安全のために知っておくべ
きその他の情報は車載マニュアルをご覧ください。
フォルクスワーゲン・アクセサリ社は常に全製品の開発を続け
ています。そのため納入範囲の形状、装備、技術が変更される
ことがありますのでご了承ください。製品の納入範囲、外見、
機能に関する記載事項は本書の編集終了時点での最新の情報で
す。本書の記載事項、図、説明を基に請求を行うことはできま
せん。
危険!
このマークのついた文章にはお客様の安全に関する情報が含
まれており、事故やケガの危険性があることを指摘していま
す。
注意!
このマークのついた文章は、お客様の車両が破損する可能性
があることを注意しています。
注意事項
このマークのついた文章には追加情報が含まれています。
フォルクスワーゲン・アクセサリ
1. 一般 1

2 納入範囲
2.1 リアウィンドウガード 2K3 017 200 の
納入範囲
パーツリスト
位置 名称 数量
1 リアウィンドウガード、右 1
2 ゴムパッド 16
3 ラバーストッパ 16
4 ネジ 32
5 リアウィンドウガード、左 1
フォルクスワーゲン・アクセサリ
2 2. 納入範囲

3 リアウィンドウガードの取付け
必要な特殊工具、検査装置、測定装置、補助具
♦ フィリップスドライバ
♦ センターポンチ
♦ ハンマー
♦ 電動ドリル
♦ ドリル (3 mm)
♦ その他の道具など:無酸性グリース
注意事項
取付けは助手と二人で行うことをお奨めします。
– ゴムパッド -2- をリアウィンドウガード -1- および -5- の穴の
中に押し込みます。
– ラバーストッパ -3- を下側からリアウィンドウガードの穴に
押し込みます。
すべての固定ポイント (片側 8 箇所) でこの作業を繰り返します。
– リアウィンドウガード -1- および -5- を取付け位置に持って
いきます。
注意事項
ドリル穴のセンターマーキングを行う際は、後でガタつき音が
出ないように、すべてのネジ付け箇所 -矢印- でリアウィンドウ
ガードがぴったりと接しているようにしてください。
フォルクスワーゲン・アクセサリ
3. リアウィンドウガードの取付け 3

– すべてのネジ付け箇所にドリル穴のセンターマーキングを行
います。その際はリアウィンドウガードをテールゲー
ト-矢印-方向に押し付けながら行ってください。
– 続いてリアウィンドウガードをテールゲートからはずしま
す。
– 直径 3 mm のドリルを使用し、すべてのポンチマークに注意
深く穴をあけます。
注意事項
ドリルで穴をあけるときに切り屑がドリル穴の中に入らないよ
うにしてください。発生する切り屑がくっつくように、ドリル
の先端にグリースをつけてください。
– リアウィンドウガード -1- および -5- を取付け位置に持って
いきます。
フォルクスワーゲン・アクセサリ
4 3. リアウィンドウガードの取付け

– すべての固定ポイントでネジ -4- を半分ぐらいまでしめて、
リアウィンドウガードが歪まないようにします。
– すべてのネジ -4- をしっかり締めます。
– ELSA (電子サービス情報システム) の⇒ 塗装の作業手順 に従
ってサビ止めを施してください。
危険!
不適切な取付けが原因で発生する腐食による損害は、VW に
よる錆止め保障の対象になりません。
フォルクスワーゲン・アクセサリ
3. リアウィンドウガードの取付け 5
Documenttranscriptie
Volkswagen Zubehör Einbauanleitung Caddy 2004 ➤ Caddy Maxi 2008 ➤ Heckscheibenschutzgitter, Fahrzeuge mit Flügeltüren 2K3 017 200 Ausgabe 05.2008 Volkswagen Zubehör Inhaltsverzeichnis 1 1.1 2 2.1 3 Allgemeines . . . . . . . . . . . . . . . . . . . . . . . . . . . . . . . . . . . . . . . . . . . . . . . . . . . . . . . . . . . . . . . . Allgemeine Informationen zu dieser Einbauanleitung . . . . . . . . . . . . . . . . . . . . . . . . . . . . . . . . Lieferumfang . . . . . . . . . . . . . . . . . . . . . . . . . . . . . . . . . . . . . . . . . . . . . . . . . . . . . . . . . . . . . . . . Lieferumfang Heckscheibenschutzgitter 2K3 017 200 . . . . . . . . . . . . . . . . . . . . . . . . . . . . . . . . Heckscheibenschutzgitter einbauen . . . . . . . . . . . . . . . . . . . . . . . . . . . . . . . . . . . . . . . . . . . . . . Dieses Werk ist urheberrechtlich geschützt. Jede Verwertung ist ohne Zustimmung des Urhebers unzulässig. Copyright © 2008 Volkswagen Zubehör GmbH, Dreieich 1 1 2 2 3 Volkswagen Zubehör 1 Allgemeines 1.1 Allgemeine Informationen zu dieser Einbauanleitung Hinweis Wir empfehlen Ihnen, den Einbau von einem Fachbetrieb durchführen zu lassen. Dieses Heft enthält wichtige Informationen und Warnungen zum Umgang mit dem Fahrzeug. Weitere Informationen, die Sie zur eigenen Sicherheit und zur Sicherheit Ihrer Mitfahrer wissen sollten, befinden sich in Ihrem Bordbuch. Volkswagen Zubehör arbeitet ständig an der Weiterentwicklung aller Produkte. Bitte haben Sie Verständnis dafür, dass deshalb jederzeit Änderungen des Lieferumfangs in Form, Ausstattung und Technik möglich sind. Die Angaben über Lieferumfang, Aussehen und Funktionen der Produkte entsprechen dem Informationsstand zum Zeitpunkt des Redaktionsschlusses. Aus den Angaben, Abbildungen und Beschreibungen dieser Anleitung können keine Ansprüche hergeleitet werden. ACHTUNG! Texte mit diesem Symbol enthalten Informationen zu Ihrer Sicherheit und weisen Sie auf mögliche Unfall- und Verletzungsgefahren hin. Vorsicht! Texte mit diesem Symbol machen Sie auf mögliche Schäden an Ihrem Fahrzeug aufmerksam. Hinweis Texte mit diesem Symbol enthalten zusätzliche Informationen. 1. Allgemeines 1 Volkswagen Zubehör 2 Lieferumfang 2.1 Lieferumfang Heckscheibenschutzgitter 2K3 017 200 Stückliste Pos. 1 2 3 4 5 2 Bezeichnung Heckscheibenschutzgitter, rechts Gummiauflage Gummipuffer Schraube Heckscheibenschutzgitter, links 2. Lieferumfang Stück 1 16 16 32 1 Volkswagen Zubehör 3 Heckscheibenschutzgitter einbauen Benötigte Spezialwerkzeuge, Prüf- und Meßgeräte sowie Hilfsmittel ♦ Kreuzschlitzschraubendreher ♦ Körner ♦ Hammer ♦ Bohrmaschine ♦ Bohrer, 3 mm ♦ zusätzliches Hilfsmittel: säurefreies Schmierfett Hinweis Wir empfehlen Ihnen, den Einbau mit Hilfe einer zweiten Person durchzuführen. – Drücken Sie die Gummiauflage -2- in die Bohrung des Heckscheibenschutzgitters -1- bzw. -5-. – Drücken Sie den Gummipuffer -3-, von unten, in die Bohrung des Heckscheibenschutzgitters. Führen Sie diese Tätigkeiten an jedem Befestigungspunkt durch (8 Stück pro Seite). – Bringen Sie das Heckscheibenschutzgitter -1- bzw. -5- in Einbauposition. Hinweis Beim Körnen der Bohrlöcher muss das Heckscheibenschutzgitter an allen Verschraubungspunkten -Pfeile- spielfrei anliegen, um spätere Klappergeräusche zu verhindern. 3. Heckscheibenschutzgitter einbauen 3 Volkswagen Zubehör – Körnen Sie an allen Verschraubungspunkten die Bohrlöcher vor, drücken Sie dabei gleichzeitig das Heckscheibenschutzgitter gegen die Heckklappe -Pfeil-. – Nehmen Sie anschließend das Heckscheibenschutzgitter von der Heckklappe ab. – Bohren Sie alle Körnerpunkte, vorsichtig, mit einem 3 mm ∅ Bohrer auf. Hinweis Vermeiden Sie, dass beim Bohren Borspäne in das Bohrloch fallen. Bestreichen Sie die Bohrerspitze mit Schmierfett, um die entstehenden Bohrspäne aufzufangen. – Bringen Sie das Heckscheibenschutzgitter -1- bzw. -5- in Einbauposition. 4 3. Heckscheibenschutzgitter einbauen Volkswagen Zubehör – Drehen Sie die Schrauben -4- an jedem Befestigungspunkt bis ca. zur Hälfte hinein, um einen spannungsfreien Sitz des Heckscheibenschutzgitters zu gewährleisten. – Drehen Sie sämtliche Schrauben -4- fest. – Führen Sie den Korrosionsschutz gemäß ELSA (Elektronisches Service Auskunftssystem) ⇒ Reparaturleitfaden Lack durch. ACHTUNG! Korrosionsschäden, die durch eine unsachgemäße Montage entstehen, werden nicht durch VW-Garantie gegen Durchrostung abgedeckt. 3. Heckscheibenschutzgitter einbauen 5 3 6 Volkswagen Accessories Installation instructions Caddy 2004 ➤ Caddy Maxi 2008 ➤ Protective grille for rear window, vehicles with wing doors 2K3 017 200 Version 05.2008 Volkswagen Accessories Contents 1 1.1 2 2.1 3 General . . . . . . . . . . . . . . . . . . . . . . . . . . . . . . . . . . . . . . . . . . . . . . . . . . . . . . . . . . . . . . . . . . . . General information for these installation instructions . . . . . . . . . . . . . . . . . . . . . . . . . . . . . . . . Scope of delivery . . . . . . . . . . . . . . . . . . . . . . . . . . . . . . . . . . . . . . . . . . . . . . . . . . . . . . . . . . . . Scope of delivery for protective grille for rear window 2K3 017 200 . . . . . . . . . . . . . . . . . . . . . . Installing protective grille for rear window . . . . . . . . . . . . . . . . . . . . . . . . . . . . . . . . . . . . . . . . . . All rights reserved. No reproduction without prior agreement from publisher. Copyright © 2008 Volkswagen Zubehör GmbH, Dreieich 1 1 2 2 3 Volkswagen Accessories 1 General 1.1 General information for these installation instructions Note We recommend that the work be carried out by a specialist workshop. This booklet contains important information and warnings on using your vehicle. Refer to your Owner's Manual for further information concerning your safety and the safety of your passengers. Volkswagen Accessories are continually working on the further development of all products. Please appreciate that we must therefore reserve the right to alter any part of the vehicle and its equipment or technical specifications at any time. The details concerning scope of delivery, design and function of the product refer to the information available at the time of publication. No legal commitment can be derived from the information, illustrations or descriptions in this manual. WARNING! Texts with this symbol contain information on safety. They help protect you from accidents and injury. Caution! Texts with this symbol draw your attention to potential sources of damage to your vehicle. Note Texts with this symbol contain additional information. 1. General 1 Volkswagen Accessories 2 Scope of delivery 2.1 Scope of delivery for protective grille for rear window 2K3 017 200 Parts list Item 1 2 3 4 5 2 Description Protective grille for rear right window Rubber fittings Rubber buffer Bolt Protective grille for rear left window 2. Scope of delivery Qty. 1 16 16 32 1 Volkswagen Accessories 3 Installing protective grille for rear window Required special tools, testers, measuring instruments and auxiliary items ♦ Phillips-type screwdriver ♦ Centre punch ♦ Hammer ♦ Drill ♦ Drill bit, 3 mm ♦ Additional material: Acid-free grease Note We recommend that the installation be carried out with the assistance of a second person. – Press rubber fitting -2- into hole of rear window protective grille -1- or -5-. – From back, press rubber buffer -3- into hole of rear window protective grille. Perform this task at each of the securing points (Qty. 8 each side) – Position rear window protective grille -1- or -5- in installation position. Note When centre punching position of holes, ensure rear window protective grille is positioned so that there is no free play (making full contact) at securing points -arrows- to prevent rattling noises. 3. Installing protective grille for rear window 3 Volkswagen Accessories – Centre punch position of securing point holes, push rear lid protective grille against rear lid -arrow- when doing this. – Then remove rear lid protective grille from rear lid. – Carefully drill out holes where marked (centre punch mark) using 3 mm drill bit. Note Prevent drilling swarf from falling into holes. Coat end of drill bit with grease to collect resulting drill swarf. – Position rear window protective grille -1- or -5- in installation position. 4 3. Installing protective grille for rear window Volkswagen Accessories – First screw bolts -4- in only approx. half-way at each securing point, to ensure stress-free installation of the rear window protective grille. – Then tighten all bolts -4-. – Perform corrosion protective measures according to instructions in ELSA (electronic repair information system) ⇒ Paint workshop manual . WARNING! Corrosion damage caused by improper installation is not covered by the VW warranty on perforation rusting. 3. Installing protective grille for rear window 5 3 6 Accessoires homologués Volkswagen Instructions de pose Caddy 2004 ➤ Caddy Maxi 2008 ➤ Grilles de protection des lunettes arrière, véhicules avec portes-papillon 2K3 017 200 Edition 05.2008 Accessoires homologués Volkswagen Sommaire 1 1.1 2 2.1 3 Généralités . . . . . . . . . . . . . . . . . . . . . . . . . . . . . . . . . . . . . . . . . . . . . . . . . . . . . . . . . . . . . . . . Informations générales sur ces instructions de pose . . . . . . . . . . . . . . . . . . . . . . . . . . . . . . . . Etendue de livraison . . . . . . . . . . . . . . . . . . . . . . . . . . . . . . . . . . . . . . . . . . . . . . . . . . . . . . . . . . Etendue de livraison Grilles de protection des lunettes arrière 2K3 017 200 . . . . . . . . . . . . . . Pose de la grille de protection des lunettes arrière . . . . . . . . . . . . . . . . . . . . . . . . . . . . . . . . . . Cet ouvrage est protégé par la législation sur les droits d’auteur. Toute utilisation sans accord de l’auteur est interdite. Copyright © 2008 Volkswagen Zubehör GmbH, Dreieich 1 1 2 2 3 Accessoires homologués Volkswagen 1 Généralités 1.1 Informations générales sur ces instructions de pose Remarque Nous vous conseillons de confier la pose à un atelier spécialisé. Cette brochure contient des informations et mises en garde importantes sur l'utilisation de votre véhicule. Vous trouverez aussi, dans votre Livre de Bord, d'autres informations à connaître concernant votre propre sécurité et celle de vos passagers. Volkswagen Zubehör œuvre en permanence au perfectionnement de tous ses produits. Vous comprendrez que nous nous réservons le droit d'apporter à tout moment des modifications au matériel livré, qu'il s'agisse de sa forme, de son équipement ou de sa technique. Les indications concernant l'ensemble de livraison, l'aspect extérieur et les fonctions des produits sont conformes aux informations disponibles au moment de la clôture de la rédaction Vous ne sauriez de ce fait vous prévaloir des indications, figures et descriptions figurant dans le présent supplément de la Notice d'Utilisation. ATTENTION ! Les textes suivis de ce symbole contiennent des informations concernant votre sécurité et vous informent des risques d'accidents et blessures éventuels. Attention ! Les textes suivis de ce symbole attirent votre attention sur les dommages que votre véhicule est susceptible de subir. Remarque Les textes suivis de ce symbole comportent des informations supplémentaires. 1. Généralités 1 Accessoires homologués Volkswagen 2 Etendue de livraison 2.1 Etendue de livraison Grilles de protection des lunettes arrière 2K3 017 200 Liste de pièces Pos. 1 2 3 4 5 2 Désignation Grille de protection des lunettes arrière, à droite Support de caoutchouc Tampon en caoutchouc Vis Grille de protection des lunettes arrière, à gauche 2. Etendue de livraison Pièce 1 16 16 32 1 Accessoires homologués Volkswagen 3 Pose de la grille de protection des lunettes arrière Outils spéciaux, appareils de contrôle et de mesure ainsi qu'auxiliaires nécessaires ♦ Tournevis cruciforme ♦ Pointeau ♦ Marteau ♦ Foreuse ♦ Foret, 3 mm ♦ Auxiliaire supplémentaire : Lubrifiant sans acide Remarque Nous vous conseillons de poser le système de plancher avec l'aide d'une autre personne. – Enfoncez le tampon en caoutchouc -2- dans le trou de la grille de protection de lunettes arrière -1- et/ou -5-. – Enfoncez le support en caoutchouc -3-, par le bas, dans le trou de la grille de protection de lunettes arrière. Procédez de la même façon à chaque point de fixation (8 de chaque côté). – Mettez la grille de protection de lunettes arrière -1- et/ou -5en position de pose. Remarque Lors du pointage des trous, la grille de protection de lunettes arrière doit être appliquée sans jeu sur tous les points de vissage -Flèche-, afin d'éviter des cliquetis par la suite. 3. Pose de la grille de protection des lunettes arrière 3 Accessoires homologués Volkswagen – Procédez au prépointage des trous à tous les points de vissage, ce faisant, poussez simultanément la grille de protection de lunettes arrière contre le hayon -Flèche-. – Ensuite, retirez la grille de protection de lunettes arrière du hayon. – Forez tous les coups de pointeau, prudemment, avec un foret de 3 mm ∅. Remarque En forant, évitez que des copeaux de forage tombent dans la forure. Enduisez de graisse la pointe du foret pour retenir les copeaux de forage. – Mettez la grille de protection de lunettes arrière -1- et/ou -5en position de pose. 4 3. Pose de la grille de protection des lunettes arrière Accessoires homologués Volkswagen – Vissez les vis -4- à chaque point de fixation jusqu'à la moitié environ en vue d'assurer une fixation sans contrainte de la grille de protection de lunettes arrière. – Serrez toutes les vis -4- à fond. – Effectuez la protection contre la corrosion suivant ELSA (système électronique de service technique) ⇒ Guide de dépannage Peinture . ATTENTION ! Les dégâts dus à la corrosion résultant d'un montage incorrect, ne sont pas couverts par la garantie VW contre la corrosion. 3. Pose de la grille de protection des lunettes arrière 5 3 6 Accessori Volkswagen Istruzione di montaggio Caddy 2004 ➤ Caddy Maxi 2008 ➤ Griglie di protezione per lunotto posteriore, veicoli con porte a battente 2K3 017 200 Edizione 05.2008 Accessori Volkswagen Indice 1 1.1 2 2.1 3 In generale . . . . . . . . . . . . . . . . . . . . . . . . . . . . . . . . . . . . . . . . . . . . . . . . . . . . . . . . . . . . . . . . Informazioni generali relative alle presenti istruzioni di montaggio . . . . . . . . . . . . . . . . . . . . . . Volume di fornitura . . . . . . . . . . . . . . . . . . . . . . . . . . . . . . . . . . . . . . . . . . . . . . . . . . . . . . . . . . Volume di fornitura griglia di protezione per lunotto posteriore 2K3 017 200 . . . . . . . . . . . . . . Montaggio della griglia di protezione per lunotto posteriore . . . . . . . . . . . . . . . . . . . . . . . . . . . . Quest’opera è protetta a norma della legge sul diritto d’autore. Qualsiasi utilizzo è vietato senza l’autorizzazione di chi ne detiene i diritti. Copyright © 2008 Volkswagen Zubehör GmbH, Dreieich 1 1 2 2 3 Accessori Volkswagen 1 In generale 1.1 Informazioni generali relative alle presenti istruzioni di montaggio Avvertenza Per il montaggio si consiglia di rivolgersi ad un'officina specializzata. Il presente fascicolo contiene importanti informazioni e avvertenze sull'uso del veicolo. Ulteriori informazioni per la sicurezza del conducente e dei passeggeri sono contenute nel libro di bordo. Tutti i prodotti Volkswagen Accessories sono sottoposti ad un costante processo di perfezionamento. Ci riserviamo pertanto la facoltà di apportare delle modifiche che possono interessare la forma, l'equipaggiamento e le caratteristiche tecniche del veicolo consegnato. Le informazioni relative a volume di fornitura, estetica e funzioni dei prodotti rispondono alla situazione in termini di informazione all'epoca di chiusura della redazione. Non è possibile far valere alcun diritto sulla base dei dati, delle illustrazioni e delle spiegazioni contenute nel presente manuale. ATTENZIONE! I testi contraddistinti da questo simbolo contengono informazioni sulla vostra sicurezza e danno indicazioni relative a possibili pericoli di infortuni e di lesione. Precauzione! I testi contraddistinti da questo simbolo segnalano il rischio di danni al veicolo. Avvertenza I testi preceduti da questo simbolo contengono informazioni ulteriori ed approfondimenti di vario genere. 1. In generale 1 Accessori Volkswagen 2 Volume di fornitura 2.1 Volume di fornitura griglia di protezione per lunotto posteriore 2K3 017 200 Pos. 1 2 3 4 5 2 Distinta dei pezzi Denominazione Griglia di protezione per lunotto posteriore, a destra Supporto in gomma Respingente in gomma Vite Griglia di protezione per lunotto posteriore, a sinistra 2. Volume di fornitura pezzi 1 16 16 32 1 Accessori Volkswagen 3 Montaggio della griglia di protezione per lunotto posteriore Attrezzi speciali, tester e apparecchi di misura nonché mezzi ausiliari necessari ♦ Cacciavite con punta a croce ♦ Bulino ♦ Martello ♦ Trapano ♦ Punta da trapano, 3 mm ♦ mezzi ausiliari supplementari: grasso lubrificante esente da acidi Avvertenza Il montaggio dovrebbe essere effettuato con l'ausilio di una seconda persona. – Premere il supporto in gomma -2- nel foro della griglia di protezione per lunotto posteriore -1- ovvero -5-. – Premere il respingente in gomma -3- dal basso nel foro della griglia di protezione per lunotto posteriore. Eseguire queste operazioni per ogni punto di fissaggio (8 per ogni lato). – Portare la griglia di protezione per lunotto posteriore -1- ovvero -5- in posizione di montaggio. Avvertenza Quando si procede alla bulinatura dei fori, la griglia di protezione per lunotto posteriore deve venire a poggiare senza gioco su tutti i punti di avvitamento -frecce- al fine di evitare rumori causati da vibrazioni. 3. Montaggio della griglia di protezione per lunotto posteriore 3 Accessori Volkswagen – Bisogna bulinare preliminarmente i fori in tutti i punti di avvitamento premendo contemporaneamente la griglia di protezione contro il portellone posteriore -freccia-. – Successivamente staccare la griglia di protezione dal portellone posteriore. – Forare tutti i punti incisi con una punta da trapano, ∅ 3 mm, agendo con cautela. Avvertenza Durante l'operazione evitare che i trucioli cadano nel foro. Trattare la punta del trapano con il grasso lubrificante per raccogliere i trucioli che si formano. – Portare la griglia di protezione per lunotto posteriore -1- ovvero -5- in posizione di montaggio. 4 3. Montaggio della griglia di protezione per lunotto posteriore Accessori Volkswagen – Avvitare le viti -4- in ogni punto di fissaggio fino a circa la metà per garantire un accoppiamento senza tensioni della griglia di protezione per lunotto posteriore. – Avvitare saldamente tutte le viti -4-. – Eseguire la protezione anticorrosiva in conformità con l'ELSA (Sistema Elettronico di Service e Informazione) ⇒ Guida Riparazioni Vernice . ATTENZIONE! Danni da corrosione risultanti da un montaggio non appropriato non sono coperti dalla garanzia VW contro la corrosione perforante. 3. Montaggio della griglia di protezione per lunotto posteriore 5 3 6 Volkswagen tillbehör Monteringsanvisning Caddy 2004 ➤ Caddy Maxi 2008 ➤ Bakruteskyddsgaller, bilar med bakdrrar 2K3 017 200 Utgva 05.2008 Volkswagen tillbehör Innehållsförteckning 1 1.1 2 2.1 3 Allmnt . . . . . . . . . . . . . . . . . . . . . . . . . . . . . . . . . . . . . . . . . . . . . . . . . . . . . . . . . . . . . . . . . . . . Allmnna informationer fr denna monteringsanvisning . . . . . . . . . . . . . . . . . . . . . . . . . . . . . . . . Leveransomfattning . . . . . . . . . . . . . . . . . . . . . . . . . . . . . . . . . . . . . . . . . . . . . . . . . . . . . . . . . . Leveransomfattning fr bakruteskyddsgaller 2K3 017 200 . . . . . . . . . . . . . . . . . . . . . . . . . . . . . . Bakruteskyddsgaller, montera . . . . . . . . . . . . . . . . . . . . . . . . . . . . . . . . . . . . . . . . . . . . . . . . . . Detta verk är upphovsrättsligt skyddat. Får ej kopieras utan tillstånd av upphovsrättsinnehavaren. Copyright © 2008 Volkswagen Zubehör GmbH, Dreieich 1 1 2 2 3 Volkswagen tillbehör 1 Allmnt 1.1 Allmnna informationer fr denna monteringsanvisning Observera Vi rekommenderar att lta utfra monteringen av en auktoriserad verkstad. Detta hfte innehller viktiga informationer och varningar fr handhavandet av bilen. Ytterligare informationer fr din egen skerhet och fr skerheten fr dina medpassagerare som du br veta finns i din instruktionsbok. Volkswagen tillbehr arbetar stndigt med fortsatt utveckling av alla produkter. Ha drfr frstelse fr att alltid ndringar vad det gller leveransomfattningens form, utrustning och teknik r mjliga. Uppgifterna vad det gller produkternas utseende och funktion motsvarar de freliggande informationerna vid tidpunkten fr presslggningen. Uppgifter, bilder och beskrivningar i denna monteringsanvisning kan drfr inte lggas till grund fr ansprk. VIKTIGT Texter med denna symbol innehller informationer fr din skerhet och hnvisar till mjliga olycksfalls- och skaderisker. Se upp! Texter med denna symbol gr dig uppmrksam p mjliga skador p din bil. Observera Texter med denna symbol innehller ytterligare informationer. 1. Allmnt 1 Volkswagen tillbehör 2 Leveransomfattning 2.1 Leveransomfattning fr bakruteskyddsgaller 2K3 017 200 Pos 1 2 3 4 5 2 Leveransomfattning Beteckning Bakruteskyddsgaller, hger Gummiunderlgg Gummiunderlgg Skruv Bakruteskyddsgaller, vnster 2. Leveransomfattning Antal 1 16 16 32 1 Volkswagen tillbehör 3 Bakruteskyddsgaller, montera Erforderliga specialverktyg, kontroll- och mtinstrument samt hjlpmedel ♦ Kryssprskruvmejsel ♦ Krnare ♦ Hammare ♦ Borrmaskin ♦ borr, ∅ 3mm ♦ Ytterligare hjlpmedel: Syrafritt smrjfett Observera Vi rekommenderar att genomfra monteringen med hjlp av en 2:a person. – Tryck in gummimellanlgget -2- i hlet i bakruteskyddsgallret -1- resp -5-. – Tryck in gummimellanlgget -3- underifrn i hlet i bakruteskyddsgallret. Genomfr detta arbetsfrlopp vid varje fstpunkt (8 st per sida). – Stll bakruteskyddsgallret -1- resp -5- i monteringsposition. Observera Vid krnslagningen av borrhlen mste bakruteskyddsgallret ligga an spelfritt vid alla frskruvningspunkter -pilar- fr att undvika klapprande oljud. 3. Bakruteskyddsgaller, montera 3 Volkswagen tillbehör – Krnsl borrhlen vid alla frskruvningspunkter, tryck drvid samtidigt bakruteskyddsgallret mot bakdrren -pil-. – Ta anslutande av bakruteskyddsgallret frn bakluckan. – Borra frsiktigt upp alla krnpunkter med ett ∅ 3mm borr. Observera Undvik vid borrningen att borrspn ramlar in i borrhlet. Stryk in borrets spets med smrjfett fr att fnga upp borrspnen. – Stll bakruteskyddsgallret -1- resp -5- i monteringsposition. 4 3. Bakruteskyddsgaller, montera Volkswagen tillbehör – Skruva i skruvarna -4- till hlften vid varje fstpunkt fr att skerstlla att bakruteskyddsgallret sitter fritt frn spnningar. – Dra fast samtliga skruvar -4-. – Genomfr korrosionsskyddet enligt ELSA (Elektronisches Service Auskunftssystem) ⇒ Reparationshandboken lack . VIKTIGT Korrosionsskador som uppstr p grund av osakkunnig montering tcks inte av VW-garantin mot genomrostning. 3. Bakruteskyddsgaller, montera 5 3 6 Volkswagen accessoires Inbouwaanwijzing Caddy 2004 ➤ Caddy Maxi 2008 ➤ Beschermrooster achterklep, wagens met vleugelportieren 2K3 017 200 Uitgave 05.2008 Volkswagen accessoires Inhoudsopgave 1 1.1 2 2.1 3 Algemeen . . . . . . . . . . . . . . . . . . . . . . . . . . . . . . . . . . . . . . . . . . . . . . . . . . . . . . . . . . . . . . . . . . Algemene informatie over deze montagehandleiding . . . . . . . . . . . . . . . . . . . . . . . . . . . . . . . . Leveringsomvang . . . . . . . . . . . . . . . . . . . . . . . . . . . . . . . . . . . . . . . . . . . . . . . . . . . . . . . . . . . . Leveringsomvang beschermrooster achterklep 2K3 017 200 . . . . . . . . . . . . . . . . . . . . . . . . . . Beschermrooster achterklep inbouwen . . . . . . . . . . . . . . . . . . . . . . . . . . . . . . . . . . . . . . . . . . . . Dit boek is door de auteurswet beschermd. Zonder toestemming van de rechthebbende is elk gebruik ongeoorloofd. Copyright © 2008 Volkswagen Zubehör GmbH, Dreieich 1 1 2 2 3 Volkswagen accessoires 1 Algemeen 1.1 Algemene informatie over deze montagehandleiding Aanwijzing Wij adviseren deze montage door een Volkswagen-specialist te laten uitvoeren. In deze brochure vindt u belangrijke informatie en waarschuwingen over hoe u met uw wagen om kunt gaan. De overige informatie die u moet kennen voor uw eigen veiligheid en voor de veiligheid van uw passagiers, vindt u in uw wagendocumentatie. Volkswagen Toebehoor werkt voortdurend aan de verdere ontwikkeling van alle producten. Wij vragen u om begrip, dat om deze reden wijzigingen van de leveringsomvang in de vorm, uitvoering en techniek mogelijk zijn. De gegevens inzake omvang van de levering, uitzicht en functies van de producten komen overeen met de stand van de informatie bij afsluiting van de redactie. Aan de gegevens, afbeeldingen en beschrijvingen in dit instructieboekje kunnen geen rechten worden ontleend. LET OP! In teksten met dit symbool staat informatie over uw veiligheid. Deze teksten wijzen u op mogelijk gevaar voor ongevallen en verwondingen. Waarschuwing! Teksten met dit symbool attenderen u op mogelijke schade aan uw wagen. Aanwijzing In teksten met dit symbool staat extra informatie. 1. Algemeen 1 Volkswagen accessoires 2 Leveringsomvang 2.1 Leveringsomvang beschermrooster achterklep 2K3 017 200 Nr. 1 2 3 4 5 2 Lijst van onderdelen Aanduiding Beschermrooster achterklep, rechts Rubberstutten Rubber buffer Schroef Beschermrooster achterklep, links 2. Leveringsomvang Onderdeel 1 16 16 32 1 Volkswagen accessoires 3 Beschermrooster achterklep inbouwen Benodigde speciale werktuigen, test- en meettoestellen en hulpmiddelen ♦ Kruiskopschroevendraaier ♦ Center ♦ Hamer ♦ Boormachine ♦ Boor, 3 mm ♦ extra hulpmiddel: zuurvrij smeervet Aanwijzing We bevelen u aan het inbouwen uit te voeren met de hulp van een tweede persoon. – Druk de rubberstutten -2- in het boorgat van het beschermrooster achterklep -1- resp. -5-. – Druk de rubber buffer -3- van onderen in het boorgat van het beschermrooster achterklep. Voer deze werkzaamheden aan ieder bevestigingspunt uit (8 stuks aan iedere zijde). – Breng het beschermrooster achterklep -1- resp. -5- in de montagepositie. Aanwijzing Bij het centreren van de boorgaten moet het beschermrooster achterklep zonder speling op alle schroefpunten -pijlen- liggen om later rammelende geluiden te voorkomen. 3. Beschermrooster achterklep inbouwen 3 Volkswagen accessoires – De boorgaten bij alle schroefpunten van tevoren centreren, daarbij tegelijkertijd het beschermrooster achterklep tegen de achterklep drukken -pijl-. – Vervolgens het beschermrooster achterklep van de achterklep verwijderen. – Boor alle centreerpunten voorzichtig met een boor van 3 mm ∅. Aanwijzing Voorkom dat er boorspanen in het boorgat vallen. Het boorpunt met smeervet bestrijken om de boorspanen op te vangen. – Breng het beschermrooster achterklep -1- resp. -5- in de montagepositie. 4 3. Beschermrooster achterklep inbouwen Volkswagen accessoires – Draai de bouten -4- van ieder bevestigingspunt ca. tot de helft vast om een spanningvrije zitting van het beschermrooster achterklep te waarborgen. – Alle bouten -4- vastdraaien. – Corrosiebescherming volgens ELSA (Elektronisches Service Auskunftssystem / elektronisch service informatiesysteem) ⇒ Reparatiebrochure lak uitvoeren. LET OP! Corrosieschade die door onvakkundige montage ontstaat wordt niet door de VW garantie tegen roesten gedekt. 3. Beschermrooster achterklep inbouwen 5 3 6 Accesorios Volkswagen Instrucciones de montaje Caddy 2004 ➤ Caddy Maxi 2008 ➤ Rejilla protectora de luneta trasera, vehículos con puertas de alas 2K3 017 200 Edición 05/2008 Accesorios Volkswagen Índice 1 1.1 2 2.1 3 Observaciones generales . . . . . . . . . . . . . . . . . . . . . . . . . . . . . . . . . . . . . . . . . . . . . . . . . . . . . . Informaciones generales relativas a estas Instrucciones de montaje . . . . . . . . . . . . . . . . . . . . Volumen de suministro . . . . . . . . . . . . . . . . . . . . . . . . . . . . . . . . . . . . . . . . . . . . . . . . . . . . . . . . Conjunto de suministro de rejilla protectora de luneta trasera 2K3 017 200 . . . . . . . . . . . . . . . . Montaje de rejilla protectora de luneta trasera . . . . . . . . . . . . . . . . . . . . . . . . . . . . . . . . . . . . . . Este Manual está protegido por la legislación sobre los derechos de autor. Queda prohibida su utilización, bajo cualquier forma, sin el permiso del autor. Copyright © 2008 Volkswagen Zubehör GmbH, Dreieich 1 1 2 2 3 Accesorios Volkswagen 1 Observaciones generales 1.1 Informaciones generales relativas a estas Instrucciones de montaje Nota Le recomendamos que el montaje lo realice un taller especializado. Este cuaderno contiene informaciones y advertencias importantes relacionadas con el vehículo. En los otros cuadernos de la documentación de a bordo aparecen otras informaciones importantes de las que el conductor y sus acompañantes deberían estar informados por su propia seguridad. Volkswagen Accesorios trabaja permanentemente en el desarrollo de todos los productos. Por lo tanto le rogamos que comprenda que el volumen de suministro puede verse sujeto a modificaciones en lo que a la forma, el equipamiento y la técnica se refiere. Los datos relativos al conjunto de suministro, el aspecto y las funciones de los productos corresponden al nivel de información disponible en el momento del cierre de redacción. Por esta razón no puede derivarse derecho alguno basándose en los datos, ilustraciones y descripciones de este manual. ¡ATENCIÓN! Los textos con este símbolo contienen información acerca de su seguridad e indican posibles riesgos de accidente y lesiones. ¡Precaución! Los textos en los que se encuentra este símbolo le avisan de que se pueden producir daños en su vehículo. Nota Los textos con este símbolo contienen información adicional. 1. Observaciones generales 1 Accesorios Volkswagen 2 Volumen de suministro 2.1 Conjunto de suministro de rejilla protectora de luneta trasera 2K3 017 200 Pos. 1 2 3 4 5 2 Lista de piezas Denominación Rejilla protectora de luneta trasera, lado derecho Suplemento de goma Taco de goma Tornillo Rejilla protectora de luneta trasera, lado izquierdo 2. Volumen de suministro Unidades 1 16 16 32 1 Accesorios Volkswagen 3 Montaje de rejilla protectora de luneta trasera Herramientas especiales, equipos de verificación y medición, así como dispositivos auxiliares necesarios ♦ Destornillador de estrella ♦ Granete ♦ Martillo ♦ Taladro ♦ Broca, 3 mm ♦ Medio auxiliar adicional: Grasa lubricante libre de ácido Nota Le recomendamos que realice el montaje de la ayuda de un segundo operario. – Presione el suplemento de goma -2- en el orificio de la rejilla protectora de la luneta trasera -1- y -5-. – Presione el taco de goma -3- desde abajo en el orificio de la rejilla protectora de la luneta trasera. Realice estas actividades en cada uno de los puntos de fijación (8 unidades en cada lado). – Coloque la rejilla protectora de la luneta trasera -1- ó -5- en la posición de montaje. Nota Al granetear los orificios para taladrar, la rejilla protectora de la luneta trasera debe tocar en todos los puntos de atornillado -flechas- sin que tenga juego, para evitar posterior ruidos de tableteo. 3. Montaje de rejilla protectora de luneta trasera 3 Accesorios Volkswagen – Granetee en todos los puntos de atornillado los orificios de taladrado presionando al mismo tiempo la rejilla protectora de la luneta trasera contra el portón trasero -flecha-. – Después, retire la rejilla protectora de la luneta trasera del portón trasero. – Taladre todos los puntos marcados, con cuidado, con una broca de ∅ 3 mm. Nota Al taladrar, evite que las virutas caigan en el orificio taladrado. Aplique un poco de grasa lubricante en la punta de la broca para recoger las virutas que se produzcan. – Coloque la rejilla protectora de la luneta trasera -1- ó -5- en la posición de montaje. 4 3. Montaje de rejilla protectora de luneta trasera Accesorios Volkswagen – Enrosque los tornillos -4- en cada punto de fijación hasta la mitad, para garantizar un asiento sin tensiones de la rejilla protectora de la luneta trasera. – Apriete todos los tornillos -4-. – Aplique la protección anticorrosión según el Manual ELSA (Servicio de información electrónico de postventa) ⇒ Manual de Reparaciones Pintura . ¡ATENCIÓN! Los daños por corrosión provocados por un montaje inadecuado no serán cubiertos por la garantía de VW contra perforación por corrosión 3. Montaje de rejilla protectora de luneta trasera 5 3 6 Volkswagen příslušenství Montážní návod Caddy 2004 ➤ Caddy Maxi 2008 ➤ Ochranné mřížky zadních skel, vozidla s křídlovými dveřmi 2K3 017 200 Vydání 05.2008 Volkswagen příslušenství Obsah 1 1.1 2 2.1 3 Všeobecně . . . . . . . . . . . . . . . . . . . . . . . . . . . . . . . . . . . . . . . . . . . . . . . . . . . . . . . . . . . . . . . . Všeobecné informace k tomuto montážnímu návodu . . . . . . . . . . . . . . . . . . . . . . . . . . . . . . . . Rozsah dodávky . . . . . . . . . . . . . . . . . . . . . . . . . . . . . . . . . . . . . . . . . . . . . . . . . . . . . . . . . . . . Rozsah dodávky ochranných mřížek zadních skel 2K3 017 200 . . . . . . . . . . . . . . . . . . . . . . . . Montáž ochranné mřížky zadního skla . . . . . . . . . . . . . . . . . . . . . . . . . . . . . . . . . . . . . . . . . . . . Toto dílo je chráněno autorským právem. JJakékoli využití bez souhlasu autora je nepřípustné. Copyright © 2008 Volkswagen Zubehör GmbH, Dreieich 1 1 2 2 3 Volkswagen příslušenství 1 Všeobecně 1.1 Všeobecné informace k tomuto montážnímu návodu Upozornění Doporučujeme Vám nechat provést montáž v odborném servisu. Tento sešit obsahuje důležité informace a varování k zacházení s vozidlem. Další informace, které byste měli vědět pro vlastní bezpečnost a bezpečnost Vašich spolucestujících, se nacházejí ve Vaší palubní knize. Oddělení Volkswagen Zubehör pracuje neustále na dalším vývoji všech výrobků. Mějte prosím pochopení pro to, že kdykoliv mohou nastat změny ve formě, vybavení a technologii výrobků. Údaje o rozsahu dodávky, vzhledu a funkcích výrobků odpovídají informačnímu stavu v době redakční uzávěrky. Z údajů, obrázků a popisů v tomto návodu nelze vyvozovat žádné nároky. POZOR! Texty s tímto symbolem obsahují informace pro Vaši bezpečnost a upozorňují na možná nebezpečí nehody a poranění. Pozor! Texty s tímto symbolem Vás upozorňují na riziko poškození Vašeho vozidla. Upozornění Texty s tímto symbolem obsahují dodatečné informace. 1. Všeobecně 1 Volkswagen příslušenství 2 Rozsah dodávky 2.1 Rozsah dodávky ochranných mřížek zadních skel 2K3 017 200 Kusovník Poz. 1 2 3 4 5 2 Název dílu Ks. Ochranná mřížka zadního skla, pravá Gumová podložka Gumový doraz Šroub Ochranná mřížka zadního skla, levá 1 16 16 32 1 2. Rozsah dodávky Volkswagen příslušenství 3 Montáž ochranné mřížky zadního skla Potřebné speciální nářadí, kontrolní a měřicí přístroje a pomocné prostředky ♦ Křížový šroubovák ♦ Důlčík ♦ Kladívko ♦ Vrtačka ♦ Vrták, 3 mm ♦ dodatečná pomůcka: mazací tuk neobsahující kyseliny Upozornění Doporučujeme Vám provádět montáž za pomoci druhé osoby. – Zamáčkněte gumovou podložku -2- do otvoru ochranné mřížky zadního skla -1- resp. -5-. – Zamáčkněte gumový doraz -3-, zespodu, do otvoru ochranné mřížky zadního skla. Tento pracovní krok proveďte u každého upevňovacího bodu (8 kusů na jedné straně). – Ustavte ochrannou mřížku zadního skla -1- resp. -5- do montážní polohy. Upozornění Při důlčíkování otvorů pro vrtání musí ochranná mřížka zadního skla na všech místech šroubových spojů -šipky- bez vůle přiléhat, aby později nedocházelo ke klepavým zvukům. 3. Montáž ochranné mřížky zadního skla 3 Volkswagen příslušenství – Označte důlčíkem otvory pro vrtání na všech místech šroubových spojů, přitom současně přitlačte ochrannou mřížku zadního skla proti zadním dveřím -šipka-. – Následně sejměte ochrannou mřížku zadního skla ze zadních dveří. – Všechny body označené důlčíkem opatrně vyvrtejte vrtákem ∅ 3 mm. Upozornění Zabraňte tomu, aby při vrtání zapadly kovové třísky do vrtaného otvoru. Pro zachycení kovových třísek potřete špičku vrtáku mazacím tukem. – Ustavte ochrannou mřížku zadního skla -1- resp. -5- do montážní polohy. 4 3. Montáž ochranné mřížky zadního skla Volkswagen příslušenství – Aby bylo zajištěno usazení ochranné mřížky zadního skla bez pnutí, nejdříve zašroubujte šrouby -4- v každém upevňovacím bodu cca do poloviny. – Následně všechny šrouby -4- pevně zašroubujte. – Proveďte antikorozní ochranu podle ELSA (Elektronisches Service Auskunftssystem) ⇒ Dílenská příručka Lak . POZOR! Záruka VW proti prorezivění se nevztahuje na škody způsobené korozí, která vznikla z důvodu neodborně provedené montáže. 3. Montáž ochranné mřížky zadního skla 5 3 6 フォルクスワーゲン・アクセサリ 取付説明書 Caddy 2004 ➤ Caddy Maxi 2008 ➤ リアウィンドウガード、スイングドア 付き車両 2K3 017 200 発行 2008 年 5 月 フォルクスワーゲン・アクセサリ 目次 1 1.1 2 2.1 3 一般 . . . . . . . . . . . . . . . . . . . . . . . . . . . . . . . . . . . . . . . . . . . . . . . . . . . . . . . . . . . . . . . . . . . . . . 本取付説明書に関する一般的な情報 . . . . . . . . . . . . . . . . . . . . . . . . . . . . . . . . . . . . . . . . . . . . . . 納入範囲 . . . . . . . . . . . . . . . . . . . . . . . . . . . . . . . . . . . . . . . . . . . . . . . . . . . . . . . . . . . . . . . . . . リアウィンドウガード 2K3 017 200 の納入範囲 . . . . . . . . . . . . . . . . . . . . . . . . . . . . . . . . . . . . リアウィンドウガードの取付け . . . . . . . . . . . . . . . . . . . . . . . . . . . . . . . . . . . . . . . . . . . . . . . . 本説明書は著作権保護の適用を受けています。 著者の同意なく本説明書を利用することを禁じます。 Copyright © 2008 Volkswagen Zubehör GmbH, Dreieich 1 1 2 2 3 フォルクスワーゲン・アクセサリ 1 一般 1.1 本取付説明書に関する一般的な情報 注意事項 取付けは専門の修理工場に依頼することをお奨めします。 本書には車両の取扱いに関する重要な情報と警告が含まれてい ます。お客様ご自身や同乗者の方の安全のために知っておくべ きその他の情報は車載マニュアルをご覧ください。 フォルクスワーゲン・アクセサリ社は常に全製品の開発を続け ています。そのため納入範囲の形状、装備、技術が変更される ことがありますのでご了承ください。製品の納入範囲、外見、 機能に関する記載事項は本書の編集終了時点での最新の情報で す。本書の記載事項、図、説明を基に請求を行うことはできま せん。 危険! このマークのついた文章にはお客様の安全に関する情報が含 まれており、事故やケガの危険性があることを指摘していま す。 注意! このマークのついた文章は、お客様の車両が破損する可能性 があることを注意しています。 注意事項 このマークのついた文章には追加情報が含まれています。 1. 一般 1 フォルクスワーゲン・アクセサリ 2 納入範囲 2.1 リアウィンドウガード 2K3 017 200 の 納入範囲 パーツリスト 位置 1 2 3 4 5 2 名称 リアウィンドウガード、右 ゴムパッド ラバーストッパ ネジ リアウィンドウガード、左 2. 納入範囲 数量 1 16 16 32 1 フォルクスワーゲン・アクセサリ 3 リアウィンドウガードの取付け 必要な特殊工具、検査装置、測定装置、補助具 ♦ フィリップスドライバ ♦ センターポンチ ♦ ハンマー ♦ 電動ドリル ♦ ドリル (3 mm) ♦ その他の道具など:無酸性グリース 注意事項 取付けは助手と二人で行うことをお奨めします。 – ゴムパッド -2- をリアウィンドウガード -1- および -5- の穴の 中に押し込みます。 – ラバーストッパ -3- を下側からリアウィンドウガードの穴に 押し込みます。 すべての固定ポイント (片側 8 箇所) でこの作業を繰り返します。 – リアウィンドウガード -1- および -5- を取付け位置に持って いきます。 注意事項 ドリル穴のセンターマーキングを行う際は、後でガタつき音が 出ないように、すべてのネジ付け箇所 -矢印- でリアウィンドウ ガードがぴったりと接しているようにしてください。 3. リアウィンドウガードの取付け 3 フォルクスワーゲン・アクセサリ – すべてのネジ付け箇所にドリル穴のセンターマーキングを行 います。その際はリアウィンドウガードをテールゲー ト-矢印-方向に押し付けながら行ってください。 – 続いてリアウィンドウガードをテールゲートからはずしま す。 – 直径 3 mm のドリルを使用し、すべてのポンチマークに注意 深く穴をあけます。 注意事項 ドリルで穴をあけるときに切り屑がドリル穴の中に入らないよ うにしてください。発生する切り屑がくっつくように、ドリル の先端にグリースをつけてください。 – リアウィンドウガード -1- および -5- を取付け位置に持って いきます。 4 3. リアウィンドウガードの取付け フォルクスワーゲン・アクセサリ – すべての固定ポイントでネジ -4- を半分ぐらいまでしめて、 リアウィンドウガードが歪まないようにします。 – すべてのネジ -4- をしっかり締めます。 – ELSA (電子サービス情報システム) の⇒ 塗装の作業手順 に従 ってサビ止めを施してください。 危険! 不適切な取付けが原因で発生する腐食による損害は、VW に よる錆止め保障の対象になりません。 3. リアウィンドウガードの取付け 5-
 1
1
-
 2
2
-
 3
3
-
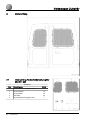 4
4
-
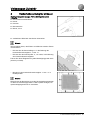 5
5
-
 6
6
-
 7
7
-
 8
8
-
 9
9
-
 10
10
-
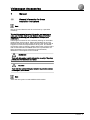 11
11
-
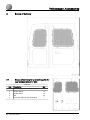 12
12
-
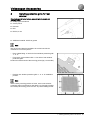 13
13
-
 14
14
-
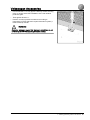 15
15
-
 16
16
-
 17
17
-
 18
18
-
 19
19
-
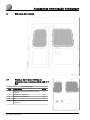 20
20
-
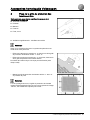 21
21
-
 22
22
-
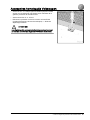 23
23
-
 24
24
-
 25
25
-
 26
26
-
 27
27
-
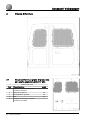 28
28
-
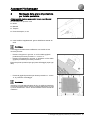 29
29
-
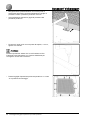 30
30
-
 31
31
-
 32
32
-
 33
33
-
 34
34
-
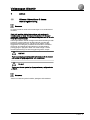 35
35
-
 36
36
-
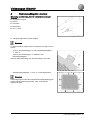 37
37
-
 38
38
-
 39
39
-
 40
40
-
 41
41
-
 42
42
-
 43
43
-
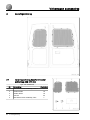 44
44
-
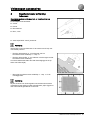 45
45
-
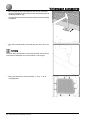 46
46
-
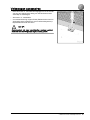 47
47
-
 48
48
-
 49
49
-
 50
50
-
 51
51
-
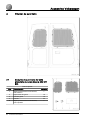 52
52
-
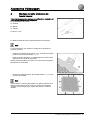 53
53
-
 54
54
-
 55
55
-
 56
56
-
 57
57
-
 58
58
-
 59
59
-
 60
60
-
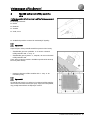 61
61
-
 62
62
-
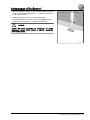 63
63
-
 64
64
-
 65
65
-
 66
66
-
 67
67
-
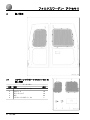 68
68
-
 69
69
-
 70
70
-
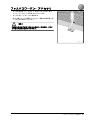 71
71


Volkswagen 2K3 017 200 Installation Instructions Manual
- Type
- Installation Instructions Manual
in andere talen
- English: Volkswagen 2K3 017 200
- italiano: Volkswagen 2K3 017 200
- français: Volkswagen 2K3 017 200
- español: Volkswagen 2K3 017 200
- Deutsch: Volkswagen 2K3 017 200
- čeština: Volkswagen 2K3 017 200
- 日本語: Volkswagen 2K3 017 200
- svenska: Volkswagen 2K3 017 200
Gerelateerde papieren
-
Volkswagen 5G9 061 197 A Installatie gids
-
-
-
-
-
-
-
-
-
