Hotpoint Ariston HKB 9 LS X /HA Instructions For Use Manual
- Categorie
- Afzuigkappen
- Type
- Instructions For Use Manual

DE EN IT
Deutsch, 10 English, 14 Italiano, 18
FR ES NL
Français, 22 Español, 26 Nederlands, 30
PT RU
Português, 34 РУССКИЙ, 38
HKB 9 LS X /HA
Betriebsanleitung
Instructions for use
Istruzioni per l’uso
Mode d’emploi
Instrucciones de uso
Gebruiksaanwijzingen
Instruções de uso
Инструкция по
зксплуатации


Deutsch
10
DE Der Dunstabzugshaube kann von der aesthetischen Seite her ander sein
als die Zeichnungen die in diesem Bedienungsanleitung geschrieben sind.
Die Bedienungsanleitungen , die Wartung und die Installation sind aber
gleich.
Die Instruktionen, die in diesem Handbuch gegeben werden, müssen strikt
eingehalten werden. Es wird keinerlei Haftung übernommen für mögliche
Mängel, Schäden oder Brände der Dunstabzugshaube, die auf die
Nichtbeachtung der Vorschriften in diesem Handbuch zurückzuführen sind. Die
Dunstabzugshaube ist ausschliesslich zum Einsatz im privaten Haushalt
vorgesehen.
! Es ist wichtig diese Bedienungsanleitung zu behalten um sie in jedem
Moment nachzuschlagen. Im Fall von Verkaufen, Abtretung oder Umziehen,
versichern Sie sich bitte dass Sie mit dem Produkt zusammen bleibt.
! Die Bedienungsanleitungen richtig lesen: es gibt wichtige Informationen
ueber die Installation, Benutzen und Sicherheit.
! Keine elektrische oder mechanische Aenderungen auf dem Produkt oder
auf die Fluchtleitungen machen.
ALLGEMEINE SICHERHEIT
Der Abstand zwischen der Abstellfläche auf dem Kochfeld und der Unterseite
der Dunstabzugshaube darf 50cm im Fall von elektrischen Kochfeldern und
65cm im Fall von Gas- oder kombinierten Herden nicht unterschreiten.
Wenn die Installationsanweisungen des Gaskochgeräts einen größeren Abstand
vorgeben, ist dieser zu berücksichtigen.
Die Abzugshaube ist mit Dübeln ausgestattet, die für die meisten Wände/Decken
geeignet sind. Trotzdem sollte ein qualifizierter Techniker hinzugezogen werden,
der entscheidet, ob die Materialien für die jeweilige Wand/Decke geeignet sind.
Außerdem muß die Wand/Decke das Gewicht der Abzugshaube tragen muss.
Achtung! Das Gerät nicht an das Stromnetz anschließen, solange die
Installation noch nicht abgeschlossen ist.
Vor Beginn sämtlicher Reinigungs- oder Wartungsarbeiten muss das Gerät
durch Ziehen des Steckers oder Betätigen des Hauptschalters der Wohnung
vom Stromnetz getrennt werden.
Bei allen Installations- und Instandhaltungsarbeiten immer Schutzhandschuhe
tragen.
Kinder nicht mit dem Gerät spielen lassen.
Erwachsene und Kinder dürfen nie unbeaufsichtigt das Gerät betreiben,
– wenn sie körperlich oder geistig dazu nicht in der Lage sind,
– oder wenn ihnen Wissen und Erfahrung fehlen, das Gerät richtig und sicher zu
bedienen.
Die Dunstabzugshaube niemals ohne korrekt montiertes Gitter in Betrieb setzen!
Die Dunstabzugshaube darf NIEMALS als Abstellfläche verwendet werden,
sofern dies nicht ausdrücklich angegeben wird.
Der Raum muss über eine hinreichende Belüftung verfügen, wenn die
Dunstabzugshaube mit anderen gas- oder brennstoffbetriebenen Geräten
gleichzeitig verwendet wird.
Bei gleichzeitigem Betrieb der Dunstabzugshaube im Abluftbetrieb und
Feuerstätten darf im Aufstellraum der Feuerstätte der Unterdruck nicht größer
als 4 Pa (4 x 10⁻⁵ bar) sein.
Die angesaugte Luft darf nicht in Rohre geleitet werden, die für die Ableitung der
Abgase von gas- oder brennstoffbetriebenen Geräten genutzt werden.
Es ist strengstens verboten, unter der Haube mit offener Flamme zu kochen.
Eine offene Flamme beschädigt die Filter und kann Brände verursachen, daher
ist dies in jedem Fall zu vermeiden.
Das Frittieren muss unter Aufsicht erfolgen, um zu vermeiden, dass das
überhitzte Öl Feuer fängt.
Zugängliche Teile können beim Gebrauch mit Kochgeräten heiss werden.
In Bezug auf technische und Sicherheitsmaßnahmen für die Ableitung der Abluft
sind die Vorschriften der zuständigen örtlichen Behörden strengstens
einzuhalten.
Die Haube muss regelmäßig innen und außen gereinigt werden (MINDESTENS
EINMAL IM MONAT, diesbezüglich sind in jedem Fall die ausdrücklichen
Angaben in der Wartungsanleitung dieses Handbuchs zu beachten).
Eine Nichtbeachtung der Vorschriften zur Reinigung der Haube sowie zur
Auswechselung und Reinigung der Filter führt zu Brandgefahr.
Um das Risiko eines Stromschlages zu vermeiden, darf die
Dunstabzugshaube ohne richtig eingesetzte Lampen nicht betrieben
werden.
Es wird keinerlei Haftung übernommen für Fehler, Schäden oder Brände des
Gerätes, die durch Nichteinhaltung der in diesem Handbuch aufgeführten
Anweisungen verschuldet wurden.
ELEKTRISCHER ANSCHLUSS
Die Netzspannung muss der Spannung entsprechen, die auf dem
Betriebsdatenschild im Innern der Haube angegeben ist. Sofern die Haube einen
Netzstecker hat, ist dieser an zugänglicher Stelle an eine den geltenden
Vorschriften entsprechende Steckdose auch nach der Montage anzuschließen.
Bei einer Haube ohne Stecker (direkter Netzanschluss) oder falls der Stecker
nicht zugänglich ist, ist ein normgerechter zweipoliger Schalter auch nach der
Montage anzubringen, der unter Umständen der Überspannung Kategorie III
entsprechend den Installationsregeln ein vollständiges Trennen vom Netz
garantiert.
Hinweis! Vor der Inbetriebnahme muss sichergestellt sein, dass die
Netzversorgung (Steckdose) ordnungsgemäß montiert wurde.
Austausch des Netzkabels
Die Dunstabzugshaube ist mit einem Spezial-Netzkabel ausgestattet; sollte das
Kabel beschädigt werden, muss beim Kundendienst Ersatz angefordert werden.
ABLEITUNG DER ABLUFT
(bei Abluftversionen)
Die Dunstabzugshaube an Abluftrohre und Wandabluftauslass mit dem selben
Durchmesser wie der Luftausgang verbinden (Anschlussflansch).
Die Benutzung von Rohren und Wandabluftauslass mit geringerem
Durchmesser, verursacht eine Verringerung der Abluftleistung und eine
drastische Zunahme der Geraeuschentwicklung.
Jegliche Verantwortung diesbezueglich wird daher abgelenkt
! Eine möglichst kurze Leitung verwenden.
! Eine Leitung mit einer möglichst geringen Anzahl von Krümmungen
verwenden (max. Winkel der Krümmung: 90°).
! Starke Änderungen des Leitungsdurchmessers sind zu vermeiden.
! Die Innenfläche der Leitung muss so glatt wie möglich sein.
! Das Material der Leitung muss von den Normen zugelassen sein.
! Jegliche Verantwortung wird von der Firma abgelehnt, sollten diese Normen
nicht respektiert werden.
UMLUFT- ODER ABLUFTBETRIEB ?
! Ihre Haube wird als Abzugshaube geliefert.
Um die Abzugshaube in der Umluftversion verwenden zu können, braucht
der AKTIVKOHLE-FILTERSYSTEM installiert zu werden.
Stellen Sie in den ersten Seiten dieser Gebrauchsanleitung fest, ob das
AKTIVKOHLE-FILTERSYSTEM mitgeliefert oder separat erhältlich ist.
Anmerkung: Wenn das Aktivkohle-Filtersystem mitgeliefert wird, kann es
schon in der Haube installiert worden sein.
Die Informationen über den Umbau der Abzugshaube in Umlufthaube sind
in dieser Gebrauchsanleitung enthalten.
Abluftbetrieb
Die Luft wird mit Hilfe eines an den Abluftstutzen anzubringenden Rohres ins
Freie geleitet.
Das Abluftrohr wird hierbei nicht geliefert und soll separat angekauft werden.
Das Abluftrohr muß denselben Durchmesser wie der Abluftstutzen aufweisen.
Das Abluftrohr muß muß in waagrechter Lage leicht nach oben geneigt sein (ca.
10%), damit die Luft ungehindert ins Freie abgeleitet werden kann.
Note. Sollte die Dunstabzugshaube mit Aktiv-kohlefilter versehen sein, so muß
dieser entfernt werden.
Umluftbetrieb
Es ist ein Aktiv-Kohlefilter zu benutzen, der bei Ihrem Fachhändler erhältlich ist.
Der Aktiv-Kohlefilter reinigt die angesaugte Luft von Fettpartikeln und
Kochdünsten bevor diese durch das obere Gitter in die Küche zurückströmt.

11
DE
BEDIENELEMENTE
Zur Auswahl der Funktionen der Haube genügt es, die Tasten zu berühren.
T1. ON/OFF Beleuchtung
T2. Reduzierung der Sauggeschwindigkeit
Bei Betätigung der Taste „T2“ wird die Sauggeschwindigkeit von der 4.
intensiven Geschwindigkeitsstufe zur 1. Geschwindigkeitsstufe reduziert.
Bei Betätigung der Taste „T2“ während des Betriebes in der 1.
Geschwindigkeitsstufe schaltet sich die Haube auf AUS ein.
T3. Erhöhung der Sauggeschwindigkeit
Bei Betätigung der Taste T3 schaltet sich die Haube von AUS auf die 1.
Geschwindigkeitsstufe ein.
Bei Betätigung der Taste (bei Haube auf EIN) wird die
Motorgeschwindigkeit von der 1. zur intensiven (zeitgeschalteten)
Geschwindigkeitsstufe geschaltet.
Geschwindigkeitsstufe 1 Led L1
Geschwindigkeitsstufe 2 Led L1+L2
Geschwindigkeitsstufe 3 Led L1+L2+L3
Intensive Geschwindigkeitsstufe (zeitgeschaltet) Led L1+L2+L3+L4
blinkend
Hinweis: die 4. Geschwindigkeitsstufe (intensiv und zeitgeschaltet) bleibt 5
Minuten lang aktiv; dann schaltet sich die Haube in die 2.
Geschwindigkeitsstufe automatisch um.
T4. Schaltuhr / Filtersättigungsanzeige – Kontrolle und Einstellung
Schaltuhr:
Die Schaltuhr aktiviert sich, wenn die Taste T4 gedrückt wird. Nach Ablauf
der Zeit schaltet sich die Haube ab.
Die Uhr ist so geteilt:
Geschwindigkeitsstufe 1 - 20 Minuten (Led L1 blinkend)
Geschwindigkeitsstufe 2 - 15 Minuten (Led L1+L2 blinkend)
Geschwindigkeitsstufe 3 - 10 Minuten (Led L1+L2+L3 blinkend)
Intensive Geschwindigkeitsstufe - 5 Minuten (Led L1+L2+L3+L4 blinkend)
Wenn die Taste T2 während des Betriebs der Schaltuhr betätigt wird,
schaltet die Haube die Schaltuhr-Betriebsart ab und reduziert die
Geschwindigkeit.
Wird die Taste T3 betätigt, schaltet die Haube die Schaltuhr-Betriebsart und
erhöht die Geschwindigkeit.
Wird die Taste T4 betätigt, schaltet die Haube die Schaltuhr-Betriebsart und
die eingestellte Geschwindigkeit bleibt erhalten.
Filtersättigungsanzeige – Kontrolle und Einstellung
Fettfiltersättigungsanzeige
Nach 80 Betriebsstunden startet die Led L1 zu blinken.
Startet die Led zu blinken, dann ist der Fettfilter zu ersetzen.
Um die Filtersättigungsanzeige zu löschen, die Taste T4 5” lang
gedrückt halten.
Ein Pipton wird ausgegeben und die Led L1 schaltet sich ab.
Aktivkohlefiltersättigungsanzeige
Nach 320 Betriebsstunden startet die Led L2 zu blinken.
Startet die Led zu blinken, dann ist der Aktivkohlefilter zu ersetzen.
Um die Filtersättigungsanzeige zu löschen, die Taste "T4" 5” lange
gedrückt halten.
Ein Pipton wird ausgegeben und die Led L2 schaltet sich ab.
Bei gleichzeitiger Anzeige des Fettfilters und des Kohlefilters wird die Leds
L1 und L2 abwechselnd blinken.
Für den Reset führen Sie den oben beschriebenen Vorgang zweimal durch.
Das erste Mal wird die Aktivkohlefilteranzeige rückgesetzt. Das zweite Mal
wird die Fettfilteranzeige rückgesetzt.
Hinweis: Bei der Standard-Betriebsart ist die Aktivkolefilteranzeige nicht aktiv.
Bei der Umluftversion muss die Aktivkohlefilteranzeige aktiviert werden.
Aktivkohlefilteranzeige aktivieren:
Die Haube auf OFF stellen und die Taste "T4" 5” lang gedrückt halten.
Nachdem die Taste betätigt worden ist, leuchten sich die Leds für die
Filtersättigungsanzeige auf, die aktiv sind. Ein Pipton wird ausgegeben und
die Led L2 wird 2" lang blinken.
Die Leds L1 und L2 bleiben für ca. 2" lang eingeschaltet, bevor die Haube
auf OFF gestellt wird.
Aktivkohlefilteranzeige deaktivieren:
Die Haube auf OFF stellen und die Taste T4 5” lang gedrückt halten.
Nachdem die Taste betätigt worden ist, leuchten sich die Leds für die
Filtersättigungsanzeige auf, die aktiv sind. Ein Pipton wird ausgegeben und
die Led L2 schaltet sich ab.
Die Led L1 bleibt für ca. 2" lang eingeschaltet, bevor die Haube auf OFF
gestellt wird.
T5. Bedientaste des Sensors (ON-automatische Betriebsart / OFF-
manuelle Betriebsart):
Automatische Betriebsart (COOKING)
Das System ist werkseitig auf manueller Betriebsart eingestellt. Um die
automatische Betriebsart zu aktivieren, die Taste „T5“ betätigen.
Bei ausgeschalteter Haube: schalten sich die Leds L1+L4 ein
Bei eingeschalteter Haube: schaltet sich die Led der ausgewählten
Geschwindigkeitsstufe ein und die anderen Leds starten zu blinken.
Während des Kochens reagiert das System schnell bei einer Erhöhung von
Kochdünsten oder Gasen: die Haube schaltet sich in die angemessenste
Geschwindigkeitsstufe um und bleibt somit wenigstens 1 Minute lang
erhalten. Dann schaltet sich die Haube in die niedrigere
Geschwindigkeitsstufe zurück oder schaltet sich ab.
Wenn das Kochen beendet ist und die Parameter vor dem Kochen erreicht
worden sind, schaltet sich das System aus.
Hinweis: Wenn die Parameter dem Ruhezustand entspricht, schaltet
das System die Haube nach 30 Minuten ab.
Die automatische Betriebsart kann auf den folgenden Weisen deaktiviert
werden:
- Bei Betätigung der Taste "T5" schaltet sich der Motor in die manuelle
Betriebsart zurück.
Hinweis: es ist auch möglich, in die manuelle Betriebsart
zurückzuschalten, indem man die Tasten "T2", "T3" oder "T6"
betätigt. "T2" reduziert,"T3" erhöht die Motorgeschwindigkeit und T6
schaltet die Haube ab.
T6. ON/OFF Absaugmotor: Bei eingeschalteter Haube zu irgendwelcher
Geschwindigkeit schaltet sich die Haube, wenn die Taste "T6" gedrückt
wird.
Bei ausgeschalteter Haube (OFF) durch das Drücken der Taste "T6"
schaltet sich die Haube in die Geschwindigkeitsstufe 1.
Kochherd auswählen
Dieser Vorgang optimiert die automatische Betriebsart der Haube je nach dem
ausgewählten Kochherd.
Hinweis: Das System ist auf Gasherd werkseitig eingestellt.
Zum Auswählen eines anderen Kochherdes (oder zum Prüfen des eingestellten
Kochherdes) gehen Sie wie folgt vor:
Die Haube auf AUS einstellen
Die Tasten "T2" e "T3" 5 Sekunden lang gleichzeitig gedrückt halten, bis der
aktuell benutzte Kochherd angezeigt wird (ein Pipton wird ausgegeben).
Gasherd: Led "L1" ein
Induktionsherd: Led "L2" ein
Elektrokochherd: : Led "L3" ein
Das zyklische Auswählen des Herdes erfolgt durch das Betätigen der Tasten
"T2" oder "T3".
Nachdem der Kochherd ausgewählt worden ist, 10” warten.
Die Led des ausgewählten Kochherdes blinkt 3 mal.
Nachdem der Kochherd ausgewählt worden ist, muss die "Kalibrierung des
Sensors" durchgeführt werden.

12
DE Kalibrierung/Aktivierung des Sensors (automatisch oder manuell)
Damit der Sensor auf die aus der unterliegenden Kochfläche kommenden
thermischen Beanspruchungen richtig reagiert, muss der Sensor
kalibriert/aktiviert werden.
Hinweis: Bevor Sie die Kalibrierung/Aktivierung des Sensors durchführen,
müssen Sie den "Kochherd auswählen " , siehe oben.
Hinweis: Die Kalibrierung/Aktivierung des Sensors ist durchzuführen, wenn
die Haube zum ersten Mal installiert wird, nach längerer
Betriebsunterbrechung oder nach einem Stromausfall.
Die Kalibrierung muss bei ausgeschaltetem Motor durchgeführt
werden.
Automatische Kalibrierung/Aktivierung des Sensors
Sobald die Haube mit Strom versorgt wird, fängt die automatische
Kalibrierung/Aktivierung des Sensors an (durch das Drücken der Taste T5
sehebar). Die Leds L1+L4 blinken so lange wie bei dem ausgewählten Kochherd
eingestellt, jedoch nicht länger als fünfzehn Minuten.
Manuelle Kalibrierung/Aktivierung des Sensors
Hinweis: die manuelle Kalibrierung ist nach längerer Betriebsunterbrechung,
nach einem Stromausfall oder bei einer schnellen Temperaturschwankung in der
Küche durchzuführen.
Die Kalibrierung/Aktivierung kann manuell durchgeführt werden:
Die Haube auf AUS stellen
Wenn die Tasten "T6" und "T5" 5" lang gleichzeitig gedrückt gehalten werden ,
starten die Leds "L1" und "L4" zu blinken so lange wie die Zeit des
ausgewählten Kochherdes anzeigt, jedoch nicht länger als fünfzehn Minuten
Sensortasten
Erfolgt ständig während der automatischen Betriebsart.
Im Störungsfall werden alle blinkenden Leds auf dem Bildschirm angezeigt (bitte
setzen Sie sich mit dem Kundendienst in Verbindung).
Die Haube kann auf jeden Fall im manuellen Betriebsweise benutzt werden.
WARTUNG
Hinweis ! Vor jeder Reinigung und Pflege ist die Dunstabzugshaube durch
Ziehen des Netzsteckers oder Ausschalten der Sicherung stromlos zu
machen.
Reinigung
Die Dunstabzugshaube muss sowohl innen als auch außen häufig gereinigt
werden (etwa in denselben Intervallen, wie die Wartung der Fettfilter). Zur
Reinigung ein mit flüssigem Neutralreiniger getränktes Tuch verwenden. Keine
Produkte verwenden, die Scheuermittel enthalten.
KEINEN ALKOHOL VERWENDEN!
Achtung: Nichtbeachtung dieser Anweisungen zur Reinigung des Gerätes und
zum Wechsel bzw. zur Reinigung der Filter kann zum Brand führen. Diese
Anweisungen sind unbedingt zu beachten!
Der Hersteller übernimmt keine Haftung für irgendwelche Schäden am Motor
oder Brandschäden, die auf eine unsachgemäße Wartung oder Nichteinhaltung
der oben angeführten Sicherheitsvorschriften zurückzuführen sind.
Perimetralabluftpaneel
Das Perimetralabluftpaneel so oft wie den Fettschutzfilter putzen , ein Tuch und
ein nicht so hoch konzentriertes Reinigungsmittel benutzen. Niemals
Schleifmittel benutzen.
Wartung der Fettfilter
Diese dienen dazu, die Fettpartikel, die beim Kochen frei werden, zu
binden.
Dieser muss einmal monatlich gewaschen werden (oder wenn das
Sättigungsanzeigesystem der Filter – sofern bei dem jeweiligen Modell
vorgesehen – dies anzeigt). Das kann mit einem milden Waschmittel von Hand,
oder in der Spülmaschine bei niedriger Temperatur und einem Kurzspülgang
erfolgen. Der Metallfettfilter kann bei der Reinigung in der Spülmaschine
verfärben, was seine Filtermerkmale jedoch in keiner Weise beeinträchtigt.
Zwecks Demontage der Fettfilter den Aushakgriff ziehen.
Wartung des Aktivkohlefilters
Dieser Filter bindet die unangenehmen Gerüche, die beim Kochen
entstehen.
Je nach der Benetzungsdauer des Herdes und der Häfigkeit der Reinigung des
Fettfilters tritt nach einer mehr oder weniger langen Benutzungsdauer die
Sättigung des Aktivkohlefilters auf. Auf jeden Fall muß der Filtereinsatz
mindestens alle 4 Monate (oder wenn das Sättigungsanzeigesystem der Filter –
sofern bei dem jeweiligen Modell vorgesehen – diese Notwendigkeit anzeigt)
ausgewechselt werden.
Er kann NICHT gereinigt oder erneut aktiviert werden.
Montage
Den Aktivkohlefilter zuerst von hinten auf der metallischen Feder der Saugkappe
anhaengen, dann von vorne mit den zwei Knoepfen.
Demontage
Den Aktivkohlefilter entnehmen, in dem man die Knoepfe die an der Saugkappe
fixiert sind auf 90° dreht.
Ersetzen der Lampen
Die Haube ist mit einem auf der Leuchtdiodentechnologie basierten
Beleuchtungssystem ausgestattet.
Die LEDs ermöglichen eine optimale Beleuchtung der Kochfläche. Sie haben
eine Leistungsdauer, die das Zehnfache deren der traditionellen Lichter ist und
bieten eine Energieersparnis bis zu 90%.
Um die Leds mit neuen zu ersetzen, setzen Sie sich bitte mit dem Kundendienst
in Verbindung.

13
DE
ENTSORGUNG
In Übereinstimmung mit den Anforderungen der Europäischen Richtlinie
2002/96/EG über Elektro- und Elektronik-Altgeräte (WEEE) ist vorliegendes
Gerät mit einer Kennzeichnung versehen.
Sie leisten einen positiven Beitrag für den Schutz der Umwelt und die
Gesundheit des Menschen, wenn Sie dieses Gerät einer gesonderten
Abfallsammlung zuführen. Im unsortierten Siedlungsmüll könnte ein solches
Gerät durch unsachgemäße Entsorgung negative Konsequenzen nach sich
ziehen.
Auf dem Produkt oder der beiliegenden Produktdokumentation ist folgendes
Symbol einer durchgestrichenen Abfalltonne abgebildet. Es weist darauf
hin, dass eine Entsorgung im normalen Haushaltsabfall nicht zulässig ist.
Entsorgen Sie dieses Produkt im Recyclinghof mit einer getrennten Sammlung
für Elektro- und Elektronikgeräte. Die Entsorgung muss gemäß den örtlichen
Bestimmungen zur Abfallbeseitigung erfolgen.
Bitte wenden Sie sich an die zuständigen Behörden Ihrer Gemeindeverwaltung,
an den lokalen Recyclinghof für Haushaltsmüll oder an den Händler, bei dem Sie
dieses Gerät erworben haben, um weitere Informationen über Behandlung,
Verwertung und Wiederverwendung dieses Produkts zu erhalten.
BETRIEBSSTÖRUNGEN
Wenn etwas nicht zu funktionieren scheint, folgende Kontrollen durchführen,
bevor der Kundendienst gerufen wird:
• Wenn die Abzugshaube nicht funktioniert:
Prüfen, ob:
- ein Stromausfall vorliegt.
- eine Geschwindigkeit gewählt wurde.
• Wenn die Leistung der Abzugshaube mangelhaft ist:
Prüfen, ob:
- die gewählte Motorgeschwindigkeit für die freigesetzte Menge an Rauch
und Dämpfen ausreicht.
- die Küche ausreichend belüftet ist, um eine Luftansaugung zuzulassen.
- der Kohlefilter verbraucht ist (bei Umluftversion).
• Wenn sich die Haube im Laufe des normalen Betriebs selbst ausgeschaltet
hat.
Prüfen, ob:
- ein Stromausfall vorliegt.
- die allpolige Trennvorrichtung ausgelöst wurde.
Die Dunstabzugshaube oder die Bedienungselemente funktionieren nicht: Für
mindestens 5 Sekunden die Stromversorgung der Dunstabzugshaube unter-
brechen und dann die Haube erneut einschalten. Kann die Störung nicht
behoben werden, kontaktieren Sie bitte den Kundendienst.
TECHNISCHE DATEN
Modell HKB 9 LS X /HA
Höhe (Abluftbetrieb) 63-116,5 cm
Höhe (Umluftbetrieb) 71,7-116,5 cm
Breite 89,8 cm
Tiefe 47,8 cm
Bruttogewicht 26,4 Kg
Stromentnahme insgesamt 320 W
Stromentnahme Motor 1x315 W
Stromentnahme Lampen 2x3 W
Ø des Abluftrohrs 15 cm
Dieses Gerät wurde gemäß folgender Richtlinien entworfen:
• Niederspannungsrichtlinie 2006/95/EC (12-12-2006)
• “EMV”-Richtlinie 2004/108/EC (15-12-2004)
Teile, die nicht zum Lieferumfang des Produkts gehören

English
14
EN The hood can look different to that illustrated in the drawings in this
booklet. The instructions for use, maintenance and installation, however,
remain the same.
Closely follow the instructions set out in this manual. All responsibility, for
any eventual inconveniences, damages or fires caused by not complying with the
instructions in this manual, is declined. The extractor hood has been designed
exclusively for domestic use.
! It is important to conserve this booklet for consultation at any moment. In
the case of sale, cession or move, make sure it is together with the product.
! Read the instructions carefully: there is important information about
installation, use and safety.
! Do not carry out electrical or mechanical variations on the product or on the
discharge conduits.
GENERAL SAFETY
The minimum distance between the supporting surface for the cooking
equipment on the hob and the lowest part of the range hood must be not less
than 50cm from electric cookers and 65cm from gas or mixed cookers.
If the instructions for installation for the gas hob specify a greater distance, this
must be adhered to.
Expansion wall plugs are provided to secure the hood to most types of
walls/ceilings. However, a qualified technician must verify suitability of the
materials in accordance with the type of wall/ceiling. The wall/ceiling must be
strong enough to take the weight of the hood. Do not tile, grout or silicone this
appliance to the wall. Surface mounting only.
WARNING! Do not connect the appliance to the mains until the installation is
fully complete.
Before any cleaning or maintenance operation, disconnect hood from the mains
by removing the plug or disconnecting the mains electrical supply.
Always wear work gloves for all installation and maintenance operations.
The appliance is not intended for use by children or persons with impaired
physical, sensorial or mental faculties, or if lacking in experience or knowledge,
unless they are under supervision or have been trained in the use of the
appliance by a person responsible for their safety.
This appliance is designed to be operated by adults, children should be
monitored to ensure that they do not play with the appliance.
This appliance is designed to be operated by adults. Children should not be
allowed to tamper with the controls or play with the appliance.
Never use the hood without effectively mounted grating!
The hood must NEVER be used as a support surface unless specifically
indicated.
The premises where the appliance is installed must be sufficiently ventilated,
when the kitchen hood is used together with other gas combustion devices or
other fuels.
The ducting system for this appliance must not be connected to any existing
ventilation system which is being used for any other purpose such as discharging
exhaust fumes from appliances burning gas or other fuels.
The flaming of foods beneath the hood itself is severely prohibited.
The use of exposed flames is detrimental to the filters and may cause a fire risk,
and must therefore be avoided in all circumstances.
Any frying must be done with care in order to make sure that the oil does not
overheat and ignite.
Accessible parts of the hood may became hot when used with cooking
applicance.
With regards to the technical and safety measures to be adopted for fume
discharging it is important to closely follow the regulations provided by the local
authorities.
The hood must be regularly cleaned on both the inside and outside (AT LEAST
ONCE A MONTH).
This must be completed in accordance with the maintenance instructions
provided in this manual). Failure to follow the instructions provided in this user
guide regarding the cleaning of the hood and filters will lead to the risk of fires.
Do not use or leave the hood without the lamp correctly mounted due to the
possible risk of electric shocks.
Additional Installation Specifications:
Use only the fixing screws supplied with the product for installation.
Use the correct length screws which are identified in the Installation Guide
WARNING! Failure to install the screws or fixing device in accordance with
these instructions may result in electrical hazards
We will not accept any responsibility for any faults, damage or fires caused to the
appliance as a result of the non-observance of the instructions included in this
manual.
ELECTRICAL CONNECTION
The mains power supply must correspond to the rating indicated on the plate
situated inside the hood. If provided with a plug connect the hood to a socket in
compliance with current regulations and positioned in an accessible area, after
installation. If it not fitted with a plug (direct mains connection) or if the plug is not
located in an accessible area, after installation, apply a double pole switch in
accordance with standards which assures the complete disconnection of the
mains under conditions relating to over-current category III, in accordance with
installation instructions.
Warning! Before re-connecting the hood circuit to the mains supply and
checking the efficient function, always check that the mains cable is correctly
assembled.
Replacing the power cable
The hood is provided with a special power cable ; if the cable is damaged,
request a new one from Technical Service.
AIR VENT
(for the suction versions)
Connect the hood and discharge holes on the walls with a diameter equivalent to
the air outlet (connection flange).
Using the tubes and discharge holes on walls with smaller dimensions will cause
a diminution of the suction performance and a drastic increase in noise.
Any responsibility in the matter is therefore declined.
! Use a duct of the minimum indispensible length.
! Use a duct with as few elbows as possible (maximum elbow angle: 90°).
! Avoid drastic changes in the duct cross-section.
! Use a duct with an as smooth as possible inside.
! The duct must be made of certified material.
! The company declines any responsibility whenever these regulations are
not respected.
FILTERING OR DUCTING ?
! Your cooker hood is ready to be used in suction version.
To use the hood in filtering version the special ACCESSORY KIT must be
installed.
Check on the first pages of this manual if the ACCESSORY KIT is furnished
or must be bought separately.
Note: If furnished, in certain cases, the additional activated carbon filtering
system may be installed on the hood.
Information about the conversion of the hood from suction version to filtering
version is present in this manual.
Ducting version
In this case the fumes are conveyed outside of the building by means of a
special pipe connected with the connection ring located on top of the hood.
Attention! The exhausting pipe is not supplied and must be purchased apart.
Diameter of the exhausting pipe must be equal to that of the connection ring.
In the horizontal runs the exhausting pipe must be slightly slanted (about 10°)
and directed upwards to vent the air easily from the room to the outside.
Attention! If the hood is supplied with active charcoal filter, then it must be
removed.
Filter version
One active charcoal filter is needed for this and can be obtained from your usual
retailer.
The filter removes the grease and smells from the extracted air before sending it
back into the room through the upper outlet grid.

15
EN
CONTROLS
To select the functions of the hood just touch the commands.
T1. ON/OFF Lights
T2. Speed decrease
Press key "T2" to decrease the speed from 4 (intensive) to 1.
Press key "T2" during operation at speed 1, the hood moves to OFF state.
T3. Speed increase
Press button T3 and the hood moves to OFF state at speed 1.
Press the button (hood in ON state) to increase the motor speed from 1 to
the intensive speed (timed).
Speed 1 LED L1
Speed 2 LED L1+L2
Speed 3 LED L1+L2+L3
Intensive speed (timed) LED L1+L2+L3+L4 flashing
Note: Speed 4 (intensive timed) keeps on for 5 minutes, after that the hood
sets speed 2 automatically
T4. Speed timing / Filter saturation signal control and configuration
Speed timing:
The speed timing is activated by pressing key T4, when the timing has
elapsed the hood switches off.
The timing is divided as follows:
Speed 1 - 20 minutes (LED L1 flashing)
Speed 2 - 15 minutes (LED L1+L2 flashing)
Speed 3 - 10 minutes (LED L1+L2+L3 flashing)
Intensive Speed - 5 minutes (LED L1+L2+L3+L4 flashing)
During the timed operation, press key T2 and the hood quits the timed
mode and decreases the speed.
Press key T3 and the hood quits the timed mode and increases the speed.
Press key T4 and the hood quits the timed mode keeping the speed set.
Filter saturation signal control and configuration
Grease filter signal
After 80 working hours LED L1 flashes.
When such signal appears, carry out the maintenance of the grease
filter.
To reset the signal: with hood on, keep key T4 pressed for 5”.
The hood gives out a "BEEP" and then it switches off; LED L1 stops
flashing.
Charcoal filter signal
After 320 working hours LED L2 flashes.
When such signal appears, carry out the maintenance of the charcoal
filter.
To reset the signal: with hood on, keep key T4 pressed for 5”.
The hood gives out a "BEEP" and then it switches off; LED L2 stops
flashing.
In the case of contemporaneous signaling of both filters, LEDs L1 and L2
flash.
The signal is reset by carrying out the procedure described above 2 times.
The first time it resets the charcoal filter signal, the second time it resets the
grease filter signal.
Note: In the standard mode the charcoal filter signal is not active.
When the hood is used in filter version, activate the charcoal filter
signal.
Activating charcoal filter signal:
Set the hood to OFF and keep key "T4" pressed for 5”.
As soon as the key is pressed, the relevant LEDs of the signals of the filters
currently active will light up. Keep pressing, the hood will give out a "BEEP"
and LED L2 will flash for 2".
LEDs L1 and L2 remain on for about 2" before the hood gets back to OFF
state.
Deactivating charcoal filter signal:
Set the hood to OFF and keep key "T4" pressed for 5”.
As soon as the key is pressed, the relevant LEDs of the signals of the filters
currently active will light up. Keep pressing, the hood will give out a "BEEP"
and LED L2 will switch off.
LED L1 remains on for about 2" before the hood gets back to OFF state.
T5. Sensor control key (ON-Automatic mode / OFF-Manual mode):
Automatic operating mode (COOKING)
The system is set by default to the "manual operating mode", to activate
the "automatic operating mode" press key "T5".
With hood off: LEDs L1+L4 switch on
With hood on: the LED of the speed selected switches on while the other
LEDs start flashing.
During cooking, the system promptly reacts to Vapour/Gas increases: it
switches the hood on at the most suitable speed and keeps working at the
same speed for at least 1 minute, before getting back to the lowest
speed/switching off.
When cooking is over and the environmental parameters are back on the
levels prior to cooking the system switches off.
Note: If the parameters are close to the rest condition the system
forces the hood switching-off after 30 minutes.
It is possible to deactivate the " automatic operating mode" as follows:
- Press key "T5" and the motor gets back to the "manual operating
mode".
Note: it is also possible to get back to the manual operating mode by
pressing keys "T2", "T3" or "T6", the system decreases ("T2"),
increases ("T3") the motor speed or switches ("T6") the hood off.
T6. ON/OFF Suction motor: With hood on at any speed, press key "T6" and
the hood switches off.
With hood off, press key "T6" and the hood switches on at Speed 1.
Selection of the hob
This operation is necessary to optimize the automatic functioning of the hood,
according to the type of hob selected.
Note: The hob set by default is the Gas hob.
To select a different hob (or to check the hob set) follow the instructions below:
Set the hood to OFF
Press keys "T2" and "T3" contemporaneously for about 5 seconds until the hob
being used is displayed (the hood gives out a "BEEP" signal).
Gas hob: LED "L1" on
Induction hob: LED "L2" on
Electric hob: LED "L3" on
The cyclical selection of the hob is possible by pressing keys "T2" or "T3".
Once the hob has been selected, wait for 10” to accept the function.
The acceptance of the hob selected is displayed by the sequence of 3 flashes of
the relevant LED of the hob selected.
After selecting the hob it is necessary to carry out the "Sensor calibration"
again.
Sensor calibration (Automatic or Manual)
In order that the sensor responds correctly to the thermal stresses produced by
the hob below it is necessary to calibrate the sensor.
Note: before calibrating the sensor carry out the "Selection of the hob",
see previous paragraph.
Note: Carry out the calibration when installing the hood for the first time,
after a long period of non-use or a blackout.
The calibration must be carried out with motor off.
Automatic calibration of the sensor
The automatic calibration of the sensor starts as soon as the hood is fed (visible
by pressing key T5), LEDs L1+L4 flash for a period of time that can vary
according to the hob selected, however no longer than fifteen minutes
Manual calibration of the sensor
Note: Carry out the manual calibration after a long period of non-use, after a
blackout or when there is a very quick change in temperature in the kitchen
The calibration can be carried out manually:
Set the hood to OFF
When keys "T6" and "T5" are pressed contemporaneously for 5", LEDs "L1"
and "L4" start flashing for a period of time that can vary according to the hob
selected, however no longer than fifteen minutes

16
EN
Sensor test
The sensors are tested constantly during the automatic operation.
In the case of failure the display shows all flashing LEDs (contact the technical
service).
The hood can be used in manual mode anyway.
MAINTENANCE
ATTENTION! Before performing any maintenance operation, isolate the hood
from the electrical supply by switching off at the connector and removing the
connector fuse.
Or if the appliance has been connected through a plug and socket, then the plug
must be removed from the socket.
Cleaning
The cooker hood should be cleaned regularly (at least with the same frequency
with which you carry out maintenance of the fat filters) internally and externally.
Clean using the cloth dampened with neutral liquid detergent. Do not use
abrasive products. DO NOT USE ALCOHOL!
WARNING: Failure to carry out the basic cleaning recommendations of the
cooker hood and replacement of the filters may cause fire risks.
Therefore, we recommend observing these instructions.
The manufacturer declines all responsibility for any damage to the motor or any
fire damage linked to inappropriate maintenance or failure to observe the above
safety recommendations.
Perimeter aspiration panel
Clean the perimeter aspiration panel with the same frequency as the ant-fats
filter, using a cloth and not too concentrated liquid detergent. Do not use
abrasive substances.
Maintenance of the anti-grease filters
Traps cooking grease particles.
This must be cleaned once a month (or when the filter saturation indication
system – if envisaged on the model in possession – indicates this necessity)
using non aggressive detergents, either by hand or in the dishwasher, which
must be set to a low temperature and a short cycle.
When washed in a dishwasher, the grease filter may discolour slightly, but this
does not affect its filtering capacity.
To remove the grease filter, pull the spring release handle.
Maintenance of the charcoal filter
It absorbs unpleasant odours caused by cooking.
The saturation of the charcoal filter occurs after more or less prolonged use,
depending on the type of cooking and the regularity of cleaning of the grease
filter.
In any case it is necessary to replace the cartridge at least every four mounths
(or when the filter saturation indication system – if envisaged on the model in
possession – indicates this necessity).The charcoal filter may NOT be washed or
regenerated.
Assembly
Hook the charcoal filter at the back on the metal tongue of the hood first, then on
the front with the two knobs.
Disassembly
Remove the charcoal filter by turning the knobs fixing it to the hood by 90°.
Replacing lamps
The hood is equipped with a lighting system based on LED technology.
The LEDs guarantee an optimum lighting, a duration up to 10 times as long as
the traditional lamps and allow to save 90% electrical energy.
For replacement, contact the technical service.

17
EN
DISPOSAL
This appliance is marked according to the European directive 2002/96/EC on
Waste Electrical and Electronic Equipment (WEEE). By ensuring this product is
disposed of correctly, you will help prevent potential negative consequences for
the environment and human health, which could otherwise be caused by
inappropriate waste handling of this product.
The symbol on the product, or on the documents accompanying the
product, indicates that this appliance may not be treated as household waste.
Instead it should be taken to the appropriate collection point for the recycling of
electrical and electronic equipment. Disposal must be carried out in accordance
with local environmental regulations for waste disposal.
For further detailed information regarding the process, collection and recycling of
this product, please contact the appropriate department of your local authorities
or the local department for household waste or the shop where you purchased
this product.
MALFUNCTIONS
If something appears not to be working properly, do the following simple checks
before calling Technical Service:
• If the hood is not working:
Check that:
- The power has not been disconnected.
- A speed has been selected.
• If the hood performs inefficiently:
Check that:
- The motor speed selected is sufficient for the amount of smoke and
vapours released.
- The kitchen is sufficiently ventilated to allow air intake.
- The charcoal filter is not worn (hood in filtering version).
• If the hood has turned off during normal functioning:
Check that:
- The power has not been disconnected.
- the omnipolar disconnection device has not tripped.
If the hood fails to operate correctly, briefly disconnect it from the mains power
supply for almost 5 sec. by pulling out the plug. Then plug it in again and try once
more before contacting the Technical Assistance Service.
TECHNICAL DATA
Model HKB 9 LS X /HA
Height (Ducting version) 63-116,5 cm
Height (Filter version) 71,7-116,5 cm
Width 89,8 cm
Depth 47,8 cm
Gross weight: 26,4 Kg
Total absorption 320 W
Motor absorption 1x315 W
Lamp absorption 2x3 W
Exhaust pipe Ø 15 cm
This appliance conforms to the following EEC Directive:
• “Low Voltage Equipment” Directive 2006/95/EC (12-12-2006)
• “Electromagnetic Compatibility” Directive 2004/108/EC (15-12-2004)
Components not provided with the product

Italiano
18
IT La cappa può avere estetiche differenti rispetto a quanto illustrato nei
disegni di questo libretto, comunque le istruzioni per l'uso, la
manutenzione e l'installazione rimangono le stesse.
Attenersi strettamente alle istruzioni riportate in questo manuale. Si declina
ogni responsabilità per eventuali inconvenienti, danni o incendi provocati
all'apparecchio derivati dall'inosservanza delle istruzioni riportate in questo
manuale. La cappa è stata progettata esclusivamente per uso domestico.
! E' importante conservare questo manuale per poterlo consultare in ogni
momento. In caso di vendita, di cessione o di trasloco, assicurarsi che resti
insieme al prodotto.
! Leggere attentamente le istruzioni: ci sono importanti informazioni
sull'installazione, sull'uso e sulla sicurezza.
! Non effettuare variazioni elettriche o meccaniche sul prodotto o sulle
condotte di scarico.
SICUREZZA GENERALE
La distanza minima fra la superficie di supporto dei recipienti sul dispositivo di
cottura e la parte più bassa della cappa da cucina deve essere non inferiore a
50cm in caso di cucine elettriche e di 65cm in caso di cucine a gas o miste.
Se le istruzioni di installazione del dispositivo di cottura a gas specificano una
distanza maggiore, bisogna tenerne conto.
La cappa è dotata di tasselli di fissaggio adatti alla maggior parte di pareti/soffitti.
E’ tuttavia necessario interpellare un tecnico qualificato per accertarVi
sull’idoneità dei materiali a seconda del tipo di parete/soffitto. La/il parete/soffitto
deve essere sufficientemente robusto da sostenere il peso della cappa.
Attenzione! Non collegare l’apparecchio alla rete elettrica finche l’installazione
non è totalmente completata.
Prima di qualsiasi operazione di pulizia o manutenzione, disinserire la cappa
dalla rete elettrica togliendo la spina o staccando l’interruttore generale
dell’abitazione.
Per tutte le operazioni di installazione e manutenzione utilizzare guanti da lavoro
L’apparecchio non è destinato all’utilizzo da parte di bambini o persone con
ridotte capacità fisiche sensoriali o mentali e con mancata esperienza e
conoscenza a meno che essi non siano sotto la supervisione o istruiti nell’uso
dell’apparecchiatura da una persona responsabile per la loro sicurezza.
I bambini devono essere controllati affinché non giochino con l’apparecchio.
Mai utilizzare la cappa senza griglia correttamente montata!
La cappa non va MAI utilizzata come piano di appoggio a meno che non sia
espressamente indicato.
Il locale deve disporre di sufficiente ventilazione, quando la cappa da cucina
viene utilizzata contemporaneamente ad altri apparecchi a combustione di gas o
altri combustibili.
L’aria aspirata non deve essere convogliata in un condotto usato per lo scarico
dei fumi prodotti da apparecchi a combustione di gas o di altri combustibili.
E’ severamente vietato fare cibi alla fiamma sotto la cappa.
L’impiego di fiamma libera è dannoso ai filtri e può dar luogo ad incendi, pertanto
deve essere evitato in ogni caso.
La frittura deve essere fatta sotto controllo onde evitare che l’olio surriscaldato
prenda fuoco.
Quando il piano di cottura è in funzione le parti accessibili della cappa possono
diventare calde.
Per quanto riguarda le misure tecniche e di sicurezza da adottare per lo scarico
dei fumi attenersi strettamente a quanto previsto dai regolamenti delle autorità
locali competenti.
La cappa va frequentemente pulita sia internamente che esternamente
(ALMENO UNA VOLTA AL MESE, rispettare comunque quanto espressamente
indicato nelle istruzioni di manutenzione riportate in questo manuale).
L’inosservanza delle norme di pulizia della cappa e della sostituzione e pulizia
dei filtri comporta rischi di incendi.
Non utilizzare o lasciare la cappa priva di lampade correttamente montate per
possibile rischio di scossa elettrica.
Si declina ogni responsabilità per eventuali inconvenienti, danni o incendi
provocati all’apparecchio derivati dall’inosservanza delle istruzioni riportate in
questo manuale.
COLLEGAMENTO ELETTRICO
La tensione di rete deve corrispondere alla tensione riportata sull’etichetta
caratteristiche situata all’interno della cappa. Se provvista di spina allacciare la
cappa ad una presa conforme alle norme vigenti posta in zona accessibile anche
dopo l’installazione. Se sprovvista di spina (collegamento diretto alla rete) o la
spina non è posta in zona accessibile, anche dopo installazione, applicare un
interruttore bipolare a norma che assicuri la disconnessione completa della rete
nelle condizioni della categoria di sovratensione III, conformemente alle regole di
installazione.
Attenzione! Prima di ricollegare il circuito della cappa all’alimentazione di rete e
di verificarne il corretto funzionamento, controllare sempre che il cavo di rete sia
stato montato correttamente.
Sostituzione del cavo di alimentazione
La cappa è provvista di un cavo alimentazione speciale; in caso di
danneggiamento del cavo, richiederlo al servizio assistenza tecnica.
SCARICO DELL' ARIA
(per le versioni aspiranti)
Collegare la cappa a tubi e fori di scarico a parete con diametro equivalente
all'uscita d'aria (flangia di raccordo).
L'utilizzo di tubi e fori di scarico a parete con diametro inferiore determinerà una
diminuizione delle prestazioni di aspirazione ed un drastico aumento della
rumorosità.
Si declina perciò ogni responsabilità in merito.
! Usare un condotto lungo il minimo indispensabile.
! Usare un condotto con minor numero di curve possibile (angolo massimo
della curva: 90°).
! Evitare cambiamenti drastici di sezione del condotto.
! Usare un condotto con l’interno piu’ liscio possibile.
! Il materiale del condotto deve essere approvato normativamente.
! L'azienda declina ogni responsabilità qualora queste norme non vengano
rispettate.
FILTRANTE O ASPIRANTE ?
! La vostra cappa è pronta per essere utilizzata in versione aspirante.
Per utilizzare la cappa in versione filtrante va installato l’apposito KIT
ACCESSORIO.
Verificate nelle prime pagine di questo manuale se il KIT ACCESSORIO è
già fornito a corredo o va acquistato a parte.
Nota: Se fornito a corredo, in alcuni casi, il sistema di filtraggio aggiuntivo a
base di carboni attivi potrebbe essere già installato sulla cappa.
Le informazioni per la trasformazione della cappa da versione aspirante a
versione filtrante sono già contenute in questo manuale.
Versione aspirante
I vapori vengono evacuati verso l’esterno tramite un tubo di scarico fissato alla
flangia di raccordo.
Il diametro del tubo di scarico deve essere equivalente al diametro dell'anello di
connessione.
Attenzione! Il tubo di evacuazione non è fornito e va acquistato.
Nella parte orizzontale, il tubo deve avere una leggera inclinazione verso l’alto
(10° circa) in modo da poter trasportare l’aria verso l’esterno più facilmente.
Se la cappa è provvista di filtri al carbone, questi devono essere tolti.
Versione filtrante
L’aria aspirata verrà sgrassata e deodorata prima di essere riconvogliata nella
stanza. Per utilizzare la cappa in questa versione è necessario installare un
sistema di filtraggio aggiuntivo a base di carboni attivi.

19
IT
COMANDI
Per selezionare le funzioni della cappa è sufficente sfiorare i comandi.
T1. ON/OFF Luci
T2. Decremento velocità
Premendo il tasto "T2" si ottiene il decremento della velocità, dalla velocità
4 (intensiva) alla velocità 1.
Premendo il tasto "T2" durante il funzionamento in velocità 1, la cappa
passa allo stato OFF.
T3. Incremento velocità
Premendo il pulsante T3 la cappa passa dallo stato OFF alla velocità 1.
Premendo il pulsante (cappa in stato ON) viene incrementata la velocità del
motore dalla velocità 1 alla velocità intensiva (temporizzata).
Velocità 1 led L1
Velocità 2 led L1+L2
Velocità 3 led L1+L2+L3
Velocità intensiva (temporizzata) led L1+L2+L3+L4 lampeggiante
Nota: La Velocità 4 (intensiva temporizzata) rimane in funzione per 5 minuti
,dopodichè la cappa imposta automaticamente la velocità 2
T4. Temporizzazione velocità / Controllo e configurazione segnalazione
della saturazione dei filtri
Temporizzazione velocità:
La temporizzazione delle velocità si abilita premendo il tasto T4, a
temporizzazione scaduta la cappa si spegne.
La temporizzazione è così suddivisa:
Velocità 1 - 20 minuti (led L1 lampeggiante)
Velocità 2 - 15 minuti (led L1+L2 lampeggiante)
Velocità 3 - 10 minuti (led L1+L2+L3 lampeggiante)
Velocità Intensiva - 5 minuti (led L1+L2+L3+L4 lampeggiante)
Durante il funzionamento temporizzato premendo il tasto T2 la cappa esce
dalla modalità temporizzata e decrementa la velocità.
Premendo il tasto T3 la cappa esce dalla modalità temporizzata e
incrementa la velocità.
Premendo il tasto T4 la cappa esce dalla modalità temporizzata
mantenendo la velocità impostata.
Controllo e configurazione segnalazione della saturazione dei filtri
Segnalazione filtro grassi
Dopo 80 ore di funzionamento il led L1 lampeggia.
Quando compare tale segnalazione eseguire la manutenzione del filtro
grassi.
Per resettare la segnalazione: a cappa accesa tenere premuto il tasto
T4 per 5”.
La cappa emetterà un "BEEP" per poi spegnersi; il led L1 smetterà di
lampeggiare.
Segnalazione filtro carboni
Dopo 320 ore di funzionamento il led L2 lampeggia.
Quando compare tale segnalazione eseguire la manutenzione del filtro
carboni.
Per resettare la segnalazione: a cappa accesa tenere premuto il tasto
"T4" per 5”.
La cappa emetterà un "BEEP" per poi spegnersi; il led L2 smetterà di
lampeggiare.
Nel caso di segnalazione contemporanea di entrambi i filtri, i led L1 e L2
lampeggeranno.
Il reset avviene effettuando 2 volte la procedera sopra descritta.
La prima volta resetta la segnalazione del filtro carboni, la seconda resetta
la segnalazione del filtro grassi.
Nota: Nella modalità standard la segnalazione filtro carboni non è attiva.
Nel caso si utilizzi la cappa in versione filtrante è necessario abilitare
la segnalazione filtro carboni.
Attivazione segnalazione filtro carboni:
Posizionare la cappa in OFF e tenere premuto il tasto "T4" per 5”.
Appena premuto il tasto si illumineranno i led relativi alle segnalazioni filtri al
momento attivi, continuando a premere, la cappa emetterà un "BEEP" e il
led L2 lampeggerà per 2".
I led L1 e L2 rimarranno accesi per circa 2" prima che la cappa torni allo
stato OFF.
Disattivazione segnalazione filtro carboni:
Posizionare la cappa in OFF e tenere premuto il tasto T4 per 5”.
Appena premuto il tasto si illumineranno i led relativi alle segnalazioni filtri al
momento attivi, continuando a premere, la cappa emetterà un "BEEP" e il
led L2 si spegnerà.
Il led L1 rimarrà acceso per circa 2" prima che la cappa torni allo stato OFF.
T5. Tasto di controllo del Sensore (ON-Modalità automatica / OFF-Modalità
manuale):
Modalità di funzionamento automatica (COOKING)
Il sistema è impostato per default in "modalità di funzionamento
manuale", per attivare la "modalità di funzionamento automatica"
premere il tasto "T5".
A cappa spenta: si accendono i led L1+L4
A cappa accesa: il led della velocità selezionata si accende mentre gli altri
led iniziano a lampeggiare.
Durante la cottura il sistema reagisce prontamente ad incrementi di
Vapore/Gas: accende la cappa alla velocità più idonea e permane nella
stessa velocità per almeno 1 minuto, prima di ritornare alla velocità più
bassa/spegnersi.
Quando la cottura è terminata e i parametri ambientali sono tornati ai livelli
precedenti alla cottura il sistema si spegne.
Nota: Se i parametri sono prossimi alla condizione di riposo il sistema
dopo 30 minuti spegne forzatamente la cappa.
E' possibile disabilitare la modalità di "modalità di funzionamento
automatica", nei seguenti modi:
- Premendo il tasto "T5" il motore ritorna in "modalita di funzionamento
manuale".
Nota: è possibile ritornare alla modalità di funzionamento manuale
anche premendo i tasti "T2", "T3" o "T6" il sistema decrementa
("T2"), incrementa ("T3") la velocità del motore o spegne ("T6") la
cappa.
T6. ON/OFF Motore di aspirazione: A cappa accesa a qualsiasi velocità
premendo il tasto "T6" la cappa si spegne.
A cappa spenta (OFF) premendo il tasto "T6" la cappa si accende alla
Velocità 1.
Selezione del piano di cottura
Questa operazione è necessaria per ottimizzare il funzionamento automatico
della cappa, in base al tipo di piano di cottura selezionato.
Nota: Il piano di cottura impostato di default è il piano a Gas.
Per la selezione di un piano di cottura differente (o per la verifica del piano di
cottura impostato) procedere come segue:
Impostare la cappa su OFF
Premere contemporaneamente i tasti "T2" e "T3" per circa 5 secondi fino
quando non viene visualizzato il piano cottura attualmente in uso (la cappa
emette un segnale sonoro "BEEP").
Piano a Gas: led "L1" acceso
Piano Induzione: led "L2" acceso
Piano Elettrico: : led "L3" acceso
La selezione ciclica del piano avviene premendo il tasti "T2" o "T3".
Una volta selezionato il piano, per accettare la funzione, attendere 10”.
L’accettazione del piano selezionato viene visalizzata dalla sequenza di 3
lampeggi del Led relativo al piano selezionato.
Dopo aver eseguito la selezione del piano di cottura è necessario rieseguire la
"Calibrazione del sensore".
Calibrazione del sensore (Automatica o Manuale)
Affinchè il sensore risponda correttamente alle sollecitazioni termiche che
arrivano dal piano di cottura sottostante è necessario eseguire la calibrazione del
sensore.
Nota: prima di eseguire la calibrazione del sensore è necessario eseguire
la "Selezione del piano di cottura" , vedi paragrafo precedente.
Nota: Effettuare la calibrazione quando si installa la cappa per la prima
volta, dopo un lungo periodo di inutilizzo o dopo un blackout.
La calibrazione deve essere effettuata con il motore spento.

20
IT Calibrazione Automatica del sensore
Appena la cappa viene alimentata inizia la calibrazione automatica del sensore
(visibile se si preme il tasto T5), i led L1+L4 lampeggiano per un tempo variabile
in base al piano di cottura selezionato, comunque non più di un quarto d'ora
Calibrazione manuale del sensore
Nota: Eseguire la calibrazione manuale dopo un lungo periodo di inutilizzo, dopo
un blackout o quando si verifica, nella cucina, una variazione molto rapida della
temperatura
La calibrazione può essere eseguita manualmente:
Impostare la cappa su OFF
premendo contemporaneamente i tasti "T6" e "T5" per 5" , i led "L1" e "L4"
iniziano a lampeggiare per un tempo variabile in base al piano di cottura
selezionato, comunque non più di un quarto d'ora
Test sensori
Avviene continuamente durante il funzionamento in automatico.
In caso di avaria il display visualizza tutti i led lampeggianti (conttattare
l'assistenza tecnica).
La cappa può comunque essere utilizzata in modalità manuale.
MANUTENZIONE
Attenzione! Prima di qualsiasi operazione di pulizia o manutenzione,
disinserire la cappa dalla rete elettrica togliendo la spina o staccando
l’interruttore generale dell’abitazione.
Pulizia
La cappa va frequentemente pulita (almeno con la stessa frequenza con cui si
esegue la manutenzione dei filtri grassi), sia internamente che esternamente.
Per la pulizia usare un panno inumidito con detersivi liquidi neutri.
Evitare l’uso di prodotti contenenti abrasivi. NON UTILIZZARE ALCOOL!
Attenzione: L’inosservanza delle norme di pulizia dell’apparecchio e della
sostituzione dei filtri comporta rischi di incendi. Si raccomanda quindi di attenersi
alle istruzioni suggerite.
Si declina ogni responsabilità per eventuali danni al motore, incendi provocati da
un’impropria manutenzione o dall’inosservanza delle suddette avvertenze.
Pannello di aspirazione perimetrale
Pulire il pannello di aspirazione perimetrale con la stessa frequenza del filtro
antigrasso, usare un panno ed un detergente liquido non troppo concentrato.
Non utilizzare mai sostanze abrasive.
Manutenzione dei filtri antigrasso
Trattiene le particelle di grasso derivanti dalla cottura.
Deve essere pulito una volta al mese (o quando il sistema di indicazione di
saturazione dei filtri - se previsto sul modello in possesso- indica questa
necessità), con detergenti non aggressivi, manualmente oppure in lavastoviglie a
basse temperature ed a ciclo breve.
Con il lavaggio in lavastoviglie il filtro antigrasso metallico può scolorirsi ma le
sue caratteristiche di filtraggio non cambiano assolutamente.
Per smontare il filtro grassi tirare la maniglia di sgancio a molla.
Manutenzione del filtro al carbone
Trattiene gli odori sgradevoli derivanti dalla cottura.
La saturazione del filtro carbone si verifica dopo un uso più o meno prolungato a
seconda del tipo di cucina e della regolarità della pulizia del filtro grassi. In ogni
caso è necessario sostituire la cartuccia al massimo ogni quattro mesi (o quando
il sistema di indicazione di saturazione dei filtri - se previsto sul modello in
possesso- indica questa necessità).
NON può essere lavato o rigenerato
Montaggio
Agganciare il filtro ai carboni attivi prima posteriormente sulla linguetta metallica
della cappa, poi anteriormente con i due pomelli.
Smontaggio
Rimuovere il filtro ai carboni attivi girando di 90° i pomelli che lo fissano alla
cappa.
Sostituzione delle lampade
La cappa è dotata di un sistema di illuminazione basato sulla tecnologia LED.
I LED garantiscono una illuminazione ottimale, una durata fino a 10 volte
maggiore delle lampade tradizionali e consentono di risparmiare il 90% di
energia elettrica.
Per la sostituzione rivolgersi al servizio assistenza tecnica.

21
IT
SMALTIMENTO
Questo apparecchio è contrassegnato in conformità alla Direttiva Europea
2002/96/EC, Waste Electrical and Electronic Equipment (WEEE). Assicurandosi
che questo prodotto sia smaltito in modo corretto, l'utente contribuisce a
prevenire le potenziali conseguenze negative per l'ambiente e la salute.
Il simbolo sul prodotto o sulla documentazione di accompagnamento
indica che questo prodotto non deve essere trattato come rifiuto domestico ma
deve essere consegnato presso l'idoneo punto di raccolta per il riciclaggio di
apparecchiature elettriche ed elettroniche. Disfarsene seguendo le normative
locali per lo smaltimento dei rifiuti. Per ulteriori informazioni sul trattamento,
recupero e riciclaggio di questo prodotto, contattare l'idoneo ufficio locale, il
servizio di raccolta dei rifiuti domestici o il negozio presso il quale il prodotto è
stato acquistato.
ANOMALIE DI FUNZIONAMENTO
Se qualcosa non sembra funzionare, prima di chiamare il Servizio Assistenza
effettuare i seguenti semplici controlli:
• Se la cappa non funziona:
Verificare che:
- non c’è interruzione di corrente.
- è stata selezionata una velocità.
• Se la cappa ha un rendimento scarso:
Verificare che:
- La velocità motore selezionata è sufficiente per la quantità di fumo e di
vapori liberata.
- La cucina è sufficientemente areata per permettere una presa d’aria.
- Il filtro carbone non è consumato (cappa in versione filtrante).
• Se la cappa si è spenta nel corso del normale funzionamento:
Verificare che:
- non c’è interruzione di corrente.
- il dispositivo di interruzione omnipolare non è scattato.
In caso di eventuali anomalie di funzionamento, prima di rivolgerVi al servizio
assistenza scollegate per almeno 5 sec. l’apparecchio dall’alimentazione
elettrica estraendo la spina e collegatelo poi nuovamente. Nel caso in cui
l’anomalia di funzionamento dovesse perdurare, rivolgersi al servizio
d’assistenza.
DATI TECNICI
Modello HKB 9 LS X /HA
Altezza (Versione aspirante) 63-116,5 cm
Altezza (Versione filtrante) 71,7-116,5 cm
Larghezza 89,8 cm
Profondità 47,8 cm
Peso lordo 26,4 Kg
Assorbimento totale 320 W
Assorbimento motore 1x315 W
Assorbimento lampade 2x3 W
Ø del tubo di scarico 15 cm
La cappa è conforme alle seguenti Direttive EC:
• “Low voltage” Directive 2006/95/EC (12-12-2006)
• “EMC” Directive 2004/108/EC (15-12-2004)
Componenti non in dotazione con il prodotto

Français
22
FR La hotte peut avoir des configurations esthétiques différentes par rapport à
ce qui est illustré dans les dessins de ce manuel, cependant les
instructions pour l’utilisation, l’entretien et l’installation restent identiques.
Suivre impérativement les instructions de cette notice. Le constructeur
décline toute responsabilité pour tous les inconvénients, dommages ou
incendies provoqués à l’appareil et dûs à la non observation des instructions de
la présente notice. La hotte a été conçue exclusivement pour l’usage
domestique.
! Il est important de conserver ce livret pour pouvoir le consulter à tout
moment. En cas de vente, de cession ou de déménagement, s’assurer qu’il
reste avec le produit.
! Lire attentivement les instructions: il y a d’importantes informations sur
l’installation, sur l’emploi et sur la sécurité.
! Ne pas effectuer des modifications électriques ou mécaniques sur le produit
ou sur les conduit d’évacuation.
SÉCURITÉ GÉNÉRALE
La distance minimum entre la superficie de support des récipients sur le
dispositif de cuisson et la partie la plus basse de la hotte de cuisine ne doit pas
être inférieure à 50cm dans le cas de cuisinières électriques et de 65cm dans le
cas de cuisinières à gaz ou mixtes.
Si les instructions d’installation du dispositif de cuisson au gaz spécifient une
plus grande distance, il faut en tenir compte.
La hotte est équipée de chevilles de fixation convenant à la plupart des
parois/plafonds. Il est cependant nécessaire de s’adresser à un technicien
qualifié afin de s’assurer que le matériel est approprié au type de paroi/plafond.
La paroi/plafond doit être suffisamment solide pour supporter le poids de la
hotte.
Attention! Ne pas raccorder l’appareil au circuit électrique avant que le montage
ne soit complètement terminé.
Avant toute opération de nettoyage ou d’entretien, débrancher la hotte du circuit
électrique en retirant la prise ou en coupant l’interrupteur général de l’habitation.
Munissez-vous de gants de travail avant d’effectuer toute opération d’installation
et d’entretien.
L’appareil n’est pas destiné à une utilisation par des enfants ou des personnes à
capacités physiques, sensorielles ou mentales réduites et sans expérience et
connaissance à moins qu’ils ne soient sous la supervision ou formés sur
l’utilisation de l’appareil par une personne responsable de leur sécurité.
Les enfants doivent être surveillés afin qu’ils ne jouent pas avec l’appareil.
Ne jamais utiliser la hotte sans que la grille ne soit montée correctement!
La hotte ne doit JAMAIS être utilisée comme plan pour déposer quelque chose
sauf si cela est expressément indiqué.
Quand la hotte est utilisée en même temps que d’autres appareils à combustion
de gaz ou d’autres combustibles, le local doit disposer d’une ventilation
suffisante.
L’air aspiré ne doit jamais être envoyé dans un conduit utilisé pour l’évacuation
des fumées produites par des appareils à combustion de gaz ou d’autres
combustibles.
Il est formellement interdit de faire flamber les aliments sous la hotte.
L’utilisation de flammes libres peut entraîner des dégâts aux filtres et peut
donner lieu à des incendies, il faut donc les éviter à tout prix.
La friture d’aliments doit être réalisée sous contrôle pour éviter que l’huile
surchauffée ne prenne feu.
Les pièces accessibles peuvent se réchauffer de façon importante quand elles
sont utilisées avec des appareils pour la cuisson.
En ce qui concerne les mesures techniques et de sécurité à adopter pour
l’évacuation des fumées, s’en tenir strictement à ce qui est prévu dans les
règlements des autorités locales compétentes. La hotte doit être régulièrement
nettoyée, aussi bien à l’intérieur qu’à l’extérieur (AU MOINS UNE FOIS PAR
MOIS, respecter néanmoins les instructions relatives à l’entretien fournies dans
ce manuel).
La non observation de ces normes de nettoyage de la hotte et du changement et
nettoyage des filtres comporte des risques d’incendie.
Ne pas utiliser ou laisser la hotte sans que les ampoules soient correctement
placées pour éviter tout risque de choc électrique.
La société décline toute responsabilité pour d’éventuels inconvénients, dégâts
ou incendies provoqués par l’appareil et dérivés de la non observation des
instructions reprises dans ce manuel.
BRANCHEMENT ÉLECTRIQUE
La tension électrique doit correspondre à la tension reportée sur la plaque
signalétique située à l’intérieur de la hotte. Si une prise est présente, branchez la
hotte dans une prise murale conforme aux normes en vigueur et placée dans
une zone accessible également après l’installation. Si aucune prise n’est
présente (raccordement direct au circuit électrique), ou si la prise ne se trouve
pas dans une zone accessible également après l’installation, appliquez un
disjoncteur normalisé pour assurer de débrancher complètement la hotte du
circuit électrique en conditions de catégorie surtension III, conformément aux
règlementations de montage.
Attention! Avant de rebrancher le circuit de la hotte à l’alimentation électrique et
d’en vérifier le fonctionnement correct, contrôlez toujours que le câble
d’alimentation soit monté correctement.
Changement du câble d'alimentation
La hotte est pourvue d'un câble d'alimentation spécial; en cas de détérioration du
câble, en demander un neuf au service d'assistance technique.
ÉVACUATION DE L'AIR
(pour les versions aspirantes)
Relier la hotte aux tubes et trous d’évacuation de la paroi d’un diamètre
équivalent à la sortie de l’air (collier de raccord).
L’utilisation de tubes et des trous d'évacuation à paroi avec un diamètre inférieur
entraînera une diminution des performances d’aspiration et une nette
augmentation du bruit.
Nous déclinons toute responsabilité à cet égard.
! Utiliser un tuyau de la longueur strictement nécessaire.
! Les coudes du tuyau doivent être en nombre minime (angle maxi du coude:
90°).
! Éviter les variations excessives de section du tuyau.
! Utiliser un tuyau le plus lisse possible sur sa partie interne.
! Le matériau du tuyau doit être aux normes.
! La société décline toute responsabilité si ces normes ne sont pas
respectées.
FILTRANTE OU ASPIRANTE ?
! Votre hotte est prête pour être utilisée en version aspirante.
Pour utiliser la hotte en version filtrante, il faut installer le KIT
ACCESSOIRES prévu.
Vérifier dans les premières pages de ce manuel si le KIT ACCESSOIRES
est déjà fourni ou s’il faut l’acheter à part.
Remarque: Si fourni dans le kit, dans certains cas, le système de filtration
supplémentaire à base de charbon actif pourrait déjà être installé dans la
hotte.
Les informations pour la transformation de la hotte de version aspirante à
version filtrante sont déjà contenues dans ce manuel.
Version aspirante
Les vapeurs sont évacuées vers l'extérieur à travers un conduit d'évacuation fixé
à la bride de raccord qui se trouve au-dessus de la hotte.
Attention!
Le tuyau d’évacuation n’est pas fourni et doit être acheté à part.
Le diamètre du tuyau d'évacuation doit être égal à celui de la bride de raccord.
Sur la partie horizontale, le tuyau doit avoir une légère inclinaison vers le haut
(10° env.) de façon à convoyer plus facilement l’air vers l’extérieur.
Si la hotte est équipée d'un filtre à charbon, ce dernier doit être enlevé.
Version filtrante
Il convient d’utiliser un filtre à charbon actif, disponible auprès de vôtre
revendeur habituel.
L’air aspiré sera dégraissé et désodorisé avant d’être refoulé dans la pièce à
travers la grille supérieure.

23
FR
COMMANDES
Pour sélectionner les fonctions de la hotte, il suffit simplement d’effleurer les
commandes.
T1. ON/OFF Lumière
T2. Diminution vitesse
En appuyant sur la touche "T2", on obtient la diminution de la vitesse, de la
vitesse 4 (intensive) à la vitesse 1.
En appuyant sur la touche "T2" durant il fonctionnement en vitesse 1, la
hotte passe à l’état OFF.
T3. Augmentation vitesse
En appuyant sur la touche T3, la hotte passe de l’état OFF à la vitesse 1.
En appuyant sur la touche (hotte à l’état ON), on augmente la vitesse du
moteur de la vitesse 1 à la vitesse intensive (temporisée).
Vitesse 1 led L1
Vitesse 2 led L1+L2
Vitesse 3 led L1+L2+L3
Vitesse intensive (temporisée) led L1+L2+L3+L4 clignotant
Note: La Vitesse 4 (intensive temporisée) reste en fonction pendant 5
minutes, après quoi la hotte se met automatiquement à la vitesse 2.
T4. Temporisation vitesse / Contrôle et configuration signal de saturation
des filtres
Temporisation vitesse:
La temporisation de la vitesse s’active en appuyant sur la touche T4, la
hotte se coupe à la fin de la temporisation.
La temporisation est divisée comme suit:
Vitesse 1 - 20 minutes (led L1 clignotant)
Vitesse 2 - 15 minutes (led L1+L2 clignotant)
Vitesse 3 - 10 minutes (led L1+L2+L3 clignotant)
Vitesse Intensive - 5 minutes (led L1+L2+L3+L4 clignotant)
Durant le fonctionnement temporisé, en appuyant sur la touche T2, la hotte
sort de la modalité temporisée et diminue la vitesse.
En appuyant sur la touche T3, la hotte sort de la modalité temporisée et
augmente la vitesse.
En appuyant sur la touche T4, la hotte sort de la modalité temporisée en
maintenant la vitesse réglée.
Contrôle et configuration signal de saturation des filtres
Signal filtre anti-graisses
Après 80 heures de fonctionnement, le led L1 clignote.
Quand ce signal apparaît, effectuer l’entretien du filtre anti-graisses.
Pour annuler le signal: à hotte allumée, appuyer sur la touche T4
pendant 5”.
La hotte émettra un "BIP" et s’éteindra; le led L1 arrêtera de clignoter.
Signal filtre au charbon
Après 320 heures de fonctionnement, le led L2 clignote.
Quand ce signal apparaît, effectuer l’entretien du filtre au charbon.
Pour annuler le signal: à hotte allumée, appuyer sur la touche T4
pendant 5”.
La hotte émettra un "BIP" et s’éteindra; le led L2 arrêtera de clignoter.
En cas de signal simultané des deux filtres, les led L1 et L2 clignoteront.
Le reset se fait en effectuant 2 fois la procédure décrite ci-dessus.
La première fois, pour annuler le signal du filtre au charbon, la deuxième
pour annuler le signal du filtre anti-graisses.
Note: Dans la modalité standard, le signal filtre au charbon n’est pas activé.
Dans le cas où l’on utilise la hotte en version filtrante, il faut habiliter
le signal filtre au charbon.
Activation signal filtre au charbon:
Placer la hotte sur OFF et appuyer sur la touche "T4" pendant 5”.
Dès que l’on appuie sur la touche, les leds relatifs aux signaux filtres actifs
s’allument, en continuant à appuyer, la hotte émettra un "BIP" et le led L2
clignotera pendant 2".
Les leds L1 et L2 resteront allumés pendant environ 2" avant que la hotte
ne revienne à l’état OFF.
Désactivation signal filtre au charbon:
Placer la hotte sur OFF et appuyer sur la touche T4 pendant 5”.
Dès que l’on appuie sur la touche, les leds relatifs aux signaux filtres actifs
s’allument, en continuant à appuyer, la hotte émettra un "BIP" et le led L2
clignotera pendant 2".
Le led L1 restera allumé pendant environ 2" avant que la hotte ne revienne
à l’état OFF.
T5. Touche de contrôle du Détecteur (ON-Modalité automatique / OFF-
Modalité manuelle):
Modalité de fonctionnement automatique (COOKING)
Le système est réglé par défaut sur "modalité de fonctionnement
manuelle", pour activer la "modalité de fonctionnement automatique"
appuyer sur la touche "T5".
A hotte éteinte: les L1+L4 s’allument.
A hotte allumée: le led de la vitesse sélectionnée s’allume tandis que les
autres commencent à clignoter.
Durant la cuisson, le système réagit rapidement aux augmentations de
Vapeur/Gaz: il allume la hotte à la vitesse la plus adaptée et reste à la
même vitesse pendant au moins 1 minute, avant de retourner à la vitesse
plus basse/s’éteindre.
Quand la cuisson est terminée et que les paramètres ambiants sont
revenus aux niveaux précédant la cuisson, le système se coupe.
Note: Si les paramètres sont proches de la condition de repos, le
système coupe la hotte après 30 minutes.
On peut déshabiliter la modalité de "modalité de fonctionnement
automatique", de la façon suivante:
- En appuyant sur la touche "T5", le moteur retourne en "modalité de
fonctionnement manuelle".
Note: on peut également retourner à la modalité de fonctionnement
manuelle en appuyant sur les touches "T2", "T3" ou "T6" le système
diminue ("T2"), augmente ("T3") la vitesse du moteur ou coupe ("T6")
la hotte.
T6. ON/OFF Moteur d’aspiration: A hotte allumée à n’importe quelle vitesse,
on coupe la hotte en appuyant sur la touche "T6".
A hotte éteinte (OFF), en appuyant sur la touche "T6" la hotte s’allume à la
Vitesse 1.
Sélection du plan de cuisson
Cette opération est nécessaire pour optimaliser le fonctionnement automatique
de la hotte, sur base du type de plan de cuisson sélectionné.
Note: Le plan de cuisson réglé par défaut est le plan à Gaz.
Pour la sélection d’un plan de cuisson différent (ou pour la vérification du plan de
cuisson réglé) procéder comme suit:
Régler la hotte sur OFF
Appuyer en même temps sur les touches "T2" et "T3" pendant environ 5
secondes jusqu’à l’affichage du plan de cuisson habituellement utilisé (la hotte
émet un signal sonore "BIP").
Plan à gaz: led "L1" allumé
Plan à Induction: led "L2" allumé
Plan Electrique: led "L3" allumé
La sélection cyclique du plan se fait en appuyant sur les touches "T2" ou "T3".
Une fois le plan sélectionné, attendre 10” pour accepter la fusion.
L’acceptation du plan sélectionné est visualisée par la séquence de 3
clignotements du led relatif au plan sélectionné.
Après avoir effectué la sélection du plan de cuisson, il faut réaliser la
"Calibration du détecteur".
Calibration du détecteur (Automatique ou Manuelle)
Afin que le détecteur réponde correctement aux sollicitations thermiques qui
arrivent du plan de cuisson qui se trouve en dessous, il faut effectuer la
calibration du détecteur.
Note: Avant d’effectuer la calibration du détecteur, il faut effectuer la
"Sélection du plan de cuisson", voir paragraphe précédent.
Note: Effectuer la calibration quand on installe la hotte pour la première
fois, après une longue période d’inactivité ou après une coupure de courant.
La calibration doit être effectuée avec le moteur coupé.

24
FR Calibration Automatique du détecteur
Dès que la hotte est alimentée, la calibration automatique du détecteur
commence (visible si l’on appuie sur la touche T5), les leds L1+L4 clignotent
pendant une durée variable sur base du plan de cuisson sélectionné, mais pas
plus d’un quart d’heure.
Calibration manuelle du détecteur
Note: Effectuer la calibration manuelle après une longue période d’inactivité,
après une coupure de courant ou quand apparaît une variation très rapide de la
température dans la cuisine.
La calibration peut être réalisée manuellement:
Régler la hotte sur OFF
En appuyant en même temps sur les touches "T6" et "T5" pendant 5", les leds
"L1" et "L4" commencent à clignoter pendant une durée variable sur base du
plan de cuisson sélectionné, mais pas plus d’un quart d’heure.
Test détecteurs
Se fait continuellement durant le fonctionnement en automatique.
En cas de panne, l’écran affiche tous les leds clignotants (contacter l’assistance
technique).
La hotte peut toutefois être utilisée en modalité manuelle.
ENTRETIEN
Attention! Avant toute opération de nettoyage ou d’entretien, débrancher la
hotte du circuit électrique en enlevant la prise ou en coupant l’interrupteur
général de l’habitation.
Nettoyage
La hotte doit être régulièrement nettoyée à l’intérieur et à l’extérieur (au moins à
la même fréquence que pour l’entretien des filtres à graisse). Pour le nettoyage,
utiliser un chiffon humidifié avec un détergent liquide neutre. Ne pas utiliser de
produit contenant des abrasifs.
NE PAS UTILISER D'ALCOOL!
ATTENTION: Il y a risque d’incendie si vous ne respectez pas les instructions
concernant le nettoyage de l’appareil et le remplacement ou le nettoyage du
filtre.
La responsabilité du constructeur ne peut en aucun cas être engagée dans le
cas d’un endommagement du moteur ou d’incendie liés à un entretien négligé ou
au non respect des consignes de sécurité précédemment mentionnées.
Panneau d’aspiration périmétral
Nettoyer le panneau d’aspiration périmétral à la même fréquence que le filtre
anti-graisses, utiliser un chiffon et un détergent liquide pas trop concentré. Ne
jamais utiliser de substances abrasives.
Entretien des filtres anti-graisses
Il retient les particules de graisse issues de la cuisson.
Le filtre doit être nettoyé une fois par mois (ou lorsque le système d’indication de
saturation des filtres – si prévu sur le modèle possédé – indique cette nécessité)
avec des détergents non agressifs, à la main ou dans le lave-vaisselle à faibles
températures et cycle rapide.
Le lavage du filtre anti-graisse métallique au lave-vaisselle peut en provoquer la
décoloration. Toutefois, les caractéristiques de filtrage ne seront en aucun cas
modifiées.
Pour démonter le filtre anti-graisse, tirer la poignée de décrochement à ressort.
Entretien des filtres au charbon
Retient les odeurs désagréables de cuisson.
La saturation du charbon actif se constate aprés un emploi plus ou mois long,
selon le type de cuisiniére et de régularité du nettoyage du filtre à graisses. En
tout cas, il est nécessaire de changer le filtre aprés, au maximum, quatre mois
(ou lorsque le système d’indication de saturation des filtres – si prévu sur le
modèle possédé – indique cette nécessité).
IL NE PEUT PAS être nettoyé ou régénéré.
Montage
Accrocher le filtre au charbon actif d’abord à l’arrière de la languette métallique
de la hotte, puis à l’avant avec les deux pommeaux.
Démontage
Enlever le filtre au charbon actif en tournant de 90° les pommeaux qui le fixent à
la hotte.
Remplacement des lampes
La hotte est dotée d’un système d’éclairage basé sur la technologie LED.
Les LEDS garantissent un éclairage optimal, une durée jusqu’à 10 fois
supérieures aux ampoules traditionnelles et permettent une épargne de 90% en
énergie électrique.
Pour le remplacement, s’adresser au service d’assistance technique.

25
FR
ÉLIMINATION
Cet appareil porte le symbole du recyclage conformément à la Directive
Européenne 2002/96/CE concernant les Déchets d’Équipements Électriques et
Électroniques (DEEE ou WEEE).
En procédant correctement à la mise au rebut de cet appareil, vous contribuerez
à empêcher toute conséquence nuisible pour l’environnement et la santé de
l’homme.
Le symbole présent sur l’appareil ou sur la documentation qui
l’accompagne indique que ce produit ne peut en aucun cas être traité comme
déchet ménager. Il doit par conséquent être remis à un centre de collecte des
déchets chargé du recyclage des équipements électriques et électroniques.
Pour la mise au rebut, respectez les normes relatives à l’élimination des déchets
en vigueur dans le pays d’installation.
Pour obtenir de plus amples détails au sujet du traitement, de la récupération et
du recyclage de cet appareil, veuillez vous adresser au bureau compétent de
votre commune, à la société de collecte des déchets ou directement à votre
revendeur.
ANOMALIES DE FONCTIONNEMENT
En cas d'anomalie de fonctionnement, avant de faire appel au service
d'assistance, effectuer les contrôles suivants:
• Si la hotte ne fonctionne pas:
S'assurer:
- de l'absence de coupure de courant.
- qu'une vitesse a été sélectionnée.
• Si la hotte a un faible rendement:
S'assurer:
- que la vitesse du moteur sélectionnée est suffisante pour la quantité de
fumée et de vapeurs libérées.
- que la cuisine est insuffisamment aérée pour assurer une prise d'air.
- que le filtre à charbon n'est pas usé (hotte en version filtrante).
• Si la hotte s'éteint durant son fonctionnement normal:
S'assurer:
- de l'absence de coupure de courant.
- que le dispositif d'interruption omnipolaire ne s'est pas déclenché.
Si la hotte ne fonctionne pas correctement, débranchez la prise pendant environ
5 secondes, puis rebranchez-la. Si le problème persiste, contactez le service de
réparation compétent.
DONNÉES TECHNIQUE
Modèle HKB 9 LS X /HA
Hauteur (Version aspirante) 63-116,5 cm
Hauteur (Version recyclage) 71,7-116,5 cm
Largeur 89,8 cm
Profondeur 47,8 cm
Poids brut: 26,4 Kg
Absorption totale 320 W
Absorption moteur 1x315 W
Absorption ampoule 2x3 W
Ø du tuyau d'évacuation 15 cm
Cette hotte est fabriqué conformément aux exigences des directives
européennes suivantes:
• Directive basse tension: 2006/95/EC (12-12-2006)
• Directive CEM : 2004/108/EC (15-12-2004)
Éléments non fournis avec la hotte

Español
26
ES La campana puede ser diferente con respecto a los dibujos de este
manual, aunque las instrucciones para su uso, la manutención y la
instalación son las mismas.
Aténgase estrictamente a las instrucciones del presente manual. Se declina
cada responsabilidad por eventuales inconvenientes, daños o incendios
provocados al aparato originados por la inobservancia de las instrucciones
colocadas en este manual. La campana ha sido concebida exclusivamente para
un uso doméstico.
! Es importante guardar este manual para poder consultar si fuera
necesario.En el caso de venta,de inutilidad o de mudanza, asegurarse que
quede junto al producto.
! Leer atentamente las instrucciones:contiene importantes informaciones
sobre la instalación,el uso y la seguridad.
! No realizar variaciones electricas o mecanicas en el producto o en el tubo
de escape.
SEGURIDAD GENERAL
La distancia mínima entre la superficie de cocción y la parte más baja de la
campana no debe ser inferior a 50cm en el caso de cocinas electricas y de
65cm en el caso de cocinas a gas o mixtas.
Si las instrucciones para la instalación del dispositivo para cocinar con gas
especifican una distancia mayor, hay que tenerlo en consideración.
La campana está dotada con tacos de fijación adecuados a la mayor parte de
paredes/techos. De cualquier modo, conviene consultar a un técnico calificado
para tener la certeza de que los materiales son adecuados a su parede/techo.
La/El pared/techo debe ser lo suficientemente fuerte para sostener el peso de la
campana.
Atención!No conectar el aparato a la red eléctrica hasta que la instalación fue
completada.
Antes de cualquier operación de limpieza o mantenimento, desenchufar la
campana o el interruptor general de la casa.
Todas las operaciones de instalación y mantenimiento se deben realizar
utilizando guantes de trabajo.
El aparato no está destinado para el uso por parte de los niños o personas con
problemas fisicos o mentales y sin experiencia y conocientos a menos que no
sea bajo la supervisión de profesionales ,o por una persona responsable de su
seguridad.
Los niños deben ser controlados para evitar que jueguen con el aparato.
Nunca utilizar la campana sin la parrilla correctamente montada!
La campana no debe ser nunca utilizada como plano de apoyo solo si es
expresamente indicado.
El ambiente debe poseer suficiente ventilación, cuando la campana de cocina es
utilizada conjuntamente con otros aparatos a gas u otros combustibles.
El aire aspirado no debe ser mezclado en un conducto para descarga de humo
producidos por aparatos a gas u otros combustibles.
Es prohibido cocinar alimentos con llama alta por debajo de la campana.
El uso de las llamas libres puede provocar daños a los filtros y dar lugar a
incendios, por lo tanto evitar en cada caso.
Las frituras deben ser cocinadas bajo control para evitar que el aceite
recalentado prenda fuego.
Las partes accessibles pueden calentarse cuando se usan junto a aparatos para
la cocción.
En cuanto a las medidas técnicas y de seguridad adoptar para la descarga de
humo atenerse estrictamente a las reglas de las autoridades locales.
La campana se debe limpiar siempre internamente y externamente (COMO
MINIMO UNA VEZ AL MES, respetando las reglas indicadas en este manual)
No efectuar los consejos de limpieza de la campana y el cambio de los filtros
puede provocar incendios.
No utilice o deje la campana sin las lámparas correctamente montadas, debido a
riesgos de cortocircuito.
Se declina todo tipo de responsabilidades, daños o incendios provocados por no
leer atentamente las instrucciones indicadas en este manual.
CONEXIÓN ELÉCTRICA
La tensión de red debe corresponder con tensión indicada en la etiqueta
colocada en el interior de la campana.Si es suministrada con un enchufe,
conectar la campana a un enchufe conforme a las normas en vigor y colocarlo
en una zona accesible, aun después de la instalación. Si no es suministrada con
enchufe (conexión directa a la red) o clavija y no es posible situarla en un lugar
accesible, aun después de la instalación, colocar un interruptor bipolar de
acuerdo con las normativas, para asegurarse la desconexión completa a la red
en el caso de la categoria de alta tensión III, conforme con las reglas de
instalación.
Atención! Antes de reconectar el circuito de la campana a la red y de verificar el
correcto funcionamiento, controlar siempre que el cable de red fue montado
correctamente.
Sustitución del cable de alimentación
La campana está provista de un cable de alimentación especial; si el cable se
daña, solicite uno nuevo al Servicio de Asistencia Técnica.
EXTRACCIÓN DE AIRE
(Para las versiones aspirantes)Conectar la campana en los tubos y en los
orificios de escape de pared con diámetro equivalente a la salida del aire (brida
de empalme).
El uso de tubos u orificios de escape de pared con diámetro inferior, determinará
una reducción de los rendimientos de la aspiración y un drástico aumento del
ruido.
Se declina cada responsabilidad.
! Utilice un conducto cuya longitud sea la mínima indispensable.
! Utilice un conducto con el menor número posible de curvas (ángulo máximo
de la curva: 90°).
! Evite los cambios drásticos en la sección del conducto
! Utilice un conducto cuyo interior sea lo más liso posible.
! El material del conducto debe estar aprobado de conformidad con las
normativas.
! La empresa declina cada responsabilidad en caso de que estas normas no
sean respetadas!
¿ FILTRANTE O ASPIRANTE ?
! Su campana extractora está lista para ser usada en versión aspirante.
Para utilizar la campana en versión filtrante se instala el KIT ACCESORIO.
Controle en las primeras paginas de este manual si el KIT ACCESORIO ya
está proveido o si hay que comprarlo.
Nota: Si proveido, en algunos casos, el sistema de filtración añadido a
base de carbones activos podria estar ya instalado en la campana.
Las informaciones para la transformación de la campana en versión
aspirante a versión filtrante ya están presentes en este manual.
Versión aspirante
El vapor viene evacuado hacia el externo a traves de un tubo de escape
introducido en el laro de sujeccion que se encuntra arriba de la campana.
El diametro del tubo de escape debe ser igual al diametro del aro de sujección.
En la parte horizontal, el tubo debe tener una ligera inclinación hacia el alto
Versión filtrante
Se debe utilizar un filtro de carbón activo, disponible del vuestro proveedor.El
aire aspirado viene reciclado antes de expulsarlo en el ambiente a través de la
parrilla superior.

27
ES
MANDOS
Para seleccionar las funciones de la campana basta con rozar los mandos.
T1. ON/OFF Luces
T2. Disminución velocidad
Apretando la tecla "T2" se obtiene la disminución de la velocidad, desde la
velocidad 4 (intensiva) a la velocidad 1.
Apretando la tecla "T2" durante el funcionamiento en velocidad 1, la
campana pasa al estado OFF.
T3. Incremento velocidad
Apretando la tecla T3 la campana pasa del estado OFF a la velocidad 1.
Apretando la tecla (campana en estado ON) viene incrementada la
velocidad del motor desde la velocidad 1 a la velocidad intensiva
(temporizada).
Velocidad 1 led L1
Velocidad 2 led L1+L2
Velocidad 3 led L1+L2+L3
Velocidad intensiva (temporizada) led L1+L2+L3+L4 destellante.
Nota: La Velocidad 4 (intensiva temporizada) permanece en función por 5
minutos, luego la campana programa automáticamente la velocidad 2.
T4. Temporización velocidad/ Control y configuración señal de la
saturación de los filtros.
Temporización velocidad
La temporización de la velocidad se habilita apretando la tecla T4, a
temporización vencida, la campana se apaga.
La temporización viene subdividida así:
Velocidad 1 - 20 minuti (led L1 destellante)
Velocidad 2 - 15 minuti (led L1+L2 destellante)
Velocidad 3 - 10 minuti (led L1+L2+L3 destellante)
Velocidad Intensiva - 5 minuti (led L1+L2+L3+L4 destellante)
Durante el funcionamiento temporizado apretando la tecla T2 la campana
sale de la modalidad temporizada y disminuye la velocidad.
Apretando la tecla T3 la campana sale de la modalidad temporizada y
aumenta la velocidad.
Apretando la tecla T4 la campana sale de la velocidad temporizada,
manteniendo la velocidad programada..
Control y configuración señal de la saturación de los filtros
Señal filtro grasas
Después de 80 horas de funcionamiento el led L1 destella.
Cuando aparece esta señal realizar el mantenimiento del filtro grasas.
Para hacer reset en la señal : a campana encendida tener apretada la
tecla T4 por 5”.
La campana emitirá un "BEEP" para luego apagarse; el led L1 dejará
de destellar.
Señal filtro carbones
Después de 320 horas de funcionamiento el led L2 destella.
Cuando aparece esta señal ejecutar el mantenimento del filtro
carbones
Para hacer reset de la señal: a campana encendida tener apretada la
tecla "T4" por 5”.
La campana emitirá un "BEEP" para luego apagarse; el led L2
dejará de destellar.
En el caso de señal contemporánea de ambos filtros, el led L1 y L2
destellarán.
El reset ocurre efectuando 2 veces el procedimento arriba descripto.
La primera vez, hace reset de la señal del filtro carbones, la segunda hace
reset de la señal del filtro grasas.
Nota: en la modalidad estándard la señal filtro carbones no es activa.
En el caso se emplee la campana en versión filtrante es necesario
habilitar la señal filtro carbones.
Activación señal filtro carbones
Colocar la campana en OFF y tener apretada la tecla “T4” por 5”.
Apenas apretada la tecla se iluminarán los leds relativos a la señal filtros al
momento activos, continuando a apretar, la campana emitirá un "BEEP" y
el led L2 destellará por 2".
Los leds L1 y L2 permanecerán encendidos por alrededor de 2”, antes de
que la campana vuelva al estado OFF.
Desactivación señal filtro carbones:
Colocar la campana en OFF y tener apretada la tecla T4 por 5”.
Apenas apretada la tecla se iluminarán los leds relativos a las señales
filtros al momento activos, continuando a apretar, la campana emitirá un
"BEEP" y el led L2 se apagará.
El led L1 permanecerá encendido por alrededor de 2” antes de que la
campana vuelva al estado OFF.
T5. Tecla de control del Sensor (ON-Modalidad automática/OFF-Modalidad
manual)
Modalidad de funcionamiento automática (COOKING)
El sistema es programado por default en "modalidad di funcionamiento
manual", para activar la "modalidad de funcionamiento automática"
apretar la tecla "T5".
A campana apagada : se encienden los leds L1+L4
A campana encendida: el led de la velocidad seleccionada se enciende
mientras los otros leds inician a destellar.
Durante la cocción el sistema reacciona rápidamente a incrementos de
Vapor/Gas ,enciende la campana a la velocidad más adecuada y
permanece en la misma velocidad por al menos 1 minuto, antes de volver a
la velocidad más baja/apagarse.
Cuando la cocción es terminada y los parámetros ambientales han vuelto a
los niveles anteriores a la cocción, el sistema se apaga.
Nota: Si los parámetros son próximos a la condición de reposo, el
sistema después de 30 minutos apaga forzadamente la campana.
Es posible deshabilitar la modalidad de "modalidad de funcionamiento
automática", en los siguientes modos:
- Apretando la tecla "T5" el motor vuelve en "modalidad de
funcionamiento manual".
Nota: es posible volver a la modalidad de funcionamiento manual
también apretando las teclas "T2", "T3" o "T6", el sistema disminuye
("T2"); incrementa ("T3") la velocidad del motor, o apaga ("T6") la
campana.
T6. ON/OFF Motor de aspiración : A campana encendida, a cualquier
velocidad apretando la tecla "T6" la campana se apaga.
A campana apagada (OFF) apretando la tecla "T6" la campana se
enciende a la velocidad 1.
Selección del plano de cocción
Esta operación es necesaria para optimizar el funcionamiento automático de la
campana, en base al tipo de plano de cocción seleccionado.
Nota: El plano de cocción programado de default es el plano a Gas.
Para la selección de un plano de cocción diferente (o para la verificación del
plan de cocción programado) proceder como sigue:
Programar la campana en OFF
Apretar contemporáneamente las teclas "T2" y "T3" alrededor de 5 segundos
hasta cuando no viene visualizado el plano cocción actualmente en uso ( la
campana emite una señal sonora ( "BEEP").
Plano a Gas: led "L1" encendido
Plano Inducción: led "L2" encendido
Plano Eléctrico: : led "L3" encendido
La selección cíclica del plano ocurre apretando las teclas "T2" o "T3".
Una vez seleccionado el plano, para aceptar la función, esperar 10”
La aceptación del plano seleccionado viene visualizada por la secuencia de 3
destellos del Led relativo al plano seleccionado
Luego de haber ejecutado la selección del plano de cocción es necesario
realizar la "Calibración del sensor".
Calibración del sensor (Automática o Manual)
Para que el sensor responda correctamente a la solicitudes térmicas que llegan
del plano de cocción de abajo, es necesario realizar la calibración del sensor.
Nota: antes de ejecutar la calibración del sensor es necesario realizar la
"Selección del plano de cocción " , ver párrafo anterior .
Nota: efectuar la calibración cuando se instala la campana por primera
vez, luego de un largo período de inutilización o después de un bloqueo.
La calibración debe ser efectuada con el motor apagado.

28
ES Calibración Automática del sensor
Apenas la campana viene alimentada, inicia la calibración automática del sensor
(visible si se aprieta la tecla T5), los leds L1+L4 destellan por un tiempo
variable en base al plano de cocción seleccionado,en todo caso no más de un
cuarto de hora .
Calibración manual del sensor
Nota: Ejecutar la calibración manual luego de un largo período de inutilidad,
despuès de un bloqueo o cuando se verifica, en la cocina, una variación muy
rápida de la temperatura.
La calibración puede ser ejecutada manualmente :
Programar la campana en OFF
Apretando contemporáneamente las teclas "T6" y "T5" por 5" , los leds "L1" y
"L4" inician a destellar por un tiempo variable en base al plano de cocción
seleccionado, en todo caso no más de un cuarto de hora.
Test sensores
Ocurre continuamente durante el funcionamiento automático.
En caso de avería el display visualiza todos los leds destellantes (contactar la
asistencia técnica).
La campana puede en todo caso ser utilizada en modalidad manual.
MANTENIMIENTO
¡Atención! Antes de cualquier operación de limpieza o mantenimiento,
retire la campana de la red eléctrica desconectando el enchufe o
desconectando el interruptor general de la casa.
Limpieza
La campana debe ser limpiada con frecuencia tanto externamente como
internamente (con la misma frecuencia con la que se realiza el mantenimiento
de los filtros de grasa). Para la limpieza, utilice un paño impregnado de
detergente líquido neutro. No utilice productos que contengan abrasivos. ¡NO
UTILICE ALCOHOL!
ATENCION: De no observarse las instrucciones dadas para limpiar el aparato y
sustituir el filtro, puede producirse un incendio. El fabricante recomienda leerlas
y respetarlas atentamente.
El fabricante no se hace responsable por los daños al motor o los incendios
provocados en el aparato debido a intervenciones de mantenimiento incorrectas
o al incumplimiento de las normas de seguridad proporcionadas.
Panel de aspiración perimetral
Limpiar el panel de aspiración perimetral con la misma frecuencia del filtro
antigrasas. Usar un paño y un detergente líquido no muy concentrado. No utilice
sustancias abrasivas.
Mantenimientos de los filtros antigrasa
Retiene las partículas de grasa producidas cuando se cocina.
Debe limpiarse una vez al mes (o cuando el sistema de indicación de saturación
de los filtros - si está previsto en el modelo que se posee - indica esta
necesidad) con detergentes no agresivos, manualmente o bien en lavavajillas a
bajas temperaturas y con ciclo breve.
Con el lavado en el lavavajilla el filtro antigrasa metálico puede desteñirse pero
sus características de filtrado no cambian absolutamente.
Para desmontar el filtro antigrasa, tirar de la manija de desenganche de muelle.
Mantenimiento del filtro al carbón
Retiene los olores desagradables producidos por el cocinado de
alimentos.
La saturaciòn del carbòn activado ocurre despuès da mas o menos tiempo de
uso prolongado, dependiendo del tipo de cocina y de la regularidad de limpieza
del filtro de grasa. En cualquier caso es necesario sustituir el cartucho al menos
cada 4 meses (o cuando el sistema de indicación de saturación de los filtros - si
está previsto en el modelo que se posee - indica esta necesidad).
NO puede lavarse o reciclarse.
Montaje
Enganchar el filtro de carbón activo primero, posteriormente sobre la pestaña
metálica de la campana, y después en la parte anterior con las dos perillas.
Desmontaje
Quitar el filtro de carbón activo girando 90° grados las perillas que lo fijan a la
campana.
Sustitución de la lámpara
La campana viene provista de un sistema de iluminación basado en la
tecnología LED.
Los LEDS garantizan una óptima iluminación, una duración hasta 10 veces
mayor de las lámparas tradicionales y permiten aborra el 90% de energía
eléctrica. .
Para la sustitución dirigirse al servicio asistencia técnica .

29
ES
ELIMINACIÓN
Este aparato lleva el marcado CE en conformidad con la Directiva 2002/96/EC
del Parlamento Europeo y del Consejo sobre residuos de aparatos eléctricos y
electrónicos (RAEE).
La correcta eliminación de este producto evita consecuencias negativas para el
medioambiente y la salud.
El símbolo en el producto o en los documentos que se incluyen con el
producto, indica que no se puede tratar como residuo doméstico. Es necesario
entregarlo en un punto de recogida para reciclar aparatos eléctricos y
electrónicos.
Deséchelo con arreglo a las normas medioambientales para eliminación de
residuos.
Para obtener información más detallada sobre el tratamiento, recuperación y
reciclaje de este producto, póngase en contacto con el ayuntamiento, con el
servicio de eliminación de residuos urbanos o la tienda donde adquirió el
producto.
ANOMALÍAS DE FUNCIONAMIENTO
Si alguna pieza parece no funcionar, realice los siguientes controles antes de
llamar al Servicio de Asistencia:
• Si la campana no funciona:
Compruebe que:
- no haya interrupciones de corriente.
- se haya seleccionado una velocidad.
• Si la campana presenta un rendimiento escaso:
Compruebe que:
- La velocidad del motor seleccionada es suficiente para la cantidad de
humo y vapores emitida.
- La cocina está suficientemente ventilada para permitir una toma de aire.
- el filtro de carbón no está gastado (campana en versión filtrante).
• Si la campana se ha apagado durante el funcionamiento normal:
Compruebe que:
- no haya interrupciones de corriente.
- el dispositivo de interrupción omnipolar no se ha disparado.
En caso de eventuales anomalías en el funcionamiento, antes de dirigirse al
servicio de asistencia, desconectar el aparato de la alimentación eléctrica,
extrayendo el enchufe al menos durante 5 segundos, y después conectarlo
nuevamente. Si la anomalía de funcionamiento no desaparece, dirigirse al
servicio de asistencia.
DATOS TÉCNICOS
Modelo HKB 9 LS X /HA
Altura (Versión aspirante) 63-116,5 cm
Altura (Versión filtrante) 71,7-116,5 cm
Ancho 89,8 cm
Profundidad 47,8 cm
Peso bruto 26,4 Kg
Absorción total 320 W
Absorción motor 1x315 W
Absorción bombillas 2x3 W
Ø del tubo de extracción 15 cm
La Campana está fabricado en conformidad con las directivas europeas
siguientes :
• Directiva Baja Tensión : 2006/95/EC (12/12/2006)
• Directiva CEM : 2004/108/EC (15/12/2004)
Componentes no suministrados con el producto

Nederlands
30
NL De wasemkap kan er anders uitzien dan aangegeven in de tekeningen uit
dit instructieboekje, echter blijven de gebruiks-, onderhouds- en installatie
aanwijzingen dezelfde.
Zich strikt aan de aanwijzingen uit deze tekst houden. Iedere
aansprakelijkheid voor eventuele schade of brand aan het apparaat veroorzaakt
door het niet in acht nemen van de aanwijzingen in deze handleiding
weergegeven wordt afgewezen. De wasemkap is uitsluitend ontworpen voor
huishoudelijk gebruik.
! Dit boekje moet voor latere raadpleging bewaard worden. In geval van
verkoop, overdracht of verplaatsing het boekje altijd bij het toestel bewaren.
! Lees de werkingsinstructies aandachtig door: er worden belangrijke
aanwijzingen over de installatie, het gebruik en de veiligheid verstrekt.
! Geen elektrische of mechanische aanpassingen op het toestel of op de
afvoerleidingen uitvoeren.
ALGEMENE VEILIGHEID
De minimum afstand tussen het kookvlak van het fornuis en het laagste deel van
de afzuigkap mag niet onder de 50cm liggen, in geval van een elektrisch fornuis
en 65cm, in geval van een gas- of gemengd fornuis.
Indien in de installatie-aanwijzing van het gaskooktoestel een grotere afstand
wordt aangegeven moet hiermee rekening worden gehouden.
De wasemkap is voorzien van bevestigingspluggen die geschikt zijn voor de
meeste muurs/plafonds. Er moet echter contact opgenomen worden met een
gekwalificeerd technicus om u ervan te vergewissen dat de materialen geschikt
zijn voor het type muur/plafond. Het muur/plafond moet stevig genoeg zijn om
het gewicht van de kap te houden.
Attentie! Het apparaat niet aan het stroomnet aansluiten voordat de installatie
voltooid is.
Koppel, voor ieder onderhoud, eerst de wasemkap van het elektriciteitsnet af
door de stekker weg te trekken of door de hoofdschakelaar van de woning uit te
schakelen.
Draag bij alle installatie- en onderhoudswerkzaamheden werkhandschoenen.
Dit apparaat mag niet worden gebruikt door kinderen of door personen met
beperkte sensorische of geestelijke capaciteiten of met weinig ervaring en
onvoldoende kennis, tenzij dit niet geschiedt onder het toezicht of volgens de
gebruiksaanwijzingen van een persoon die verantwoordelijk is voor hun
veiligheid.
De kinderen moeten altijd gecontroleerd worden zodat zij niet met het apparaat
spelen.
De wasemkap nooit gebruiken als het rooster niet goed gemonteerd is!
De wasemkap NOOIT als steunvlak gebruiken tenzij dit niet uitdrukkelijk is
aangegeven.
Altijd voor een goede ventilatie van de ruimte zorgen als de wasemkap
tegelijkertijd wordt gebruikt met andere apparaten die gas en andere
brandstoffen toepassen.
De gezogen lucht mag niet afgevoerd worden in een leiding die gebruikt wordt
voor de afvoer van rook van apparaten die gas of andere brandstoffen
toepassen.
Het is streng verboden met open vlammen onder de wasemkap te koken.
Het gebruik van open vlammen is schadelijk voor de filters en kan brand
veroorzaken, daarom moet het absoluut vermeden worden.
Het frituren moet geschieden onder voortdurend toezicht om te voorkomen dat
verhit vet in brand raakt.
De bereikbare onderdelen kunnen bijzonder warm worden als deze tegelijkertijd
met kookapparaten gebruikt worden.
Wat betreft technische- en veiligheidsmaatregelen voor de rookafvoer zich strikt
houden aan de regelingen voorzien door de plaatselijke bevoegde autoriteiten.
De wasemkap moet regelmatig schoongemaakt worden, zowel binnen als buiten
(MINSTENS EENMAAL PER MAAND, neem in ieder geval hetgeen in deze
handleiding is aangegeven in acht).
Het niet in acht nemen van de reinigingsnormen van de wasemkap en van de
vervanging en reiniging van de filters kan brandgevaar veroorzaken.
Zorg altijd dat de lampjes in de kap aanwezig en goed gemonteerd zijn om het
gevaar voor elektrische schokken te voorkomen.
Iedere aansprakelijkheid voor eventuele schade aan het apparaat of brand
veroorzaakt door het niet in acht nemen van de aanwijzingen uit deze
handleiding wordt afgewezen.
ELEKTRISCHE AANSLUITING
De netspanning moet corresponderen met de spanning die vermeld wordt op het
etiket met eigenschappen, aan de binnenkant van de wasemkap. Als de
wasemkap een stekker heeft, moet deze in een stopcontact worden gestoken
dat voldoet aan de geldende voorschriften op een, ook na de installatie, goed
bereikbare plaats. Heeft de kap geen stekker (rechtstreekse verbinding met het
net) of is deze, ook na de installatie, niet goed te bereiken, dan moet er een
tweepolige schakelaar worden geplaatst die de volledige ontkoppeling van het
net garandeert in het geval van een overspanning van klasse III, in
overeenstemming met de installatie normen.
Attentie! Alvorens de wasemkap weer aan het voedingsnet aan te sluiten
controleer of deze goed functioneert, controleer altijd of de voedingskabel goed
gemonteerd is.
Vervanging van de voeding
De afzuigkap is voorzien van een speciale voedingskabel; als de kabel
beschadigd is, vraag de technische dienst voor een nieuwe kabel.
LUCHTAFVOER
(afzuigend apparaat)
Verbind de wasemkap aan wandafvoerpijpen en afvoeropeningen met dezelfde
diameter als de luchtuitgang (verbindingsflens).Het gebruik van
wandafvoerpijpen of afvoeropeningen met een kleinere diameter zal leiden tot
een vermogensverlies en een sterke toename van het bedrijfsgeluid.
Iedere aansprakelijkheid hiervoor wordt afgewezen.
! De lengte van het afvoerkanaal moet zo kort mogelijk zijn.
! Gebruik zo min mogelijk bochten (maximaal toegestane hoek: 90°).
! Vermijd grote verschillen in doorsnede.
! Gebruik een buis met een zo glad mogelijke binnenkant.
! Het gebruikte materiaal moet volgens norm zijn.
! Het bedrijf wijst iedere aansprakelijkheid af indien deze voorschriften niet in
acht worden genomen.
FILTEREND OF AFZUIGEND APPARAAT ?
! Uw afzuigkap is ingesteld om als afzuigend apparaat te worden gebruikt.
Om de kap als filterend apparaat te gebruiken dient de betreffende
TOEBEHOREN SET gemonteerd te worden.
Controleer op de eerste pagina’s van deze handleiding of de
TOEBEHOREN SET wordt meegeleverd of gekocht moet worden.
Opmerking: Indien de set meegeleverd wordt, kan, in enkele gevallen, het
extra actieve koolstoffilter reeds op de kap gemonteerd zijn.
De inlichtingen om de kap van afzuigend apparaat in filterend apparaat om
te zetten zijn in deze handleiding te vinden.
Uitvoering als afzuigend apparaat
De aangezogen rook en damp worden naar buiten geleid via een afvoerpijp die
is aangesloten op de verbindingsring aan de bovenkant van de wasemkap.
Attentie: De afvoerpijp wordt hierbij niet geleverd en moet apart aangekocht
worden.
De middellijn van de afvoerpijp moet even groot zijn als die van de
verbindingsring.
De horizontale stukken van de buis moeten enigszins omhoog hellen (ongeveer
10°) om de lucht gemakkelijk naar buiten te voeren.
Note. Als de wasemkap reeds is voorzien van koolstoffilter dan moet u dit
verwijderen.
Filtrerende versie
Hiervoor is het voldoende een, bij uw leverancier verkrijgbare, koolstoffilter te
gebruiken.
De afgezogen lucht wordt ontvet en gefilterd voordat zij weer teruggeblazen
wordt in het vertrek via het bovenste rooster

31
NL
BEDIENINGSELEMENTEN
Om de functies van de wasemkap te selecteren is het voldoende de bedieningen
aan te raken
T1. Lichten ON/OFF
T2. Snelheidsafname
Door op de toets “T2” te drukken neemt de snelheid af, van snelheid 4
(intensieve zuigkracht) naar snelheid 1.
Door, tijdens de werking in snelheid 1, op de toets “T2” te drukken gaat de
afzuigkap op OFF.
T3. Snelheidstoename
Door op de toets T3 te drukken schakelt de afzuigkap van de OFF stand
over naar snelheid 1.
Door op de toets te drukken (afzuigkap ON) neemt de snelheid van de
motor toe, van snelheid 1 naar de intensieve snelheid (met timer functie).
Snelheid 1 Led lampje L1
Snelheid 2 Led lampjes L1+L2
Snelheid 3 Led lampjes L1+L2+L3
Intensieve snelheid (met timer functie) knipperende Led lampjes
L1+L2+L3+L4
Opmerking: Snelheid 4 (intensieve snelheid met time functie) blijft 5
minuten lang aan, vervolgens gaat de kap automatisch over op snelheid 2
T4. Snelheid Timer Functie / Controle en Configuratie filter verzadiging
signalering
Snelheid Timer functie:
De timer voor de snelheid wordt geactiveerd door op toets T4 te drukken,
na afloop van de ingestelde tijd gaat de afzuigkap uit.
De timer instelling is op de volgende wijze onderverdeeld:
Snelheid 1 - 20 minuten (knipperend Led lampje L1)
Snelheid 2 - 15 minuten (knipperende Led lampjes L1+L2)
Snelheid 3 - 10 minuten (knipperende Led lampjes L1+L2+L3 )
Intensieve snelheid - 5 minuten (knipperende Led lampjes L1+L2+L3+L4)
Tijdens de timer functie, door op de toetst T2 te drukken verlaat de kap de
timer functie en neemt de snelheid af.
Door op de toets T3 te drukken verlaat de kap de timer functie en neemt de
snelheid toe.
Door op de toets T4 te drukken verlaat de kap de timer functie en behoudt
dezelfde snelheid.
Controle en configuratie filter verzadiging signalering
Vetfilter signalering
Na 80 werkuur gaat het Led lampje L1 knipperen.
Als deze signalering verschijnt de onderhoudswerkzaamheden van het
vetfilter uitvoeren.
Om de signalering te resetten: met ingeschakelde kap houd de toets
T4, 5 seconden lang, ingedrukt.
De afzuigkap produceert een “PIEPTOON” en gaat daarna uit; het Led
lampje L1 stopt te knipperen.
Koolstoffilter signalering
Na 320 werkuur gaat het Led lampje L2 knipperen.
Als deze signalering verschijnt de onderhoudswerkzaamheden van het
koolstoffilter uitvoeren.
Om de signalering te resetten: met ingeschakelde kap houd de toets
“T4”, 5 seconden lang, ingedrukt.
De afzuigkap produceert een “PIEPTOON” en gaat daarna uit; het Led
lampje L2 stopt te knipperen.
In het geval van een gelijktijdige signalering van beide filters, knipperen de
Led lampjes L1 en L2.
De reset geschiedt door 2 maal de boven beschreven procedure uit te
voeren.
De eerste keer wordt de signalering van het koolstoffilter gereset, de
tweede keer de signalering van het vetfilter.
Opmerking: In de standaard modus is de koolstoffilter signalering niet
actief.
Indien de afzuigkap als filterende apparaat wordt gebruikt moet de
koolstoffilter signalering geactiveerd worden.
Activering van de koolstoffilter signalering:
Plaats de kap op OFF en houd de toets “T4” 5 seconden lang, ingedrukt.
Zodra de toets wordt ingedrukt gaan de Led lampjes van de op dat ogenblik
actieve signaleringen branden, door te blijven drukken produceert de
afzuigkap een “PIEPTOON” en het Led lampje L2 zal 2 seconden lang
knipperen.
De Led lampjes L1 en L2 blijven ongeveer 2 seconden lang aan voordat de
kap weer terugkeert in de OFF stand.
Uitschakeling van de koolstoffilter signalering:
Plaats de kap op OFF en houd de toets T4 5 seconden lang ingedrukt.
Zodra de toets wordt ingedrukt gaan de Led lampjes van de op dat ogenblik
actieve signaleringen branden, door te blijven drukken produceert de
afzuigkap een “PIEPTOON” en het Led lampje L2 gaat uit.
Het Led lampje L1 blijft ongeveer 2 seconden lang aan voordat de kap weer
terugkeert in de OFF stand.
T5. Sensor controle toets (ON-Automatische modus / OFF-manuele
modus):
Automatische werking (COOKING)
De default instelling van het systeem is de “manuele werking”, om de
“automatische werking” te activeren druk op de toets "T5".
Met uitgeschakelde kap: gaan de Led lampjes L1+L4 branden
Met ingeschakelde kap: het Led lampje van de ingeschakelde zuigkracht
gaat branden terwijl de andere Led lampjes gaan knipperen.
Tijdens de werking reageert het systeem automatisch op de Stoom/Gas
toename: de kap gaat aan op de meest geschikte snelheid en blijft minstens
1 minuut lang aan op die zuigkracht, alvorens weer terug te keren naar de
laagste zuigkracht of alvorens weer uit te gaan.
Na afloop als de omgevingswaardes weer naar de normale waardes zijn
teruggekeerd gaat het systeem uit.
Opmerking: Als de parameters bij de waarden van de ruststand liggen
wordt de kap na 30 minuten door het systeem uitgezet.
De “automatische werking” kan op de volgende wijze uitgeschakeld
worden:
- Door op de toets “T5” te drukken gaat de motor weer terug in de
“manuele werking”.
Opmerking: het is tevens mogelijk terug te keren in de “manuele
stand” met de toetsen “T2”, “T3” of “T6”, met (“T2”) neemt de
motorsnelheid toe, met (“T3”) neemt de motorsnelheid af met (“T6”)
gaat de kap uit.
T6. ON/OFF Zuigmotor: Door op de toets “T6” te drukken, met de kap op een
willekeurige stand, wordt hij uitgeschakeld.
Door op de “T6” toets te drukken, met uitgeschakelde kap (OFF), gaat de
kap aan op Snelheid 1.
Selectie van het kookvlak
Deze handeling is noodzakelijk om de automatische werking van de afzuigkap te
optimaliseren, naargelang het geselecteerde kookvlak.
Opmerking: De default-instelling is Gas kookvlak.
Om een ander kookvlak te selecteren (of om het ingestelde kookvlak te
controleren) op de volgende wijze handelen:
De afzuigkap op OFF instellen
Druk tegelijkertijd ongeveer 5 lang seconden op de toetsen “T2” en “T3” totdat
het in gebruik zijnde kookvlak wordt weergegeven (de afzuigkap produceert een
“PIEPTOON”).
Gas kookvlak: Led lampje "L1" aan
Inductie kookvlak: Led lampje "L2" aan
Elektrisch kookvlak: : Led lampje "L3" aan
De cyclische selectie van het kookvlak geschiedt met de toetsen “T2” of “T3”.
Nadat het kookvlak geselecteerd is wacht 10 seconden lang voor de activering
van de gekozen functie.
De bevestiging van het geselecteerde kookvlak wordt weergegeven door het 3
maal achterelkaar knipperen van het Led lampje van het gekozen kookvlak.
Na de selectie van het kookvlak moet de “Kalibratie van de Sensor” uitgevoerd
worden.
Kalibratie van de Sensor (Automatisch of Manueel)
Opdat de sensor goed reageert op de thermische schommelingen uit het
onderstaande kookvlak, moet de kalibratie van de sensor uitgevoerd worden.

32
NL Opmerking: voordat de kalibratie wordt uitgevoerd moet de “Selectie van
het kookvlak” worden uitgevoerd, zie vorige paragraaf.
Opmerking: Voer de kalibratie uit tijdens de eerste installatie van de kap,
na een lange stilstand periode of na een black-out.
De kalibratie moet met uitgeschakelde motor uitgevoerd worden.
Automatische Kalibratie van de sensor
Zodra de kap gevoed wordt begint de automatische kalibratie van de sensor
(zichtbaar door op de toets T5 te drukken), de Led lampjes L1+L4 knipperen
voor een afwisselende tijd naargelang het geselecteerde kookvlak, in ieder geval
nooit langer dan één kwartier.
Manuele Kalibratie van de sensor
Opmerking: Voer de manuele kalibratie uit na een lange stilstand periode, na
een black-out of indien in de keuken een snelle temperatuurschommeling plaats
heeft.
De kalibratie kan manueel uitgevoerd worden:
De afzuigkap op OFF instellen
door tegelijkertijd 5 seconden lang op de toetsen “T6” en “T5” te drukken, gaan
de Led lampjes “L1” en “L4” knipperen voor een afwisselende tijd naargelang
het geselecteerde kookvlak, in ieder geval nooit langer dan één kwartier
Sensoren test
Deze heeft voortdurend plaats tijdens de automatische werking.
In het geval van een storing weergeeft de display alle knipperende Led lampjes
(neem contact op met de technische dienst).
De kap kan wel in de manuele stand gebruikt worden.
ONDERHOUD
Attentie! Koppel, voor ieder onderhoud, eerst de wasemkap van het
elektriciteitsnet af door de stekker weg te trekken of door de
hoofdschakelaar van de woning uit te schakelen.
Schoonmaak
De kap moet regelmatig schoon gemaakt worden, zowel binnen als buiten
(tenminste met dezelfde regelmaat waarmee de vetfilters gereinigd worden).
Gebruik voor het reinigen een doek die u vochtig maakt met een beetje neutraal
vloeibaar reinigingsmiddel. Gebruik geen producten die schuurmiddelen
bevatten.
GEEN ALCOHOL GEBRUIKEN!
Attentie: Als u deze aanwijzingen m.b.t. reiniging van het apparaat en
vervanging resp. reiniging van de filters niet opvolgt, kan dat tot brand leiden.
Deze aanwijzingen beslist opvolgen!
De fabrikant is niet aansprakelijk voor schade aan de motor of schade t.g.v.
brand die het gevolg zijn van ondeskundig onderhoud of niet opvolgen van de
bovengenoemde veiligheidsvoorschriften.
Paneel voor de omtrek zuiging
Reinig het paneel voor de omtrek zuiging even vaak als het vetfilter, gebruik een
doek en een niet te geconcentreerd vloeibaar reinigingsmiddel. Gebruik geen
producten die schuurmiddelen bevatten.
Onderhoud van de vetfilters
Houdt de vetdeeltjes vast.
Moet eenmaal per maand worden gereinigd (of als de aanwijzer verzadigde
filters – indien aanwezig op het model in Uw bezit – deze noodzaak aangeeft)
met neutrale reinigingsmiddelen, met de hand of in de vaatwasmachine op lage
temperaturen en met een kort programma. Door hem in de vaatwasmachine te
wassen kan het metalen vetfilter ontkleuren, maar dit is niet van invloed op de
eigenschappen, die beslist niet veranderen.
Om het vetfilter te demonteren trekt u aan de veerbelaste
ontgrendelingshandgreep.
Onderhoud van het koolstoffilter
Houdt de lastige kookgeuren vast.
De verzadiging van de koolstoffilter vindt plaats na een min of meer
geprolongeerd gebruik en hangt af van het soort koken en de regelmaat
waarmee de vetfilter wordt gewassen. In ieder geval moet de filter minstens om
de 4 maanden (of als de aanwijzer verzadigde filters – indien aanwezig op het
model in Uw bezit – deze noodzaak aangeeft) vervangen worden. Het kan NIET
gewassen of opnieuw gebruikt worden
Montage Maak het koolstoffilter eerst aan de achterzijde op het metalen lipje
van de kap vast en vervolgens aan de voorzijde, met de twee knoppen.
Demontage Verwijder het koolstoffilter door de knoppen die hem aan de kap
bevestigen met 90° te draaien.
Vervanging lampjes
De kap is voorzien van een verlichtingssysteem gebaseerd op de LEDDEN
technologie. De Ledden zorgen voor een optimale verlichting, voor een 10 maal
langere tijdsduur ten opzichte van de traditionele lampjes en een
elektriciteitsbesparing van wel 90%.
Voor de vervanging neem contact op met de technische assistentie.

33
NL
VERWIJDERING
Dit apparaat is voorzien van het merkteken volgens de Europese richtlijn
2002/96/EG inzake Afgedankte elektrische en elektronische apparaten (AEEA).
Door ervoor te zorgen dat dit product op de juiste manier als afval wordt
verwerkt, helpt u mogelijk negatieve consequenties voor het milieu en de
menselijke gezondheid te voorkomen die anders zouden kunnen worden
veroorzaakt door onjuiste verwerking van dit product als afval.
Het symbool op het product of op de bijbehorende documentatie geeft
aan dat dit product niet als huishoudelijk afval mag worden behandeld. In plaats
daarvan moet het worden afgegeven bij een verzamelpunt voor recycling van
elektrische en elektronische apparaten. Afdanking moet worden uitgevoerd in
overeenstemming met de plaatselijke milieuvoorschriften voor afvalverwerking.
Voor nadere informatie over de behandeling, terugwinning en recycling van dit
product wordt u verzocht contact op te nemen met het stadskantoor in uw
woonplaats, uw afvalophaaldienst of de winkel waar u het product heeft
aangeschaft.
STORINGEN
Bij een storing van de afzuigkap, voer de volgende controles uit alvorens de
Technische Dienst te raadplegen:
• Als de afzuigkap niet functioneert:
Controleer of: Controleer dat:
- er geen stroomonderbreking is.
- er een snelheid is geselecteerd.
• Bij een laag rendement van de afzuigkap:
Controleer of: Controleer dat:
- de ingestelde snelheid volstaat voor de afgegeven hoeveelheid rook en
dampen.
- de keuken is voldoende geventileerd voor een correcte luchttoevoer.
- de koolstoffilter niet is verzadigd (i.g.v. recirculatie).
• het uitvallen van de afzuigkap tijdens de normale werking heeft
plaatsgevonden.
Controleer of: Controleer dat:
- er geen stroomonderbreking is.
- de omnipolaire schakelaar niet is opgetreden.
In geval van storingen, voordat U zich tot de assistentie service wendt, minstens
5 seconden het apparaat van de elektrische voeding doen, door de stekker uit te
trekken, en daarna weer invoeren. In het geval dat de storing blijft voortbestaan,
wendt U zich tot de assistentie service.
TECHNISCHE GEGEVENS
Model HKB 9 LS X /HA
Hoogte (Uitvoering als afzuigend apparaat ) 63-116,5 cm
Hoogte (Filtrerende versie) 71,7-116,5 cm
Breedte 89,8 cm
Diepte 47,8 cm
Bruto gewicht: 26,4 Kg
Totale vermogen 320 W
Motorvermogen 1x315 W
Verlichtingsvermogen 2x3 W
Ø van de afvoerbuis 15 cm
Dit product is ontworpen in overeenstemming met:
• Laagspanningsrichtlijn 2006/95/EC (12-12-2006)
• "EMC"-richtlijn 2004/108/EC (15-12-2004)
Niet meegeleverde onderdelen

Português
34
PT A coifa pode ter estéticas diferentes a quanto ilustrado neste livrete,
todavia as instruções de uso, manutenção e instalação permanecem as
mesmas.
Ater-se especificamente às instruções indicadas neste manual. Declina-se
qualquer responsabilidade por eventuais inconvenientes, danos ou incêndios
provocados ao aparelho, derivantes da inobservância das instruções indicadas
neste manual. O exaustor foi projectado para ser utilizado exclusivamente em
ambientes domésticos.
! É importante conservar este livrete para podê-lo consultar a qualquer
momento. Em caso de venda, cessão ou mudança, certificar-se que o
mesmo fique junto com o produto.
! Ler cuidadosamente as instruções: as mesmas apresentam importantes
informações sobre a instalação, uso e segurança.
! Não efectuar variações eléctricas ou mecânicas no produto ou nos tubos de
fuga.
SEGURANÇA GERAL
A distância mínima entre a superfície de suporte dos recipientes no dispositivo
de cozimento e a parte mais baixa da coifa não deve ser inferior a 50cm no caso
de fogões eléctricos e 65cm no caso de fogões a gás ou mistos.
Se as instruções de instalação do dispositivo de cozimento a gás especificarem
uma distância maior, deve-se levar em conta esta indicação.
A coifa é dotada de buchas de fixação adequadas à maior parte das
paredes/tectos. Todavia, é necessário interpelar um técnico qualificado para se
certificar quanto à idoneidade dos materiais em função do tipo de parede/tecto.
A parede/tecto deve ser suficientemente robusta para suportar o peso da coifa.
Atenção! Não conectar o aparelho à rede eléctrica enquanto a instalação não
tiver sido totalmente completada.
Antes de qualquer operação de limpeza ou manutenção, desligar a coifa da rede
eléctrica tirando a ficha ou desligando o interruptor geral da habitação.
Para todas as operações de instalação e manutenção, utilize luvas de trabalho.
O aparelho não se destina ao uso por parte de crianças ou pessoas com
capacidades físicas, sensoriais ou mentais reduzidas e com falta de experiência
e conhecimento excepto se as mesmas não estiverem sendo supervisionadas
ou instruídas no uso da aparelhagem por parte de uma pessoa responsável pela
segurança das mesmas.
As crianças devem ser controladas de maneira que não brinquem com o
aparelho.
Nunca utilizar a coifa sem a grelha correctamente montada!
A coifa NUNCA deve ser utilizada como plano de apoio excepto se isto não tiver
sido expressamente indicado.
Quando a coifa de cozinha é utilizada contemporaneamente com outros
aparelhos a combustão de gás ou outros combustíveis o local deve dispor de
suficiente ventilação.
O ar aspirado não deve ser transportado por meio de ductos usados para a
descarga dos fumos produzidos por aparelhos a combustão de gás ou de outros
combustíveis.
É severamente proibido cozinhar alimentos directamente na chama sob a coifa.
O emprego de chama livre é danoso para os filtros e pode dar lugar a incêndios,
portanto, deve ser absolutamente evitado.
A fritura deve ser feita sob controlo de modo a evitar que o óleo superaquecido
se incendeie.
As partes accessíveis podem aquecer-se notávelmente quando forem usadas
com os aparelhos para a cozedura.
No que diz respeito às medidas técnicas e de segurança a serem adoptadas
para a descarga dos fumos, ater-se estritamente a quanto previsto pelos
regulamentos das autoridades competentes locais.
A coifa deve ser limpa frequentemente tanto interna quanto externamente
(PELO MENOS UMA VEZ POR MÊS, todavia, respeitar quanto expressamente
indicado nas instruções de manutenção indicadas neste manual).
A inobservância das normas de limpeza da coifa e da substituição e limpeza dos
filtros comporta riscos de incêndio.
Não utilizar ou deixar a coifa sem lâmpadas correctamente montadas devido ao
possível risco de choque eléctrico.
Declina-se qualquer responsabilidade por eventuais inconvenientes, danos ou
incêndios provocados ao aparelho derivantes da inobservância das instruções
indicadas neste manual.
CONEXÃO ELÉTRICA
A tensão de rede deve corresponder à tensão indicada na etiqueta das
características situada no interior da coifa. Se dotada de ficha, conectar a coifa a
uma tomada em conformidade com as normas vigentes posta em zona
acessível,mesmo depois da instalação. Se não dotada de ficha (conexão directa
à rede) ou a tomada não se encontra em zona acessível,mesmo depois da
instalação, aplicar um interruptor bipolar em conformidade com a norma que
assegure a desconexão completa da rede nas condições da categoria de
sobretensão III, conformemente às regras de instalação.
Atenção! Antes de conectar novamente o circuito da coifa com a alimentação
de rede e de verificar seu correcto funcionamento, controlar sempre que o cabo
de rede esteja montado correctamente.
Substituição do cabo de alimentação
O exaustor está equipado com um cabo de alimentação especial; no caso do
cabo ficar danificado, efectuar um pedido ao serviço de assistência técnica.
SAÍDA DO AR
(para as versões apsirantes)
Conectar a coifa a tubos e orifícios de descarga de parede com diâmetro
equivalente à saída de ar (flange de união).
O uso de tubos ou orifícios de descarga de parede com diâmetro inferior
determinará uma diminuição da performance de aspiração e um drástico
aumento do ruído.
Declina-se qualquer responsabilidade a este respeito.
! Utilizar uma conduta com o comprimento mínimo indispensável.
! Utilizar uma conduta com o menor número possível de curvas (ângulo
máximo da curva: 90ºC 90°).
! Evitar alterações drásticas da secção do tubo (diâmetro).
! Usar uma conduta com o interior mais liso possível.
! O material da conduta deve ser aprovado em conformidade com a lei.
! Caso estas normas não sejam respeitadas a empresa declina qualquer
responsabilidade.
FILTRANTE OU ASPIRANTE ?
! O seu exaustor está pronto para ser utilizado na versão aspirante.
Para utilizar o exaustor na versão filtrante deve ser instalado um KIT
ACESSÓRIO apropriado.
Verifique nas primeiras páginas deste manual se o KIT ACESSÓRIO já
vem fornecido ou se deve ser comprado separadamente.
Nota: Se for fornecido com o equipamento, em alguns casos, o sistema de
filtragem adjunta à base de carvão activo pode já estar instalado no
exaustor.
As informações para a transformação do exaustor da versão aspirante à
versão filtrante já estão contidas neste manual.
Versão aspirante
Os vapores são evacuados para o externo por meio de um tubo de descarga
fixado ao flange de conexão que se encontra sobre a coifa.
O diâmetro do tubo de descarga deve ser equivalente ao diâmetro do anel de
conexão.
Na parte horizontal o tubo deve ter uma leve inclinação para cima (cerca de 10°)
de modo a poder transportar o ar para fora mais facilmente.
Se a coifa for dotada de filtros de carvão activado, estes deverão ser tirados.
Versão filtrante
Deve ser utilizado um filtro de carvão activado, disponível junto ao seu
revendedor. O ar aspirado será desengordurado e desodorizado antes de ser
reintroduzido no ambiente através da grelha superior.

35
PT
COMANDOS
Para seleccionar as funções da coifa basta tocar os comandos.
T1. ON/OFF Luzes
T2. Diminuição de velocidade
Pressionando a tecla "T2" obtem-se a diminuição da velocidade, da
velocidade 4 (intensiva) à velocidade 1.
Pressionando a tecla "T2" durante o funcionamento em velocidade 1, a
coifa passa ao estado OFF.
T3. Aumento de velocidade
Pressionando o botão “T3” a coifa passa do estado OFF à velocidade 1.
Pressionando o botão (Coifa em estado ON) vem acrescentada a
velocidade ao motor da velocidade 1 à velocidade intensiva (com timer).
Velocidade 1 led L1
Velocidade 2 led L1+L2
Velocidade 3 led L1+L2+L3
Velocidade intensiva (temporizada) led L1+L2+L3+L4 estarão a piscar.
Nota: A Velocidade 4 (intensiva com tempo) permanece em função por 5
minutos, após disso a coifa estabelece automaticamente a velocidade 2.
T4. Temporização velocidade / Controle e configuração de sinalização da
saturação dos filtros
Temporização velocidade:
A temporização da velocidade vem ativada pressionando a tecla T4,
quando terminada a coifa desliga-se.
A temporização é então dividida em quatro diferentes velocidades:
Velocidade 1 - 20 minutos (led L1 pisca)
Velocidade 2 - 15 minutos (led L1+L2 pisca)
Velocidade 3 - 10 minutos (led L1+L2+L3 pisca)
Velocidade Intensiva - 5 minutos (led L1+L2+L3+L4 pisca )
Durante o funcionamento temporizado pressionando a tecla T2 a coifa sai
da modalidade temporizada e diminui a velocidade.
Pressionando a tecla T3 a coifa sai da modalidade temporizada e aumenta
a velocidade.
Pressionando a tecla T4 a coifa sai da modalidade temporizada mantendo
a velocidade anteriormente imposta.
Controle e configuração de sinalização da saturação dos filtros
Sinalização de filtro de gorduras
Após 80 horas de funcionamento o led L1 irá piscar.
Quando aparece tal sinalização, prosseguir com a manutenção do
filtro de gordura.
Para o reset da sinalização: quando ligada, mantenha pressionada a
tecla T4 por 5”.
Um sinal sonoro “BEEP” será emitido para finalmente, desligar-se; o
led L1 parara de piscar.
Sinalização filtro de carvão
Após 320 horas de funcionamento o led L2 irá piscar.
Quando aparece tal sinalização, prosseguir com a manutenção do
filtro de gordura.
Para realizar o reset da sinalização: quando ligada, mantenha
pressionada a tecla T4 por 5”.
A coifa emitirá um “BEEP” para então, desligar-se; o led L2 para de
piscar.
No caso de sinalização contemporânea de ambos os filtros, os leds L1 e L2
picarão.
O reset vem efetuado 2 vezes como descrito acima.
O primeiro reset será aquela da sinalização do filtro de carvão, o segundo
da sinalização do filtro de gordura.
Nota: Na modalidade standard a sinalização do filtro de carvão ativo não é
ativada.
Em caso de utilização da coifa em versão filtrante é necessário
habilitar a sinalização filtro de carvão.
Ativação sinalização filtro de carvão:
Posicionar a coifa em estado OFF e mantenha pressionado o botão "T4"
por 5”.
Logo após se iluminarão os leds relativos às sinalizações de filtros
ativados, continuando a apertar, a coifa emitirá um “BEEP” e o led L2
começará a piscar durando cerca de 2".
Os leds L1 e L2 ficarão acesos por cerca de 2" antes que a coifa retorne ao
estado OFF.
Desativação sinalização filtro de carvão:
Posicionar a coifa em estado OFF e manter pressionado o botão T4 por 5”.
Logo após se iluminarão os leds relativos às sinalizações de filtros
ativados, continuando a apertar, a coifa emitirá um “BEEP” e o led L2
apaga-se.
O led L1 ficarà ligado por cerca de 2" antes que a coifa retorne ao estado
OFF.
T5. Tecla de controle do Sensor (ON - Modalidade automática / OFF -
Modalidade manual):
Modalidade de funcionamento automática (COOKING)
O sistema é impostado para default em "modalidade de funcionamento
manual", para ativar a "modalidade de funcionamento automático"
pressionar a tecla "T5".
Quando desligada: se acendem os leds L1+L4 da coifa.
Quando ligada: o led da velocidade selecionada se acende enquanto
outros leds iniciam a picar.
Durante o cozimento o sistema reage imediatamente aos incrementos de
Vapores/Gases: ligue a coifa à velocidade mais eficaz e deixe-a na mesma
velocidade ao menos por 1 minuto, antes de voltar à velocidade mais
baixa/desligar-se.
Ao fim do cozimento e os parâmetros ambientais forem aqueles
precedentes ao nível anterior do cozimento o sistema desliga-se.
Nota: Se os parâmetros são próximos a aquele da condição de
repouso o sistema desliga a coifa automaticamente após 30 minutos.
É possível desabilitar a modalidade de "modalidade de funcionamento
automático", em seguintes modos:
- Pressionando a tecla "T5" fazendo com que o motor volte a "modalidade
de funcionamento manual".
Nota: é possível voltar à modalidade de funcionamento manual
pressionando também as teclas "T2", "T3" ou "T6" o sistema diminui
("T2"), aumenta ("T3") a velocidade do motor ou desliga ("T6") a
coifa.
T6. ON/OFF Motor de sucção: Quando a coifa for em funcionamento,
pressionando a tecla "T6" a coifa desliga-se.
Quando desligada (OFF) pressionando a tecla "T6" a coifa liga-se à
velocidade 1.
Selecione do plano de cozimento
Esta operação é necessária para otimizar o funcionamento automático da coifa,
ao tipo de plano de cozimento selecionado.
Nota: o plano de cozimento quando em default é o plano a Gás.
Para a seleção de um plano de cozimento diferente ( ou para a verificação do
plano de cozimento selecionado) prosseguir assim:
Desligue a coifa (OFF).
Pressione contemporaneamente as teclas "T2" e "T3" por cerca de 5 segundos
até que não vem visualizado o plano de cozimento atualmente em uso ( a coifa
emitirá um sinal sonoro “BEEP”)
Plano a Gás: led "L1" aceso
Plano Indução: led "L2" aceso
Plano Elétrico: : led "L3" aceso
A seleção cíclica do plano liga-se pressionando a tecla "T2" ou "T3".
Uma vez selecionado, espere 10” para que a função do plano seja aceita.
A aprovação do plano selecionado vem visualizado na seqüência de 3 piscadas
do Led relativo ao plano selecionado
Após a conclusão da seleção do plano de cozimento é necessário iniciar com a
"Calibração do sensor".
Calibração do sensor (Automática ou Manual)
Até que o sensor responda corretamente às solicitações térmicas que chegam
do plano de cozimento inferior é necessário realizar a calibração do sensor.
Nota: antes de iniciar tal processo é necessário executar a "Seleção do
plano de cozimento" , ver parágrafo precedente.

36
PT Nota: Efetuar a calibração quando se instala a coifa pela primeira vez, após
um longo período de inutilizo ou depois de um blackout..
A calibração deve ser efetuada com o motor desligado.
Calibração Automática do sensor
Apenas a coifa vem alimentada começa a calibração automática do sensor
(visível se pressione a tecla T5), os leds L1+L4 piscarão por um tempo variável,
ou seja, em base ao plano de cozimento selecionado, a operação não leva mais
que 15 minutos.
Calibração manual do sensor
Nota: Fazer a calibração manual após um longo período de utilização, um
blackout ou quando nota-se que ocorre uma variação muito rápida da
temperatura no ambiente.
A calibração pode ser executada manualmente:
Desligar a coifa ( OFF ).
Pressionando contemporaneamente as teclas "T6" e "T5" por 5" , os leds "L1"
e "L4" iniciarão a piscar variavelmente por um curto período de tempo,
dependendo do plano de cozimento selecionado, tempo de espera é não mais
que 15”.
Teste sensores
É realizada continuamente durante o funcionamento do método automático.
Caso aconteça que todos os leds iniciem a piscar no display, contatar a
assistência técnica.
A coifa pode mesmo assim ser utilizado de maneira manual.
MANUTENÇÃO
Atenção! Antes de qualquer operação de limpeza ou manutenção,
desconectar a coifa da rede eléctrica tirando a tomada ou desligando o
interruptor geral da habitação.
Limpeza
A coifa deve ser limpa freqüentemente, interna e externamente (pelo menos
com a mesma frequência com a qual se efectua a manutenção dos filtros
gorduras).
Para a limpeza use um pano humedecido com detergentes líquidos neutros.
Evite o uso de produtos contendo abrasivos.
NÃO UTILIZE ÁLCOOL!
Atenção: O não cumprimento das instruções fornecidas para a limpeza do
aparelho e para a limpeza ou substituição do filtro pode provocar riscos de
incêndio.
O fabricante declina toda e qualquer responsabilidade pelos danos ao motor ou
decorrentes de incêndio, provocados por uma manutenção inadequada ou pelo
não cumprimento das indicações de segurança citadas anteriormente.
Painel perimetral de aspiração
Limpar o painel perimetral de aspiração com a mesma frequência do filtro anti-
gordura, usar um pano e um detergente líquido não muito concentrado. Nunca
utilizar substâncias abrasivas.
Manutenção dos filtros anti-gordura
Capta as partículas de gordura derivantes do cozimento.
Deve ser limpo uma vez por mês (ou quando o sistema de indicação da
saturação dos filtros - se previsto no modelo que se possui – indicar esta
necessidade) com detergentes não agressivos, manualmente ou em máquina de
lavar louça a baixas temperaturas e com ciclo breve.
Apesar do filtro metálico para a gordura poder perder cor com as lavagens na
máquina da loiça, as suas características de filtração não se alteram.
Para desmontar o filtro antigordura puxe o puxador de libertação com mola.
Manutenção do filtro a carvão
Retém os odores desagradáveis produzidos durante a cozedura.
A saturação do filtro de carvão activado se verifica após um uso mais ou menos
prolongado em função do tipo de cozinha e da regularidade da limpeza do filtro
de gorduras. Em todo caso, é necessário substituir o cartucho no máximo cada
4 meses (ou quando o sistema de indicação da saturação dos filtros - se
previsto no modelo que se possui – indicar esta necessidade).
NÃO pode ser lavado ou regenerado.
Montagem:
Aganche o filtro a carvões activos antes da parte de trás da lingueta metálica do
exaustor e depois na parte dianteira com os dois botões.
Desmontagem:
Remova o filtro de carvões activos rodando de 90º os botões que o fixa ao
exaustor.
Substituição das lâmpadas
A coifa è dotada de um sistema de iluminação baseada na tecnologia LED.
Os LED garantem uma iluminação melhor e uma duração de até 10 vezes maior
que as lâmpadas tradicionais e economizam 90% de energia elétrica.
Para a substituição contatar o serviço de assistência técnica.

37
PT
ELIMINAÇÃO
Este aparelho está classificado de acordo com a Directiva Europeia 2002/96/EC
sobre Resíduos de equipamento eléctrico e electrónico (REEE).
Ao garantir a eliminação adequada deste produto, estará a ajudar a evitar
potenciais consequências negativas para o ambiente e para a saúde pública,
que poderiam derivar de um manuseamento de desperdícios inadequado deste
produto.
O símbolo no produto, ou nos documentos que acompanham o produto,
indica que este aparelho não pode receber um tratamento semelhante ao de um
desperdício doméstico.
Pelo contrário, deverá ser depositado no respectivo centro de recolha para a
reciclagem de equipamento eléctrico e electrónico.
A eliminação deverá ser efectuada em conformidade com as normas ambientais
locais para a eliminação de desperdícios.
Para obter informações mais detalhadas sobre o tratamento, a recuperação e a
reciclagem deste produto, contacte o Departamento na sua localidade, o seu
serviço de eliminação de desperdícios domésticos ou a loja onde adquiriu o
produto.
ANOMALIAS DE FUNCIONAMENTO
Se algo parece não funcionar, antes de contactar o Serviço de Assistência
efectuar seguintes controlos simples:
• Se o exaustor não funcionar:
Verificar que:
- não há interrupção de corrente.
- foi seleccionada uma velocidade.
• Se o exaustor tiver uma performance fraca:
Verificar que:
- A velocidade do motor seleccionada é suficiente para a quantidade de
fumo e vapores libertada.
- O fogão é suficientemente arejado para permitir uma tomada de ar.
- O filtro de carvão não está gasto (exaustor em versão filtrante).
• Se o exaustor desligar durante o funcionamento normal:
Verificar que:
- não há interrupção de corrente.
- o dispositivo de corte omnipolar não disparou.
Se o exaustor não funcionar correctamente, retirar a ficha para desligá-lo por um
breve período da rede eléctrica principal (pelo menos 5 seg.). Em seguida
colocar novamente a ficha e experimentar mais uma vez antes de contactar o
Serviço de assistência técnica. Se o problema de funcionamento persistir,
contacte o serviço de assistência.
DADOS TÉCNICOS
Modelo HKB 9 LS X /HA
Altura (Versão aspirante) 63-116,5 cm
Altura (Versão filtrante) 71,7-116,5 cm
Largura 89,8 cm
Profundidade 47,8 cm
Peso bruto 19,3 Kg
Absorção Total 320 W
Absorção motor 1x315 W
Absorção lâmpadas 2x3 W
Ø do tubo de exaustão 15 cm
Este aparelho foi concebido em conformidade com os:
• Directiva “Baixa Tensão” 2006/95/EC (12/12/2006)
• Directiva “EMC” 2004/108/EC (15/12/2004)
Componentes não fornecidas com o produto.

РУССКИЙ
38
RU Вытяжка может иметь дизайн, отличающийся от вытяжки показанной
на рисунках данного руководства, тем не менее, руководство по
эксплуатации, техническое обслуживание и установка остаются те же.
Производитель снимает с себя всякую ответственность за неполадки,
ущерб или пожар, которые возникли при использовании прибора
вследствие несоблюдения инструкций, приведенных в данном руководстве.
Вытяжка предназначена исключительно для домашнего использования.
! Очень важно сохранить эту инструкцию, чтобы можно было обратиться
к ней в любой момент. Если изделие продается, передается или
переносится обеспечить, чтобы инструкция всегда была с ним.
! Внимательно прочитать инструкции: в них находится важная
информация по установке, эксплуатации и безопасности.
! Запрещается выполнять изменения в электрической или механической
части изделия или в трубах рассеивания.
ОБЩИЕ ПРАВИЛА ТЕХНИКИ БЕЗОПАСНОСТИ
Расстояние нижней грани вытяжки над опорной плоскостью под сосуды на
кухонной плите должно быть не менее 50cm – для электрических плит, и не
менее 65cm для газовых или комбинированных плит.
Если в инструкциях по установке газовой плиты оговорено большее
расстояние, то учтите это.
Вытяжка снабжена дюбелями для крепления ее в большинстве
стен/потолков. Однако, необходимо обратиться к квалифицированному
технику и убедиться в том, что материалы пригодны для данного типа
стены/ потолка. Стена/потолок должны обладать достаточной прочностью с
учетом массы прибора.
Внимание! Не подключайте прибор к электрической сети, пока операции по
установке полностью не завершены.
Прежде чем приступить к операциям по очистке или уходе отсоедините
вытяжку от сети, вынув вилку или выключив общий выключатель
электрической сети.
Для выполнения всех операций по установке и уходу используйте рабочие
перчатки.
Дети или взрослые не должны пользоваться вытяжкой, если по своему
физическому или психическому состоянию не в состоянии этого делать, или
если они не обладают знаниями и опытом необходимыми для правильного
и безопасного управления прибором.
Не оставляйте детей без присмотра, чтобы они не играли с прибором.
Не используйте вытяжку, если решетка неправильно установлена!
Категорически запрещается использовать вытяжку в качестве опорной
плоскости, если это специально не оговорено.
Обеспечьте надлежащий воздухообмен помещения, когда Вы используете
вытяжку в кухне одновременно с другими приборами на газу или на другом
горючем.
Вытягиваемый воздух не должен выбрасываться наружу через воздуховод,
используемый для выброса дымов от приборов с газовым сжиганием или с
питанием другими горючими.
Категорически запрещается готовить блюда “под пламенем”, поскольку
свободное пламя может повредить фильтры и стать причиной пожара;
поэтому, воздерживайтесь от этого в любом случае.
Жаренье в большом количестве масла должно производиться под
постоянным контролем, имея в виду, что перегретое масло может
воспламеняться.
При использовании вместе с прочими аппаратами для варки, открытые
части прибора могут сильно нагреваться.
Что касается технических мер и условий по технике безопасности при
отводе дымов, то придерживайтесь строго правил, предусмотренных
регламентом местных компетентных властей.
Производите периодическую очистку вытяжки как внутри, так и снаружи (ПО
КРАЙНЕЙ МЕРЕ, РАЗ В МЕСЯЦ с соблюдением условий, которые
специально предусмотрены в инструкциях по обслуживанию данного
прибора).
Несоблюдение инструкций по чистке вытяжки и по замене и чистке
фильтров может стать причиной пожара.
Не используйте и не оставляйте вытяжку без правильно установленных
лампочек в связи с возможным риском удара электрическим током.
Мы снимаем с себя всякую ответственность за неполадки, ущерб или
сгорание прибора вследствие несоблюдения инструкций, приведенных в
данном руководстве.
ЭЛЕКТРИЧЕСКОЕ СОЕДИНЕНИЕ
Напряжение сети должно соответствовать напряжению, указанному на
табличке технических данных, которая размещена внутри прибора. Если
вытяжка снабжена вилкой, подключите вытяжку к штепсельному разъему,
отвечающему действующим правилам, который должен быть расположен в
легкодоступном месте, что можно сделать и после установки. Если же
вытяжка не снабжена вилкой (прямое подключения к сети), или
штепсельный разъем не расположен в доступном месте, также и после
установки, то используйте надлежащий двухполюсный выключатель,
обеспечивающий полное размыкание сети при возникновении условий
перенапряжения 3-ей категории, в соответствии с инструкциями по
установке.
Внимание! прежде чем подключить к сети питания электрическую систему
вытяжки и проверить исправное функционирование ее убедитесь в том,
что кабель питания правильно смонтирован.
Замена электрокабеля
Вытяжка имеет специальный кабель электропитания; в случае
повреждения кабеля, необходимо заказать его в службе по техническому
обслуживанию.
ВЫБРОС ВОЗДУХА
(для исполнения с отводом воздуха)
Подсоединить вытяжку к выводной трубе с диаметром соответствующим
отверстию выхода воздуха (соединительный фланец).
Установка труб с меньшим диаметром даст уменьшение мощности
всасывания воздуха и резкое увеличение уровня шума.
Производитель снимает с себя всякую ответственность по отношению
выше сказанного.
! Использовать трубу с минимально необходимой длиною.
! Использовать трубу с наименьшим количеством изгибов
(максимальный угол изгиба: 90°).
! Избегать резкого изменения сечения трубы.
! Внутренняя поверхность используемой трубы должна быть как можно
более гладкой.
! Материал трубы, должен быть утвержден, согласно норматив.
! Предприятие снимает с себя какую-либо ответственность если данные
правила не выполняются.
С РЕЦИРКУЛЯЦИЕЙ ИЛИ С ВЫВОДОМ ?
! Ваша вытяжка готова к использованию в режиме отвода.
Для того чтобы использовать вытяжку в режиме рециркуляции
необходимо установить ДОПОЛНИТЕЛЬНЫЙ КОМПЛЕКТ.
Проверьте на первых страницах данного руководства, входит ли
ДОПОЛНИТЕЛЬНЫЙ КОМПЛЕКТ в поставку или его необходимо
приобрести отдельно.
Примечание: Если входит в поставку оборудования, в некоторых
случаях, дополнительный комплект угольных фильтров может уже
быть установлен на вытяжке.
Информация по переводу вытяжки из режима отвода в режим
рециркуляции уже входит в данное руководство.
Исполнение с рециркуляцией
В этом режиме испарения выводятся наружу через гибкий трубопровод,
подсоединенный к соединительному кольцу.
Диаметр выводной трубы должен соответствовать диаметру
соединительного кольца.
Внимание! Выводная труба не входит в комплект и должна быть
приобретена отдельно.
В горизонтальной части труба должна быть немного приподнята к верху (на
около 10°) так, чтобы воздух быстрее мог выходить наружу. Если вытяжка
снабжена угольным фильтром, то уберите его
Исполнение с отводом воздуха
Должен использоваться угольный фильтр, имеющийся в наличии у вашего
дистрибутора. Втягиваемый воздух обезжиривается и дезодируется перед
тем, как вновь возвращается в помещение через верхнюю решетку.

39
RU
КОМАНДЫ
Для выбора функций вытяжки достаточно слегка нажать на командные
кнопки.
T1. ON/OFF Свет
T2. Уменьшение скорости
Нажимая на кнопку “T2” снижаем скорость, переходим со скорости 4
(интенсивная) на скорость 1.
Нажимая на кнопку “T2”во время работы на скорости 1, вытяжка
выключится OFF.
T3. Увеличение скорости
Нажимая на кнопку T3, вытяжка переходит с выключенного состояния
OFF на скорость 1.
Нажимая на кнопку (вытяжка включена ON) увеличиваем скорость
двигателя от скорости 1 до интенсивной скорости
(запрограммированной).
Скорость 1 светодиод L1
Скорость 2 светодиоды L1+L2
Скорость 3 светодиоды L1+L2+L3
Интенсивная скорость (запрограммированная на время) мигающие
светодиоды L1+L2+L3+L4
Примечание: Скорость 4 (интенсивная запрограммированная)
остается включенной на протяжении 5 минут, после чего вытяжка
автоматически устанавливает скорость 2.
T4 Программирование на время скорости / Контроль и конфигурация
сигнализации насыщения фильтров.
Программирование скорости:
Нажимая на кнопку Т4, подключаем таймер скорости. По истечении
запрограммированного времени вытяжка выключится.
Таймер распределен следующим образом:
Скорость 1 -20 минут (мигающий светодиод L1 )
Скорость 2 -15 минут (мигающие светодиоды L1+L2 )
Скорость 3 -10 минут (мигающие светодиоды L1+L2+L3 )
Интенсивная скорость -5 минут (мигающие светодиоды L1+L2+L3+L4 )
Во время работы с таймером, нажимая на кнопку Т2, вытяжка выйдет
из режима работы с таймером и уменьшится скорость.
Нажимая на кнопку Т3, вытяжка выйдет из режима работы с таймером
и увеличится скорость.
Нажимая на кнопку Т4, вытяжка выйдет из режима работы с таймером,
продолжая работать на установленной скорости.
Контроль и конфигурация сигнализации насыщения фильтров.
Сигнализация жирового фильтра
По истечении 80 часов работы начнет мигать светодиод L1.
Когда появляется такая сигнализация, необходимо выполнить
техническое обслуживание жиропоглощающего фильтра.
Что бы сбросить сигнализацию: на включенной вытяжке
необходимо нажимать кнопку T4 на протяжении 5”.
Вытяжка выполнит зуммерный сигнал, и светодиод L1 прекратит
мигать.
Сигнализация угольного фильтра
По истечении 320 часов работы начнет мигать светодиод L2.
Когда появляется такая сигнализация, необходимо выполнить
техническое обслуживание угольного фильтра.
Что бы сбросить сигнализацию: на включенной вытяжке
необходимо нажимать кнопку T4 на протяжении 5”.
Вытяжка выполнит зуммерный сигнал, и светодиод L2 прекратит
мигать.
Если одновременно включается сигнализации обоих фильтров, на
дисплее начнут мигать светодиоды L1 и L2.
Чтобы сбросить сигнализацию, выполните 2 раза вышеописанную
процедуру.
За первый раз сбрасывается сигнализация угольного фильтра, за
второй раз сбрасывается сигнализация жиропоглощающего фильтра.
Примечание: В стандартном режиме сигнализация угольного
фильтра не активирована.
Если используется вытяжка в исполнение с рециркуляцией,
необходимо активировать сигнализацию угольного фильтра.
Подключение сигнализации угольного фильтра:
Выключить вытяжку (OFF) и держать нажатой кнопку Т4 на протяжении
5”.
Как только кнопка нажата, засветятся светодиоды действующих
фильтров, продолжая нажимать, вытяжка произведет зуммерный
сигнал и светодиод L2 начнет мигать на протяжении 2".
Светодиоды L1 и L2 останутся включенными на протяжении около 2"
перед тем как вытяжка выключится OFF.
Отключение сигнализации угольного фильтра:
Выключить вытяжку (OFF) и держать нажатой кнопку Т4 на протяжении
5”.
Как только кнопка нажата, засветятся светодиоды сигнализаций
действующих фильтров, продолжая нажимать, вытяжка произведет
зуммерный сигнал, и светодиод L2 погаснет.
Светодиоды L1 останется включенным на протяжении около 2" перед
тем как вытяжка выключится OFF.
T5. Кнопка управления датчиком (ON-Автоматический режим / OFF-
Ручной режим):
Автоматический режим функционирования (COOKING)
Система настроена по умолчанию в «ручном режиме», для активации
«автоматического режима» нажмите на кнопку «T5».
При выключенной вытяжке: Зажгутся светодиоды L1+L4
При включенной вытяжке: загорится светодиод выбранной скорости,
а все остальные светодиоды начнут мигать.
Во время приготовления пищи система быстро реагирует на
увеличение Испарения/Газа: система включает наиболее подходящую
скорость и вытяжка работает на этой скорости минимум 1 минуту,
перед тем как вернуться на более низкую скорость или выключиться.
Когда приготовление пищи закончено, и параметры окружающей среды
вернулись в предыдущее состояние, система выключится.
Примечание: если параметры близки к условиям ожидания,
система по истечении 30 минут принудительно выключит
вытяжку.
Можно отключить «автоматический режим» следующим образом:
- Нажимая на кнопку «Т5» двигатель вернется в «ручной режим
функционирования».
Примечание: Можно вернуться в автоматический режим
функционирования также с помощью кнопок "T2", "T3" или
"T6". Система уменьшит ("T2"), увеличит (
"T3") скорость
двигателя или выключит ("T6") вытяжку.
T6. Кнопка ON/OFF Вытяжной двигатель: при включенной вытяжки на
любой скорости, нажимая на кнопку «Т6», вытяжка выключится.
При выключенной вытяжки (OFF), нажимая на кнопку Т6, вытяжка
включится на Скорости 1.
Выбор варочной поверхности
Эта операция необходима для оптимизации автоматического режима
работы вытяжки в зависимости от выбранного типа варочной поверхности.
Примечание: плита установленная по умолчанию – Газовая.
Для выбора другого типа варочной поверхности (или для того, чтобы
проверить какой тип варочной поверхности установлен) выполнить
следующие операции:
Установить вытяжку на OFF
Одновременно нажимать на кнопки "T2" и "T3" на протяжении 5 секунд
пока не будет визуально отображена варочная поверхность, находящаяся в
использовании на данный момент (вытяжка издаст звуковой сигнал).
Газовая варочная поверхность: Светодиод “L1” горит:
Индукционная варочная поверхность: Светодиод “L2” горит:
Электрическая варочная поверхность: Светодиод “L3” горит:
Последовательный выбор варочной поверхности выполняется, нажимая на
кнопки "T2" или "T3".
После выбора варочной поверхности для принятия функции, подождать
10”.
Принятие выбранной варочной поверхности визуализируется

40
RU последовательными 3 миганиями светодиода, соответствующего
выбранной плите.
После того как выбрана варочная поверхность необходимо снова
выполнить «Калибровку датчика».
Калибровка датчика (Автоматическая или ручная)
Для того чтобы датчик корректно считывал тепловые нагрузки с варочной
поверхности, необходимо выполнить калибровку датчика.
Примечание: Перед выполнением калибровки датчика необходимо
выполнить "Выбор варочной поверхности", смотри предыдущий
пункт.
Примечание: Калибровка датчика выполняется первый раз после
установки вытяжки, после длительного простоя или после
отключения электроэнергии.
Калибровка выполняется с выключенным двигателем.
Автоматическая калибровка датчика
После включения вытяжки начинается автоматическая калибровка датчика
(отображается при нажатии кнопки T5), светодиоды L1+L4 мигают на
протяжении разного времени в зависимости от выбранной варочной
поверхности, но не больше пятнадцати минут.
Ручная калибровка датчика
Примечание: Выполнить ручную калибровку после длительного простоя,
отключения электроэнергии или когда на кухне случается резкий
перепад температур.
Калибровка может выполняться вручную:
Установить вытяжку на OFF
Одновременно нажимать на кнопки "T6" и "T5" на протяжении 5",
светодиоды "L1" и "L4" начнут мигать на протяжении разного времени
согласно выбранной варочной поверхности, но не больше пятнадцати
минут.
Проверка датчиков
Производится постоянно во время работы в автоматическом режиме.
В случае аварии дисплей визуально отображает все мигающие светодиоды
(обратиться в службу технического обслуживания)
Вытяжку, в любом случае, можно использовать в ручном режиме.
ТЕХНИЧЕСКОЕ ОБСЛУЖИВАНИЕ
Внимание! Прежде чем выполнить любую операцию по чистке или
техническому обслуживанию, отсоедините вытяжку от электросети,
отсоединяя вилку или главный выключатель помещения.
Очистка
Вытяжка должна подвергаться частой очистке как внутри, так и снаружи (по
крайней мере с той же периодичностью, что и уход за фильтрами для
задержки жира). Для чистки используйте специальную тряпку, смоченную
нейтральным жидким моющим средством. Не применяйте средства,
содержащие абразивные материалы.
НЕ ПРИМЕНЯЙТЕ СПИРТ!
Внимание: Не соблюдение правил чистки прибора и замены фильтров
может привести к риску возникновения пожара. Поэтому рекомендуем
соблюдать приведенные инструкции.
Снимается любая ответственность в связи с возможными повреждениями
двигателя и с пожарами, возникшими вследствие неправильного ремонта
или несоблюдения вышеописанных предупреждений.
Панель периметрального всасывания
Чистить всасывающую, наружную панель с той же частотой что и жировой
фильтр, используя салфетку с не сильно концентрированным моющим
средством. Ни когда не использовать абразивные вещества.
Обслуживание жировых фильтров
Удерживает частицы жира, исходящие от плиты.
Фильтр следует зачищать ежемесячно (или когда система индикации
насыщения фильтров, если она имеется в Вашей модели, указывает на
данную необходимость ) неагрессивными моющими средствами, вручную
или в посудомоечной машине при низкой температуре и экономичном цикле
мытья.
При мытье в посудомоечной машине может иметь место некоторое
обесцвечивание фильтра задержки жира, но его фильтрующая
характеристика остается абсолютно неизменной.
Для снятия фильтра задержки жира потяните к себе подпружиненную ручку
отцепления фильтра.
Обслуживание угольного фильтра
Удаляет неприятные запахи кухни.
Насыщение угольного фильтра происходит по истечении более или менее
длительного периода эксплуатации, предопределяемого типом хукни и
периодичностью зачистки фидьтров задержки жира. В любом случае,
заменяйте патрон по крайней мере через каждые 4 месяца (или когда
система индикации насыщения фильтров, если она имеется в Вашей
модели, указывает на данную необходимость).
Угольный фильтр НЕ подлежит мойке или регенерации.
Установка
Навесить угольный фильтр сначала задней стороной на металлический
язычок вытяжки, потом переднюю часть закрепить двумя рукоятками.
Демонтаж
Снять угольный фильтр, поворачивая на 90° рукоятки, которые фиксируют
его с вытяжкой.
Замена ламп
Вытяжка оборудована освещением на светодиодах LED.
Светодиоды обеспечивают оптимальное освещение, их срок службы в 10
раз превышает срок работы традиционных лампочек, и позволяют
экономить 90% электроэнергии.
Для замены светодиодов обращаться в службу технического обслуживания.

41
RU
УТИЛИЗАЦИЯ
Данное изделие промаркировано в соответствии с Европейской директивой
2002/96/EC по утилизации электрического и электронного оборудования
(WEEE).
Обеспечив правильную утилизацию данного изделия, Вы поможете
предотвратить потенциальные негативные последствия для окружающей
среды и здоровья человека, которые могли бы иметь место в противном
случае.
Символ на самом изделии или сопроводительной документации
указывает, что при утилизации данного изделия с ним нельзя обращаться
как с обычными бытовыми отходами. Вместо этого, его следует сдавать в
соответствующий пункт приемки электрического и электронного
оборудования для последующей утилизации.
Сдача на слом должна производиться в соответствии с местными
правилами по утилизации отходов.
За более подробной информацией о правилах обращения с такими
изделиями, их утилизации и переработки обращайтесь в местные органы
власти, в службу по утилизации отходов или в магазин, в котором Вы
приобрели данное изделие.
АНОМАЛИИ В РАБОТЕ
Если что-то не работает должным образом, перед тем как обратиться в
Службу по техническому обслуживанию, выполните следующие простые
проверки:
• Если вытяжка не работает:
Проверить:
- что бы не была прервана подача тока.
- что бы была выбрана скорость.
• Если вытяжка плохо работает:
Проверить:
- что выбранная скорость двигателя достаточна для выработанного
количества дыма и пара.
- что кухня достаточно проветрена для того, чтобы вытяжка могла
выполнить забор воздуха.
- что угольный фильтр не отработан (вытяжка в режиме с
рециркуляцией воздуха).
• Если вытяжка выключилась в ходе нормальной работы:
Проверить:
- что не прервана подача тока.
- что не сработал однополюсный выключающий аппарат.
В случае возможных аномалий в работе, перед тем как обратиться в
службу технического обслуживания отключить от электропитания аппарат
минимум на 5 секунд, вынимая вилку и потом подсоединить его снова. Если
аномалия в работе продолжает существовать обратиться в службу
техобслуживания.
ТЕХНИЧЕСКИЕ ДАННЫЕ
Модель HKB 9 LS X /HA
Высота (Исполнение с рециркуляцией) 63-116,5 cm
Высота (Исполнение с отводом воздуха) 71,7-116,5 cm
Ширина 89,8 cm
Глубина 47,8 cm
Вес брутто 26,4 Kg
Потребляемая мощность 320 W
Двигатель 1x315 W
Освещение 2x3 W
Диаметр воздухоотвода 15 cm
Изделия соответствует с нормами:
• "Низкое напряжение 2006/95/EC (12-12-2006)
• "Электромагнитной совместимости" 2004/108/EC (15-12-2004)
Комплектующие, не входящие в комплект
деталей к изделию


-
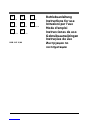 1
1
-
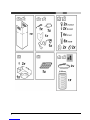 2
2
-
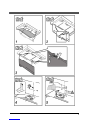 3
3
-
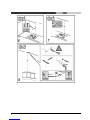 4
4
-
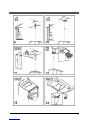 5
5
-
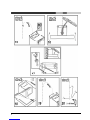 6
6
-
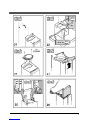 7
7
-
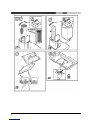 8
8
-
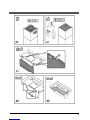 9
9
-
 10
10
-
 11
11
-
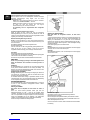 12
12
-
 13
13
-
 14
14
-
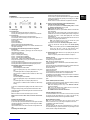 15
15
-
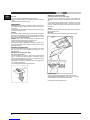 16
16
-
 17
17
-
 18
18
-
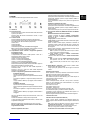 19
19
-
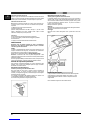 20
20
-
 21
21
-
 22
22
-
 23
23
-
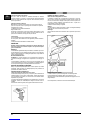 24
24
-
 25
25
-
 26
26
-
 27
27
-
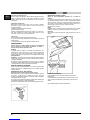 28
28
-
 29
29
-
 30
30
-
 31
31
-
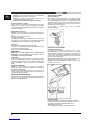 32
32
-
 33
33
-
 34
34
-
 35
35
-
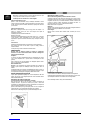 36
36
-
 37
37
-
 38
38
-
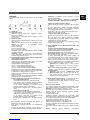 39
39
-
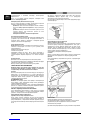 40
40
-
 41
41
-
 42
42
-
 43
43
-
 44
44


Hotpoint Ariston HKB 9 LS X /HA Instructions For Use Manual
- Categorie
- Afzuigkappen
- Type
- Instructions For Use Manual
in andere talen
- English: Hotpoint Ariston HKB 9 LS X /HA
- italiano: Hotpoint Ariston HKB 9 LS X /HA
- français: Hotpoint Ariston HKB 9 LS X /HA
- español: Hotpoint Ariston HKB 9 LS X /HA
- Deutsch: Hotpoint Ariston HKB 9 LS X /HA