
ZH
ES
DE
FR
AR
FL
IT
EN
08
EN 12380
Akatherm BV, Industrieterrein 11, 5981 NK Panningen, The Netherlands
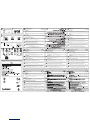
I. Studor Mini-Vent.
II. Adaptador Universal Studor.
La válvula de entrada de aire Studor Mini-Vent es una válvula anti-retorno usada para
ventilación de ramales o aparatos individuales. Protege el cierre unidireccional y no permite la
entrada de gases con malos olores.
Cuando se producen presiones negativas en la tubería de saneamiento, la válvula se abre
permitiendo la entrada de aire (a). Una vez la presión se ha equilibrado, la válvula se cierra
por completo con fuerza suficiente para que el aire viciado no pueda salir (b).
- La Válvula Studor Mini-Vent debe ser instalada en posición vertical y con la parte superior hacia arriba
para que pueda funcionar correctamente (la desviación de verticalidad debe ser menor de 5º).
- Instale la válvula en lugar registrable y que permita la libre circulación de aire.
- Instale la válvula Studor Mini-Vent como máximo a 1000mm por debajo del nivel de agua del
aparato al que esté conectada.
- La válvula debe ser instalada 100mm sobre el nivel del colector evacuación.
- Para instalaciones en cubierta, instale la válvula 150mm por encima del aislamiento.
- Instale la válvula solo después de haber probado el sistema de saneamiento.
- La válvula Studor Mini-Vent trae de serie, el de clic Adaptador Universal Studor (II). Para algunos
mercados, vendrá provista de un adaptador alternativo o no traerá adaptador.
- Preparación del Adaptador Universal Studor para su ajuste en tuberías DN40 (no válido para el
diámetro DN40 de Australia): utilice un cutter para practicar una pequeña incisión en la parte baja
del adaptador (3.a), en la muesca del segundo anillo y retire el material sobrante.
FUNCIONAMIENTO
PAUTAS DE INSTALACIÓN
CONTENIDO DEL PAQUETE
ATENCIÓN
Vea al dorso los detalles de instalación de la válvula Studor Mini-Vent.
Respete las normativas y regulaciones locales.
Para más información visite www.studor.net o contacte con su distribuidor local.
3
2
1
La válvula Studor Mini-Vent ha de ser instalada en un entorno de aire limpio, libre de polvo, grasas o disolventes
El embalaje protector, sólo ha de ser retirado después de haber sido concluidos los trabajos en
obra.
I. Studor Mini-Vent.
II. Studor Adapter.
Das Studor Mini-Vent ist ein Rohrbelüfter zur Belüftung von Abwasserleitungen. Es schützt die
Geruchsverschlüsse vor Entleerung und verhindert somit die Ausbreitung von Kanalgasen im Wohnraum.
Wenn ein Unterdruck im Abwasserrohr entsteht, öffnet sich das Ventil und lässt Luft einströmen (a). Wenn
der Druck wieder ausgeglichen ist, schliesst das Mini-Vent dicht, damit keine schlechten Gerüche austreten
können (b).
- Das Studor Mini-Vent muss senkrecht installiert werden, um die korrekte Funktion zu garantieren (+/- 5°).
- Der Rohrbelüfter sollte zu Wartungs- und Inspektionszwecken zugänglich installiert werden, auf
ausreichende Luftzufuhr ist zu achten.
- Das Studor Mini-Vent sollte nicht mehr als 1000 mm unterhalb der Rückstauhöhe eines
Entwässerungsgegenstandes installiert werden.
- Der Rohrbelüfter sollte mindestens 100 mm über der Anschlußleitung montiert werden.
- Bei Dachbodeninstallationen bitte mindestens 150 mm über der Isolierung montieren.
- Die Installation des Belüftungsventils sollte nach Prüfung der Funktionstüchtigkeit der Abwasserinstallation
- Das Studor Mini-Vent ist serienmässig mit einem Adapter (II) ausgestattet, der zu den gängigsten
Rohrdimensionen paßt. Auf Anfrage kann das Ventil auch mit einer anderen Adaptervariante oder ohne
Adapter angeboten werden.
- Zur Anpassung des Adapters an den Außendurchmesser von Rohren DN 40 (gilt nicht für australische
DN40), ist die innere Dichtlippe entlang der Vertiefung zu entfernen (3.a).
FUNKTION
ANLEITUNG
INHALT
ACHTUNG
Beispiele zur Installation des Studor Mini-Vents sind auf der Rückseite abgebildet.
Bitte beachten Sie die jeweiligen zur Zeit gültigen Bauvorschriften und Normen.
Weitere Informationen erhalten Sievon Ihrem regionalen Händler oder direkt bei www.studor.net
3
2
1
Das Studor Mini-Vent muss in sauberer Umgebung installiert werden, frei von Baustaub, Fett oder Lösungsmitteln.
Die Schutzfolie sollte erst nach Abschluß aller Baumaßnahmen entfernt werden.
erfolgen.
I. Studor Mini-Vent.
II. Adaptateur Universel Studor.
Le clapet Mini-Vent de Studor est une soupape monodirectionnelle pour ventiler une conduite
de raccordement ou un seul appareil sanitaire. Il protège les gardes d’eau des siphons évitant
la diffusion des mauvaises odeurs dans l’habitation.
En cas dedépression dans la tuyauterie d’évacuation, le clapet s’ouvre pour permettre à l’air
de rentrer (a). Dès que la pression est revenue à l’équilibre, le Mini-Vent se referme de façon
hermétique, afin que l’air contaminé ne puisse pas s'échapper (b).
- Le Studor Mini-Vent doit être installé en position droite et verticale pour permettre son bon
fonctionnement (tolérance de 5° en vertical).
- L’emplacement du clapet doit être accessible et permettre une circulation libre de l’air.
- Installer le Mini-Vent à 100 cm maximum en dessous du niveau de débordement de l’appareil
sanitaire auquel il est rattaché.
- Le clapet doit être installé à 100mm au dessus de la conduite horizontale.
- Dans un grenier, placer le clapetà 150mm au dessus de la couche d’isolation.
- Installer le clapper uniquement après avoir effectué les tests du réseau d’évacuation.
- Dans sa configuration standard, le Studor Mini-Vent est pourvu de l'Adaptateur Universel (II). Pour
des marchés spécifiques, il peut être pourvu d’un adaptateur alternatif ou sans adaptateur.
- Préparation de l'Adaptateur Universelpour montage sur une conduite DN40 (exception DN40
Australien) : faire une petite incisionà l’intérieurde l'adaptateur(3.a) avec uncouteau - à
hauteur du deuxième cercle - et retirer l'excédent de matière.
FONCTIONNEMENT
GUIDE DE POSE
CONTENU DE LA BOÎTE
ATTENTION
Exemples d’installations du Studor Mini-Vent : voir au verso de la page.
Suivre législation, normes et règlements en vigueurs.
Pour toutes informations complémentaires, visiter www.studor.net ou contacter votre distributeur local.
3
2
1
Le Studor Mini-Vent doit être installé dans un environnement d’air propre, sans poussière, ni huiles ou solvants.
La protection plastique couvrant le clapet doit être enlevée uniquement après l'achèvement de
toutes les phases de travaux des locaux concernés.
I.
II.
De Studor Mini-Vent / Mini-Knits moet worden geïnstalleerd in een omgeving met zuivere lucht,
vrij van stof, vet en oplosmiddelen.
De plastic beschermfolie mag pas worden verwijderd nadat alle werkzaamheden in de
installatiezone zijn beëindigd.
I. Studor Mini-Vent / Mini-Knits.
II. Aansluitmof.
- De Studor Mini-Vent / Mini-Knits moet verticaal en rechtop worden geïnstalleerd om een correcte
werking te bewerkstelligen (niet meer dan 5° afwijking van verticaal).
- Plaats het ventiel zodanig dat het bereikbaar blijft en op een plaats met voldoende luchtcirculatie.
- Installeer de Studor Mini-Vent / Mini-Knits niet meer dan 1000mm onder het overstromingsniveau
van de (sanitaire) voorziening.
- Het ventiel moet 100mm boven de horizontale afvoerleiding worden geïnstalleerd.
- In een zolder moet het ventiel 150mm boven de isolatielaag worden geïnstalleerd.
- Test eerst het afvoersysteem alvorens het ventiel te installeren.
- De Studor Mini-Vent / Mini-Knits is standaard uitgerust met een flexibele aansluitmof (II), dat op
de meeste gangbare buizen kan worden aangesloten.
- Om de flexibele aansluitmof zo aan te passen dat ze past op een DN40 pijp: maak met een mes
een kleine insnijding aan de binnenkant van de mof (3.a) ter hoogte van de tweede cirkel en trek
er vervolgens het overtollige materiaal af.
WERKING
RICHTLIJNEN VOOR INSTALLATIE
INHOUD
OPGELET
Zie achterzijde voor voorbeeldinstallaties voor de Studor Mini-Vent / Mini-Knits.
Volg de plaatselijke bouwvoorschriften en de EN-12380.
Meer informatie op www.necap.be of www.studor.net of contacteer een verdeler in uw streek.
3
2
1
De Studor Mini-Vent / Mini-Knits is een eenrichtingsklep voor het ventileren van een afvoerbuis of een
individuele (sanitaire) voorziening. Hij beschermt de watersloten en zorgt ervoor dat er geen stank in
de leefruimte kan komen.
Wanneer er in een afvoerbuis een negatieve druk ontstaat, gaat de klep open zodat er lucht kan
binnenstromen (a). Wanneer de druk opnieuw in evenwicht is, gaat de Studor Mini-Vent / Mini-Knits
hermetisch dicht, zodat de stank niet kan ontsnappen (b).
I. Studor Mini-Vent.
II. Adattatore Universale Studor.
La Studor Mini-Vent è una valvola di aerazione monodirezionale per ventilare una diramazione
orizzontale od un singolo apparecchio. Essa protegge il tappo idraulico ed impedisce la
fuoriuscita dei cattivi odori nell’ambiente abitativo.
Quando si crea una depressione nei tubi di scarico, la valvola si apre permettendo all’aria
esterna di entrare (a). Quando la pressione interna è bilanciata la Mini-Vent si chiude
ermeticamente, non permettendo la diffusione di odori fognari (b).
- La Studor Mini-Vent deve essere montata diritta ed in posizione verticale, per permetterne il
corretto funzionamento (entro max. 5° dalla verticale).
- Installare la valvola in una zona accessibile, avente libera circolazione d’aria.
- Installare la Studor Mini-Vent non oltre 1000mm sotto il livello di debordamento dell’apparecchio
sanitario al quale è raccordata.
- La valvola deve essere installata almeno a 100mm sopra il tubo di scarico orizzontale.
- In soffitta, la valvola deve essere installata almeno a 150mm al di sopra del materiale
d’isolamento.
- Installare la valvola solo dopo che il sistema di scarico è stato testato.
- Nella confezione standard, la Studor Mini-Vent è dotata di un Adattatore Universale ad innesto (II).
FUNZIONE
GUIDA AL MONTAGGIO
CONTENUTO
ATTENZIONE
Alcuni esempi di installazione della Studor Mini-Vent sono visibili sul retro del presente foglio illustrativo.
Seguire la normative europea EN12056-2 e le direttive locali vigenti.
Per maggiori informazioni visitare www.studor.net o contattare il vostro distributore locale.
3
2
1
La Studor Mini-Vent deve essere installata in un ambiente pulito, privo di polveri, di grassi o di solventi.
La protezione di plastica che avvolge la valvola deve essere rimossa solo dopo il completamento di
tutti lavori nell’area interessata.
Per alcuni mercati specifici può essere previsto un adattatore alternativo o nessun adattatore.
- Per preparare l’Adattatore Universale all’intallazione della valvola sui tubi DN40 (non valido per il
DN40 Australiano): creare un’incisione con un taglierino presso il secondo cerchio all’interno
dell’adattatore (3.a) e rimuovere il materiale in eccesso.
I. Studor Mini-Vent.
II. Studor Global connector.
The Studor Mini-Vent Air Admittance Valve (AAV) is a one way valve used for branch or single fixture
ventilation. It protects the water trap seals and does not allow sewer gases and smells to leak into the
living space.
When a negative pressure in the drainage pipe occurs, the valve opens to allow the entrance of air (a).
When the pressure is balanced the Mini-Vent closes absolutely tight, so the foul air cannot escape (b).
- The Studor Mini-Vent must be installed vertically and upright to permit its correct operation (within
5° of vertical).
- Place the valve in an accessible location, allowing free air movement.
- Install the Studor Mini-Vent no more than 1000mm below the flood level of the fixture to which it
is connected.
- The valve must be installed 100mm above the horizontal waste.
- In attic installations, place the valve 150mm above the insulation.
- Install the valve after the drainage system has been tested.
- As standard, the Studor Mini-Vent is provided with the push-fit Global Connector (II). For specific
markets it may be provided with an alternative or no connector.
- To prepare the Global Connector to fit to DN40 pipe (not applicable for Australian DN40): on
the underside of the connector (3.a) use a cutter to make a small incision in the indentation of
the second marked ring. Tear off excess material.
OPERATION
INSTALLATION GUIDELINES
CONTENTS OF THE BOX
ATTENTION
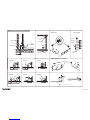
See overleaf for sample installations for the Studor Mini-Vent.
Follow your local building/plumbing regulations.
For more information visit www.studor.net or contact your local distributor.
The Studor Mini-Vent must be installed in a clean air environment, free of dust, grease and solvents.
The protective shrink-wrap covering should only be removed after all building work in the installation
area has been fully completed.
3
2
1
a.b.
-Pa +Pa
I. II.
Studor Mini-Vent
TM
1
max.
1000mm
min.
100mm
min.
100mm
min. 150mm
2
3
(3.a)
DN32 DN40 DN50
Thread
adaptor
DN63
DN40 DN50
DN50
Push-fit
AUSTRALIA
(3.a)
BRITISH
BOARD OF
AGRÉMENT
CERTIFICATE NO. 89/2139
011-7B003
AS/NZS 4936
WM-022085
0100D/01-0008/022018

110 S oil pip e
Pipe sleeve
Fibreglass insulation
110 S oil pip e
Water closet
Mini-Vent
False ceiling
110 Soil pipe
Mini-Vent
GROUP VENT
(In recess box)
P. A . P. A . S Y S T E M
Maxi-Vent
Mini-Vent
P.A .P.A.
BRANCH VENT WITH FLOOR DRAIN
Mini-Vent
WHB
WHB
WC
FD
WC
WHB
FD
Mini-Vent
(In recess box)
Washing machine
Mini-Vent
Min.
100mm
Mini-Vent
(In hidden location)
Mini-Vent
(In hidden location)
Mini-Vent
(In hidden location)
Mini-Vent
(In hidden location)
Kitchen sink
Dishwasher
110 Soil pipe
110 Soil pipe
Bath tub
max. 1500
max. 1500
Mini-Vent should be installed in these areas
Mini-Vent
Studor Mini-Vent Sample Installations
TM
www.studor.net
-
 1
1
-
 2
2


in andere talen
- italiano: Studor Mini-Vent Guida d'installazione
- español: Studor Mini-Vent Guía de instalación
- Deutsch: Studor Mini-Vent Installationsanleitung
