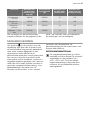
Electrolux EHD60020P Handleiding
- Categorie
- Kookplaten
- Type
- Handleiding

EHD60020P
................................................ .............................................
NL KOOKPLAAT GEBRUIKSAANWIJZING 2
EN HOB USER MANUAL 16

Electrolux. Thinking of you.
Ga voor meer van onze ideeën naar www.electrolux.com
INHOUD
Veiligheidsinformatie 2
Veiligheidsvoorschriften 3
Beschrijving van het product 5
Dagelijks gebruik 7
Nuttige aanwijzingen en tips 9
Onderhoud en reiniging 10
Probleemoplossing 11
Montage 12
Technische informatie 14
Milieubescherming 15
Wijzigingen voorbehouden.
VEILIGHEIDSINFORMATIE
Lees zorgvuldig de meegeleverde instructies voor installatie en
gebruik van het apparaat. De fabrikant is niet verantwoordelijk
voor letsel en schade veroorzaakt door een foutieve installatie.
Bewaar de instructies van het apparaat voor toekomstig ge-
bruik.
VEILIGHEID VAN KINDEREN EN KWETSBARE
MENSEN
Waarschuwing! Gevaar voor verstikking, letsel of
permanente invaliditeit.
• Dit apparaat kan worden gebruikt door kinderen van 8 jaar
en ouder en door mensen met beperkte lichamelijke, zintuig-
lijke of verstandelijke vermogens of een gebrek aan ervaring
en kennis, indien zij onder toezicht staan van een volwasse-
ne of van iemand die verantwoordelijk is voor hun veiligheid.
• Laat kinderen niet met het apparaat spelen.
• Houd alle verpakkingsmaterialen uit de buurt van kinderen.
• Houd kinderen en huisdieren uit de buurt van het apparaat
als het in werking is of afkoelt. Het apparaat is heet.
• Als het apparaat is uitgerust met een kinderbeveiliging, ra-
den wij aan dit te activeren.
• Reiniging en onderhoud mag niet worden uitgevoerd door
kinderen zonder toezicht.
2 electrolux

ALGEMENE VEILIGHEID
• Het apparaat en de toegankelijke onderdelen ervan worden
heet tijdens gebruik. De verwarmingselementen niet aanra-
ken.
• Bedien het apparaat niet met een externe timer of een apart
afstandbedieningssysteem.
• Zonder toezicht koken op een kookplaat met vet of olie kan
gevaarlijk zijn en brandgevaar opleveren.
• Probeer brand nooit met water te blussen, maar schakel in
plaats daarvan het apparaat uit en bedek de vlam, d.w.z.
met een deksel of blusdeken.
• Bewaar geen voorwerpen op de kookplaten.
• Gebruik geen stoomreiniger om het apparaat schoon te ma-
ken.
• Metalen voorwerpen, zoals messen, vorken, lepels en dek-
sels mogen niet op de kookplaat worden geplaatst, aange-
zien ze heet kunnen worden.
• Als de glaskeramische oppervlakte gebarsten is, schakel het
apparaat dan uit om het risico op elektrische schokken te
voorkomen.
• Schakel het kookplaatelement uit na elk gebruik met de be-
dieningstoetsen. Vertrouw niet op de pandetector.
VEILIGHEIDSVOORSCHRIFTEN
MONTAGE
Waarschuwing! Alleen een erkende
installatietechnicus mag het apparaat
installeren.
• Verwijder alle verpakkingsmaterialen.
• Installeer en gebruik geen beschadigd
apparaat.
• Volg de installatie-instructies op die zijn
meegeleverd met het apparaat.
• Houd de minimumafstand naar andere
apparaten en units in acht.
• Wees voorzichtig met het verplaatsen van
het apparaat, het is zwaar. Draag altijd
veiligheidshandschoenen.
• Dicht de oppervlakken af met kit om te
voorkomen dat ze gaan opzetten door
vocht.
• Bescherm de bodem van het apparaat
tegen stoom en vocht.
• Installeer het apparaat niet naast een
deur of onder een raam. Dit voorkomt dat
hete pannen van het apparaat vallen als
de deur of het raam wordt geopend.
• Als het apparaat geïnstalleerd is boven
lades zorg er dan voor dat de ruimte tus-
sen de onderkant van het apparaat en de
bovenste lade voldoende is voor luchtcir-
culatie.
• Zorg ervoor dat er een ventilatieruimte
van 2 mm vrij is tussen het werkblad en
de voorkant van de onderste unit. De ga-
electrolux 3

rantie dekt geen schade veroorzaakt
door het gebrek aan een adequate venti-
latieruimte.
• De onderkant van het apparaat kan heet
worden. Wij raden aan om een onbrand-
baar scheidingspaneel te plaatsen onder
het apparaat om te voorkomen dat de
onderkant kan worden aangeraakt.
Aansluiting aan het elektriciteitsnet
Waarschuwing! Gevaar voor brand en
elektrische schokken.
• Alle elektrische aansluitingen moeten
door een gediplomeerd elektromonteur
worden gemaakt.
• Dit apparaat moet worden aangesloten
op een geaard stopcontact.
• Verzeker u ervan dat de stekker uit het
stopcontact is getrokken, voordat u wel-
ke werkzaamheden dan ook uitvoert.
• Gebruik de juiste stroomkabel.
• Voorkom dat de stroomkabels verstrikt
raken.
• Zorg ervoor dat de stroomkabel of stek-
ker (indien van toepassing) het hete ap-
paraat of heet kookgerei niet aanraakt als
u het apparaat op de nabijgelegen con-
tactdozen aansluit
• Zorg ervoor dat het apparaat correct is
geïnstalleerd. Losse en onjuiste stroom-
kabels of stekkers (indien van toepassing)
kunnen ervoor zorgen dat de contact-
klem te heet wordt.
• Zorg ervoor dat er een schokbescher-
ming wordt geïnstalleerd.
• Zorg ervoor dat het snoer niet wordt be-
last door trekken.
• Zorg dat u de hoofdstekker (indien van
toepassing) of kabel niet beschadigt.
Neem contact op met de service-afdeling
of een elektromonteur om een bescha-
digde hoofdkabel te vervangen.
• De elektrische installatie moet een isola-
tieapparaat bevatten waardoor het appa-
raat volledig van het lichtnet afgesloten
kan worden. Het isolatieapparaat moet
een contactopening hebben met een mi-
nimale breedte van 3 mm.
• Gebruik alleen de juiste isolatie-appara-
ten: stroomonderbrekers, zekeringen
(schroefzekeringen moeten uit de houder
worden verwijderd), aardlekschakelaars
en contactgevers.
GEBRUIK
Waarschuwing! Gevaar op letsel,
brandwonden of elektrische schokken
• Gebruik dit apparaat in een huishoudelij-
ke omgeving.
• De specificatie van het apparaat mag niet
worden veranderd.
• Bedien het apparaat niet met een externe
timer of een apart afstandbedieningssys-
teem.
• Laat het apparaat tijdens het gebruik niet
onbeheerd achter.
• Bedien het apparaat niet met natte han-
den of als het contact maakt met water.
• Leg geen bestek of deksels van steelpan-
nen op de kookzones. Deze kunnen heet
worden.
• Zet de kookzone op "uit" na elk gebruik.
Vertrouw niet alleen op de pandetector.
• Het apparaat mag niet worden gebruikt
als werkblad of aanrecht.
• Sluit het apparaat direct af van de
stroomtoevoer als het oppervlak van het
apparaat gebroken is. Dit om elektrische
schokken te voorkomen.
• Gebruikers met een pacemaker moeten
een afstand van minimaal 30 cm bewa-
ren van de inductiekookzones als het ap-
paraat in werking is.
Waarschuwing! Brand- of
explosiegevaar.
• Verhitte vetten en olie kunnen ontvlamba-
re damp afgeven. Houd vlammen of ver-
warmde voorwerpen uit de buurt van vet
en olie als u er mee kookt.
• De dampen die hete olie afgeeft kunnen
spontane ontbranding veroorzaken.
• Gebruikte olie die voedselresten bevat
kan brand veroorzaken bij een lagere
temperatuur dan olie die voor de eerste
keer wordt gebruikt.
• Plaats geen ontvlambare producten of
items die vochtig zijn door ontvlambare
producten in, bij of op het apparaat.
• Probeer niet om een brand te blussen
met water. Haal het apparaat uit het
stopcontact en dek de vlammen af met
een deksel of blusdeken.
Waarschuwing! Risico op schade aan
het apparaat.
4 electrolux

• Zet geen hete pannen op het bedienings-
paneel.
• Laat kookgerei niet droogkoken.
• Laat geen voorwerpen of kookgerei op
het apparaat vallen. Het oppervlak kan
beschadigen.
• Activeer de kookzones niet met lege pan-
nen of zonder pannen erop.
• Geen aluminiumfolie op het apparaat leg-
gen.
• Pannen van gietijzer, aluminium of met
beschadigde bodems kunnen krassen
veroorzaken in het glaskeramiek. Til deze
voorwerpen altijd op als u ze moet ver-
plaatsen op het kookoppervlak.
ONDERHOUD EN REINIGING
Waarschuwing! Risico op schade aan
het apparaat.
• Reinig het apparaat regelmatig om te
voorkomen dat het materiaal van het op-
pervlak achteruitgaat.
• Gebruik geen waterstralen of stoom om
het apparaat te reinigen.
• Maak het apparaat schoon met een
vochtige, zachte doek. Gebruik alleen
neutrale schoonmaakmiddelen. Gebruik
geen schuurmiddelen, schuursponsjes,
oplosmiddelen of metalen voorwerpen.
VERWIJDERING
Waarschuwing! Gevaar voor letsel of
verstikking.
• Neem contact met uw plaatselijke over-
heid voor informatie m.b.t. correcte afval-
verwerking van het apparaat.
• Haal de stekker uit het stopcontact.
• Snijd het netsnoer van het apparaat af en
gooi dit weg.
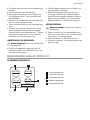
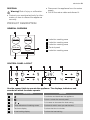
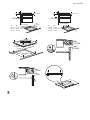
BESCHRIJVING VAN HET PRODUCT
ALGEMEEN OVERZICHT
210 mm
180 mm 180 mm
145 mm
1 2
45
3
1
Inductiekookzone
2
Inductiekookzone
3
Inductiekookzone
4
Bedieningspaneel
5
Inductiekookzone
electrolux 5

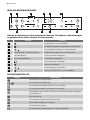
INDELING BEDIENINGSPANEEL
1 2 4 5 3 6
8910 7
Gebruik de tiptoetsen om het apparaat te bedienen. De displays, indicatielampjes
en geluiden tonen welke functies worden gebruikt.
Tiptoets Functie
1
Het apparaat in- en uitschakelen
2
Het bedieningspaneel vergrendelen/ontgrendelen
3
/
Het verhogen of verlagen van de kookstand
4
Timerindicatie voor de kookzones Geeft aan voor welke zone u de tijd instelt
5
Het timerdisplay De tijd in minuten weergeven
6
Een kookstanddisplay De kookstand weergeven
7
De Powerfunctie inschakelen
8
Kookzone selecteren
9
/
De tijd verlengen of verkorten
10
De functie STOP+GO in- en uitschakelen
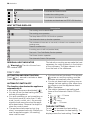
KOOKSTANDDISPLAYS
Display- Beschrijving
De kookzone is uitgeschakeld.
-
De kookzone wordt gebruikt.
De functie Warmhouden/STOP+GO is in werking.
De functie Automatisch opwarmen is in werking.
Het kookgerei is incorrect of te klein, of er bevindt zich geen kookgerei
op de kookzone.
Er is een storing.
Er is nog een kookzone heet (restwarmte).
Slot/kinderbeveiliging is in werking.
De Powerfunctie werkt.
De automatische uitschakeling is in werking getreden.
6 electrolux

RESTWARMTE-INDICATIE
Waarschuwing!
Verbrandingsgevaar door restwarmte!
De inductiekookzones creëren de voor het
koken benodigde warmte direct in de bo-
dem van de pan. Het glaskeramiek wordt
verwarmd door de warmte van de pannen.
DAGELIJKS GEBRUIK
IN- EN UITSCHAKELING
Raak
1 seconde aan om het apparaat
in– of uit te schakelen.
AUTOMATISCHE UITSCHAKELING
De functie schakelt het apparaat
automatisch uit als:
•
Alle kookzones uitgeschakeld zijn (
).
• U de kookstand niet instelt nadat u het
apparaat hebt ingeschakeld.
• U iets hebt gemorst of iets langer dan 10
seconden op het bedieningspaneel hebt
gelegd (een pan, doek, etc.). Er klinkt zes
keer een geluidssignaal en het apparaat
wordt uitgeschakeld. Verwijder het voor-
werp of reinig het bedieningspaneel.
• Het apparaat wordt te heet (b.v. als een
pan droogkookt). De kookzone moet af-
gekoeld zijn voordat u het apparaat weer
kunt gebruiken.
• U ongeschikt kookgerei gebruikt. Het
symbool
gaat branden en na 2 minu-
ten schakelt de kookzone automatisch
uit.
• U een kookzone niet uitschakelt of de
kookstand verandert. Na enige tijd gaat
branden en wordt het apparaat uitge-
schakeld. Zie hieronder.
• De verhouding tussen warmte-instelling
en tijden van de automatische uitschakel-
ingsfunctie:
•
, - — 6 uur
•
- — 5 uur
•
— 4 uur
•
- — 1,5 uur
TEMPERATUURINSTELLING
aanraken om te verhogen. aanraken
om te verlagen. Het display toont de kook-
stand. Raak
en tegelijkertijd aan om
de kookzone uit te schakelen.
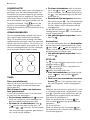
AUTOMATISCH OPWARMEN
U kunt een gewenste kookstand sneller ver-
krijgen als u de functie Automatisch opwar-
men inschakelt. Deze functie schakelt even
de hoogste kookstand in (zie afbeelding) en
verlaagt dan naar de gewenste kookstand.
De functie Automatisch opwarmen starten
voor een kookzone:
1.
Raak
aan. Het symbool ver-
schijnt op de display.
2.
Raak meteen
aan. Het symbool
verschijnt op de display.
3.
Raak meteen
aan tot de benodigde
temperatuurinstelling aan gaat. Na 3
seconden verschijnt
op de display.
Om de functie te stoppen, raakt u
aan.
1
2
3
4
5
6
7
8
9
10
11
0
123456789
POWERFUNCTIE
De Powerfunctie maakt meer vermogen be-
schikbaar voor de inductiekookzones. De
Powerfunctie kan een beperkte tijd worden
ingeschakeld (zie het hoofdstuk Technische
informatie). Daarna wordt de inductiekook-
zone automatisch teruggeschakeld naar de
hoogste kookstand. Raak
aan om de
functie in te schakelen;
gaat branden.
Raak
of aan om de functie uit te
schakelen.
electrolux 7

POWERFUNCTIE
De Powerfunctie maakt meer vermogen be-
schikbaar voor de inductiekookzones. De
Powerfunctie kan een beperkte tijd worden
ingeschakeld (zie het hoofdstuk Technische
informatie). Daarna wordt de inductiekook-
zone automatisch teruggeschakeld naar de
hoogste kookstand. Raak
aan om de
functie in te schakelen;
gaat branden.
Wijzig de kookstand om de kookstand uit te
schakelen.
VERMOGENSBEHEER
Het vermogensbeheer verdeelt het vermo-
gen tussen twee kookzones (zie afbeel-
ding). De powerfunctie verhoogt het laatst
geselecteerde vermogen naar het maximale
niveau voor één kookzone. De kracht in an-
dere kookzones neemt automatisch af. Het
warmte-instellingsdisplay van de verlaagde
zone verandert tussen twee niveaus.
TIMER
Timer met aftelfunctie
Gebruik de timer met aftelfunctie om in te
stellen hoe lang de kookzone deze keer
wordt gebruikt.
Stel de timer in nadat u de kookzone
hebt geselecteerd.
U kunt de kookstand vóór of na het instel-
len van de timer selecteren.
•
De kookzone instellen:raak
herhaal-
delijk aan totdat het controlelampje van
een benodigde kookzone aan gaat.
•
De timer in- of uitschakelen: raak
of van de timer aan om de tijd in te
stellen (
00
-
99
minuten). Als het lampje
van de kookzone langzamer gaat knippe-
ren, wordt de tijd afgeteld.
• De timer uitschakelen: stel de kookzo-
ne in met
en raak aan om de timer
uit te schakelen. De resterende tijd telt af
tot
00
. Het indicatielampje van de kook-
zone gaat uit.
• Resterende tijd weergeven: selecteer
de kookzone met
. Het indicatielampje
van de kookzone gaat sneller knipperen.
Op het display wordt de resterende tijd
weergegeven.
Als de tijd verstreken is, klinkt er een ge-
luidssignaal en knippert
00
. De kookzone
wordt uitgeschakeld.
• Het geluidssignaal stopzetten: Aanra-
ken van
Kookwekker
U kunt de timer gebruiken als kookwekker
als de kookzones uitgeschakeld zijn. Raak
aan. Raak of aan om de tijd in te
stellen. Als de tijd verstreken is, klinkt er een
geluidssignaal en knippert
00
.
• Het geluidssignaal stopzetten: Aanra-
ken van
STOP+GO
De
-functie stelt alle kookzones in op de
laagste instelling (
).
Als
in werking is, kunt u de warmte-in-
stelling niet wijzigen.
stopt de timerfunctie niet.
• Voor het inschakelen van deze functie,
raakt u
aan. Het symbool gaat
branden.
•
Raak voor het uitschakelen van deze
functie
aan. De kookstand die u eer-
der hebt ingesteld, wordt weergegeven.
SLOT
Wanneer de kookzones in gebruik zijn, kunt
u het bedieningspaneel vergrendelen, maar
niet
. Hiermee wordt voorkomen dat de
kookstand per ongeluk wordt veranderd.
Stel eerst de kookstand in.
Raak om deze functie te starten
aan.
Het symbool
verschijnt gedurende vier
seconden.
De timer blijft aan.
Raak om deze functie te stoppen
aan.
De kookstand die u eerder hebt ingesteld,
wordt weergegeven.
8 electrolux

Als u het apparaat stopt, stopt deze functie
ook.
DE KINDERBEVEILIGING
Deze functie voorkomt dat het apparaat on-
bedoeld wordt gebruikt.
De kinderbeveiliging inschakelen
•
Schakel het apparaat in met
. Stel
geen kookstand in.
•
Raak
4 seconden aan. Het symbool
gaat branden.
•
Schakel het apparaat uit met
.
De kinderbeveiliging uitschakelen
•
Schakel het apparaat in met
. Stel
geen kookstand in. Raak
4 secon-
den aan. Het symbool
gaat branden.
•
Schakel het apparaat uit met
.
De kinderbeveiliging gedurende een
kooksessie onderdrukken
•
Schakel het apparaat in met
. Het
symbool
gaat branden.
•
Raak
4 seconden aan. Stel de kook-
stand in binnen 10 seconden. U kunt
het apparaat bedienen.
•
Als u het apparaat uitschakelt met
,
gaat de kinderbeveiliging weer werken.
NUTTIGE AANWIJZINGEN EN TIPS
INDUCTIEKOOKZONES
Bij een inductiekookzone zorgt een sterk
elektro-magnetisch veld ervoor dat de pan
erg snel heet wordt.
KOOKGEREI VOOR
INDUCTIEKOOKZONES
Belangrijk! Gebruik de inductiekookzones
met geschikt kookgerei.
Materiaal van het kookgerei
• correct: gietijzer, staal, geëmailleerd
staal, roestvrij staal, meerlaagse bodem
(aangemerkt als geschikt voor inductie
door de fabrikant).
• niet correct: aluminium, koper, messing,
glas, keramiek, porselein.
Een pan is geschikt voor een
inductiekookplaat als…
• ... een beetje water op de hoogste kook-
stand binnen korte tijd wordt verwarmd.
• ... een magneet vast blijft zitten aan de
bodem van het kookgerei.
De bodem van het kookgerei moet
zo dik en vlak mogelijk zijn.
Afmetingen van de pannen: inductie-
kookzones passen zich tot op zekere hoog-
te automatisch aan de grootte van de bo-
dem van het kookgerei aan.
LAWAAI TIJDENS GEBRUIK
Als u dit hoort:
• krakend geluid: de pan is gemaakt van
verschillende materialen (sandwich-con-
structie).
• fluitend geluid: bij gebruik van één of
meer kookzones met een hoge kook-
stand en als de pan is gemaakt van ver-
schillende materialen (sandwich-con-
structie)
• Zoemen: als u hoge kookstanden ge-
bruikt.
• Klikken: er treedt elektrische schakeling
op.
• Sissen, zoemen: de ventilator werkt.
Deze geluiden zijn normaal en hebben
niets met een defect te maken.
ENERGIE BESPAREN
Energie besparen
• Doe indien mogelijk altijd een deksel op
het kookgerei.
• Zet het kookgerei op de kookzone voor-
dat u deze inschakelt.
• Gebruik de restwarmte om het eten
warm te houden of te smelten.
De efficiëntie van de kookzone
De efficiëntie van de kookzone heeft betrek-
king op de diameter van het kookgerei.
electrolux 9

Kookgerei met een diameter die kleiner is
dan het minimum, ontvangt slechts een
deel van het vermogen dat door de kookzo-
ne wordt gegenereerd. Zie het hoofdstuk
Technische gegevens voor de minimale dia-
meters.
DE VOORBEELDEN VAN
KOOKTOEPASSINGEN
De relatie tussen het stroomverbruik van de
warmte-instelling en de kookzone is niet li-
neair.
Wanneer u de warmte-instelling verhoogt, is
dit niet proportioneel met de toename in
stroomverbruik van de kookzone.
Het betekent dat de kookzone met de me-
dium warmte-instelling minder dan de helft
van het vermogen gebruikt.
De gegevens in de volgende tabel die-
nen slechts als richtlijn.
Ver-
war-
min
gs-
stan
d
Gebruik om: Tijd Tips Nominaal
stroomver-
bruik
1
Het door u gekookte eten
warm te houden
naar behoefte Leg een deksel op de pan. 3 %
1 - 2 Hollandaisesaus, smelten:
boter, chocolade, gelatine
5 - 25 min Meng het geheel van tijd
tot tijd.
3 – 5 %
1 - 2 Stollen: luchtige omeletten,
gebakken eieren
10 - 40 min Met deksel bereiden. 3 – 5 %
2 - 3 Zachtjes aan de kook bren-
gen van rijst en gerechten
op melkbasis, reeds bereide
gerechten opwarmen
25 - 50 min Voeg minstens tweemaal
zoveel vloeistof toe als
rijst, melkgerechten tijdens
het bereiden tussendoor
roeren.
5 – 10 %
3 - 4 Stomen van groenten, vis en
vlees
20 - 45 min Enkele eetlepels vloeistof
toevoegen
10 – 15 %
4 - 5 Aardappelen stomen 20 - 60 min Gebruik max. ¼ l water
voor 750 g aardappelen
15 – 21 %
4 - 5 Bereiden van grotere hoe-
veelheden voedsel, stoof-
schotels en soepen
60 - 150 min Tot 3 l vloeistof plus ingre-
diënten
15 – 21 %
6 - 7 Lichtjes braden: kalfsoester,
cordon bleu van kalfsvlees,
koteletten, rissoles, wors-
tjes, lever, roux, eieren, pan-
nenkoeken, donuts
zoals nodig Halverwege de bereidings-
tijd omdraaien.
31 – 45 %
7 - 8 Door-en-door gebraden,
rösties, lendenbiefstukken,
steaks
5 - 15 min Halverwege de bereidings-
tijd omdraaien.
45 – 64 %
9 Aan de kook brengen van water, pasta koken, aanbraden van vlees (gou-
lash, stoofvlees), frituren van friet
100 %
Aan de kook brengen van grote hoeveelheden water. Het vermogensbe-
heer is ingeschakeld.
ONDERHOUD EN REINIGING
Reinig het apparaat telkens na gebruik Gebruik altijd kookgerei met een schone
bodem.
10 electrolux

Krassen of donkere vlekken in de glas-
keramiek hebben geen invloed op de
werking van het apparaat.
Vuil verwijderen:
1. – Verwijder direct:gesmolten plastic,
gesmolten folie en suikerhoudende
gerechten. Anders kan het vuil het
apparaat beschadigen. Gebruik een
speciale schraper voor de glazen
plaat. Plaats de schraper schuin op
de glazen plaat en verwijder resten
door het blad over het oppervlak te
schuiven.
– Verwijder nadat het apparaat vol-
doende is afgekoeld:kalkvlekken,
waterkringen, vetvlekken, glimmende
metaalachtige verkleuringen. Gebruik
een speciaal schoonmaakmiddel
voor glaskeramiek of roestvrij staal.
2. Reinig het apparaat met een vochtige
doek en een beetje afwasmiddel.
3. Wrijf het apparaat ten slotte droog
met een schone doek.
PROBLEEMOPLOSSING
Probleem Mogelijke oorzaak Oplossing
U kunt het apparaat niet in-
schakelen of bedienen.
Schakel het apparaat opnieuw
in en stel de kookstand binnen
10 seconden in.
U hebt twee of meer tiptoetsen
tegelijk aangeraakt.
Raak slechts één tiptoets tege-
lijk aan.
De STOP+GO-functie is in
werking.
Raadpleeg het hoofdstuk "Da-
gelijks gebruik".
Er bevindt zich water of vet-
spatten op het bedieningspa-
neel.
Reinig het bedieningspaneel.
Er klinkt een geluidssignaal en
het apparaat wordt uitgescha-
keld.
Er weerklinkt een geluidssignaal
als het apparaat uit is.
U hebt een of meer tiptoetsen
afgedekt.
Verwijder het voorwerp van de
tiptoetsen.
Het apparaat wordt uitgescha-
keld.
U hebt iets op de tiptoets
gezet.
Verwijder het voorwerp van de
tiptoets.
De restwarmte-indicatie gaat
niet aan.
De kookzone is niet heet, om-
dat hij slechts kortstondig is
gebruikt.
Als het lang duurt alvorens de
kookzone voldoende heet is,
neem dan contact op met de
klantenservice.
De automatische opwarmfunc-
tie start niet.
Kookzone is heet. Laat de kookzone voldoende af-
koelen.
De hoogste kookstand is inge-
steld.
De hoogste kookstand heeft
hetzelfde vermogen als de auto-
matische opwarmfunctie.
De kookstand schakelt tussen
twee kookstanden.
Het stroombeheer is ingescha-
keld.
Zie “Energiebeheer”.
electrolux 11

Probleem Mogelijke oorzaak Oplossing
De sensorvelden worden warm. Het kookgerei is te groot of
staat te dicht bij het bedie-
ningspaneel.
Plaats groter kookgerei op de
achterste kookzones indien no-
dig.
gaat branden.
De automatische uitschakeling
is in werking getreden.
Schakel het apparaat uit en
weer in.
gaat branden.
De kinderbeveiliging of toets-
blokkering is actief.
Raadpleeg het hoofdstuk "Da-
gelijks gebruik".
gaat branden.
Geen kookgerei op de kook-
zone.
Zet kookgerei op de kookzone.
De pan is niet goed. Gebruik het juiste kookgerei.
De diameter aan de bodem
van het kookgerei is te klein
voor de kookzone.
Zet het kookgerei op een kleine-
re kookzone.
en een getal gaat branden.
Er heeft zich een fout in het
apparaat voorgedaan.
Ontkoppel het apparaat enige
tijd van de stroomtoevoer. Ont-
koppel de zekering uit het elek-
trische systeem van het huis.
Sluit het apparaat opnieuw aan.
Als
weer gaat branden,
neem dan contact op met de
klantenservice.
gaat branden.
Er is een storing opgetreden in
het apparaat, omdat er kook-
gerei is drooggekookt. De
oververhittingsbeveiliging voor
de kookzones en de Automati-
sche uitschakeling zijn actief.
Schakel het apparaat uit. Verwij-
der het hete kookgerei. Schakel
na ongeveer 30 seconden de
kookzone opnieuw in. Als het
kookgerei het probleem was,
dan moet het foutbericht van
het display verdwijnen, maar de
restwarmte-indicatie kan aanblij-
ven. Laat het kookgerei vol-
doende afkoelen en controleer
in het hoofdstuk "Kookgerei
voor inductiekookzone" of het
kookgerei geschikt is voor in-
ductiekookplaten.
Als u door het volgen van de bovenstaande
suggesties het probleem niet kunt oplos-
sen, dient u contact op te nemen met uw
vakhandelaar of de klantenservice. Geef de
gegevens door van het typeplaatje, een
driecijferige code voor de glaskeramiek (be-
vindt zich op de hoek van het glazen opper-
vlak) en de foutmelding die wordt weerge-
geven.
Controleer of u het apparaat op de juiste
manier gebruikt hebt. Bij onjuist gebruik van
het apparaat wordt het bezoek van de
technicus van de klantenservice of de vak-
handelaar in rekening gebracht, zelfs tijdens
de garantieperiode. De instructies over de
klantenservice en de garantiebepalingen
vindt u in het garantieboekje.
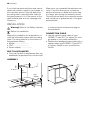
MONTAGE
Waarschuwing! Raadpleeg de
hoofdstukken Veiligheid.
Voor montage
Noteer voor montage van het apparaat de
onderstaande informatie van het typepla-
tje. Het typeplaatje bevindt zich aan de on-
derkant van de behuizing van het apparaat.
• Model ...........................
12 electrolux

• Productnummer
(PNC) ........................................
• Serienummer (S.N.)..............
INBOUWAPPARATUUR
• Inbouwapparaten mogen alleen worden
gebruikt nadat zij ingebouwd zijn in ge-
schikte inbouwunits of werkbladen die
aan de normen voldoen.
AANSLUITKABEL
• In het geval van een eenfase- of tweefa-
se-aansluiting, moet het geschikte net-
snoer van het type H05BB-F Tmax. 90°C
(of hoger) worden gebruikt.
• Vervang de beschadigde voedingskabel
door een speciale kabel (type H05BB-F
Tmax 90°C of hoger). Neem contact op
met een klantenservice bij u in de buurt.
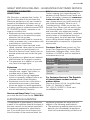
MONTAGE
min.
50mm
min.
500mm
min.
2mm
< 20 mm
min. 2 mm
A
B
A
12 mm
28 mm
38 mm
B
57 mm
41 mm
31 mm
min
30 mm
min. 500 mm
> 20 mm
min. 2 mm
A
B
A
12 mm
28 mm
38 mm
B
57 mm
41 mm
31 mm
min. 500 mm
electrolux 13

490
+1
mm
560
+1
mm
R 5mm
55mm
min.
12 mm
min.
2 mm
min.
38 mm
min.
2 mm
Als u een beveiligingsdoos gebruikt (extra
toebehoren
1)
), dan is de voorste ventilatie-
ruimte van 2 mm en de beschermmat on-
der het apparaat niet nodig.
U kunt de beschermdoos niet gebruiken als
u het apparaat boven een oven installeert.
1) De beveiligingsdoos is als toebehoren niet in elk land verkrijgbaar. Neem contact op met uw plaatselijke
leverancier.
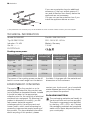
TECHNISCHE INFORMATIE
Modell EHD60020P Prod.Nr. 949 594 034 01
Typ 58 GAD D5 AU 220 - 240 V 50 - 60 Hz
Induction 7.4 kW Made in Germany
Ser.Nr. .......... 7.4 kW
ELECTROLUX
Vermogen van kookzones
14 electrolux

Kookzone Nominaal ver-
mogen (max
warmte-instel-
ling) [W]
Powerfunctie
ingeschakeld
[W]
Maximale duur
van de Power-
functie [min]
Minimale dia-
meter van het
kookgerei [mm]
Rechtsachter —
180 mm
1800 W 2800W 10 145
Rechtsvoor —
145 mm
1400 W 2500W 4 125
Linksachter —
180 mm
1800 W 2800W 10 145
Linksvoor — 210
mm
2300 W 3700W 10 180
Het vermogen van de kookzones kan
enigszins afwijken van de gegevens in de
tabel. Het verandert met het materiaal en
de afmetingen van het kookgerei.
MILIEUBESCHERMING
Het symbool op het product of op de
verpakking wijst erop dat dit product niet
als huishoudafval mag worden behandeld,
maar moet worden afgegeven bij een
verzamelpunt waar elektrische en
elektronische apparatuur wordt gerecycled.
Als u ervoor zorgt dat dit product op de
juiste manier wordt verwijderd, voorkomt u
mogelijke negatieve gevolgen voor mens en
milieu die zich zouden kunnen voordoen in
geval van verkeerde afvalverwerking. Voor
gedetailleerdere informatie over het
recyclen van dit product, kunt u contact
opnemen met de gemeente, de
gemeentereiniging of de winkel waar u het
product hebt gekocht.
VERPAKKINGSMATERIAAL
De verpakkingsmaterialen zijn milieu-
vriendelijk en herbruikbaar De kunststof
onderdelen zijn gemarkeerd, bijv.:
>PE<,>PS<, enz. Gooi het verpak-
kingsmateriaal weg in de juiste afval-
container bij uw plaatselijke afvalver-
werkingsdienst.
electrolux 15

Electrolux. Thinking of you.
Share more of our thinking at www.electrolux.com
CONTENTS
Safety information 16
Safety instructions 17
Product description 19
Daily use 20
Helpful hints and tips 22
Care and cleaning 24
Troubleshooting 24
Installation 26
Technical information 28
Environment concerns 28
GREAT BRITAIN & IRELAND - Guarantee/
Customer Service 29
European Guarantee 29
Subject to change without notice.
SAFETY INFORMATION
Before the installation and use of the appliance, carefully read
the supplied instructions. The manufacturer is not responsible
if an incorrect installation and use causes injuries and dam-
ages. Always keep the instructions with the appliance for fu-
ture reference.
CHILDREN AND VULNERABLE PEOPLE SAFETY
Warning! Risk of suffocation, injury or permanent disability.
• This appliance can be used by children aged from 8 years
and above and persons with reduced physical, sensory or
mental capabilities or lack of experience and knowledge if
they are supervised by an adult or a person who is responsi-
ble for their safety.
• Do not let children play with the appliance.
• Keep all packaging away from children.
• Keep children and pets away from the appliance when it op-
erates or when it cools down. Accessible parts are hot.
• If the appliance has a child safety device, we recommend
that you activate it.
• Cleaning and user maintenance shall not be made by chil-
dren without supervision.
GENERAL SAFETY
• The appliance and its accessible parts become hot during
use. Do not touch the heating elements.
16 electrolux

• Do not operate the appliance by means of an external timer
or separate remote-control system.
• Unattended cooking on a hob with fat or oil can be danger-
ous and may result in fire.
• Never try to extinguish a fire with water, but switch off the
appliance and then cover flame e.g. with a lid or a fire blan-
ket.
• Do not store items on the cooking surfaces.
• Do not use a steam cleaner to clean the appliance.
• Metallic objects such as knives, forks, spoons and lids
should not be placed on the hob surface since they can get
hot.
• If the glass ceramic surface is cracked, switch off the appli-
ance to avoid the possibility of electric shock.
• After use, switch off the hob element by its control and do
not rely on the pan detector.
SAFETY INSTRUCTIONS
INSTALLATION
Warning! Only a qualified person must
install this appliance.
• Remove all the packaging.
• Do not install or use a damaged appli-
ance.
• Obey the installation instruction supplied
with the appliance.
• Keep the minimum distance from the
other appliances and units.
• Always be careful when you move the
appliance because it is heavy. Always
wear safety gloves.
• Seal the cut surfaces with a sealant to
prevent moisture to cause swelling.
• Protect the bottom of the appliance from
steam and moisture.
• Do not install the appliance adjacent to a
door or under a window. This prevents
hot cookware to fall from the appliance
when the door or the window is opened.
• If the appliance is installed above drawers
make sure that the space, between the
bottom of the appliance and the upper
drawer, is sufficient for air circulation.
• Make sure that the ventilation space of 2
mm, between the worktop and the front
of the below unit, is free. The warranty
does not cover damages caused by the
lack of an adequate ventilation space.
• The bottom of the appliance can get hot.
We recommend to install a non-combus-
tile separation panel under the appliance
to prevent access to the bottom.
Electrical connection
Warning! Risk of fire and electrical
shock.
• All electrical connections must be made
by a qualified electrician.
• The appliance must be earthed.
• Before carrying out any operation make
sure that the appliance is disconnected
from the power supply.
• Use the correct electricity mains cable.
• Do not let the electricity mains cable tan-
gle.
electrolux 17

• Make sure the mains cable or plug (if ap-
plicable) does not touch the hot appli-
ance or hot cookware, when you con-
nect the appliance to the near sockets
• Make sure the appliance is installed cor-
rectly. Loose and incorrect electricity
mains cable or plug (if applicable) can
make the terminal become too hot.
• Make sure that a shock protection is in-
stalled.
• Use the strain relief clamp on cable.
• Make sure not to cause damage to the
mains plug (if applicable) or to the mains
cable. Contact the Service or an electri-
cian to change a damaged mains cable.
• The electrical installation must have an
isolation device which lets you discon-
nect the appliance from the mains at all
poles. The isolation device must have a
contact opening width of minimum 3
mm.
• Use only correct isolation devices: line
protecting cut-outs, fuses (screw type
fuses removed from the holder), earth
leakage trips and contactors.
USE
Warning! Risk of injury, burns or
electric shock.
• Use this appliance in a household envi-
ronment.
• Do not change the specification of this
appliance.
• Do not use an external timer or a sepa-
rate remote-control system to operate
the appliance.
• Do not let the appliance stay unattended
during operation.
• Do not operate the appliance with wet
hands or when it has contact with water.
• Do not put cutlery or saucepan lids on
the cooking zones. They can become
hot.
• Set the cooking zone to “off” after each
use. Do not rely on the pan detector.
• Do not use the appliance as a work sur-
face or as a storage surface.
• If the surface of the appliance is cracked,
disconnect immediately the appliance
from the power supply. This to prevent
an electrical shock.
• Users with a pacemaker must keep a
distance of minimum 30 cm from the in-
duction cooking zones when the appli-
ance is in operation.
Warning! Risk of fire or explosion.
• Fats and oil when heated can release
flammable vapours. Keep flames or heat-
ed objects away from fats and oils when
you cook with them.
• The vapours that very hot oil releases can
cause spontaneous combustion.
• Used oil, that can contain food remnants,
can cause fire at a lower temperature
than oil used for the first time.
• Do not put flammable products or items
that are wet with flammable products in,
near or on the appliance.
• Do not try to extinguish a fire with water.
Disconnect the appliance and cover the
flame with a lid or a fire blanket.
Warning! Risk of damage to the
appliance.
• Do not keep hot cookware on the control
panel.
• Do not let cookware to boil dry.
• Be careful not let objects or cookware fall
on the appliance. The surface can be
damaged.
• Do not activate the cooking zones with
empty cookware or without cookware.
• Do not put aluminium foil on the appli-
ance.
• Cookware made of cast iron, aluminium
or with a damaged bottom can cause
scratches on the glass ceramic. Always
lift these objects up when you have to
move them on the cooking surface.
CARE AND CLEANING
Warning! Risk of damage to the
appliance.
• Clean regularly the appliance to prevent
the deterioration of the surface material.
• Do not use water spray and steam to
clean the appliance.
• Clean the appliance with a moist soft
cloth. Only use neutral detergents. Do
not use abrasive products, abrasive
cleaning pads, solvents or metal objects.
18 electrolux

DISPOSAL
Warning! Risk of injury or suffocation.
• Contact your municipal authority for infor-
mation on how to discard the appliance
correctly.
• Disconnect the appliance from the mains
supply.
• Cut off the mains cable and discard it.
PRODUCT DESCRIPTION
GENERAL OVERVIEW
210 mm
180 mm 180 mm
145 mm
1 2
45
3
1
Induction cooking zone
2
Induction cooking zone
3
Induction cooking zone
4
Control panel
5
Induction cooking zone
CONTROL PANEL LAYOUT
1 2 4 5 3 6
8910 7
Use the sensor fields to operate the appliance. The displays, indicators and
sounds tell which functions operate.
Sensor field Function
1
To activate and deactivate the appliance
2
To lock / unlock the control panel
3
/
To increase or decrease the heat setting
4
Timer indicators of cooking zones To show for which zone you set the time
5
The timer display To show the time in minutes
6
A heat setting display To show the heat setting
electrolux 19

Sensor field Function
7
To activate the Power function
8
To select the cooking zone
9
/
To increase or decrease the time
10
To activate and deactivate the STOP+GO function
HEAT SETTING DISPLAYS
Display Description
The cooking zone is deactivated.
-
The cooking zone operates.
The Keep Warm/STOP+GO function operates.
The Automatic Heat-up function operates.
The cookware is incorrect or too small, or there is no cookware on the
cooking zone.
There is a malfunction.
A cooking zone is still hot (residual heat).
The Lock / The Child Safety Device operates.
The Power function operates.
The Automatic Switch-Off operates.
RESIDUAL HEAT INDICATOR
Warning! The risk of burns from
residual heat!
The induction cooking zones make the heat
necessary for cooking directly in the bottom
of the cookware. The glass ceramic is hot
from the heat of the cookware.
DAILY USE
ACTIVATION AND DEACTIVATION
Touch
for 1 second to activate or deac-
tivate the appliance.
AUTOMATIC SWITCH OFF
The function deactivates the appliance
automatically if:
•
All cooking zones are deactivated (
).
• You do not set the heat setting after you
activate the appliance.
• You spill something or put something on
the control panel for more than 10 sec-
onds, (a pan, a cloth, etc.). An acoustic
signal sounds some time and the appli-
ance deactivates. Remove the object or
clean the control panel.
• The appliance becomes too hot (e.g.
when, a saucepan boils dry). Before you
use the appliance again, the cooking
zone must be cool.
• You use incorrect cookware. The symbol
comes on and the cooking zone de-
activates automatically after 2 minutes.
• You do not deactivate a cooking zone or
change the heat setting. After some time
comes on and the appliance deacti-
vates. See below.
• The relation between heat setting and
times of the Automatic Switch Off func-
tion:
•
, - — 6 hours
•
- — 5 hours
•
— 4 hours
•
- — 1.5 hours
THE HEAT SETTING
Touch
to increase the heat setting.
Touch
to decrease the heat setting. The
display shows the heat setting. Touch
20 electrolux

and at the same time to deactivate the
cooking zone.
AUTOMATIC HEAT UP
You can get a necessary heat setting in a
shorter time if you activate the Automatic
Heat Up function. This function sets the
highest heat setting for some time (see the
diagram), and then decreases to the neces-
sary heat setting.
To start the Automatic Heat Up function for
a cooking zone:
1.
Touch
. The symbol comes on
in the display.
2.
Immediately touch
. The symbol
comes on in the display.
3.
Immediately touch
again and again
until the necessary heat setting comes
on. After 3 seconds
comes on in the
display.
To stop the function, touch
.
1
2
3
4
5
6
7
8
9
10
11
0
123456789
POWER FUNCTION
The Power function makes more power
available to the induction cooking zones.
The Power function can be activated for a
limited period of time ( see Technical Infor-
mation chapter). After that, the induction
cooking zone automatically sets back to
highest heat setting. To activate, touch
,
comes on. To deactivate, touch or
.
POWER FUNCTION
The Power function makes more power
available to the induction cooking zones.
The Power function can be activated for a
limited period of time ( see Technical Infor-
mation chapter). After that, the induction
cooking zone automatically sets back to
highest heat setting. To activate, touch
,
comes on. To deactivate, change the
heat setting.
POWER MANAGEMENT
The power management divides the power
between cooking zones (see the illustra-
tion). The power function increases the last
selected power to the maximum level for
one cooking zone. The power in other
cooking zones automatically decreases.
The heat setting display for the reduced
zone changes between two levels.
TIMER
Count Down Timer
Use the Count Down Timer to set how long
the cooking zone operates for only this one
time.
Set the Timer after the selection of the
cooking zone.
You can set the heat setting before or after
you set the timer.
•
To set the cooking zone: touch
again and again until the indicator of a
necessary cooking zone comes on.
•
To activate or change the Timer:
touch
or of the timer to set the time
(
00
-
99
minutes). When the indicator
of the cooking zone starts to flash slow,
the time counts down.
electrolux 21

• To deactivate the Timer: set the cook-
ing zone with
and touch to deacti-
vate the Timer. The remaining time
counts back to
00
. The indicator of the
cooking zone goes out.
• To see the remaining time: set the
cooking zone with
. The indicator of
the cooking zone starts to flash quickly.
The display shows the remaining time.
When the time comes to an end, the sound
operates and
00
flashes. The cooking zone
deactivates.
•
To stop the sound: touch
Minute Minder
You can use the Timer as a Minute Mind-
er while the cooking zones do not operate.
Touch
. Touch or to set the time.
When the time comes to an end, the sound
operates and
00
flashes
•
To stop the sound: touch
STOP+GO
The
function sets all cooking zones that
operate to the lowest heat setting (
).
When
operates, you cannot change the
heat setting.
The
function does not stop the timer
function.
•
To activate this function touch
. The
symbol
comes on.
•
To deactivate this function touch
.
The heat setting that you set before
comes on.
LOCK
When the cooking zones operate, you can
lock the control panel, but not
. It pre-
vents an accidental change of the heat set-
ting.
First set the heat setting.
To start this function touch . The symbol
comes on for 4 seconds.
The Timer stays on.
To stop this function touch
. The heat
setting that you set before comes on.
When you stop the appliance, you also stop
this function.
THE CHILD SAFETY DEVICE
This function prevents an accidental opera-
tion of the appliance.
To activate The Child Safety Device
•
Activate the appliance with
. Do not
set the heat settings.
•
Touch
for 4 seconds. The symbol
comes on.
•
Deactivate the appliance with
.
To deactivate The Child Safety Device
•
Activate the appliance with
. Do not
set the heat settings. Touch
for 4
seconds. The symbol
comes on.
•
Deactivate the appliance with
.
To override The Child Safety Device for
only one cooking time
•
Activate the appliance with
. The sym-
bol
comes on.
•
Touch
for 4 seconds. Set the heat
setting in 10 seconds. You can operate
the appliance.
• When you deactivate the appliance with
, The Child Safety Device operates
again.
HELPFUL HINTS AND TIPS
INDUCTION COOKING ZONES
For induction cooking zones a strong elec-
tro-magnetic field creates the heat in the
cookware very quickly.
COOKWARE FOR INDUCTION
COOKING ZONES
Important! Use the induction cooking
zones with correct cookware.
Cookware material
• correct: cast iron, steel, enamelled steel,
stainless steel, the bottom made of multi-
layer (with correct mark from a manufac-
turer).
• not correct: aluminium, copper, brass,
glass, ceramic, porcelain.
Cookware is correct for an induction
hob if …
• ... some water boils very quickly on a
zone set to the highest heat setting.
22 electrolux

• ... a magnet pulls on to the bottom of the
cookware.
The bottom of the cookware must
be as thick and flat as possible.
Cookware dimensions: induction cooking
zones adapt to the dimension of the bottom
of the cookware automatically to some limit.
THE NOISES DURING OPERATION
If you can hear
• crack noise: cookware is made of differ-
ent materials (Sandwich construction).
• whistle sound: you use one or more
cooking zones with high power levels and
the cookware is made of different materi-
als (Sandwich construction).
• humming: you use high power levels.
• clicking: electric switching occurs.
• hissing, buzzing: the fan operates.
The noises are normal and do not refer
to appliance malfunction.
ENERGY SAVING
How to save energy
• If it is possible, always put the lids on the
cookware.
• Put cookware on a cooking zone before
you start it.
• Use the residual heat to keep the food
warm or to melt it.
The cooking zone efficiency
The cooking zone efficiency is related to the
diameter of the cookware. The cookware
with a smaller diameter than the minimum
receives only a part of the power generated
by the cooking zone. For the minimum di-
ameters see the Technical Information
chapter.
THE EXAMPLES OF COOKING
APPLICATIONS
The relation between the heat setting and
the cooking zone consumption of power is
not linear.
When you increase the heat setting it is not
proportional to the increase of the cooking
zone consumption of power.
It means that the cooking zone with the
medium heat setting uses less than a half of
its power.
The data in the table is for guidance
only.
Hea
t
set-
ting
Use to: Time Hints Nominal
power con-
sumption
1
Keep warm the food you
cooked
as required Put a lid on a cookware 3 %
1 - 2 Hollandaise sauce, melt:
butter, chocolate, gelatine
5 - 25 min Mix from time to time 3 – 5 %
1 - 2 Solidify: fluffy omelettes,
baked eggs
10 - 40 min Cook with a lid on 3 – 5 %
2 - 3 Simmer rice and milkbased
dishes, heating up ready-
cooked meals
25 - 50 min Add the minimum twice as
much liquid as rice, mix
milk dishes part procedure
through
5 – 10 %
3 - 4 Steam vegetables, fish,
meat
20 - 45 min Add some tablespoons of
liquid
10 – 15 %
4 - 5 Steam potatoes 20 - 60 min Use max. ¼ l water for
750 g of potatoes
15 – 21 %
4 - 5 Cook larger quantities of
food, stews and soups
60 - 150 min Up to 3 l liquid plus ingre-
dients
15 – 21 %
electrolux 23

Hea
t
set-
ting
Use to: Time Hints Nominal
power con-
sumption
6 - 7 Gentle fry: escalope, veal
cordon bleu, cutlets, ris-
soles, sausages, liver, roux,
eggs, pancakes, doughnuts
as necessary Turn halfway through 31 – 45 %
7 - 8 Heavy fry, hash browns, loin
steaks, steaks
5 - 15 min Turn halfway through 45 – 64 %
9 Boil water, cook pasta, sear meat (goulash, pot roast), deep-fry chips 100 %
Boil large quantities of water. Power management is activated.
CARE AND CLEANING
Clean the appliance after each use.
Always use cookware with clean bottom.
Scratches or dark stains on the glass-
ceramic cause no effect on how the
appliance operates.
To remove the dirt:
1. – Remove immediately: melted plas-
tic, plastic foil, and food with sugar. If
not, the dirt can cause damage to
the appliance. Use a special scraper
for the glass . Put the scraper on the
glass surface at an acute angle and
move the blade on the surface .
– Remove after the appliance is
sufficiently cool: limescale rings ,
water rings, fat stains, shiny metallic
discolorations. Use a special cleaning
agent for glass ceramic or stainless
steel.
2. Clean the appliance with a moist cloth
and some detergent.
3. At the end rub the appliance dry
with a clean cloth.
TROUBLESHOOTING
Problem Possible cause Remedy
You cannot activate the appli-
ance or operate it.
Activate the appliance again
and set the heat setting in less
than 10 seconds.
You touched 2 or more sensor
fields at the same time.
Touch only one sensor field.
The STOP+GO function oper-
ates.
Refer to the chapter “Daily Use”.
There is water or fat stains on
the control panel.
Clean the control panel.
24 electrolux

Problem Possible cause Remedy
An acoustic signal sounds and
the appliance deactivates.
An acoustic signal sounds
when the appliance is deactiva-
ted.
You put something on one or
more sensor fields.
Remove the object from the
sensor fields.
The appliance deactivates. You put something on the sen-
sor field
.
Remove the object from the
sensor field.
The residual heat indicator
does not come on.
The cooking zone is not hot
because it operated only for a
short time.
If the cooking zone operated
sufficiently long to be hot, speak
to the service centre.
The Automatic Heat Up func-
tion does not operate.
The cooking zone is hot. Let the cooking zone become
sufficiently cool.
The highest heat setting is set. The highest heat setting has the
same power as the Automatic
Heat Up function.
The heat setting changes be-
tween two levels.
The Power management is ac-
tivated.
Refer to “Power management”.
The sensor fields become hot. The cookware is too large or
you put it too near to the con-
trols.
Put large cookware on the rear
cooking zones if necessary.
comes on.
The Automatic Switch Off op-
erates.
Deactivate the appliance and
activate it again.
comes on.
The Child Safety Device or the
Lock function operates.
Refer to the chapter “Daily Use”.
comes on.
No cookware is on the cook-
ing zone.
Put cookware on the cooking
zone.
The cookware is incorrect. Use the correct cookware.
The diameter of the bottom of
the cookware is too small for
the cooking zone.
Move cookware to a smaller
cooking zone.
and a number come on.
There is an error in the appli-
ance.
Disconnect the appliance from
the electrical supply for some
time. Disconnect the fuse from
the electrical system of the
house. Connect it again. If
comes on again, speak to the
service centre.
comes on.
There is an error in the appli-
ance because a cookware
boils dry. The overheating pro-
tection for the cooking zones
and the Automatic Switch Off
operate.
Deactivate the appliance. Re-
move the hot cookware. After,
approximately 30 seconds, acti-
vate the cooking zone again. If
the cookware was the problem,
the error message goes out of
the display, but the residual
heat indicator can stay. Let the
cookware become sufficiently
cool and refer to “Cookware for
the induction cooking zone” to
see if your cookware is compat-
ible with the appliance.
electrolux 25

If you tried the above solutions and cannot
repair the problem, speak to your dealer or
the customer service. Give the data from
the rating plate, three digit letter code for
the glass ceramic (it is in the corner of the
glass surface) and an error message that
comes on.
Make sure, you operated the appliance cor-
rectly. If not the servicing by a customer
service technician or dealer will not be free
of charge, also during the warranty period.
The instructions about the customer service
and conditions of guarantee are in the guar-
antee booklet.
INSTALLATION
Warning! Refer to the Safety chapters.
Before the installation
Before the installation of the appliance, re-
cord the information below from the rating
plate. The rating plate is on the bottom of
the appliance casing.
• Model ...........................
• PNC .............................
• Serial number ....................
BUILT-IN APPLIANCES
• Only use the built-in appliances after you
assemble the appliance into correct built-
in units and work surfaces that align to
the standards.
CONNECTION CABLE
• Use the correct mains cable of type
H05BB-F Tmax 90°C (or higher) for a sin-
gle phase or two phase connection.
• Replace the damaged mains cable with a
special cable (type H05BB-F Tmax 90°C
or higher). Speak to your local Service
Centre.
ASSEMBLY
min.
50mm
min.
500mm
min.
2mm
26 electrolux

< 20 mm
min. 2 mm
A
B
A
12 mm
28 mm
38 mm
B
57 mm
41 mm
31 mm
min
30 mm
min. 500 mm
> 20 mm
min. 2 mm
A
B
A
12 mm
28 mm
38 mm
B
57 mm
41 mm
31 mm
min. 500 mm
490
+1
mm
560
+1
mm
R 5mm
55mm
min.
12 mm
min.
2 mm
min.
38 mm
min.
2 mm
electrolux 27

If you use a protection box (an additional
accessory
1)
), the front airflow space of 2
mm and protective floor directly below the
appliance are not necessary.
You can not use the protection box if you
install the appliance above an oven.
1) The protection box accessory may not be available in some countries. Please contact your local supplier.
TECHNICAL INFORMATION
Modell EHD60020P Prod.Nr. 949 594 034 01
Typ 58 GAD D5 AU 220 - 240 V 50 - 60 Hz
Induction 7.4 kW Made in Germany
Ser.Nr. .......... 7.4 kW
ELECTROLUX
Cooking zones power
Cooking zone Nominal Power
(Max heat set-
ting) [W]
Power Function
activated [W]
Power function
maximum dura-
tion [min]
Minimum cook-
ware diameter
[mm]
Right rear — 180
mm
1800 W 2800 W 10 145
Right front — 145
mm
1400 W 2500 W 4 125
Left rear — 180
mm
1800 W 2800 W 10 145
Left front — 210
mm
2300 W 3700 W 10 180
The power of the cooking zones can be dif-
ferent in some small range from the data in
the table. It changes with the material and
dimensions of the cookware.
ENVIRONMENT CONCERNS
The symbol on the product or on its
packaging indicates that this product may
not be treated as household waste. Instead
it should be taken to the appropriate
collection point for the recycling of electrical
and electronic equipment. By ensuring this
product is disposed of correctly, you will
help prevent potential negative
consequences for the environment and
human health, which could otherwise be
caused by inappropriate waste handling of
this product. For more detailed information
about recycling of this product, please
contact your local council, your household
waste disposal service or the shop where
you purchased the product.
PACKAGING MATERIAL
The packaging materials are friendly to
the environment and can be recycled.
The plastic components are identified
by marking: >PE<,>PS<, etc. Discard
the packaging materials as household
waste at the waste disposal facilities in
your municipality.
28 electrolux

GREAT BRITAIN & IRELAND - GUARANTEE/CUSTOMER SERVICE
STANDARD GUARANTEE
CONDITIONS:
We, Electrolux, undertake that if within 12
months of the date of the purchase this
Electrolux appliance or any part thereof is
proved to be defective by reason only of
faulty workmanship or materials, we will, at
our option repair or replace the same FREE
OF CHARGE for labour, materials or car-
riage on condition that:
• Appliance has been correctly installed
and used only on the electricity supply
stated on the rating plate.
• Appliance has been used for normal do-
mestic purposes only, in accordance with
manufacturer's instructions.
• Appliance hasn't been serviced, main-
tained, repaired, taken apart or tampered
with by person not authorised by us.
• Electrolux Service Force Centre must un-
dertake all service work under this guar-
antee
• Any appliance or defective part replaced
shall become the Company's property.
• This guarantee is in addition to your stat-
utory and other legal rights.
Exclusions
• Damage, calls resulting from transport,
improper use, neglect, light bulbs, re-
movable parts of glass, plastic.
• Costs for calls to put right appliance
which is improperly installed, calls to ap-
pliances outside United Kingdom.
• Appliances found to be in use within a
commercial environment, plus those
which are subject to rental agreements.
• Products of Electrolux manufacturer that
are not marketed by Electrolux
Service and Spare Parts.Please contact
your local Service Force Centre: 08445 616
616(Call will be routed to Service Force
Centre covering your postcode area). For
address of local Service Force Centre and
further information, please visit: www.serv-
iceforce.co.uk Before calling out an engi-
neer, please ensure you have read the de-
tails under the heading "What to do if... /
Troubleshooting". When you contact the
Service Force Centre you will need to give
the following details: Your name, address
and postcode, your telephone number,
clear concise details of the fault, model and
serial number of the appliance (found on
the rating plate), the purchase date. Please
note a valid purchase receipt or guarantee
documentation is required for in guarantee
service calls.
Customer Care.Please contact our Cus-
tomer Care Department: Electrolux Major
Appliances, Addington Way, Luton, Bed-
fordshire, LU4 9QQ or visit our website at
www.electrolux.co.uk
Customer
Care De-
partment,
Tel: (Calls may be recorded
for training purposes)
Electrolux 08445 613 613
AEG-Elec-
trolux
08445 611 611
Zanussi-
Electrolux
08445 612 612
For Customer Service in The Republic
of Ireland please contact us at the
address below:
Electrolux Group (Irl) Ltd, Long Mile Road,
Dublin 12, Republic of Ireland
Tel: +353 (0)1 4090751, Email: serv-
EUROPEAN GUARANTEE
This appliance is guaranteed by Electrolux
in each of the countries listed at the back of
this user manual, for the period specified in
the appliance guarantee or otherwise by
law. If you move from one of these coun-
tries to another of the countries listed, the
appliance guarantee will move with you
subject to the following qualifications:-
• The appliance guarantee starts from the
date you first purchased the appliance
which will be evidenced by production of
electrolux 29

a valid purchase document issued by the
seller of the appliance.
• The appliance guarantee is for the same
period and to the same extent for labour
and parts as exists in your new country
of residence for this particular model or
range of appliances.
• The appliance guarantee is personal to
the original purchaser of the appliance
and cannot be transferred to another
user.
• The appliance is installed and used in ac-
cordance with instructions issued by
Electrolux and is only used within the
home, i.e. is not used for commercial
purposes.
• The appliance is installed in accordance
with all relevant regulations in force within
your new country of residence.
The provisions of this European Guarantee
do not affect any of the rights granted to
you by law.
WWW.ELECTROLUX.COM
Albania +35 5 4 261 450 Rruga “Kavajës”, ish-parku autobuzëve,
Tiranë
Belgique/België/Belgien ++32 27162444 Raketstraat 40, 1130 Brussel/Bruxelles
Česká republika +420 261 302 261 Budějovická 3, Praha 4, 140 21
Danmark +45 70 11 74 00 Strevelinsvej 38-40, 7000 Fredericia
Deutschland +49 180 32 26 622 Fürther Str. 246, 90429 Nürnberg
Eesti +37 2 66 50 030 Pärnu mnt. 153, 11624 Tallinn
España +34 902 11 63 88 Carretera M-300, Km. 29,900 Alcalá de
Henares Madrid
France 08 92 68 24 33 (0.34€/
min)
www.electrolux.fr
Great Britain +44 8445 616 616 Addington Way, Luton, Bedfordshire LU4
9QQ
Hellas +30 23 10 56 19 70 4, Limnou Str., 54627 Thessaloniki
Hrvatska +385 1 63 23 338 Slavonska avenija 3, 10000 Zagreb
Ireland +353 1 40 90 753 Long Mile Road Dublin 12
Italia +39 (0) 434 558500 C.so Lino Zanussi, 26 - 33080 Porcia
(PN)
Latvija +371 67313626 Kr. Barona iela 130/2, LV-1012, Riga
Lietuva +370 5 278 06 03 Ozo 10a, LT-08200 Vilnius
Luxembourg +352 42 431 301 Rue de Bitbourg, 7, L-1273 Hamm
Magyarország (06-1)467-3205
+361 252 1773
H-1142 Budapest XIV, Erzsébet királyné
útja 87
Nederland +31 17 24 68 300 Vennootsweg 1, 2404 CG - Alphen aan
den Rijn
Norge +47 81 5 30 222 Risløkkvn. 2 , 0508 Oslo
Österreich 0810 955030 Herziggasse 9, 1230 Wien
Polska +48 22 43 47 300 ul. Kolejowa 5/7, Warszawa
Portugal +35 12 14 40 39 39 Quinta da Fonte - Edificio Gonçalves Zar-
co - Q 35 -2774-518 Paço de Arcos
Romania +40 21 451 20 30 Str. Garii Progresului 2, S4, 040671 RO
30 electrolux

Schweiz - Suisse - Sviz-
zera
+41 62 88 99 111 Industriestrasse 10, CH-5506 Mägenwil
Slovenija +38 61 24 25 731 Gerbičeva ulica 110, 1000 Ljubljana
Slovensko +421 2 32 14 13 34-5 Electrolux Slovakia s.r.o., Electrolux Do-
máce spotrebiče SK, Galvaniho 17/B,
821 04 Bratislava
Suomi 030 600 5200
Lankapuhelinverkosta 0,0828€/puhelu+0,032€/min Matkapuhelinverkosta 0,192€/min
Sverige +46 (0)771 76 76 76 Electrolux Service, S:t Göransgatan 143,
S-105 45 Stockholm
Türkiye +90 21 22 93 10 25 Tarlabaşı caddesi no : 35 Taksim İstanbul
Россия 8-800-200-3589 129090 Москва, Олимпийский
проспект, 16, БЦ "Олимпик"
Україна +380 44 586 20 60 04074 Київ, вул.Автозаводська, 2а,
БЦ "Алкон"
electrolux 31

www.electrolux.com/shop 892955893-A-422012
-
 1
1
-
 2
2
-
 3
3
-
 4
4
-
 5
5
-
 6
6
-
 7
7
-
 8
8
-
 9
9
-
 10
10
-
 11
11
-
 12
12
-
 13
13
-
 14
14
-
 15
15
-
 16
16
-
 17
17
-
 18
18
-
 19
19
-
 20
20
-
 21
21
-
 22
22
-
 23
23
-
 24
24
-
 25
25
-
 26
26
-
 27
27
-
 28
28
-
 29
29
-
 30
30
-
 31
31
-
 32
32


Electrolux EHD60020P Handleiding
- Categorie
- Kookplaten
- Type
- Handleiding
in andere talen
- English: Electrolux EHD60020P User manual
Gerelateerde artikelen
-
Electrolux EHS30020P Handleiding
-
-
-
-
Electrolux EHD68210P Handleiding
-
-
-
-
-