Yamaha MX49 Handleiding
- Categorie
- Synthesizer
- Type
- Handleiding
Deze handleiding is ook geschikt voor

Owner’s Manual
EN

S2
MX49 MX61 MX88 Owner’s Manual
SPECIAL MESSAGE SECTION
This product utilizes batteries or an external power supply
(adapter). DO NOT connect this product to any power supply
or adapter other than one described in the manual, on the
name plate, or specifically recommended by Yamaha.
WARNING: Do not place this product in a position where
anyone could walk on, trip over, or roll anything over power or
connecting cords of any kind. The use of an extension cord is
not recommended! If you must use an extension cord, the min-
imum wire size for a 25’ cord (or less) is 18 AWG. NOTE: The
smaller the AWG number, the larger the current handling
capacity. For longer extension cords, consult a local electri-
cian.
This product should be used only with the components sup-
plied or; a cart, rack, or stand that is recommended by
Yamaha. If a cart, etc., is used, please observe all safety mark-
ings and instructions that accompany the accessory product.
SPECIFICATIONS SUBJECT TO CHANGE:
The information contained in this manual is believed to be cor-
rect at the time of printing. However, Yamaha reserves the
right to change or modify any of the specifications without
notice or obligation to update existing units.
This product, either alone or in combination with an amplifier
and headphones or speaker/s, may be capable of producing
sound levels that could cause permanent hearing loss. DO
NOT operate for long periods of time at a high volume level or
at a level that is uncomfortable. If you experience any hearing
loss or ringing in the ears, you should consult an audiologist.
IMPORTANT: The louder the sound, the shorter the time
period before damage occurs.
Some Yamaha products may have benches and / or accessory
mounting fixtures that are either supplied with the product or as
optional accessories. Some of these items are designed to be
dealer assembled or installed. Please make sure that benches
are stable and any optional fixtures (where applicable) are well
secured BEFORE using.
Benches supplied by Yamaha are designed for seating only.
No other uses are recommended.
NOTICE:
Service charges incurred due to a lack of knowledge relating to
how a function or effect works (when the unit is operating as
designed) are not covered by the manufacturer’s warranty, and
are therefore the owners responsibility. Please study this man-
ual carefully and consult your dealer before requesting service.
ENVIRONMENTAL ISSUES:
Yamaha strives to produce products that are both user safe
and environmentally friendly. We sincerely believe that our
products and the production methods used to produce them,
meet these goals. In keeping with both the letter and the spirit
of the law, we want you to be aware of the following:
Battery Notice:
This product MAY contain a small non-rechargeable battery
which (if applicable) is soldered in place. The average life span
of this type of battery is approximately five years. When
replacement becomes necessary, contact a qualified service
representative to perform the replacement.
This product may also use “household” type batteries. Some of
these may be rechargeable. Make sure that the battery being
charged is a rechargeable type and that the charger is
intended for the battery being charged.
When installing batteries, never mix old batteries with new
ones, and never mix different types of batteries. Batteries
MUST be installed correctly. Mismatches or incorrect installa-
tion may result in overheating and battery case rupture.
Warning:
Do not attempt to disassemble, or incinerate any battery. Keep
all batteries away from children. Dispose of used batteries
promptly and as regulated by the laws in your area. Note:
Check with any retailer of household type batteries in your
area for battery disposal information.
Disposal Notice:
Should this product become damaged beyond repair, or for
some reason its useful life is considered to be at an end,
please observe all local, state, and federal regulations that
relate to the disposal of products that contain lead, batteries,
plastics, etc. If your dealer is unable to assist you, please con-
tact Yamaha directly.
NAME PLATE LOCATION:
The name plate is located on the bottom of the product. The
model number, serial number, power requirements, etc., are
located on this plate. You should record the model number,
serial number, and the date of purchase in the spaces provided
below and retain this manual as a permanent record of your
purchase.
Model
Serial No.
Purchase Date
PLEASE KEEP THIS MANUAL
92-BP (bottom)
For Instrument
* This applies only to products distributed by YAMAHA CORPORATION OF AMERICA.
COMPLIANCE INFORMATION STATEMENT
(DECLARATION OF CONFORMITY PROCEDURE)
Responsible Party: Yamaha Corporation of America
Address: 6600 Orangethorpe Ave., Buena Park, Calif. 90620
Telephone: 714-522-9011
Type of Equipment: Music Synthesizer
Model Name: MX49, MX61, MX88
This device complies with Part 15 of the FCC Rules.
Operation is subject to the following two conditions:
1) this device may not cause harmful interference, and
2) this device must accept any interference received including interference
that may cause undesired operation.
See user manual instructions if interference to radio reception is suspected.
(FCC DoC)

MX49 MX61 MX88 Owner’s Manual
S3
1. IMPORTANT NOTICE: DO NOT MODIFY THIS
UNIT!
This product, when installed as indicated in the instructions
contained in this manual, meets FCC requirements. Modifi-
cations not expressly approved by Yamaha may void your
authority, granted by the FCC, to use the product.
2. IMPORTANT: When connecting this product to accesso-
ries and/or another product use only high quality shielded
cables. Cable/s supplied with this product MUST be used.
Follow all installation instructions. Failure to follow instruc-
tions could void your FCC authorization to use this product
in the USA.
3. NOTE: This product has been tested and found to comply
with the requirements listed in FCC Regulations, Part 15 for
Class “B” digital devices. Compliance with these require-
ments provides a reasonable level of assurance that your
use of this product in a residential environment will not result
in harmful interference with other electronic devices. This
equipment generates/uses radio frequencies and, if not
installed and used according to the instructions found in the
users manual, may cause interference harmful to the opera-
* This applies only to products distributed by YAMAHA CORPORATION OF AMERICA. (class B)
tion of other electronic devices. Compliance with FCC regula-
tions does not guarantee that interference will not occur in all
installations. If this product is found to be the source of inter-
ference, which can be determined by turning the unit “OFF”
and “ON”, please try to eliminate the problem by using one of
the following measures:
Relocate either this product or the device that is being affected
by the interference.
Utilize power outlets that are on different branch (circuit
breaker or fuse) circuits or install AC line filter/s.
In the case of radio or TV interference, relocate/reorient the
antenna. If the antenna lead-in is 300 ohm ribbon lead,
change the lead-in to co-axial type cable.
If these corrective measures do not produce satisfactory
results, please contact the local retailer authorized to distribute
this type of product. If you can not locate the appropriate
retailer, please contact Yamaha Corporation of America, Elec-
tronic Service Division, 6600 Orangethorpe Ave, Buena Park,
CA90620
The above statements apply ONLY to those products distrib-
uted by Yamaha Corporation of America or its subsidiaries.
FCC INFORMATION (U.S.A.)
For AC adaptor and Instrument

S4
MX49 MX61 MX88 Owner’s Manual
For AC adaptor
This device complies with Part 15 of the FCC Rules. Operation is subject to the following two conditions:
(1) this device may not cause harmful interference, and (2) this device must accept any interference received,
including interference that may cause undesired operation.
• This applies only to products distributed by Yamaha Canada Music Ltd.
• Ceci ne s’applique qu’aux produits distribués par Yamaha Canada Musique Ltée.
(can_b_01)
CAN ICES-3 (B)/NMB-3(B)
The above warning is located on the rear of the unit.
Explanation of Graphical Symbols
The lightning flash with arrowhead symbol
within an equilateral triangle is intended to
alert the user to the presence of uninsulated
“dangerous voltage” within the product’s
enclosure that may be of sufficient
magnitude to constitute a risk of electric
shock to persons.
The exclamation point within an equilateral
triangle is intended to alert the user to the
presence of important operating and
maintenance (servicing) instructions in the
literature accompanying the product.
IMPORTANT SAFETY INSTRUCTIONS
1 Read these instructions.
2 Keep these instructions.
3 Heed all warnings.
4 Follow all instructions.
5 Do not use this apparatus near water.
6 Clean only with dry cloth.
7 Do not block any ventilation openings. Install in
accordance with the manufacturer’s instructions.
8 Do not install near any heat sources such as
radiators, heat registers, stoves, or other apparatus
(including amplifiers) that produce heat.
9 Do not defeat the safety purpose of the polarized or
grounding-type plug. A polarized plug has two
blades with one wider than the other. A grounding
type plug has two blades and a third grounding
prong. The wide blade or the third prong are
provided for your safety. If the provided plug does
not fit into your outlet, consult an electrician for
replacement of the obsolete outlet.
10 Protect the power cord from being walked on or
pinched particularly at plugs, convenience
receptacles, and the point where they exit from the
apparatus.
11 Only use attachments/accessories specified by the
manufacturer.
12 Use only with the cart, stand,
tripod, bracket, or table
specified by the manufacturer,
or sold with the apparatus.
When a cart is used, use
caution when moving the cart/
apparatus combination to
avoid injury from tip-over.
13 Unplug this apparatus during lightning storms or
when unused for long periods of time.
14 Refer all servicing to qualified service personnel.
Servicing is required when the apparatus has been
damaged in any way, such as power-supply cord or
plug is damaged, liquid has been spilled or objects
have fallen into the apparatus, the apparatus has
been exposed to rain or moisture, does not operate
normally, or has been dropped.
(UL60065_03)
CAUTION: TO REDUCE THE RISK OF
ELECTRIC SHOCK, DO NOT REMOVE
COVER (OR BACK). NO USER-SERVICEABLE
PARTS INSIDE. REFER SERVICING TO
QUALIFIED SERVICE PERSONNEL.
CAUTION
RISK OF ELECTRIC SHOCK
DO NOT OPEN
WARNING
TO REDUCE THE RISK OF FIRE OR ELECTRIC SHOCK, DO NOT EXPOSE THIS APPARATUS TO RAIN OR
MOISTURE.

MX49 MX61 MX88 Owner’s Manual
S5
L'avertissement ci-dessus se trouve à l'arrière de l'instrument.
Explication des symboles graphiques
L'éclair avec une flèche à l'intérieur d'un
triangle équilatéral est destiné à attirer
l'attention de l'utilisateur sur la présence
d'une « tension dangereuse » non isolée à
l'intérieur de l'appareil, pouvant être
suffisamment élevée pour constituer un
risque d'électrocution.
Le point d'exclamation à l'intérieur d'un
triangle équilatéral est destiné à attirer
l'attention de l'utilisateur sur la présence
d'instructions importantes sur l'emploi ou la
maintenance (réparation) de l'appareil dans la
documentation fournie.
CONSIGNES DE SÉCURITÉ À LIRE ATTENTIVEMENT
1 Lisez les instructions ci-après.
2 Conservez ces instructions.
3 Tenez compte des avertissements.
4 Suivez toutes les instructions.
5 N'utilisez pas cet instrument dans un milieu humide.
6 Employez uniquement un chiffon sec pour nettoyer
l'instrument.
7 N'obstruez pas les ouvertures prévues pour la
ventilation. Installez l'instrument conformément aux
instructions du fabricant.
8 N'installez pas l'instrument près d'une source de
chaleur, notamment un radiateur, une bouche de
chaleur, un poêle ou autres (y compris les
amplificateurs).
9 Ne modifiez pas les caractéristiques de la fiche avec
mise à la terre polarisée. Une fiche polarisée est
dotée de deux broches (l'une est plus large que
l'autre). Une fiche avec mise à la terre comprend
deux broches, ainsi qu'une troisième qui relie
l'instrument à la terre. La broche la plus large (ou
troisième broche) permet de sécuriser l'installation
électrique. Si vous ne pouvez pas brancher le cordon
d'alimentation dans la prise d'alimentation,
demandez à un électricien de la remplacer.
10 Protégez le cordon d'alimentation. Cela permet
d'éviter de marcher dessus ou de le tordre au niveau
de la fiche, de la prise d'alimentation et des points de
contact sur l'instrument.
11 N'employez que les dispositifs/accessoires indiqués
par le fabricant.
12 Utilisez uniquement le chariot,
le socle, le trépied, le support
ou le plan indiqués par le
fabricant ou livrés avec
l'instrument. Si vous utilisez
un chariot, soyez prudent si
vous le déplacez avec
l'instrument posé dessus pour
éviter de le renverser.
13 Débranchez l'instrument en cas d'orage ou lorsque
vous ne l'utilisez pas pendant des périodes
prolongées.
14 Confiez toutes les réparations à des techniciens
qualifiés. Des réparations sont nécessaires lorsque
l'instrument est endommagé, notamment dans les
cas suivants : cordon d'alimentation ou fiche
défectueuse, liquides ou objets projetés sur
l'appareil, exposition aux intempéries ou à
l'humidité, fonctionnement anormal ou chute.
(UL60065_03)
ATTENTION
RISQUE D'ÉLECTROCUTION
NE PAS OUVRIR
ATTENTION : POUR RÉDUIRE LES RISQUES D'ÉLECTROCUTION,
NE PAS RETIRER LE CAPOT (OU LE DOS). NE CONTIENT
PAS DE PIÈCES NÉCESSITANT L'INTERVENTION
DE L'UTILISATEUR. POUR TOUTE INTERVENTION,
FAIRE APPEL À DES PROFESSIONNELS QUALIFIÉS.
AVERTISSEMENT
N'UTILISEZ PAS L'INSTRUMENT SOUS LA PLUIE OU DANS UN ENVIRONNEMENT HUMIDE, FAUTE DE QUOI
VOUS RISQUEZ DE PROVOQUER UN INCENDIE OU DE VOUS ÉLECTROCUTER.

S6
MX49 MX61 MX88 Owner’s Manual
PRECAUTIONS
PLEASE READ CAREFULLY BEFORE PROCEEDING
Please keep this manual in a safe and handy place for future reference.
WARNING
• This AC adaptor is designed for use with only Yamaha electronic
instruments. Do not use for any other purpose.
• Indoor use only. Do not use in any wet environments.
CAUTION
• When setting up, make sure that the AC outlet is easily accessible. If
some trouble or malfunction occurs, immediately turn off the power
switch of the instrument and disconnect the AC adaptor from the
outlet. When the AC adaptor is connected to the AC outlet, keep in
mind that electricity is flowing at the minimum level, even if the
power switch is turned off. When you are not using the instrument
for a long time, make sure to unplug the power cord from the wall
AC outlet.
WARNING
Always follow the basic precautions listed below to avoid the possibility of serious injury or even death from electrical
shock, short-circuiting, damages, fire or other hazards. These precautions include, but are not limited to, the following:
• Do not place the power cord near heat sources such as heaters or
radiators. Also, do not excessively bend or otherwise damage the
cord, or place heavy objects on it.
• Only use the voltage specified as correct for the instrument. The
required voltage is printed on the name plate of the instrument.
• Use the specified adaptor (page 40) only. Using the wrong adaptor
can result in damage to the instrument or overheating.
• Check the electric plug periodically and remove any dirt or dust
which may have accumulated on it.
• This instrument contains no user-serviceable parts. Do not open the
instrument or attempt to disassemble or modify the internal
components in any way. If it should appear to be malfunctioning,
discontinue use immediately and have it inspected by qualified
Yamaha service personnel.
• Do not expose the instrument to rain, use it near water or in damp or
wet conditions, or place on it any containers (such as vases, bottles
or glasses) containing liquids which might spill into any openings.
If any liquid such as water seeps into the instrument, turn off the
power immediately and unplug the power cord from the AC outlet.
Then have the instrument inspected by qualified Yamaha service
personnel.
• Never insert or remove an electric plug with wet hands.
• Do not put burning items, such as candles, on the unit.
A burning item may fall over and cause a fire.
• When one of the following problems occur, immediately turn off the
power switch and disconnect the electric plug from the outlet. Then
have the device inspected by Yamaha service personnel.
- The power cord or plug becomes frayed or damaged.
- It emits unusual smells or smoke.
- Some object has been dropped into the instrument.
- There is a sudden loss of sound during use of the instrument.
For AC adaptor
For Instrument
Power supply/AC adaptor
Do not open
Water warning
Fire warning
If you notice any abnormality
DMI-5 1/2

MX49 MX61 MX88 Owner’s Manual
S7
CAUTION
Always follow the basic precautions listed below to avoid the possibility of physical injury to you or others, or damage
to the instrument or other property. These precautions include, but are not limited to, the following:
• Do not connect the instrument to an electrical outlet using a
multiple-connector. Doing so can result in lower sound quality, or
possibly cause overheating in the outlet.
• When removing the electric plug from the instrument or an outlet,
always hold the plug itself and not the cord. Pulling by the cord can
damage it.
• Remove the electric plug from the outlet when the instrument is not
to be used for extended periods of time, or during electrical storms.
• Do not place the instrument in an unstable position where it might
accidentally fall over.
• Before moving the instrument, remove all connected cables, to
prevent damage to the cables or injury to anyone who might trip
over them.
• When setting up the product, make sure that the AC outlet you are
using is easily accessible. If some trouble or malfunction occurs,
immediately turn off the power switch and disconnect the plug from
the outlet. Even when the power switch is turned off, electricity is
still flowing to the product at the minimum level. When you are not
using the product for a long time, make sure to unplug the power
cord from the wall AC outlet.
• Before connecting the instrument to other electronic components,
turn off the power for all components. Before turning the power on
or off for all components, set all volume levels to minimum.
• Be sure to set the volumes of all components at their minimum
levels and gradually raise the volume controls while playing the
instrument to set the desired listening level.
• Do not insert a finger or hand in any gaps on the instrument.
• Never insert or drop paper, metallic, or other objects into the gaps
on the panel. This could cause physical injury to you or others,
damage to the instrument or other property, or operational failure.
• Do not rest your weight on, or place heavy objects on the
instrument, and do not use excessive force on the buttons, switches
or connectors.
• Do not use the instrument/device or headphones for a long period of
time at a high or uncomfortable volume level, since this can cause
permanent hearing loss. If you experience any hearing loss or
ringing in the ears, consult a physician.
Always turn the power off when the instrument is not in use.
Even when the [ ] (Standby/On) switch is in standby status (display is off), electricity is still flowing to the instrument at the minimum level.
When you are not using the instrument for a long time, make sure you unplug the power cord from the wall AC outlet
Power supply/AC adaptor
Location
Connections
Handling caution
Yamaha cannot be held responsible for damage caused by improper use or modifications to the instrument, or data that is lost or destroyed.
DMI-5 2/2

MX49 MX61 MX88 Mode d'emploi
S3
PRÉCAUTIONS D'USAGE
PRIÈRE DE LIRE ATTENTIVEMENT AVANT DE PROCÉDER
À TOUTE MANIPULATION
Rangez ce manuel en lieu sûr et à portée de main afin de pouvoir le consulter ultérieurement.
AVERTISSEMENT
• L'adaptateur secteur est conçu pour être utilisé exclusivement avec
les instruments de musique électroniques Yamaha. Ne l'affectez pas
à un autre usage.
• Utilisation en intérieur uniquement. N'utilisez pas l'adaptateur dans
un environnement humide.
ATTENTION
• Lors de l'installation, assurez-vous que la prise secteur est facilement
accessible. En cas de problème ou de dysfonctionnement, désactivez
immédiatement l'interrupteur d'alimentation de l'instrument et retirez
l'adaptateur secteur de la prise de courant. Lorsque l'adaptateur
secteur est branché dans la prise secteur, gardez à l'esprit qu'une
faible dose d'électricité circule toujours dans l'instrument, même si
l'interrupteur d'alimentation est désactivé. Lorsque vous n'utilisez
pas l'instrument pendant une période prolongée, veillez à débrancher
le cordon d'alimentation de la prise murale.
AVERTISSEMENT
Veillez à toujours observer les précautions élémentaires énumérées ci-après pour éviter de graves blessures, voire la
mort, en raison d'une électrocution, d'un court-circuit, de dégâts, d'un incendie ou de tout autre risque. La liste de ces
précautions n'est pas exhaustive :
• Ne laissez pas le cordon d'alimentation à proximité de sources de
chaleur telles que les radiateurs ou les éléments chauffants.
Évitez également de le plier de façon excessive ou de l'endommager de
quelque manière que ce soit ou de placer dessus des objets lourds.
• Utilisez uniquement la tension requise pour l'instrument.
Celle-ci est indiquée sur la plaque du fabricant de l'instrument.
• Utilisez uniquement l'adaptateur spécifié (page 40). L'utilisation
d'un adaptateur inapproprié peut endommager l'instrument ou
entraîner une surchauffe.
• Vérifiez périodiquement l'état de la fiche électrique, dépoussiérez-la
et nettoyez-la.
• L'instrument ne contient aucune pièce nécessitant l'intervention
de l'utilisateur. N'ouvrez pas l'instrument et ne tentez pas d'en
démonter les éléments internes ou de les modifier de quelque façon
que ce soit. Si l'appareil présente des signes de dysfonctionnement,
mettez-le immédiatement hors tension et faites-le contrôler par un
technicien Yamaha qualifié.
• N'exposez pas l'instrument à la pluie et ne l'utilisez pas près d'une
source d'eau ou dans un milieu humide. Ne déposez pas dessus des
récipients (tels que des vases, des bouteilles ou des verres) contenant
des liquides qui risqueraient de s'infiltrer par les ouvertures. Si un
liquide, tel que de l'eau, pénètre à l'intérieur de l'instrument, mettez
immédiatement ce dernier hors tension et débranchez le cordon
d'alimentation de la prise secteur. Faites ensuite contrôler l'instrument
par un technicien Yamaha qualifié.
• N'essayez jamais de retirer ou d'insérer une fiche électrique avec les
mains mouillées.
• Ne déposez pas des objets présentant une flamme, tels que des
bougies, sur l'instrument. Ceux-ci pourraient se renverser et
provoquer un incendie.
• Si l'un des problèmes suivant survient, coupez immédiatement
l'alimentation et retirez la fiche électrique de la prise. Faites ensuite
contrôler l'appareil par un technicien Yamaha.
- Le cordon électrique s'effiloche ou est endommagé.
- L'instrument dégage une odeur inhabituelle ou de la fumée.
- Un objet est tombé à l'intérieur de l'instrument.
- Une brusque perte de son est intervenue durant l'utilisation
de l'instrument.
Adaptateur secteur
Instrument
Alimentation/Adaptateur secteur
Ne pas ouvrir
Prévention contre l'eau
Prévention contre les incendies
En cas d'anomalie
DMI-5 1/2

S4
MX49 MX61 MX88 Mode d'emploi
ATTENTION
Observez toujours les précautions élémentaires reprises ci-dessous pour éviter tout risque de blessures corporelles,
pour vous-même ou votre entourage, ainsi que la détérioration de l'instrument ou de tout autre bien. La liste de ces
précautions n'est pas exhaustive :
• N'utilisez pas de connecteur multiple pour brancher l'instrument sur
une prise secteur. Cela risque d'affecter la qualité du son, voire de
provoquer la surchauffe de la prise.
• Veillez à toujours saisir la fiche, et non le cordon, pour débrancher
l'instrument de la prise d'alimentation. Si vous tirez sur le cordon,
vous risquez de l'endommager.
• Débranchez la fiche électrique de la prise secteur lorsque vous
n'utilisez pas l'instrument pendant un certain temps ou en
cas d'orage.
• Ne placez pas l'instrument dans une position instable afin d'éviter
qu'il ne tombe accidentellement.
• Avant de déplacer l'instrument, débranchez-en tous les câbles afin
d'éviter de les endommager ou de blesser quiconque risquerait de
trébucher dessus.
• Lors de la configuration de l'instrument, assurez-vous que la prise
secteur que vous utilisez est facilement accessible. En cas de
problème ou de dysfonctionnement, coupez immédiatement
l'alimentation et retirez la fiche de la prise. Même lorsque
l'interrupteur d'alimentation est en position d'arrêt, du courant
électrique de faible intensité continue de circuler dans l'instrument.
Si vous n'utilisez pas l'instrument pendant une période prolongée,
veillez à débrancher le cordon d'alimentation de la prise murale.
• Avant de raccorder l'instrument à d'autres appareils électroniques,
mettez ces derniers hors tension. Avant de mettre ces appareils sous
ou hors tension, réglez tous les niveaux de volume sur le
son minimal.
• Veillez également à régler tous les appareils sur le volume minimal
et à augmenter progressivement les commandes de volume tout en
jouant de l'instrument pour obtenir le niveau sonore souhaité.
• Ne glissez pas les doigts ou la main dans les fentes de l'instrument.
• Évitez d'insérer ou de laisser tomber des morceaux de papier,
des pièces métalliques ou tout autre objet dans les interstices du
panneau. Vous pourriez vous blesser ou provoquer des blessures
à votre entourage, endommager l'instrument ou un autre bien ou
causer des dysfonctionnements au niveau de l'instrument.
• Ne vous appuyez pas sur l'instrument et ne déposez pas d'objets
lourds dessus. Ne manipulez pas trop brutalement les touches,
les sélecteurs et les connecteurs.
• N'utilisez pas l'instrument ou le casque de manière prolongée à des
niveaux sonores trop élevés ou inconfortables qui risqueraient
d'entraîner des troubles définitifs de l'audition. Si vous constatez
une baisse d'acuité auditive ou que vous entendez des sifflements,
consultez un médecin.
Mettez toujours l'instrument hors tension lorsque vous ne l'utilisez pas.
Notez que même lorsque l'interrupteur [ ] (Veille/Marche) est en position de veille (l'écran est éteint), une faible quantité de courant électrique
circule toujours dans l'instrument.
Lorsque vous n'utilisez pas l'instrument pendant une période prolongée, veillez à débrancher le cordon d'alimentation de la prise murale.
Alimentation/Adaptateur secteur
Emplacement
Connexions
Précautions de manipulation
Yamaha ne peut être tenu responsable des détériorations causées par une mauvaise manipulation de l'instrument ou par des modifications
apportées par l'utilisateur, ni des données perdues ou détruites.
DMI-5 2/2

S8
MX49 MX61 MX88 Owner’s Manual
The model number, serial number, power requirements, etc., may
be found on or near the name plate, which is at the bottom of the
unit. You should note this serial number in the space provided
below and retain this manual as a permanent record of your pur-
chase to aid identification in the event of theft.
Model No.
Serial No.
(bottom_en_01)
OBSERVERA!
Apparaten kopplas inte ur växelströmskällan (nätet) så länge som
den ar ansluten till vägguttaget, även om själva apparaten har
stängts av.
ADVARSEL: Netspændingen til dette apparat er IKKE afbrudt,
sålænge netledningen sidder i en stikkontakt, som er tændt —
også selvom der er slukket på apparatets afbryder.
VAROITUS: Laitteen toisiopiiriin kytketty käyttökytkin ei irroita
koko laitetta verkosta.
(standby)
(weee_eu_en_02)
Information for users on collection and disposal of old equipment:
This symbol on the products, packaging, and/or accompanying documents means that used electrical and electronic
products should not be mixed with general household waste.
For proper treatment, recovery and recycling of old products, please take them to applicable collection points, in accordance
with your national legislation.
By disposing of these products correctly, you will help to save valuable resources and prevent any potential negative effects
on human health and the environment which could otherwise arise from inappropriate waste handling.
For more information about collection and recycling of old products, please contact your local municipality, your waste
disposal service or the point of sale where you purchased the items.
For business users in the European Union:
If you wish to discard electrical and electronic equipment, please contact your dealer or supplier for further information.
Information on Disposal in other Countries outside the European Union:
This symbol is only valid in the European Union. If you wish to discard these items, please contact your local authorities or dealer and ask for
the correct method of disposal.

MX49 MX61 MX88 Owner’s Manual
S9
NOTICE
To avoid the possibility of malfunction/ damage to the product, damage to data, or damage to other property, follow the notices
below.
Handling and Maintenance
• Do not use the instrument in the vicinity of a TV, radio, stereo equipment, mobile phone, or other electric devices. Otherwise, the
instrument, TV, or radio may generate noise. When you use the instrument along with an application on your iPad, iPhone or iPod touch,
we recommend that you set “Airplane Mode” to “ON” on that device in order to avoid noise caused by communication.
• Do not expose the instrument to excessive dust or vibrations, or extreme cold or heat (such as in direct sunlight, near a heater, or in a car
during the day) to prevent the possibility of panel disfiguration, damage to the internal components or unstable operation.
• Do not place vinyl, plastic or rubber objects on the instrument, since this might discolor the panel or keyboard.
• When cleaning the instrument, use a soft, cloth. Do not use paint thinners, solvents, alcohol, cleaning fluids, or chemical-impregnated
wiping cloths.
Saving data
• The data in the instrument’s Edit Buffer (memory location for edited data) is lost when you turn off the power to the instrument. Save the
data to the user memory (internal storage memory), or to USB flash drive/an external device such as a computer. However, the data
saved to the user memory may be lost due to some failure, an operation mistake, etc. Save your important data onto USB flash drive/an
external device such as a computer.
• To protect against data loss through USB flash drive damage, we recommend that you save your important data onto spare USB flash
drive or an external device such as a computer as backup data.
Infor mation
About copyrights
• Copying of the commercially available musical data including but not limited to MIDI data and/or audio data is strictly prohibited except
for your personal use.
• This product incorporates and bundles contents in which Yamaha owns copyrights or with respect to which Yamaha has license to use
others’ copyrights. Due to copyright laws and other relevant laws, you are NOT allowed to distribute media in which these contents are
saved or recorded and remain virtually the same or very similar to those in the product.
* The contents described above include a computer program, Accompaniment Style data, MIDI data, WAVE data, voice recording data, a
score, score data, etc.
* You are allowed to distribute medium in which your performance or music production using these contents is recorded, and the
permission of Yamaha Corporation is not required in such cases.
About functions/data bundled with the instrument
• This device is capable of using various types/formats of music data, and automatically optimizes that data to the proper format before
use. As a result, this device may not play back the data exactly as the producers or composers of the data originally intended.
About this manual
• The illustrations and LCD screens as shown in this manual are for instructional purposes only, and may appear somewhat different from
those on your instrument.
• Windows is a registered trademark of Microsoft
®
Corporation in the United States and other countries.
• Apple, iTunes, Mac, Macintosh, iPhone, iPad and iPod touch are trademarks of Apple Inc., registered in the U.S. and other countries.
• IOS is a trademark or registered trademark of Cisco in the U.S. and other countries and is used under license.
• The company names and product names in this manual are the trademarks or registered trademarks of their respective companies.
Yamaha may from time to time update firmware of the product without notice for improvement in functions and usability. To take full
advantage of this instrument, we recommend that you upgrade your instrument to the latest version. The latest firmware can be
downloaded from the website below:
http://download.yamaha.com/

2
MX49 MX61 MX88 Owner’s Manual
Introduction
Thank you for purchasing the Yamaha MX49, MX61, or MX88 (hereafter referred to in this Owner’s Manual as this
instrument) Music Synthesizer. Please read this owner’s manual carefully before using the instrument in order to take full
advantage of its various features. When you have finished reading the manual keep it in a safe, accessible place, and
refer to it when you need to better understand an operation or function.
Accessories
• Owner’s Manual (this book)
• CUBASE AI DOWNLOAD INFORMATION
•AC adaptor*
*May not be included in your area. Please check with your Yamaha dealer.

MX49 MX61 MX88 Owner’s Manual
3
About the Manuals
This instrument has the following documents and instructional materials.
Included Documents
Owner’s Manual (this book)
Describes how to set up your instrument and how to perform basic operations. This is the document you should
read first when you start playing and using the instrument.
Online Materials (PDF)
Reference Manual
Describes the internal design of your instrument, how to use a connected computer, and all parameters that can
be adjusted and set. The manual includes the following contents.
Synthesizer Parameter Manual
This general, cross-product document explains parameters, effect types, effect parameters, and MIDI messages
that are used for all synthesizers. Read the Owner’s Manual and Reference Manual first and then use this
parameter manual if necessary to learn more about parameters and terms that relate to Yamaha synthesizers in
general.
Data List
Provides lists such as the Voice List, Performance List, Arpeggio Type List, Effect Type List, as well as reference
materials such as the MIDI Data table and MIDI Implementation Chart.
Basic Structure
• Structure of the MX49, MX61, or MX88
• Controller block
• Tone Generator block
• Effect block
• Arpeggio block
• Song/ Pattern playing block
• Internal memory
• MIDI/Audio signal flow
Using a Connected Computer
• Connecting to a computer
• Creating a Song with a computer
Using iOS Applications
Reference
• Performance
• Song/Pattern settings
•File
• Utility
• Remote mode
How to use the PDF manuals
The Reference Manual, the Synthesizer Parameter Manual, and the Data List are provided as data documents in
PDF format. The PDF manuals listed above can be obtained from the Yamaha Downloads web page. To do so, go to
the web page using the following URL, enter “MX49,” “MX61,” or “MX88” into the “Model Name” field, and then click
“Search.”
Yamaha Downloads:
http://download.yamaha.com/
These PDF files can be viewed and read on a computer. When using Adobe
®
Reader
®
to view a PDF file, you can
search for specific words, print a specific page or link to open a desired section in the manual. The term search and
link functions are especially convenient methods of navigating through a PDF file, and we recommend that you use
them. The latest version of Adobe Reader can be downloaded from the following URL.
http://www.adobe.com/products/reader/

4
MX49 MX61 MX88 Owner’s Manual
Main Features
Dynamic, MOTIF-based Sounds
This instrument contains a wide range of dynamic and authentic waveforms derived directly from the world famous
Yamaha MOTIF (including the realistic instrument sounds of acoustic piano, electric piano, synthesizer, drums, and many
others). These give you exceptionally high-quality sound for playing and recording in various musical genres. Moreover,
you can easily play back phrases of each instrument—even complex phrases impossible to play live—by using the
Arpeggio function. The instrument also features an extensive effect system—including VCM (Virtual Circuitry Modeling)
Effects, REV-X (high grade Reverb) Effects, and Master EQ. In a wide variety of ways, this instrument truly enhances and
inspires your music performance and creation.
Easy-to-use user interface
This instrument has been designed for easy playability and simple, intuitive operation. For example, the Category
buttons let you quickly select a desired Voice from easy-to-understand groups, based on the general instrument type or
sound characteristics. The useful and popular Layer function (playing two Voices together) and Split function (playing
two separate Voices with your left and right hands) can also be set instantly. What’s more, four Knobs are available on the
panel—letting you control twelve aspects of the sound, and tweak them in real time as you play.
Highly portable, with easy-to-carry design
This instrument can go virtually wherever you go, thanks to its light weight and compact size. The MX49 is designed slim
and trim, so that it easily fits on your desk or in front of your computer. The MX61 has a indented handle at the bottom,
allowing you to easily carry it with one hand.
Jam along with the Rhythm Patterns and Songs
This instrument features a wealth of dynamic Rhythm Patterns in wide variety of musical genres. You can play the
keyboard along with Rhythm Pattern playback—a truly inspiring way to perform! The instrument also conveniently lets
you play back MIDI and Audio data contained in USB flash memory—letting you easily use Song data created on
computer during live performance, without needing a computer! Plus, an [AUX IN] jack allows you to connect a portable
music player, so that you can play the keyboard along with your favorite songs.
Full music production capabilities—with just this instrument!
Both MIDI and audio data can be transferred to and from a computer via USB—without the need for a separate audio
interface or a MIDI interface. You can record and play MIDI data, record digital audio data from this instrument directly,
and monitor the DAW sound from the OUTPUT [L/MONO] jack/ [PHONES] jack.
Integration with Cubase
This instrument is specially designed to work seamlessly with Cubase, Steinberg’s full-featured DAW software—giving
you a comprehensive, all-in-one music production system, in which hardware and software are fully integrated.
USB audio and MIDI Class-Compliant for easy connection to iOS applications
This instrument can connect to iOS by using USB Audio/MIDI Class Compliant. You can use Stereo Audio In/Out and
MIDI In/Out with iPhone and iPad through Apple’s Lightning - USB Camera Adapter. Combining the
instrument with an iOS
audio application, you can get a mobile audio recording solution.

MX49 MX61 MX88 Owner’s Manual
5
PRECAUTIONS ................................................... S6
Introduction .............................................................2
Accessories.............................................................2
About the Manuals ..................................................3
Included Documents.................................................. 3
Online Materials (PDF)............................................... 3
Main Features .........................................................4
Controls and Functions 6
Front Panel .............................................................6
Rear Panel ..............................................................8
Setting Up 9
Power supply...........................................................9
Connecting speakers or headphones .....................9
Powering up the system..........................................9
Auto Power Off function ........................................10
Adjusting the volume and the brightness of the
display ...................................................................10
Playing the Demo Songs.......................................10
Resetting User Memory to the initial factory
settings..................................................................11
Basic Operation and Displays 12
Moving the cursor..................................................12
Changing (editing) parameter values....................12
Selecting an item from a List.................................12
Selecting a page ...................................................13
Note settings .........................................................13
Naming (inputting characters) ...............................13
Leaving the current display ...................................13
Quick Guide 14
Playing the Voices.................................................14
Selecting a Voice for Part 1...................................... 14
Selecting a Voice for Part 2...................................... 15
Combining Voices (Layer) ....................................... 15
Playing separate Voices with your left and right hands
(Split)........................................................................ 16
Changing the tonal qualities of the Voice with the
controllers..............................................................17
Controllers on the front panel................................... 17
External Controllers ................................................. 18
Using the Arpeggio function ................................. 18
Playing back the Arpeggio ...................................... 18
Changing the Arpeggio tempo ................................ 19
Changing the Arpeggio type ................................... 19
Keyboard Octave/Transpose settings .................. 20
Octave...................................................................... 20
Transpose ................................................................ 20
Storing the edited settings.................................... 20
Playing the Performances .................................... 20
Playing back Rhythm Patterns ............................. 21
Playing the keyboard with the Rhythm Pattern ........ 21
Changing the Rhythm Pattern type and sound........ 22
Changing the tempo for the Rhythm Pattern ........... 22
Playing the keyboard along with Songs ............... 23
Songs compatible with this instrument .................... 23
Playing back MIDI data of the USB flash memory... 23
Playing back audio data of the USB flash memory 24
Playing back song data of a portable music player 25
Creating an original Performance......................... 25
Selecting the Reverb/Chorus type
(Common Edit/Part Edit) .......................................... 25
Changing the Insertion Effect of the Voice
(Voice Edit)............................................................... 27
Changing the Controller Set for the Voice
(Voice Edit)............................................................... 28
Storing a Voice (Voice Store) ................................... 29
Storing a Performance (Performance Store)............ 29
Changing Voices smoothly while performing ....... 30
Making Global System Settings (Utility settings).. 31
Changing the Master Tune setting........................... 31
Adjusting the brightness of the display
(LCD Contrast) ......................................................... 31
Saving/loading files on USB flash memory
(File settings)........................................................ 31
Formatting the USB flash memory ........................... 31
Saving settings to USB flash memory...................... 32
Loading the settings from a USB flash memory ...... 32
Connecting an external MIDI instrument.............. 33
Controlling the instrument from an external MIDI
keyboard or synthesizer........................................... 33
Controlling an external MIDI keyboard or synthesizer
from the instrument .................................................. 34
Appendix 35
Shift Function List................................................. 35
Display Messages ................................................ 35
Troubleshooting.................................................... 37
Specifications ....................................................... 40
Index .................................................................... 41
Contents

6
MX49 MX61 MX88 Owner’s Manual
Front Panel
[MASTER VOLUME] knob (page 10)
Adjusts the volume of the overall sound.
Pitch Bend Wheel (page 17)
Bends the pitch of the notes up or down while playing
the keyboard.
Modulation Wheel (page 17)
Controls vibrato applied to the sound.
Knobs [A] – [D] (page 17)
These four highly versatile knobs let you adjust various
aspects or parameters of Parts 1 and 2.
[KNOB FUNCTION] button (page 17)
Changes the functions assigned to Knobs [A] – [D].
[PART 1-2 LINK] button (page 17)
Determines the sound which is applied to the Knob
effects.
[DAW REMOTE] button (See Reference
Manual)
Turning on this button enters the Remote mode. The
Remote mode lets you control DAW software on your
computer from the panel controls of the instrument.
TRANSPOSE [-]/[+] buttons (page 20)
Use these buttons to raise or lower the pitch of the notes
in semitone steps.
OCTAVE [-]/[+] buttons (page 20)
Use these buttons to change the note range of the
keyboard.
Transport buttons (pages 21 and 23)
[] (Stop) button
Press to stop playback of Rhythm Pattern or Song data.
[ / ] (Play/Pause) button
Press to alternately start/pause playback of a Rhythm
Pattern or Song data from the current point.
[FILE] button (page 31)
Calls up the File display from which you can transfer files
between this instrument and USB flash memory.
[UTILITY] button (page 31)
Calls up the Utility display from which you can set
parameters that apply to the entire system of this
instrument.
[EDIT] button
Calls up the display from which you can edit a
Performance (page 20). Also, pressing this button while
editing lets you switch between the just-edited sound
and its original, unedited condition, allowing you to hear
how your edits affect the sound (Compare function).
[JOB] button (Refer to the Reference Manual)
Calls up the Performance Job or Utility Job display.
[STORE] button
Stores the Performance/Voice/Utility settings.
Controls and Functions
C2 D2 E2 F2 G2 A2 B2 C3 C4
(The illustration is of the MX49; however, the controls and terminals of the MX61 and MX88 are the same.)

MX49 MX61 MX88 Owner’s Manual
Controls and Functions
7
[PERFORMANCE NUMBER] display
Indicates the number of the selected Performance.
[SELECT] button (page 20)
Calls up the display from which you can select a
Performance.
LCD (Liquid Crystal Display) (page 10)
The backlit LCD indicates the parameters and values
related to the currently selected operation or function.
[DATA] dial (page 12)
Changes the selected value in the display.
[SHIFT] button (page 35)
Pressing this button along with another button enables
you to execute various alternate commands of the
respective buttons.
[INC/YES]/[DEC/NO] buttons (page 12)
For increasing/decreasing the value of the currently
selected parameter.
Cursor buttons (page 12)
These move the “cursor” around the display, and scroll
through the pages of the edited display.
[EXIT] button
The menus and displays of the instrument are organized
according to a hierarchical structure. Press this button to
exit from the current display and return to the previous
level in the hierarchy.
[ENTER] button
Use this button to select the display to be edited, to
define the value, and to execute a Job or a Store
operation.
[LAYER] button (page 15), [SPLIT] button
(page 16)
These buttons respectively layer different Voices of Parts
1 and 2, and split the keyboard into left and right parts.
[ARP] button (page 18)
Determines whether the Arpeggio function is applied to
the entire Performance or not.
[RHYTHM PATTERN] button (page 21)
Calls up the display from which you can select a Rhythm
Pattern.
[EXT. SONG] (External Song) button (page 23)
Calls up the display from which you can select Song
data of the USB flash memory connected to the USB [TO
DEVICE] terminal.
[TEMPO] button (pages 19, 22 and 23)
Calls up the display from which you can set the tempo
for the Arpeggio/ Rhythm Pattern/ Song.
Voice Category button (page 14)
Selects a Voice category for Part 1/Part2.
[PART SELECT] button
Calls up the display from which you can select a Part
from Parts 1 – 16 and play it.
C5 C6

8
MX49 MX61 MX88 Owner’s Manual
Controls and Functions
Rear Panel
DC IN jack (page 9)
Connect the supplied power adaptor to this connector.
(Standby/On) switch (page 9)
Press to turn the power On ( ) or set to Standby ( ).
MIDI [IN]/[OUT] terminals (page 33)
MIDI [IN] is for receiving control or performance data
from another MIDI device.
MIDI [OUT] is for transmitting all control, performance
and playback data from this instrument to another MIDI
device.
USB terminals
There are two different types of USB terminals, and the
rear panel of the instrument features both.
The USB [TO HOST] terminal is used to connect this
instrument to the computer via a USB cable and allows
you to transfer MIDI data and audio data between the
devices. For information about the Port handled by the
instrument, refer to the “Reference Manual” PDF
document.
The USB [TO DEVICE] terminal is used to connect this
instrument to a USB flash memory via a USB cable. For
details, see pages 23 and 31.
[SUSTAIN] jack (page 18)
For connection of an optional FC3A, FC4A, or FC5
Footswitch. When connecting an FC4A or FC5, this also
enables footswitch control over various other functions.
[FOOT CONTROLLER] jack (page 18)
For connection of an optional FC7 Foot controller. This
jack lets you continuously control one of various different
assignable functions—including volume, tone, pitch, or
other aspects of the sound.
[AUX IN] (Auxiliary Input) jack (page 25)
The Auxiliary Input stereo mini-jack is used to input audio
from an external audio device. For example, you can use
this jack to connect a portable music player and play
along with your favorite music.
NOTE
Use the external device’s volume control to adjust the
desired level balance with this instrument.
OUTPUT [L/MONO]/[R] jacks
Line level audio signals are output via these phone jacks.
For monophonic output, use only the [L/MONO] jack.
[PHONES] (Headphone) jack
This standard stereo phones jack is for connection to a
set of stereo headphones. The audio output is identical
to that of the OUTPUT [L/MONO]/[R] jack.
MX49, MX61
MX88

MX49 MX61 MX88 Owner’s Manual
9
Power supply
Make connections for the supplied power adaptor
(page 40) in the following order. Before you connect the
power adaptor, make sure that the power of this
instrument is set to Standby status ().
1 Wrap the DC output cable of the power
adaptor around the cable clip (as shown
below), then connect the plug of the adaptor
to the DC IN jack on the rear panel.
NOTE Use of the cable clip prevents accidental unplugging of the
cable during operation. Make sure to avoid tightening the
cord more than necessary or pulling on the cord strongly
while it is wrapped around the cable clip to prevent wear on
the cord or possible breakage of the clip.
2 Connect the other end of the power adaptor
to an AC outlet.
NOTE Follow this procedure in reverse order when disconnecting
the power adaptor.
WARNING
• Use only the specified adaptor (page 40). The use of other
adaptors may result in irreparable damage to both the
adaptor and the instrument.
• When using the AC adaptor with
a removable plug, make sure to
keep the plug attached to the AC
adaptor. Using the plug alone
can cause electric shock or fire.
• Never touch the metallic section
when attaching the plug. To avoid
electric shock, short circuit or
damage, also be careful that
there is no dust between the AC
adaptor and plug.
CAUTION
Even when the power of this instrument is in the Standby
status, electricity is still flowing to the instrument at the
minimum level. When you are not using the instrument for a
long time, make sure you unplug the power adaptor from the
wall AC outlet.
Connecting speakers or
headphones
Since this instrument has no built-in speakers, you will
need to monitor the sound of the instrument by using
external equipment. Connect a set of headphones,
powered speakers, or other playback equipment as
illustrated below. When making connections, be sure that
your cables have the appropriate ratings.
NOTICE
Before connecting this instrument to external devices, turn
off the power to all the devices.
Powering up the system
Make sure the volume settings of this instrument and
external devices such as powered speakers are turned
down to the minimum before turning the power on. When
connecting this instrument to the powered speakers, turn
on the power switch of each device in the following order.
When turning the power on:
First, turn the power of the instrument on with the
(Standby/On) switch, then turn the power of the
connected powered speakers on.
When turning the power off:
First, turn the power of the connected powered speakers
off, then turn the power of the instrument off with the
(Standby/On) switch.
Setting Up
MX49, MX61 MX88
Power adaptor
AC outlet
Plug
Slide the plug
as indicated
The shape of the plug differs
depending on your area.
Powered speaker
(Left)
Powered speaker
(Right)
OUTPUT [L/MONO] OUTPUT [R]
Headphones
[PHONES]
Standard mono phone
plugs
Standard stereo phone plug
MX49, MX61, or MX88
Standby/On switch DC IN
MX49, MX61, or MX88

MX49 MX61 MX88 Owner’s Manual
Setting Up
10
Auto Power Off function
To prevent unnecessary power consumption, this
instrument features an Auto Power Off function that
automatically turns the power off if the instrument is not
operated for a specified period of time. In the default
settings, the power will be turned off if this instrument is
not operated for 30 minutes.
If you wish to disable the Auto Power Off function, turn the
power on while holding down the lowest key on the
keyboard. An “Auto power off disabled” message
appears briefly and Auto Power Off is disabled. The
setting is retained even if the power is turned off.
The amount of time that elapses before the power is
automatically turned off can be set by the following
operation.
[UTILITY] Select “01:General” with Cursor [ ] button
[ENTER] Select “AutoOff” with Cursor [ ] button,
then change the value with [DATA] dial [STORE]
NOTICE
• Depending on the instrument status (for example, the
settings have been modified but not yet stored), the power
may not turn off automatically, even after the elapse of the
specified period of time. Always turn off the power
manually when the instrument is not in use.
• When the instrument is not operated for a specified period
of time while connected to an external device such as an
amplifier, speaker or computer, make sure to follow the
instructions in the Owner’s Manual to turn off the power to
the instrument and the connected devices, in order to
protect the devices from damage. If you do not want the
power to turn off automatically when a device is
connected, disable Auto Power Off.
• When Auto Power Off is set to “off,” the value will be
retained even if the backup data saved on another device
is loaded to the instrument. When Auto Power Off is set to
something other than “off,” the value will be overwritten
with loaded data.
• Keep in mind that the amount of time that elapses before
the power automatically turns off is reset to 30 minutes if
you execute the Factory Set function (page 11).
NOTE • The setting time is approximate.
• To turn the power on after Auto Power Off has been exe-
cuted, press the Standby/On switch once to set it to
Standby, and then press it again to set to On.
Adjusting the volume and
the brightness of the
display
Adjust the volume levels of this instrument and the
connected amplifier/speaker system.
NOTE When connecting to a set of powered speakers or PA
equipment, set the Master Volume to about 70%, then raise
the volume of the powered speakers or PA equipment to the
appropriate level.
CAUTION
Do not listen with the headphones at high volume for long
periods of time. Doing so may cause hearing loss.
If the display is not easily visible, while holding down
[UTILITY], press [INC/YES]/[DEC/NO] to adjust for
optimum visibility.
Playing the Demo Songs
The instrument features a variety of Demo Songs,
showcasing its dynamic sound and sophisticated
functions.
Here’s how to play them back.
1 Press [FILE] and [UTILITY] at the same time.
The DEMO display is called up.
2 Rotate the [DATA] dial to select a Demo Song.
3 Press [F/ K] (Play/Pause) to play back the
Demo Song.
The Demo Song currently shown on the display starts.
NOTE To adjust the volume level of the Demo Songs, use the
[MASTER VOLUME] Knob.
4 Press [J] (Stop) to stop the Demo Song.
5 In order to leave the DEMO display, press
[EXIT].
Adjust the volume
with the [MASTER
VOLUME] knob.
Adjust the display contrast.
MX49, MX61, or MX88

MX49 MX61 MX88 Owner’s Manual
Setting Up
11
Resetting User Memory to
the initial factory settings
The original factory settings of this synthesizer’s User
Memory can be restored as described here. The
Performances, User Voices, and Utility settings of the
User Memory will be reset to the initial factory settings.
This operation is especially handy when you’ve
unintentionally deleted or overwritten the Performances
or Utility settings.
NOTICE
When the factory settings are restored, all the Performance,
User Voice, and system settings in the Utility display you
created will be erased. Make sure you are not overwriting any
important data. Be sure to save all important data to your
USB flash memory before executing this procedure
(page 32).
1 Press [UTILITY], then press [JOB].
The Utility Job Select display is called up.
2 Use the Cursor [ ]/[ ] buttons to select the
“02:FactrySet,” then press [ENTER].
The Factory Set display is called up.
3 Press [ENTER].
The display prompts you for confirmation. To cancel
this operation, press [DEC/NO] here. In this case, in
order to return to the top display, press [EXIT]
repeatedly if necessary after canceling.
NOTICE
When setting the “Power On Auto” to on and executing
Factory Set, the Factory Set operation will automatically be
executed each time you turn the power on. Keep in mind that
this also means that your original data in the User Memory
will be erased each time you turn on the power. Therefore,
the parameter normally is set to off. If you set it to off and
execute Factory Set, the Factory Set operation will not be
executed when turning the power on the next time.
4 Press [INC/YES].
The Factory Set operation is executed.
NOTICE
For Factory Set operations that take longer to process, you
will see a message during processing. While such a
message is shown on the display, do not turn off the power.
Turning the power off in this state results in loss of all user
data and may cause the system to freeze (due to corruption
of data in the User Memory). This could also result in the
instrument not being able to start up properly, even when
turning the power on next time.
5 Press [EXIT] several times to return to the top
display.
JOB*Factory*Set
****PowerOn*Auto=off
qw**Are*you*sure?***
e****[NO]/[YES]****r

MX49 MX61 MX88 Owner’s Manual
12
Moving the cursor
The display cursor indicates a selected item and is
shown in the three following types.
Arrow type
This flashing triangular cursor indicates the selected
item’s line. You can move the cursor up or down by using
the Cursor [ ]/[ ] buttons.
Flash type
The selected item itself flashes. You can move the cursor
indication up/down/left/right by using the Cursor [ ]/[ ]/
[]/[ ] buttons.
Underline type
This flashing underline indicates the selected item. This
display actually has two cursor indicators: the underline
and the flash type. You can move the flash type cursor by
using the Cursor [ ]/[ ] buttons in this display, and
move the underline type cursor by using the Cursor []/
[] buttons.
Changing (editing)
parameter values
Rotating the [DATA] dial to the right (clockwise) increases
the value, while rotating it to the left (counter-clockwise)
decreases it. Pressing the [INC/YES] button increases a
parameter value by one step, and pressing [DEC/NO]
decreases it. Pressing and holding either button
continuously increases or decreases the value. For
parameters with large value ranges, you can increase the
value by 10 by while holding down the [SHIFT] button
and pressing the [INC/YES] button. To decrease by 10,
simultaneously hold down the [SHIFT] button and press
the [DEC/NO] button.
Selecting an item from a
List
When there are multiple displays to be edited, the name
of each display is indicated in a scrollable list as a
selected item.
In order to switch the selected item, use the Cursor [ ]/
[ ] buttons, then press [ENTER] to define the selection.
The icon displayed to the left of number indicates that
other items are available up (s) or down (a) in the list.
Basic Operation and Displays
AP
STR:081:Amb*Pizza
001:CncrtGrandc
Selected item
DrumKit
*Insert*Eff*
a
***
REV:
****
SPX
*
Hall
2
Selected item
AP*:*001:CncrtGrand
a
3
tyuiop@000123456789
Selected item
Increases
number
Decreases
number
Decreases
number
Increases
number
Common
a
01:Chorus*Eff
2
Number of the
selected item
Name of the selected item
(display to be edited)
a
d
s
Other selected item(s) available
further down
Other selected items available
either up or down
Other selected item(s) available
further up

MX49 MX61 MX88 Owner’s Manual
Basic Operation and Displays
13
Selecting a page
The display to be edited may consist of multiple pages.
In this case, the upper (s)/ lower (a) icons are indicated
at the bottom left of the display. You can select a page by
using the Cursor [ ]/[ ] buttons.
Note settings
Pressing a key lets you set a note value for the Split Point
parameter (page 16). You can set the desired Split Point
by holding down [SPLIT] and pressing the corresponding
key (only when [SPLIT] is set to on; the lamp lights).
Naming (inputting
characters)
You can freely name the data you’ve created, such as
that of Voices and Performances. First, move the cursor
to the desired location in the name with the Cursor []/
[] buttons, and select the character by using the
[DATA] dial or the [INC/YES]/[DEC/NO] buttons.
Leaving the current
display
If you wish to return to the previous display from the
current display, press [EXIT]. In order to return to the top
display, press [EXIT] repeatedly.
NOTE If you wish to leave the Remote mode (refer to the
“Reference Manual” PDF document), you need to press
[DAW REMOTE] instead of [EXIT].
DrumKit
*Insert*Eff*
a
***
REV:
****
SPX
*
Hall
2
Indicates availability
of other pages
Parameter which can be edited
+
Split Point
Common*Name
a
*******[Simple*Bld]
2
Selected location flashes

MX49 MX61 MX88 Owner’s Manual
14
Playing the Voices
The instrument consists of 16 Parts. Voices, which are the
basic sounds and building blocks of the instrument, are
assigned to each Part. After the instrument is turned on,
the top display which appears shows the Voices of only
Parts 1 and 2. With the default settings, playing the
keyboard will sound only the Voice for Part 1. Select the
desired Voice from the various preset Voices and play it.
Top display
Selecting a Voice for Part 1
The Voices of the instrument are conveniently divided into
specific categories, each based on a general instrument
type or sound characteristic. In order to select a Voice,
first select a category.
Here, you’ll learn how to change Voices and play a Voice
while Part 1 is selected.
NOTE For lists of the Voices and categories, see the “DATA LIST”
PDF document.
1 Press the desired Voice Category button.
2 Rotate the [DATA] dial to select the desired
Voice in the selected category.
3 Play the keyboard.
4 Repeat steps 1 – 3 to play the various Voices.
Quick Guide
HINT
The instructions of the “Playing the Voices” section
assume that you are starting from the top display
with the default settings immediately after turning
this instrument on. If the instrument is in a different
status, or for some reason you cannot return to the
top display with the default settings, simultaneously
hold down [SHIFT] and press [SELECT]. This is the
Quick Reset function and allows you to return
operation to the same top display as when the
instrument is first turned on.
NOTICE
Executing the Quick Reset function above erases any
edited data. Be sure to store important data to internal
memory (page 29).
NOTE For details about this function, see the “Shift Function
List” (page 35).
STR:081:Amb
*
Pizza
AP 001:CncrtGrandc
001:CncrtGrandcAP
Voice for Part 1
Voice for Part 2
Voice
Category
Cursor indicates that Part 1 is selected
Voice number Voice name
+
KB
STR:081:Amb
*
Pizza
001:Vintage'74c
Category of Part 1 is changed.
KB
STR:081:Amb
*
Pizza
004:Soft*Casec
Voice for Part 1 is changed.

MX49 MX61 MX88 Owner’s Manual
Quick Guide
15
Selecting a Voice for Part 2
Here, you’ll learn how to select a Voice for Part 2 as well
as Part 1. By setting the Voices of Part 1 and Part 2 in the
top display, you can alternate between the two Voices as
you play without the sound unnaturally cutting off.
1 Press the Cursor [ ] button to select Part 2.
Only Part 2 can now be sounded.
2 Press the desired Voice Category button.
3 Rotate the [DATA] dial to select a specific
desired Voice in the selected category.
4 Play the keyboard.
5 While playing the keyboard, press the Cursor
[ ] button to select Part 1.
The Part 2 sound is maintained for the last key
played, and the Voice changes to that of Part 1, which
plays from the next key and after.
Combining Voices (Layer)
You can select separate Voices for Parts 1 and 2, and
play both Voices together in a layer.
1 Press [LAYER].
Part 1 and Part 2 can now be sounded at the same
time (Layer). In the display, Part 2 is selected.
2 Use the Category buttons and the [DATA] dial
to select a Voice for Part 2, and check the
sound by playing the keyboard.
NOTE To change the Voice for Part 1, press the Cursor [ ]
button to select Part 1, then use the Category buttons
and the [DATA] dial to select a different Voice.
3 Adjust the volume for Part 1 and Part 2 as
desired, checking the sound as you play the
keyboard.
Make sure that the lamp of [PART 1-2 LINK] is off,
then press the [KNOB FUNCTION] repeatedly to turn
on the third lamp. Then adjust the volume for the
selected Part with Knob [A]. After returning to the top
display, select the other Part with the Cursor [ ]/[ ]
buttons, then adjust the volume with Knob [A] again.
NOTE If the Knob [A] value has brackets, rotating Knob [A] will
not change the value until displayed value is reached.
HINT
Stopping Arpeggio playback
Depending on the selected Voice, you can trigger
Arpeggio playback by playing the keyboard. To stop
Arpeggio playback at any time, press [ARP]. To
enable the Arpeggio function again, press [ARP] so
that the lamp lights.
KB
STR:081:Amb
*
Pizza
:004:Soft*Case
c
KB
ORG:001:16+8+5&1/3
:004:Soft*Case
c
Voice for Part 2 is changed.
Voice for Par t 1
Voice for Par t 2
KB
ORG:002:Jz2Perc+C3
:004:Soft*Case
c
Voice for Part 2 is changed.

MX49 MX61 MX88 Owner’s Manual
Quick Guide
16
4 To cancel the Layer function, press [LAYER]
again.
The [LAYER] lamp turns off, and only the Part 1 Voice
sounds.
Playing separate Voices with your
left and right hands (Split)
This function lets you play different Voices with your left
and right hands. To use this, assign the Voice for Part 1 to
the right part of the keyboard, and Voice for Part 2 to the
left. The point (or key) at which the keyboard is split
between left and right parts is called the “Split Point.” You
can freely set the Split Point to any desired key.
1 Press [SPLIT].
The Voices of Part 1 and Part 2 are split to the left and
right of the keyboard, and Part 2 is selected.
2 Select a Voice for Part 2, using the Category
buttons and the [DATA] dial, and check the
sound while playing the keyboard.
NOTE To change the Voice for Part 1, press the Cursor [ ]
button to select Part 1, then use the Category buttons
and the [DATA] dial to select a different Voice.
3 To change the Split Point, simultaneously
hold down [SPLIT] and press the desired key.
4 Adjust the volume for Part 1 and Part 2 as
desired, checking the sound as you play the
keyboard.
Make sure that the lamp of [PART 1-2 LINK] is off,
then press the [KNOB FUNCTION] repeatedly to turn
on the third lamp. Then rotate Knob [A]. The volume
for the selected Part is changed. After returning to the
top display, select the other Part by using the Cursor
[ ]/[ ] buttons, then adjust the volume by rotating
Knob [A] again.
5 To cancel the Split function, press [SPLIT]
again.
The [SPLIT] lamp turns off, and only the Part 1 Voice
sounds.
HINT
Creating a thick, textured sound by layering
Voices
By slightly increasing/decreasing the value of the
“Detune” parameter for one Part after assigning
synthesizer Voices to Parts 1 and 2, you can create
a powerful lead synthesizer sound. Experiment with
other Voices and the Detune parameter (called up
as described below) to create other warm, organic
sounds.
[EDIT] Select “02:Part” [ENTER] Select
“01:Play Mode” [ENTER] Cursor [ ]/[ ]
buttons
Voice for Part 2 Voice for Part 1
Split Point
HINT
Changing the octave range for a Part
It may be musically useful to change the pitch of the
Split Part—for example, setting it to a higher or lower
octave. To do this, set the “NoteShift” parameter for
the Part to +12 or -12. You can change the pitch of
the Part in semitone steps. You can call up NoteShift
as follows.
[EDIT] Select “02:Part” [ENTER] Select
“01:Play Mode” [ENTER] Cursor [ ]/[ ]
button
+
Split Point

MX49 MX61 MX88 Owner’s Manual
Quick Guide
17
Changing the tonal qualities
of the Voice with the
controllers
The instrument features various controllers which let you
change the sound of the instrument in real time. These
include the Knobs, Pitch Bend Wheel, and Modulation
Wheel. You can also control various functions by using
external controllers connected to the corresponding
jacks on the rear panel.
Controllers on the front panel
Pitch Bend wheel
Use the Pitch Bend wheel to bend notes up or down while
playing the keyboard. This wheel is self-centering and
automatically returns to normal pitch when released. Try
out the Pitch Bend wheel while pressing a note on the
keyboard.
NOTE You can change the maximum pitch bend range by calling
up the “PB Upper”/ “PB Lower” parameters as follows and
change the values of these parameters.
[EDIT] Select “02:Part” [ENTER] Select “01:Play
Mode” [ENTER] Cursor [ ]/[ ] buttons
Modulation wheel
This controller is used to apply vibrato to the keyboard
sound. Try out the Modulation wheel with various Preset
Voices while playing the keyboard.
Knobs [A] – [D]
You can change the brightness and tone characteristics
of Part 1/Part 2 in realtime by turning the Knobs while you
play. Three functions are assigned to each Knob,
alternatively selected via the [KNOB FUNCTION] button.
1 Press [KNOB FUNCTION] repeatedly if
necessary, so that the lamp corresponding to
the desired functions lights.
The Knob Function display which shows the current
functions and current values for Knobs [A] – [D] is
called up. The values in brackets indicate that the
Knob indication is different from the current actual
value.
NOTE You can instantly reset Knobs [A] – [D] to Function 1 by
holding down [SHIFT] and pressing [KNOB
FUNCTION].
2 Press [PART 1-2 LINK] to determine whether
the Knob functions are applied to both Part 1
and Part 2 (on), or only the selected Part (off).
3 While playing the keyboard, rotate one of the
Knobs.
The function assigned to the Knob you’re currently
operating and the function value appear in the Knob
Function display. If the value is shown in brackets,
rotating the corresponding Knob has no effect on the
value until the Knob indication reaches the current
value.
NOTE For details about each function, see the “Reference
Manual” PDF document.
Knobs [A] – [D]
Pitch Bend Wheel
Modulation Wheel
Raises
the pitch
Lowers
the pitch
Maximum
Minimum
*Cut**Rez**Cho**Rev
(+34)*:02***40***12
]
[A]
[B] [C] [D]
Function 3
Function 2
Function 1
Function
names
Values
***Part01*Cutoff***
********+30********
qw
er

MX49 MX61 MX88 Owner’s Manual
Quick Guide
18
External Controllers
Footswitch
An optional Footswitch (FC3A, FC4A or FC5) connected
to the [SUSTAIN] jack on the rear panel lets you control
sustain. Notes played while the Footswitch is pressed are
sustained longer than normal after you release the
corresponding keys, like a damper pedal on an acoustic
piano (Sustain function). If you connect an FC3A, you can
use the half-damper function for some Voices of the
PIANO and KEYBOARD categories. When using the half-
damper function, the degree to which the pedal is
pressed can control how long the notes are sustained.
Change the setting as follows according to the
connected Footswitch.
[UTILITY] Select “03:Controller” [ENTER] Select
“FS Pedal” parameter Set “FS Pedal” to connected
Footswitch Return to top display by pressing [EXIT]
twice
NOTE If you wish to use the half-damper function, set the “FS
Pedal” to “FC3 Half On.”
Foot controller
You can connect an optional Foot Controller (FC7) to the
[FOOT CONTROLLER] jack on the rear panel. This
conveniently lets you use your foot to control volume (like
the volume pedal of an organ), freeing your hands for
playing.
NOTE You can also control other functions than sustain or volume
by using a foot pedal connected to the [SUSTAIN] jack or
[FOOT CONTROLLER] jack. For details, see the explanation
of the Utility Controller display in the “Reference Manual”
PDF document.
Using the Arpeggio function
The Arpeggio function lets you create arpeggios (broken
chords) by simply playing the appropriate notes on the
keyboard. For example, you could play the notes of a
triad—the root, third, and fifth—and the Arpeggio
function will automatically create a variety of interesting
arpeggio-type phrases. You can set different Arpeggio
types for each Part, and apply the Arpeggio function up
to two Parts simultaneously. The most suitable Arpeggio
type is automatically selected for each part when you
select a voice, but you can easily select any other
Arpeggio type.
Playing back the Arpeggio
1 Press [EDIT].
2 Select “02:Part” by pressing the Cursor [ ]
button, then press [ENTER].
HINT
When Sustain is applied only to specific
Parts
If you wish to apply the sustain effect only to Part 1,
set the receive switch of the “Sustain” for Part 2 to off
as follows.
[EDIT] Select “02:Part” [ENTER]
[KEYBOARD] (2) Select “04:Receive Switch”
[ENTER] “Sustain” = “off”
FC3A, FC4A, FC5 FC7
Rear Panel
Part 2
Arpeggio switch = on
Voice
Part 1
Arpeggio switch = on
Voice
Arpeggio switch = on
EDIT
02:Part
s

MX49 MX61 MX88 Owner’s Manual
Quick Guide
19
3 Select “03:Arp Select” with the Cursor [ ]/
[ ] buttons, then press [ENTER].
This calls up the Edit display related to the Arpeggio
for the Part.
4 Press [PIANO] (1).
This calls up the Edit display for Part 1. (Other Parts
can be selected by pressing the appropriate number
button 1 – 16.)
5 Select the “Switch” parameter with the
Cursor [ ] button, then set it to “on” with the
[DATA] dial.
The Arpeggio for Part 1 is enabled.
6 If necessary, press [ARP] on the panel so that
the lamp lights.
7 Play the keyboard to sound the Arpeggio.
The sound of the Arpeggio produced changes
according to the number of notes you play and the
area of the keyboard you play in.
8 If Arpeggio playback does not stop after you
quit playing, press [ARP] to stop it.
9 If desired, play back the Arpeggio for Part 2
as well as Part 1.
Press [KEYBOARD] (2) (similar to step 4 above), then
execute from steps 5 to 8 again.
Changing the Arpeggio tempo
1 Press [TEMPO].
2 While playing back the Arpeggio from the
keyboard, change the tempo with the [DATA]
dial.
3 Press [EXIT] to leave the Tempo display.
Changing the Arpeggio type
1 Make desired settings according to the
instructions of steps 1 – 4 in “Playing back
the Arpeggio.”
2 Select the Arpeggio type parameter in page 3
of the Arp Select display with the Cursor [ ]/
[ ] buttons, then change the Arpeggio type
while playing the keyboard.
Move the flashing cursor to the Arpeggio category or
Arpeggio number with the Cursor [ ]/[] buttons,
then change the setting with the [DATA] dial.
3 If desired, select the “Hold” parameter with
the Cursor [ ] button, then change the
setting with the [DATA] dial.
This parameter determines whether the Arpeggio
continues cycling after the keys are released. For
details about this parameter, see the “Synthesizer
Parameter Manual” PDF document.
Part01
03:Arp*Select
d
Part01*Arp*Select
Switch=*on
a
Tap Tempo function
The tempo can also set by “playing” or tapping the
[TEMPO] button several times repeatedly at the
desired tempo.
*******Tempo
**********90
qw
er
v
Part01*Arp*Select
ApKb:036:BalladEP2
d
Arpeggio
category
Arpeggio
number
Arpeggio name
Part01*Arp*Select
Hold=******on
a

MX49 MX61 MX88 Owner’s Manual
Quick Guide
20
Keyboard Octave/
Transpose settings
Octave
The OCTAVE [-]/[+] button lets you shift the pitch of the
keyboard in octaves, up to a maximum of three. For
example, you may want to shift the pitch down lower to
get extra bass notes, or shift up to get higher notes for
leads and solos. Pressing the [-] and the [+] buttons
together at the same time will return the setting to the
initial value (0).
The current octave range can be confirmed via the status
of the lamp of the OCTAVE [-]/[+] buttons. When set to
one octave down or up, the corresponding lamp lights.
When set to two octaves down or up, the corresponding
lamp flashes slowly. When set to three octaves down or
up, the corresponding lamp flashes quickly.
Transpose
The TRANSPOSE [-]/[+] button lets you shift the pitch of
the keyboard in semitones (up to 11 semitones). This
function allows you to play in the same position and with
the same fingering, even if the Song data or another
instrument player is playing in a different key. Pressing
the [-] and the [+] buttons together at the same time will
return the setting to the initial value (0). When set to one
semitone down or up, the corresponding lamp lights.
Storing the edited settings
When you are satisfied with the results, store the settings
you’ve made to internal memory (as a Performance) so
that they can be recalled after turning off the power.
Press [STORE], then press [ENTER]. Finally, press [INC/
YES] to store the settings to Performance 1.
NOTE For detailed instructions on the Store operation, see “Storing
the Performance” (page 29).
Playing the Performances
A program in which multiple Voices (parts) are combined
is referred to as a “Performance,” and the instrument has
a total of 128 Performances. A Performance consists of
up to 16 Parts. The Parts which you normally use for
playing the keyboard are Parts 1 and 2.
When turning on this instrument with the factory settings,
Performance 1 is called up. In the instructions covered so
far (pages 14 – 20), you’ve played and edited Parts 1 and
2 of Performance 1, which is simply designed for playing
one or two Voices. Performances 2 – 128 are provided for
enjoying a powerful and thick sound which consists of
multiple various Voices. In the instructions below, we’ll
change the Performance to one of Performances 2 – 128
and play it.
1 Press [SELECT].
The Performance Select display is called up.
2 Rotate the [DATA] dial to select a
Performance.
The selected Performance number is shown in the
[PERFORMANCE NUMBER] display.
NOTE For a detailed list of all Performances, see the
“Performance List” of the “Data List” PDF document.
Performance 128
Performance 1
Normally used Parts
Part 1
Voice
Voice
Part 2
Part 3
Voice
Part 10
Voice
Part 16
Voice
Performance*Select
001(A01):MXCategory
c
Performance Select display
Performance
number
Performance
group
Performance name

MX49 MX61 MX88 Owner’s Manual
Quick Guide
21
NOTE The 128 Performances are divided into eight groups (A
– H), each of which consist of sixteen Performances. To
select these groups of Performances, simultaneously
hold down [SHIFT] and use the [DATA] dial or [INC/
YES]/[DEC/NO] buttons.
3 Play the keyboard.
If the lamp of the [ / ] (Play/Pause) button flashes
before playing the keyboard, playing the keyboard
starts the Rhythm Pattern (Key On Start function). In
this case, play the keyboard with the Rhythm Pattern.
To stop the Rhythm Pattern, press [] (Stop).
Also, if the Arpeggio playback continues after you’ve
finished playing, press [ARP] to stop the Arpeggio.
4 When you’re done trying out the various
Performances, press [EXIT] to return to the
Top display.
The display showing the currently selected Part 1 and
Part 2 is called up.
Playing back Rhythm
Patterns
The instrument features a wide variety of Rhythm
Patterns. An appropriate Rhythm Pattern is assigned to
each Performance.
Playing the keyboard with the
Rhythm Pattern
1 After selecting a Performance, with the [ /]
(Play/Pause) lamp flashing, play the
Keyboard.
If the [ / ] (Play/Pause) lamp is turned off,
press [ / ] (Play/Pause), then play the
keyboard.
The lamp of [ /] (Play/Pause) flashes quickly and
the Rhythm Pattern plays back.
2 To pause the Rhythm Pattern, press [ / ]
(Play/Pause). To resume playback, press [ /
] (Play/Pause) again.
3 Press [ ] (Stop) to stop the Rhythm Pattern.
HINT
You can switch the Performance number directly by
pressing the [SHIFT] button and the Voice Category
button simultaneously in the Performance Select
display (Performance Direct Select function). While
this function is enabled, you can change the
performance number simply by pressing the Voice
Category button, without needing to press the
[SHIFT] button.
HINT
You can select Performances in sequence with a
footswitch by connecting an FC4A/FC5 to the
[SUSTAIN] jack and setting as follows. Keep in mind
that the sustain function cannot be used in this case.
[UTILITY] Select “03:Controller” [ENTER]
“FS” = “PC inc” / “PC dec.”
PAD:003:AmbSyn*pad
CMP:065:TranceLine
HINT
Using the Key On Start function
The Key On Start function automatically starts a
Rhythm Pattern when you play a key on the
keyboard. Especially convenient in live performance
situations, this allows you to start playing the
keyboard and have the Rhythm Pattern instantly
start playback at the same time. There are some
Performances which are automatically set to
standby condition for the Key On Start function. In
this case, you can automatically use the Key On
Start function simply by playing the keyboard. For
other Performances, enable the function as
described below.
1 While holding down [] (Stop) press [ /
] (Play/Pause).
The lamp of [ /] (Play/Pause) flashes slowly,
and the selected Performance is set to standby
status for the Key On Start function.

MX49 MX61 MX88 Owner’s Manual
Quick Guide
22
Changing the Rhythm Pattern type
and sound
You can select a different Rhythm Pattern to be assigned
to the Performance, and even change the Drum Voice
used for the Pattern.
1 Press [RHYTHM PATTERN].
2 Press the Cursor [ ] button repeatedly if
necessary to call up the 1st page (similar to
the one shown below), then press [ / ]
(Play/Pause) and change the Rhythm Pattern
type.
Move the cursor to the category or number of the
Rhythm Pattern with the Cursor []/[ ] buttons.
3 Press the Cursor [ ] button to call up the 2nd
page, then rotate the [DATA] dial to change
the Drum Voice.
NOTE You can set additional parameters related to the Rhythm
Pattern in other pages. For details about these
parameters, see the “Reference Manual” PDF
document.
4 When you have finished making the desired
Rhythm Pattern settings, press [] (Stop) to
stop the Rhythm Pattern.
Changing the tempo for the
Rhythm Pattern
1 Press [TEMPO].
2 Press [ / ] (Play/Pause) to play back the
Rhythm Pattern, then rotate the [DATA] dial to
change the tempo.
NOTE This tempo setting is automatically reflected to the
Arpeggio tempo and can be set for each Performance.
NOTE If you wish to cancel this standby status, press
[] (Stop).
2 Play the keyboard.
The Rhythm Pattern starts at the same time.
3 Press [] (Stop) to stop the Rhythm
Pattern.
NOTE For details about resetting the Key On Start function,
see the “Reference Manual” PDF document.
+
PATTERN*****01:01/04
*R&B:091:Smooth*2
a
Category Number Name
PATTERN*****01:01/04
*DR*:061:SFX*Kit
d
Tap Tempo function
The tempo can also set by “playing” or tapping the
[TEMPO] button several times repeatedly at the
desired tempo.
Storing the Rhythm Pattern
You can store the changed Rhythm Pattern settings
as Performance data. For instructions on storing a
Performance, see page 29.
*******Tempo
**********90
qw
er
v

MX49 MX61 MX88 Owner’s Manual
Quick Guide
23
Playing the keyboard
along with Songs
MIDI data and audio data contained in the USB flash
memory can be played back as a “Song” on the
instrument.
Songs compatible with this
instrument
Data formats of MIDI data and audio data that can be
played on this instrument are as follows.
MIDI data
Only SMF (Standard MIDI File) MIDI data of format 0 can
be used for playback on this instrument. The file
extension is “.MID.” This instrument is equipped with a
16-track sequencer for playback and a 16-part multi-
timbral tone generator, allowing you to play back MIDI
data of up to 16 tracks.
Audio data
Only 44.1kHz/16-bit stereo Wave file audio data can be
used for playback on this instrument. The file extension is
“.WAV.”
Playing back MIDI data of the USB
flash memory
1 Connect the USB flash memory in which the
MIDI data is stored.
NOTE Make sure that the desired MIDI data is stored in the
root directory (which is called up when you first open
the memory location) of the USB flash memory.
2 Press [SELECT], then select an appropriate
Performance for playing back the MIDI data.
3 Press [EXT. SONG].
4 Press the Cursor [ ] button repeatedly if
necessary to call up the 1st page, then rotate
the [DATA] dial to select the desired MIDI
data.
5 Press [ / ] (Play/Pause).
The lamp of [ /] (Play/Pause) flashes and the
selected MIDI data is played back with the selected
Performance sounds.
6 Play the keyboard along with the MIDI data.
The selected Part is sounded. To change the Part for
playing, press [PART SELECT] to select one of the 16
Parts with the numbered Category buttons.
7 To pause the MIDI data, press [ /] (Play/
Pause). To resume playback, press [ / ]
(Play/Pause) again.
8 If you wish to change the tempo, press
[TEMPO], then rotate the [Data] dial to select
the desired value.
NOTE This tempo setting is automatically reflected to the
Arpeggio tempo and Rhythm Pattern tempo, and can
be set for each Performance.
MIDI and audio data
MIDI data is comprised of your keyboard
performance information and is not a recording of
the actual sound itself. The performance information
refers to which keys are played, at what timing, and
at what strength—just as in a musical score. Based
on the recorded performance information, the tone
generator outputs the corresponding sound. Audio
data, on the other hand, is a recording of the
performed sound itself. This data is recorded in the
same way as that used in recording with voice
recorders, etc. This data can be played with a
portable music player, etc., allowing you to easily let
other people hear your performance.
Performance*Select
001(A01):MXCategory
c
Tap Tempo function
The tempo can also set by “playing” or tapping the
[TEMPO] button several times repeatedly at the
desired tempo.
SONG**********001:01
**File=MYSONG01.MID
a
Current measure and beat for the MIDI data
Name of the MIDI data
*******Tempo
**********90
qw
er
v

MX49 MX61 MX88 Owner’s Manual
Quick Guide
24
9 Press [ ] (Stop) to stop the MIDI data.
Playing back audio data of the
USB flash memory
1 Connect the USB flash memory in which the
audio data is stored.
NOTE Make sure that the desired audio data is stored in the
root directory (which is called up when you first open
the memory location) of the USB flash memory.
2 Press [EXT. SONG].
3 Press the Cursor [ ] button repeatedly if
necessary to call up the 1st page, then rotate
the [DATA] dial to select the desired audio
data.
4 Press the Cursor [ ] button repeatedly if
necessary to call up the 2nd page, then rotate
the [DATA] dial to adjust the volume for the
audio data.
5 Press [ / ] (Play/Pause).
The lamp of [ /] (Play/Pause) flashes and the
selected audio data is played back.
6 Play the keyboard along with the audio data.
7 To pause the audio data, press [ /] (Play/
Pause). To resume playback, press [ / ]
(Play/Pause) again.
8 Press [ ] (Stop) to stop the audio data.
SONG***********00:00
**File=BACK_001.WAV
a
Current elapsed time of audio data (in minutes and seconds)
Name of the audio data
SONG**********
*****WAV*Volume=100
s
Precautions when using the USB [TO
DEVICE] terminal
This instrument features a built-in USB [TO DEVICE]
terminal. When connecting a USB flash memory to
the terminal, be sure to handle the USB flash
memory with care. Follow the important precautions
below.
NOTE For more information about the handling of USB flash
memories, refer to the owner’s manual of your
particular USB flash memory.
Compatible USB devices
Only USB memory devices of the flash-memory
variety can be used with the instrument.
Furthermore, the instrument does not necessarily
support all commercially available USB flash
memories, nor can Yamaha guarantee operation of
USB devices that you purchase. Before purchasing
a USB flash memory for use with this instrument,
please visit the following web page:
http://download.yamaha.com/
Connecting USB flash memories
When connecting a USB flash memory to the USB
[TO DEVICE] terminal, make sure that the connector
on the device is appropriate and that it is connected
in the proper direction.
NOTICE
• Avoid connecting or disconnecting the USB flash
memory during playback, file management (such as
Save, Copy, Delete and Format operations) or while
the instrument is accessing the USB flash memory in
any way. Failure to do so may result in “freezing” of
the operation of the instrument or corruption of the
USB flash memory and the data.
• When connecting then disconnecting the USB flash
memory (and vice versa), make sure to wait a few
seconds between the two operations.
NOTE • When connecting a USB cable, make sure that the
length is less than 3 meters.
• Though the instrument supports the USB 1.1
standard, you can connect and use a USB 2.0 flash
memory with the instrument. However, note that the
transfer speed is that of USB 1.1.
• The rating of the USB [TO DEVICE] terminal is a
maximum of 5V/500mA. Do not connect USB
devices having a rating above this, since this can
cause damage to the instrument itself.

MX49 MX61 MX88 Owner’s Manual
Quick Guide
25
Playing back song data of a
portable music player
1 Connect a portable music player to the [AUX
IN] jack of this instrument.
NOTE • Whenever connecting other devices, ensure that the
cables you use have plugs that match the input or output
connectors on those devices.
• Before making connections, you should also turn the
volume on the other devices to the minimum.
2 Press the play button on the connected music
player.
The song data of the music player is played back
from the instrument.
NOTE Use the external device’s volume control to adjust the
desired level balance with this instrument.
3 Play the keyboard along with the song data.
4 After finishing, press the stop button on the
music player.
Creating an original
Performance
In Performance Edit, you can edit both the parameters
unique to each Part (Part Edit) and parameters common
to all Parts (Common Edit). You can also edit the Voice
parameters which are assigned to each Part of the
Performance (Voice Edit). Edit these parameters to
create an original Performance.
NOTE For details about all parameters, see the “Reference
Manual” PDF document.
NOTE Preset Performances have their default settings such as
Voice settings and the note range limits. Initializing
Performances is useful when creating a completely new
Performance from scratch. For details, see the “Reference
Manual” PDF document.
Selecting the Reverb/Chorus type
(Common Edit/Part Edit)
1 Press [EDIT].
2 Press the Cursor [ ] button if necessary to
select “01: Common,” then press [ENTER].
The Performance Common Edit display is called up.
Using USB flash memories
By connecting the instrument to a USB flash
memory, you can save data you’ve created to the
connected device, as well as read data from the
connected device.
Number of USB flash memories that can
be used
Only one USB flash memory can be connected to
the [USB TO DEVICE] terminal simultaneously.
Formatting USB flash memories
When a USB flash memory is connected, a message
may appear prompting you to format the device/
media. If so, execute the Format operation
(page 31).
NOTICE
The Format operation overwrites any previously
existing data. Make sure that the media you are
formatting does not contain important data.
To protect your data (write-protect)
To prevent important data from being inadvertently
erased, apply the write-protect provided with the
flash memory device. If you want to save data to the
USB flash memory, make sure to disable write-
protect.
Turning off the instrument
When turning off the instrument, make sure that the
instrument is NOT accessing the USB flash memory
by playback or file management (such as during
Save, Copy, Delete and Format operations). Failure
to do so may corrupt the USB flash memory and the
data.
Rear Panel
1/8" stereo-mini cable
Portable music player, etc.
HINT
You can use the convenient Tap Tempo function to
match Arpeggio tempo to the song data being
played back from the portable music player. To do
this, simply “play” or tap the [TEMPO] button several
times repeatedly with the song data.
EDIT
01:Common
a

MX49 MX61 MX88 Owner’s Manual
Quick Guide
26
3 Press the Cursor [ ] button if necessary to
select “01:Chorus Eff,” then press [ENTER].
The Chorus effect setting display is called up.
4 Press the Cursor [ ] buttons repeatedly if
necessary to call up the 1st page, then use
the Cursor []/[ ] buttons and the [DATA]
dial to change the Chorus effect category/
type.
5 Press the Cursor [ ] button to call up the 2nd
page, then rotate the [DATA] dial to select a
preset for the effect parameters of the
selected effect type.
Each preset type contains optimum settings for
various parameters, letting you select a general “feel”
you want and have the parameters set accordingly.
NOTE You can also edit each effect parameter in the 3rd or
later pages. For details about each parameter, see the
“Synthesizer Parameter Manual” PDF document.
6 When you have finished making Chorus
effect settings, press [EXIT], then press the
Cursor [ ] button to select “02:Reverb Eff.”
Finally, press [ENTER].
The Reverb effect display is called up.
7 Press the Cursor [ ] button to call up the 1st
page, then rotate the [DATA] dial to change
the Reverb effect type
8 Press the Cursor [ ] button to call up the 2nd
page, then rotate the [DATA] dial to select a
preset for the effect parameters of the
selected effect type.
NOTE You can also edit each effect parameter in the 3rd or
later pages. For details about each parameter, see the
“Synthesizer Parameter Manual” PDF document.
9 When you have finished making Reverb effect
settings, press [EXIT] two times, then press
the Cursor [ ] button to select “02:Part.”
Finally, press [ENTER].
The Performance Part Edit display is called up.
10 Press the Cursor [ ] button repeatedly if
necessary to select “01:Play Mode,” then
press [ENTER].
11 Press the desired Category button to select
the edited Part.
The selected Part number is shown in the upper left
corner of the display.
12 Use the Cursor [ ]/[ ] buttons to select
“ChoSend” and “RevSend” in 5th and 6th
pages, then rotate the [DATA] dial to adjust
the parameter settings.
These parameters set the depth of Chorus/Reverb
effects applied to the selected Part sound.
Common
a
01:Chorus*Eff
2
Common*Chorus*Eff
a
***CHO:****G*Chorus
2
Effect category Effect type
Common*Chorus*Eff
d
Preset=*******Basic
2
Common
d
02:Reverb*Eff
2
Common*Reverb*Eff
a
****Type=Rev
]
X*Hall
2
HINT
Performance Edit indicator
When editing Performance
parameters, a dot (.) is shown in the
lower right of the [PERFORMANCE
NUMBER] display. This provides a
quick confirmation that the current Performance has
been modified but not yet stored. When you want to
store the current status, execute the Performance
store function (page 29). After storing, this indication
will be gone.
Common*Reverb*Eff
d
Preset=*******Basic
2
EDIT
02:Part
s
Part01
a
01:Play*Mode
2

MX49 MX61 MX88 Owner’s Manual
Quick Guide
27
Changing the Insertion Effect of
the Voice (Voice Edit)
You can edit parameters of the Voice assigned to each
Part. The Voice parameters are in the Voice Edit displays
(those having “Voice” or “DrumKit” indications in the
display names). In this example, we’ll change the
Insertion effect settings.
1 Press [EDIT].
2 Press the Cursor [ ] button to select
“02:Part,” then press [ENTER].
The Part Edit display is called up.
3 Press a Category button to select the desired
Part.
The selected Part number is shown in the upper left of
the display.
4 Press the Cursor [ ] button to select
“01:Play Mode,” then press [ENTER].
5 Use the Cursor [ ]/[ ] buttons to select
“InsSw,” then rotate the [DATA] dial to set the
parameter to on.
NOTE This instrument features four Insertion Effects, which
can be applied to up to four Parts of the Performance.
6 Press [EXIT], then use the Cursor [ ]/[ ]
buttons to select “05:Voice Insert Eff”/
”06:Drumkit Ins Eff.” Finally, press [ENTER].
The Insertion effect display of the Voice Edit is called
up.
7 Press the Cursor [ ] button repeatedly if
necessary to call up the 1st page, then use
the Cursor []/[ ] buttons and the [DATA]
dial to change the effect type.
8 Press the Cursor [ ] button to call up the 2nd
page, then select a preset for the Effect
parameters of the selected Effect type.
Each preset type contains optimum settings for
various parameters, letting you select a general “feel”
you want and have the parameters set accordingly.
NOTE You can also edit each effect parameter in the 3rd or
later pages. For details about each parameter, see the
“Synthesizer Parameter Manual” PDF document.
9 If you want to change the Insertion effect of
another Part, press a numbered Category
button to select the desired Part (as in step 3
above), then follow steps 4 to 8 again after
pressing [EXIT].
NOTE You can also change Parts by pressing a numbered
Category button on the Insertion effect display of Voice
Edit.
EDIT
02:Part
s
Part01*Play*Mode
d
**********InsSw=*on
2
Part01
d
05:Voice*Insert*Eff
2
Voice*Insert*Eff
a
***MSC:*Damper*Reso
2
Effect category Effect type
Voice*Insert*Eff
d
Preset=*******Basic
2

MX49 MX61 MX88 Owner’s Manual
Quick Guide
28
Changing the Controller Set for
the Voice (Voice Edit)
You can assign different functions for the controllers
(Knobs, Modulation Wheel, etc.) to each Voice. Each
Voice can have up to six sets which determine the
available controllers for the Voice and their functions. The
controller assignments are called a “Controller Set.” In
this example, we’ll change the Controller Set of the Voice
assigned to the Part.
1 Press [EDIT].
2 Press the Cursor [ ] button to select
“02:Part,” then press [ENTER].
The Performance Part Edit display is called up.
3 Press a Category button to select the desired
Part.
The selected Part number is shown in the upper left of
the display.
4 Use the Cursor [ ]/[ ] buttons to select
“07:Voice Ctrl Set” or ”06:Drumkit Ctrl Set,”
then press [ENTER].
The Voice Edit Controller Set display is called up.
5 Use the Cursor [ ]/[ ] buttons to select a
Controller Set from Controller Sets 1 – 6, then
press [ENTER].
6 Press the Cursor [ ] button repeatedly if
necessary to call up the 1st page, then rotate
the [DATA] dial to select the desired
Controller.
NOTE For details about the settings, see the “Reference
Manual” PDF document.
7 Press the Cursor [ ] button to call up the 2nd
page, then rotate the [DATA] dial to select the
desired function to be assigned to the
selected Controller.
8 Press the Cursor [ ] button to call up the 3rd
page, then adjust the depth for the
Controller’s function.
9 If you wish to change other Controller Sets,
repeat steps 5 to 8 above after pressing
[EXIT].
10 If you wish to change Controller Sets for
other Parts, press a numbered Category
button to select the desired Part, then follow
steps 5 to 9 above again.
EDIT
02:Part
s
Part01
d
07:Voice*Ctrl*Set
2
Part10
d
06:DrumKit*Ctrl*Set
2
HINT
Voice Edit indicator
When editing Voice parameters, an (Edit)
indicator is shown in the upper right of the display.
This provides a quick confirmation that the Voice
assigned to a Part has been modified but not yet
stored. When you want to store the current status,
execute the Voice Store function (page 29). After
storing, this indication disappears.
Voice*Ctrl*Set
a
01:Set1
2
Voice*Ctrl*Set1
a
*****Source=*MW(01)
2
Voice*Ctrl*Set1
a
**Dest=*****ELFO
]
PM
2
Voice*Insert*Eff
a
***MSC:*Damper*Reso
2
2

MX49 MX61 MX88 Owner’s Manual
Quick Guide
29
Storing a Voice (Voice Store)
The edited Voice parameters can be stored as a User
Voice separately from a Performance. Moreover, these
stored User Voices can be assigned to a different Part or
Performance.
NOTE If you execute Performance Store, the edited Voice data will
not be stored; make sure to store the Voice using Voice
Store.
1 When the Voice Edit display is shown, press
[EXIT], then press the Cursor [ ] button to
select “08:Voice Name.” After that, press
[ENTER].
When the top display is shown, follow the instructions
below.
[EDIT] Select “02:Part” [ENTER] Select
“08:Voice Name” [ENTER]
2 Enter an original name for the Voice before
storing it.
For instructions on entering a name, see “Naming”
(page 13) in “Basic Operations and Displays.”
3 Press [STORE].
4 Determine the User Voice number as the
store destination, and press [ENTER].
5 Press [INC/YES].
The Voice data is stored, and operation returns to the
Part Edit display. To return to the top display, press
[EXIT] several times. To cancel the Store operation,
press [DEC/NO].
Storing a Performance
(Performance Store)
When you are satisfied with the Performance you’ve
created, store the new settings to internal memory (as a
Performance).
NOTICE
If you execute Performance Store while the Voice has been
modified but not yet stored, the edited Voice and all recent
changes you made to it will be erased. Make sure to store
important Voice data as a User Voice (Voice Store) before
storing the Performance.
1 Press [EDIT] to select “01:Common,” then
press [ENTER]. After that, select “06:Name,”
then press [ENTER].
2 Enter an original name for the Performance
before storing it.
For instructions on entering a name, see “Naming”
(page 13) in “Basic Operations and Displays.”
3 Press [STORE].
4 Determine the Performance number as the
store destination, and press [ENTER].
NOTICE
Keep in mind that the destination Performance will be
overwritten and lost by executing Performance Store.
5 Press [INC/YES].
The Performance data is stored, and operation
returns to the top display. To cancel the Store
operation, press [DEC/NO].
Part01
s
08:Voice*Name
2
Voice*Name
a
*******[CncrtGrand]
2
STORE*Voice
*****U001:Initialize
2
Voice Store display
qw**Are*you*sure?***
e****[NO]/[YES]****r
Common*Name
a
*******[MXPerf01**]
2
STORE*Performance
*001(A01):MXCategory
2
Performance Store display
qw**Are*you*sure?***
e****[NO]/[YES]****r

MX49 MX61 MX88 Owner’s Manual
Quick Guide
30
Changing Voices smoothly
while performing
When you change a Voice assigned to a Part or select a
different Performance, the sound of the previous Voice/
Performance will be cut off, replaced abruptly by the
newly selected Voice/Performance.
In live performance situations, you probably want to
avoid this. To change Voices as you play without having
them cut off, assign the Voices you intend to play
beforehand to Parts 1 – 16 of a Performance, then select
the corresponding Part (with the numbered Category
buttons) as you play.
1 Press [PART SELECT].
2 Press the Cursor [ ] button several times to
call up the 1st page.
3 Use the Category buttons or the Cursor []/
[] buttons to select the desired Part from
Parts 1 – 16.
4 Rotate the [DATA] dial to change the Voice
category for the selected Part.
5 Press the Cursor [ ] button to call up the 2nd
page, then rotate the [DATA] dial to select the
Voice from the current Voice category.
NOTE You can also edit other Part parameters in the 3rd or
subsequent pages. For details about each parameter,
see the “Reference Manual” PDF document.
6 To change Voices for other Parts, repeat
steps 2 to 5 above.
NOTE You can also change Parts with the Category buttons or
the Cursor []/[ ] button in pages other than the 1st
page.
7 When you have finished making settings for
the Parts, select different Voices (Parts) by
using the Category buttons or the Cursor []/
[] buttons, while playing the keyboard.
8 Store the Voice assignments as a
Performance to internal memory so you can
instantly call them up whenever you want.
For details about storing, see the “Storing the
Performance” (page 29).
AP*:*001:CncrtGrand
a
3
tyuiop@000123456789
Voice
category
Voice
number
Voice name
Part 1 – 16
AP*:*001:CncrtGrand
a
3
tyuiop@000123456789
Cursor indicates the selected Part
AP*:*001:CncrtGrand
d
3
tyuiop@000123456789
HINT
Applying Insertion effects to desired Parts
Insertion effects can be independently applied to up
to four Parts (maximum) to which the desired Voices
for live performance are assigned. For details about
the settings, see “Changing the Insertion Effect of
the Voice” (page 27).

MX49 MX61 MX88 Owner’s Manual
Quick Guide
31
Making Global System
Settings (Utility settings)
Pressing [UTILITY] calls up the Utility display, from which
you can make global system settings.
Changing the Master Tune setting
This function sets the overall tuning of the instrument.
1 Press the Cursor [ ] button repeatedly if
necessary to select “01:General,” then press
[ENTER].
2 Use the Cursor [ ]/[ ] buttons to select the
“Tune” parameter, then rotate the [DATA] dial
to change the value.
The pitch is changed in cent increments.
NOTE The frequency of the basic pitch (note A3) is 440 Hz. An
increase of 3 or 4 cents corresponds to a frequency
increase of about 1 Hz.
3 Press [STORE].
All Utility settings are stored.
Adjusting the brightness of the
display (LCD Contrast)
1 Press the Cursor [ ] button repeatedly if
necessary to select “01:General,” then press
[ENTER].
2 Use the Cursor [ ]/[ ] buttons to select the
“LCD Contrast” parameter, then rotate the
[DATA] dial to change the value.
3 Press [STORE].
All Utility settings are stored.
NOTE Adjusting the display brightness
To adjust the brightness of the display, simultaneously
hold down [UTILITY] and press [INC/YES]/[DEC/NO].
Saving/loading files on
USB flash memory (File
settings)
You can save the created Performances and Voices to
USB flash memory, and load data from the USB flash
memory.
Formatting the USB flash memory
Some USB flash memories may not be supported by this
instrument. In this case, follow the instructions below to
format the memory before using it.
NOTICE
If data is already saved to the USB flash memory, be careful
not to format it. If you format the device, all previously
recorded data will be deleted. Make sure to check
beforehand whether or not the device contains important
data.
1 Connect the USB flash memory to the USB
[TO DEVICE] terminal.
2 Press [FILE] to call up the File display.
3 Use the Cursor [ ]/[ ] buttons to select “05:
Format,” then press [ENTER].
A confirmation message appears. If you wish to
cancel the Format operation, press [EXIT].
4 Press [INC/YES] to execute the Format
operation.
After formatting has been completed, a “Completed”
message appears and operation returns to the
original display.
NOTICE
While formatting is in process, do not remove or
disconnect the USB flash memory from the instrument.
Also, make sure to keep the power of the instrument on
until the operation is finished.
NOTE By executing the Format operation in the File mode, the
USB flash memory will be formatted to MS-DOS or
Windows format. The formatted device may not be
compatible with other devices, such as a Mac computer
or digital camera.
UTILITY*General
d
Tune=+**0.0/440.0Hz
2
UTILITY*General
d
*****LCD*Contrast=5
2
For details about the Utility settings, see the
“Reference Manual” PDF document.

MX49 MX61 MX88 Owner’s Manual
Quick Guide
32
Saving settings to USB flash
memory
You can save all data of the User memory—containing
Performances, created User Voices, and Utility settings—
to USB flash memory as an “All” file (extension: .X5A).
1 Connect a USB flash memory to the USB [TO
DEVICE] terminal.
2 Press [FILE].
3 Press the Cursor [ ] buttons several times to
select “01:Save,” then press [ENTER].
4 Assign a name to the file.
For instructions on entering a name, see “Naming”
(page 13) in “Basic Operations and Displays.”
5 Press [ENTER].
6 Press [INC/YES].
The file is saved to the USB flash memory. To cancel
the Save operation, press [EXIT] while the “Now
saving...” message is still displayed.
7 Press [EXIT] several times to exit from the
File display.
Loading the settings from a USB
flash memory
1 Connect the USB flash memory to the USB
[TO DEVICE] terminal.
2 Press [FILE].
3 Use the Cursor [ ]/[ ] buttons to select
“02:Load,” then press [ENTER].
Any “All” files that are contained in the USB flash
memory appear in the display.
NOTE If no “All” files are stored in the root directory of the USB
flash memory, a “File not found” message appears and
the Load display cannot be called up.
4 Select the desired file, then press [ENTER].
5 Select the desired data type of the selected
“All” file, then press [ENTER].
Select the desired type: all data (All), all data except
for the Utility settings (All without Sys), or
Performance data only (Performance).
FILE
a
01:Save
2
FILE*Save
*****Name=[********]
2
qw**Are*you*sure?***
e****[NO]/[YES]****r
FILE
d
02:Load
2
FILE*Load
*******File=MX01
2
FILE*Load
Type=****Performance
2

MX49 MX61 MX88 Owner’s Manual
Quick Guide
33
6 If you’ve set “Type” to “Performance” in step
5, select the desired Performance number,
then press [ENTER].
If you’ve set “Type” to something other than
“Performance” in step 5, go on to step 8.
7 Select the destination Performance number
(for loading), then press [ENTER].
8 Press [INC/YES].
The data is loaded from the USB flash memory. To
cancel the Load operation, press [EXIT] while the
“Now loading...” message is still displayed.
9 Press [EXIT] repeatedly if necessary to exit
from the File display.
Connecting an external
MIDI instrument
With a standard MIDI cable (available separately), you
can connect an external MIDI instrument, and transmit
MIDI data between the instrument and the connected
instrument.
Either the MIDI connectors or the USB [TO HOST]
terminal can be used for MIDI data transmission/
reception; however, they cannot be used at the same
time. Select the desired connector for use in the “MIDI IN/
OUT” parameter of the [UTILITY] “02:MIDI” display. As
you work through the explanations in this chapter, set
“MIDI IN/OUT” to “MIDI” since MIDI is used as the
example connection here.
Controlling the instrument from an
external MIDI keyboard or
synthesizer
Here, we’ll use an external keyboard or synthesizer to
remotely select and play the Voices of the instrument.
Src*Performance
001(A01):MXCategory
2
Dst*Performance
003(A03):Sirius
2
qw**Are*you*sure?***
e****[NO]/[YES]****r
MIDI [IN]
MIDI OUT
External MIDI keyboard (for example, an 88-key synthesizer)
MX49, MX61, or MX88

MX49 MX61 MX88 Owner’s Manual
Quick Guide
34
Controlling an external MIDI
keyboard or synthesizer from the
instrument
This connection lets you sound an external MIDI tone
generator (synthesizer, tone generator module, etc.) by
playing the instrument or playing back a Song or Pattern
of the instrument. Use this connection when you wish to
sound the other instrument along with the instrument.
HINT
MIDI Transmit and Receive channels –
Changing the Performances remotely
The MIDI Receive channels for Parts 1 – 16 of the
instrument are fixed to 1 – 16. Make sure to match
the MIDI Transmit channels of the external MIDI
instrument with the MIDI Receive channels of the
instrument. For details on setting the MIDI Transmit
channels of the external MIDI instrument, refer to the
owner’s manual of that instrument.
You can also use an external MIDI instrument to
change this instrument’s Performances with the
proper program change messages. To do this, you’ll
need to match the MIDI Transmit channel of the
external MIDI instrument with the basic MIDI
Receive channel of the instrument. For details on
setting the basic MIDI Receive channel of the
instrument, follow the instructions below.
1 Press [UTILITY].
2 Use the Cursor [ ]/[ ] buttons to select
“02:MIDI,” then press [ENTER].
3 Use the Cursor [ ]/[ ] buttons to select
“BasicCh (Basic Channel),” then check
the channel.
If necessary, change the channel to the same
channel as the MIDI transmit channel of the
external MIDI instrument.
MIDI IN
MIDI [OUT]
External MIDI tone generator (for example, MOTIF-RACK XS)
MX49, MX61, or MX88
HINT
MIDI Transmit and Receive Channels –
Sounding only an external tone generator
The MIDI Receive channels for Parts 1 – 16 of the
instrument are fixed to 1 – 16. Make sure to match
the MIDI Receive channels of the external MIDI
instrument with the MIDI Transmit channels of the
instrument. For details on setting the MIDI Transmit
channels of the external MIDI instrument, refer to the
owner’s manual of that instrument.
You can also control an external tone generator from
the instrument and have only that device sound. To
do this, set the [MASTER VOLUME] knob to “0” or
set the Local Control to “off” with the following
operation: [UTILITY] Select “02:MIDI” [ENTER]
“LocalCtrl” = “off.”

MX49 MX61 MX88 Owner’s Manual
35
Shift Function List
Some of the important functions and operations on the instrument can be executed with convenient panel control
shortcuts. Simply hold down the [SHIFT] button and press the indicated button (as described below).
Display Messages
Appendix
Operation Function
[SHIFT] + [INC]/[DEC]/[DATA] dial Increases/decreases the value by 10. (Program number in the Play mode; parameter
value in the Edit mode)
In the Performance Select display, this switches among the Performance groups.
[SHIFT] + [SPLIT] In the Performance top display, this replaces Part 1 with Part 2 (Invert function).
[SHIFT] + [LAYER] In the Performance top display, this copies a selected Part (Part 1 or Part 2) to the
other Part (Unison function).
[SHIFT] + [EXIT] Calls up the Performance top display.
[SHIFT] + [SELECT] Resets Performance 1 to the factory settings, and calls up the top display of
Performance 1 (Quick Reset function).
[SHIFT] + [KNOB FUNCTION] Instantly resets Knobs [A] – [D] to Function 1.
[SHIFT] + [PART 1-2 LINK] Resets [PART 1-2 LINK] to on.
[SHIFT] + [ARP] Calls up the Arpeggio display of Performance Part Edit.
[SHIFT] + desired Category button In the Performance top display, this instantly calls up the Voice in the next Sub
Category of the selected Category. Perform this operation with the same Category
button repeatedly to select the subsequent Sub Categories.
In the Performance Select display, this selects the corresponding Performance
among Performances 1 – 16 in the selected Performance group.
NOTE For details about Sub Categories, see the “DATA LIST” PDF document
LCD indication Description
All remote templates stored. Appears when you store the Control Template in the Remote mode.
Are you sure? Confirms whether you want to execute a specified operation or not.
Auto power off disabled. Appears when Auto Power Off is disabled (by simultaneously holding down the lowest key on the
keyboard and turning the power on).
Bulk protected. Bulk data cannot be received because of the Utility setting.
Clear edit Voice? Appears when executing Performance Store while modifying but not yet having stored a Voice.
Make sure to confirm whether the edited Voice data should be erased or not.
Completed. The specified load, save, format, or other Job has been completed.
Connecting USB device . . . Currently recognizing the USB flash memory connected to the USB [TO DEVICE] terminal.
Device number is off. Bulk data cannot be transmitted/received since the device number is off.
Device number mismatch. Bulk data cannot be transmitted/received since the device numbers don’t match.
Executing . . . A Format operation or Job is being executed. Please wait.
FactorySet . . . The Factory Set operation is automatically being executed when you turn the power on.
File already exists. A file having the same name as the one you are about to save already exists.
File not found. The file of the specified type cannot be found.
Illegal file name. The specified file name is invalid. Try entering a different name.

36
MX49 MX61 MX88 Owner’s Manual
Appendix
Illegal file. The file specified for loading is unusable by this instrument or cannot be loaded in the current
status.
Illegal format. The format of the file specified for playback is SMF Format 1 or an audio data format other than
WAV. Use SMF Format 0 MIDI data or WAV format audio data.
Incompatible USB device. A USB device which cannot be used with this instrument has been connected to the USB [TO
DEVICE] terminal.
Invert Appears when replacing Part 1 with Part 2 by while holding down [SHIFT] and pressing [SPLIT]
(Invert function).
MIDI buffer full. Failed to process the MIDI data because too much data was received at one time.
MIDI checksum error. An error occurred when receiving bulk data.
MIDI data error. An error occurred when receiving MIDI data.
No response from USB device. There is no response from the USB device connected to the USB [TO DEVICE] terminal.
Now loading . . . [EXIT] to cancel Indicates that a file is being loaded. If you wish to cancel this operation, press [EXIT] while this
message appears.
Now saving . . . [EXIT] to cancel Indicates that a file is being saved. If you wish to cancel this operation, press [EXIT] while this
message appears.
Now working. . . Canceling the Load/Save operation, after the [EXIT] button has been pressed.
Overwrite? A Save operation will overwrite data on the USB flash memory, and this message prompts you to
confirm whether it is OK to continue or not.
Please keep power on . . . The data is being written to User memory. Never attempt to turn off the power while data is being
written to User memory. Turning the power off while this message is shown results in loss of all
user data and may cause the system to freeze (due to corruption of data in the User memory).
This may also result in this instrument being unable to properly start up the next time the power is
turned on.
Please stop sequencer. The operation you have attempted to execute cannot be done during Song/Pattern playback.
Quick reset Appears when while holding down [SHIFT] and pressing [SELECT]. Performance 1 is set to the
factory settings, and the top display of Performance 1 is called up (Quick Reset function).
Receiving MIDI bulk . . . This instrument is receiving MIDI bulk data.
System memory crashed. Failed to write the data to the internal memory of this instrument.
This Performance uses User
Voices.
Appears when the Performance specified for loading contains User Voices. User Voices cannot
be loaded with the Performance. Make sure that the same User Voices used when you saved the
Performance are stored at the same User Voice numbers or not, since the User Voices are not
loaded with the Performance.
Transmitting MIDI bulk . . . This instrument is transmitting MIDI bulk data.
Unison Appears when copying Part 1/Part 2 to another Part by while holding down [SHIFT] and pressing
[LAYER] (Unison function).
USB connection terminated. A break in the connection with the USB flash memory has occurred because of an abnormal
electric current. Disconnect the device from the USB [TO DEVICE] terminal, then press the
[ENTER] button.
USB device full. The USB flash memory is full and no more data can be saved. Use a new USB flash memory, or
make space by erasing unwanted data from the device.
USB device not ready. A USB flash memory is not properly inserted in or connected to the USB [TO DEVICE] terminal.
USB device read/write error. An error occurred while reading or writing to/from a USB flash memory or attempting to delete or
overwrite a read-only file.
USB device unformatted. Appears when the connected USB flash memory is either unformatted or formatted in a way that
this instrument does not support. In such a case, check the content of the USB flash memory.
USB device write protected. The USB flash memory is write protected, or you have attempted to write to read-only media.
USB power consumption
exceeded.
Appears when the current being drawn by the USB flash memory exceeds the level supported by
this instrument.
USB transmission error. An error occurred while communicating with a USB flash memory.
Utility stored. The Utility settings have been stored.
LCD indication Description

MX49 MX61 MX88 Owner’s Manual
Appendix
37
Troubleshooting
No sound? Wrong sound? When a problem like this occurs, please check the following points before assuming that the
product is faulty. Many problems can be solved by executing the Factory Set operation (page 11), after backing up your
data to an USB flash memory (page 32). If the problem persists, consult your Yamaha dealer.
No Sound.
Is this instrument properly connected to related external equipment (e.g., amplifier, speaker, headphone) via audio cables?
Since this instrument has no built-in speakers, you will need an external audio system or a set of stereo headphones to properly monitor it
(page 9*).
Is the power of this synthesizer and any external equipment connected to it turned on?
Have you made all the appropriate level settings—including the Master Volume on this instrument and the volume settings on any
connected external equipment?
If a Foot Controller is connected to the [FOOT CONTROLLER] jack, operate the Foot Controller and check the sound volume.
Check the Local Control parameter in the Utility display.
When this instrument is used by itself and this parameter is set to off, no sound is produced even if you play the keyboard.
Check the Direct Monitor Switch parameter in the Utility display.
When this instrument is used by itself and this parameter is set to off, no sound is produced even if you play the keyboard.
Are the MIDI volume or MIDI expression settings too low when using an external controller?
Are the effect and filter settings appropriate?
If you are using the filter, try changing the cutoff frequency. Some cutoff settings may filter out all of the sound.
Are the volume or expression settings too low?
No sound from the [AUX IN] jack.
Is the volume of the connected audio device set to a value other than “0”?
Cannot play audio data.
Is the volume for the audio data set to a value other than “0”?
Is the format of the audio data correct?
This instrument can play only stereo WAVE (.wav) files of 44.1kHz/16-bit.
Playback continues without stopping.
When the [ARP] button is turned on, press it so that its lamp is turned off.
When playing back Rhythm Pattern or Song data of the USB flash memory, press the [] (Stop) b utton.
The instrument is automatically turned off even if no operation is done.
Is the Auto Power Off function enabled?
If necessary, disable this function or change the amount of time that elapses before the power is automatically turned off.
[UTILITY] Select “02:MIDI” [ENTER] “LocalCtrl”
[UTILITY] Select “01:General” [ENTER] “DirectMonitor”
[EDIT] Select “02:Part” [ENTER] Select “02:Filter/EG” [ENTER]
[EDIT] Select “02:Part” [ENTER] Select “05:Voice Insert Eff”/“05:DrumKit Insert Eff” [ENTER]
[UTILITY] Select “01:General” [ENTER] “MasterVolume”
[EDIT] Select “01:Common” [ENTER] Select “05:General” [ENTER] “Volume”
[PART SELECT] “Volume”
[UTILITY] Select “01:General” [ENTER] “WAV Volume”
[UTILITY] Select “01:General” [ENTER] “A utoOff”

38
MX49 MX61 MX88 Owner’s Manual
Appendix
Distorted sound.
Are the effect settings appropriate?
Use of certain effects at certain settings may produce distortion.
Are the filter settings appropriate?
Excessively high filter resonance settings can cause distortion.
Are any of the following volume parameters set so high that clipping is occurring?
Sound is cut off.
Is the entire amount of notes played (via your keyboard playback and Song/Pattern/Arpeggio playback) exceeding the maximum
polyphony of this instrument?
The maximum number of simultaneous notes may be less than 128 depending on the Voices used.
Only one note sounds at a time.
When this situation occurs, the Mono/Poly parameter in the current mode is set to “mono.” If you wish to play chords, set this parameter
to “poly.”
Pitch or intervals are wrong.
Is the Master Tune parameter in the Utility display set to a value other than “0”?
Is the Note Shift parameter in the Utility display set to a value other than “0”?
Are the Note Shift and Detune parameters of each Part set to values other than “0”?
No effect is applied.
Check the on/off status of the Insertion Effect switch.
Is the Reverb Send or Chorus Send set to a value other than “0”?
Has the Insertion Effect type for the Part been set to “thru”?
The Edit Indicator appears, even when parameters are not being edited.
Keep in mind that even though the Edit mode is not active, simply moving a Knob or playing back the MIDI data of the USB flash
memory may cause the Edit Indicator to appear.
[EDIT] Select “02:Part” [ENTER] Select “05:Voice Insert Eff”/“05:DrumKit Insert Eff” [ENTER]
[EDIT] Select “02:Part” [ENTER] Select “02:Filter/EG” [ENTER]
[UTILITY] [EDIT] Select “01:Common” [ENTER] Select “05:General” [ENTER] “Volume”
[PART SELECT] “Volume”
[UTILITY] Select “01:General” [ENTER] “WAV Volume”
[EDIT] Select “02:Part” [ENTER] Select “01:PlayMode” [ENTER] “Mono/Poly”
[UTILITY] Select “01:General” [ENTER] “Tune”
[UTILITY] Select “01:General” [ENTER] “NoteShift”
[EDIT] Select “01:Part” [ENTER] Select “01:PlayMode” [ENTER] “NoteShift”/“Detune”
[EDIT] Select “02:Part” [ENTER] Select “01:PlayMode” [ENTER] “InsSw”
[PART SELECT] “InsSw”
[EDIT] Select “02:Part” [ENTER] Select “01:PlayMode” [ENTER] “ChoSend”/“RevSend”
[EDIT] Select “02:Part” [ENTER] Select “05:Voice Insert Eff”/“05:DrumKit Insert Eff” [ENTER]

MX49 MX61 MX88 Owner’s Manual
Appendix
39
Cannot start the Arpeggio.
Check whether [ARP] is turned on or off.
Are the Arpeggio switches for both Part and Common set to on?
Is the MIDI Sync parameter set to “internal” or “auto” (using internal clock)?
Cannot stop the Arpeggio.
When Arpeggio playback does not stop even if you release the key, set the Arpeggio Hold parameter to “off.”
The Voice produces a different sound depending on the assign destination Part or
Performance.
Depending on the effect (and other) settings for the Performance or Part, the Voice assigned to the Performance or Part may produce
a different sound. If necessary, change the following parameter settings.
The Song/Pattern cannot be started even when pressing the [ /] (Play/Pause) button.
When you attempt to play back the Song data, is the USB flash memory containing the data connected to this instrument?
Is the [DAW REMOTE] button turned off?
Is the current display something other than Utility or File?
Is the MIDI Sync parameter set to “internal” or “auto” (using internal clock)?
Data communication between the computer and this instrument does not work properly.
Check whether the Port settings on the computer are appropriate or not.
Check whether the MIDI IN/OUT parameter is set to the appropriate value or not.
MIDI bulk data transmission/reception does not work properly.
Is the Receive Bulk parameter set to on?
When receiving MIDI bulk data transmitted via the Bulk Dump function and recorded to the external MIDI device, you need to set the
MIDI Device Number to the same value as when transmitting.
When transmission does not work properly, is the device number of the MIDI instrument connected to this instrument set to match the
Device Number Parameter in the Utility display?
Cannot save data to the USB flash memory.
Is the USB flash memory being used write protected? (Write-protect should be set to off for saving data.)
Is the USB flash memory being used properly formatted?
[EDIT] Select “02:Part” [ENTER] Select “03:Arp Select” [ENTER] “Switch”
[EDIT] Select “01:Common” [ENTER] Select “04:Arp Switch” [ENTER] “Switch”
[UTILITY] Select “02:MIDI” [ENTER] “MIDI Sync”
[EDIT] Select “02:Part” [ENTER] Select “03:Arp Select” [ENTER] “Hold”
[EDIT] Select “02:Part” [ENTER] Select “01:PlayMode” [ENTER] “ChoSend”/“RevSend”
[EDIT] Select “01:Common” [ENTER] Select “01:Chorus Eff”/“02:Reverb Eff” [ENTER]
[PART SELECT] “InsSw”
[EDIT] Select “02:Part” [ENTER] Select “02:Filter/EG” [ENTER]
[UTILITY] Select “02:MIDI” [ENTER] “MIDI Sync”
[UTILITY] Select “02:MIDI” [ENTER] “MIDI IN/OUT”
[UTILITY] Select “02:MIDI” [ENTER] “RcvBulk”
[UTILITY] Select “02:MIDI” [ENTER] “DeviceNo.”
[UTILITY] Select “02:MIDI” [ENTER] “DeviceNo.”
[FILE] Select “05:Format” [ENTER] [INC/YES]

40
MX49 MX61 MX88 Owner’s Manual
Appendix
Specifications
The contents of this manual apply to the latest specifications as of the publishing date. To obtain the latest manual, access the Yamaha website
then download the manual file. Since specifications, equipment or separately sold accessories may not be the same in every locale, please
check with your Yamaha dealer.
Keyboard
MX49 49 keys (Initial touch)
MX61 61 keys (Initial touch)
MX88 88 keys, GHS keyboard (Initial touch)
Tone
Generator
block
Tone Generator AWM2
Polyphony 128 (max.)
Multi-timbral Capacity 16 parts (Internal)
Wave Approx.166 MB (when converted to 16-bit linear format)
Voice Preset: 1,106 Normal Voices + 61 Drum Kits (GM: 128 Normal Voices + 1 Drum Kit)
User: 128 Normal Voices + 8 Drum Kits
Performance User: 128 (16 parts)
Effect System Reverb x 9 types (42 presets), Chorus x 17 types (88 presets), Insertion Effect x 48
types (267 presets) x 4, Master EQ (5 bands)
Sequencer
block
Sequence Play SMF Format 0 (playback only)
Tempo (BPM) 5 – 300
Rhythm Pattern 208 Patterns
Song 27 Demo Songs
Arpeggio 999 types
Others
Sequence software
compatible with the
Remote Control function
For Windows
®
: Cubase 8 or later, SONAR X2 Producer
For Mac
®
: Cubase 8 or later, Logic Pro X, Digital Performer 9
*Functions to be controlled differ depending on the software
Controllers Pitch Bend Wheel x 1, Modulation Wheel x 1, Assignable Knob x 4, [DATA] dial x 1
Display 3 digit LED + 20 x 2 line character LCD (backlit)
Connectors OUTPUT [L/MONO]/[R] (6.3 mm, standard phone jack),
[PHONE] (6.3 mm, standard stereo phone jack), [FOOT CONTROLLER], [SUSTAIN],
MIDI [IN]/[OUT], USB [TO HOST]/[TO DEVICE], [AUX IN], DC IN
Power Consumption 9W (When using PA-150 AC adaptor)
Dimensions, Weight MX49: 830(W) x 298(D) x 91(H) mm (32-11/16" x 11-3/4" x 3-9/16"), 3.8kg (8 lbs., 6 oz.)
MX61: 984(W) x 299(D) x 112(H) mm (38-3/4" x 11-3/4" x 4-7/16"), 4.8kg (10 lbs., 9 oz.)
MX88:
1320(W) x 405(D) x 168(H) mm (52" x 15-15/16" x 6-5/8"), 13.9kg (30 lbs., 10 oz.)
Accessories AC adaptor (PA-150 or an equivalent recommended by Yamaha), Owner’s Manual
(this book), Cubase AI Download Information
GM Voice
GM (General MIDI) is a worldwide standard for Voice organization and MIDI functions of synthesizers and tone generators. It was
designed primarily to ensure that any Song data created with a specific GM device would sound virtually the same on any other
GM device—no matter the manufacturer or the model. The GM Voice bank on this synthesizer is designed to appropriately play
back GM Song data. However, keep in mind that the sound may not be exactly the same as played by the original tone generator.

MX49 MX61 MX88 Owner’s Manual
Appendix
41
Index
A
[ARP] button ....................................................................... 7, 19
Arpeggio ................................................................................. 18
Audio data .............................................................................. 23
Auto Power Off function .......................................................... 10
[AUX IN] jack ...................................................................... 8, 25
B
Brightness of the display .................................................. 10, 31
C
Category ................................................................................. 14
Chorus .................................................................................... 25
Common Edit .......................................................................... 25
Connection (External MIDI instrument) ................................... 33
Controller Set .......................................................................... 28
Controllers ............................................................................... 17
Cursor ..................................................................................... 12
Cursor buttons .................................................................... 7, 12
D
[DATA] dial ......................................................................... 7, 12
[DAW REMOTE] button ............................................................. 6
DC IN jack ............................................................................. 8, 9
[DEC/NO] button ................................................................. 7, 12
Demo Song ............................................................................. 10
E
[EDIT] button ........................................................... 6, 25, 27, 28
Edit indicator ..................................................................... 26, 28
Effect ................................................................................. 25, 27
[ENTER] button ......................................................................... 7
[EXIT] button ....................................................................... 7, 13
[EXT. SONG] button ............................................................ 7, 23
F
Factory settings ...................................................................... 11
[FILE] button ....................................................................... 6, 31
File settings ............................................................................. 31
Foot controller ......................................................................... 18
[FOOT CONTROLLER] jack ................................................ 8, 18
Footswitch ............................................................................... 18
Formatting the USB flash memory .......................................... 31
H
Half-damper function .............................................................. 18
Headphones ............................................................................. 9
I
[INC/YES] button ................................................................. 7, 12
Initial factory settings .............................................................. 11
Inputting characters ................................................................ 13
Insertion Effect ........................................................................ 27
Invert function ......................................................................... 35
J
[JOB] button ..............................................................................6
K
Key On Start function ..............................................................21
[KNOB FUNCTION] button ..................................................6, 17
Knobs [A] – [D] ....................................................................6, 17
L
Layer .......................................................................................15
[LAYER] button ....................................................................7, 15
LCD ...........................................................................................7
LCD Contrast .....................................................................10, 31
List ...........................................................................................12
Load ........................................................................................32
M
Master Tune .............................................................................31
[MASTER VOLUME] knob ...................................................6, 10
MIDI data .................................................................................23
MIDI [IN]/[OUT] terminals ....................................................8, 33
MIDI Transmit and Receive channels .....................................34
Modulation wheel ................................................................6, 17
N
Naming ....................................................................................13
O
OCTAVE [-]/[+] buttons .......................................................6, 20
OUTPUT [L/MONO]/[R] jacks ................................................8, 9
P
Page ........................................................................................13
Part ..........................................................................................20
[PART 1-2 LINK] button .......................................................6, 17
Part Edit ...................................................................................25
[PART SELECT] button ........................................................7, 30
Pedal .......................................................................................18
Performance ............................................................................20
[PERFORMANCE NUMBER] display ...................................7, 20
Performance Select display ....................................................20
Performance Store ...................................................................29
[PHONES] jack ......................................................................8, 9
Pitch Bend wheel .................................................................6, 17
[ /] (Play/Pause) button ............................................6, 21, 23
Power supply .............................................................................9
Q
Quick Reset function .........................................................14, 35
R
Reverb .....................................................................................25
Rhythm Pattern ........................................................................21
[RHYTHM PATTERN] button ...............................................7, 22

42
MX49 MX61 MX88 Owner’s Manual
Appendix
S
Save ........................................................................................ 32
[SELECT] button ................................................................. 7, 20
[SHIFT] button ..................................................................... 7, 35
SMF ......................................................................................... 23
Song ........................................................................................ 23
Speaker ..................................................................................... 9
Split ......................................................................................... 16
[SPLIT] button ..................................................................... 7, 16
Standby/On switch ................................................................ 8, 9
[ ] (Stop) button ...................................................................... 6
Stopping Arpeggio playback .................................................. 15
Store ........................................................................................ 29
[STORE] button ................................................................... 6, 29
Storing the Rhythm Pattern ..................................................... 22
Sustain function ...................................................................... 18
[SUSTAIN] jack ................................................................... 8, 18
T
Tap Tempo function .................................................... 19, 22, 23
Tempo ......................................................................... 19, 22, 23
[TEMPO] button ...................................................... 7, 19, 22, 23
Transport buttons ...................................................................... 6
TRANSPOSE [-]/[+] buttons ................................................ 6, 20
U
Unison function ....................................................................... 35
USB flash memory ...................................................... 23, 24, 31
USB [TO DEVICE] terminal ........................................... 8, 24, 31
[UTILITY] button .................................................................. 6, 31
Utility settings .......................................................................... 31
V
Voice ....................................................................................... 14
Voice Category ....................................................................... 14
Voice Category button ........................................................ 7, 14
Voice Edit .......................................................................... 27, 28
Voice Store .............................................................................. 29
Volume .................................................................................... 10
W
WAV Volume ........................................................................... 24
Wave file ................................................................................. 23


Yamaha Web Site (English only)
https://www.yamahasynth.com/
Yamaha Downloads
https://download.yamaha.com/
Manual Development Group
© 2012 Yamaha Corporation
Pub lished 02/2017 MW##*.*-**E0
Printed in China
ZV90250
Documenttranscriptie
Owner’s Manual EN For Instrument SPECIAL MESSAGE SECTION This product utilizes batteries or an external power supply (adapter). DO NOT connect this product to any power supply or adapter other than one described in the manual, on the name plate, or specifically recommended by Yamaha. WARNING: Do not place this product in a position where anyone could walk on, trip over, or roll anything over power or connecting cords of any kind. The use of an extension cord is not recommended! If you must use an extension cord, the minimum wire size for a 25’ cord (or less) is 18 AWG. NOTE: The smaller the AWG number, the larger the current handling capacity. For longer extension cords, consult a local electrician. This product should be used only with the components supplied or; a cart, rack, or stand that is recommended by Yamaha. If a cart, etc., is used, please observe all safety markings and instructions that accompany the accessory product. SPECIFICATIONS SUBJECT TO CHANGE: The information contained in this manual is believed to be correct at the time of printing. However, Yamaha reserves the right to change or modify any of the specifications without notice or obligation to update existing units. This product, either alone or in combination with an amplifier and headphones or speaker/s, may be capable of producing sound levels that could cause permanent hearing loss. DO NOT operate for long periods of time at a high volume level or at a level that is uncomfortable. If you experience any hearing loss or ringing in the ears, you should consult an audiologist. IMPORTANT: The louder the sound, the shorter the time period before damage occurs. Some Yamaha products may have benches and / or accessory mounting fixtures that are either supplied with the product or as optional accessories. Some of these items are designed to be dealer assembled or installed. Please make sure that benches are stable and any optional fixtures (where applicable) are well secured BEFORE using. Benches supplied by Yamaha are designed for seating only. No other uses are recommended. Battery Notice: This product MAY contain a small non-rechargeable battery which (if applicable) is soldered in place. The average life span of this type of battery is approximately five years. When replacement becomes necessary, contact a qualified service representative to perform the replacement. This product may also use “household” type batteries. Some of these may be rechargeable. Make sure that the battery being charged is a rechargeable type and that the charger is intended for the battery being charged. When installing batteries, never mix old batteries with new ones, and never mix different types of batteries. Batteries MUST be installed correctly. Mismatches or incorrect installation may result in overheating and battery case rupture. Warning: Do not attempt to disassemble, or incinerate any battery. Keep all batteries away from children. Dispose of used batteries promptly and as regulated by the laws in your area. Note: Check with any retailer of household type batteries in your area for battery disposal information. Disposal Notice: Should this product become damaged beyond repair, or for some reason its useful life is considered to be at an end, please observe all local, state, and federal regulations that relate to the disposal of products that contain lead, batteries, plastics, etc. If your dealer is unable to assist you, please contact Yamaha directly. NAME PLATE LOCATION: The name plate is located on the bottom of the product. The model number, serial number, power requirements, etc., are located on this plate. You should record the model number, serial number, and the date of purchase in the spaces provided below and retain this manual as a permanent record of your purchase. NOTICE: Service charges incurred due to a lack of knowledge relating to how a function or effect works (when the unit is operating as designed) are not covered by the manufacturer’s warranty, and are therefore the owners responsibility. Please study this manual carefully and consult your dealer before requesting service. ENVIRONMENTAL ISSUES: Yamaha strives to produce products that are both user safe and environmentally friendly. We sincerely believe that our products and the production methods used to produce them, meet these goals. In keeping with both the letter and the spirit of the law, we want you to be aware of the following: 92-BP (bottom) Model Serial No. Purchase Date PLEASE KEEP THIS MANUAL COMPLIANCE INFORMATION STATEMENT (DECLARATION OF CONFORMITY PROCEDURE) Responsible Party: Address: Telephone: Type of Equipment: Model Name: Yamaha Corporation of America 6600 Orangethorpe Ave., Buena Park, Calif. 90620 714-522-9011 Music Synthesizer MX49, MX61, MX88 This device complies with Part 15 of the FCC Rules. Operation is subject to the following two conditions: 1) this device may not cause harmful interference, and 2) this device must accept any interference received including interference that may cause undesired operation. See user manual instructions if interference to radio reception is suspected. * This applies only to products distributed by YAMAHA CORPORATION OF AMERICA. S2 MX49 MX61 MX88 Owner’s Manual (FCC DoC) For AC adaptor and Instrument FCC INFORMATION (U.S.A.) 1. IMPORTANT NOTICE: DO NOT MODIFY THIS UNIT! This product, when installed as indicated in the instructions contained in this manual, meets FCC requirements. Modifications not expressly approved by Yamaha may void your authority, granted by the FCC, to use the product. 2. IMPORTANT: When connecting this product to accessories and/or another product use only high quality shielded cables. Cable/s supplied with this product MUST be used. Follow all installation instructions. Failure to follow instructions could void your FCC authorization to use this product in the USA. 3. NOTE: This product has been tested and found to comply with the requirements listed in FCC Regulations, Part 15 for Class “B” digital devices. Compliance with these requirements provides a reasonable level of assurance that your use of this product in a residential environment will not result in harmful interference with other electronic devices. This equipment generates/uses radio frequencies and, if not installed and used according to the instructions found in the users manual, may cause interference harmful to the opera* This applies only to products distributed by YAMAHA CORPORATION OF AMERICA. tion of other electronic devices. Compliance with FCC regulations does not guarantee that interference will not occur in all installations. If this product is found to be the source of interference, which can be determined by turning the unit “OFF” and “ON”, please try to eliminate the problem by using one of the following measures: Relocate either this product or the device that is being affected by the interference. Utilize power outlets that are on different branch (circuit breaker or fuse) circuits or install AC line filter/s. In the case of radio or TV interference, relocate/reorient the antenna. If the antenna lead-in is 300 ohm ribbon lead, change the lead-in to co-axial type cable. If these corrective measures do not produce satisfactory results, please contact the local retailer authorized to distribute this type of product. If you can not locate the appropriate retailer, please contact Yamaha Corporation of America, Electronic Service Division, 6600 Orangethorpe Ave, Buena Park, CA90620 The above statements apply ONLY to those products distributed by Yamaha Corporation of America or its subsidiaries. (class B) MX49 MX61 MX88 Owner’s Manual S3 For AC adaptor This device complies with Part 15 of the FCC Rules. Operation is subject to the following two conditions: (1) this device may not cause harmful interference, and (2) this device must accept any interference received, including interference that may cause undesired operation. CAN ICES-3 (B)/NMB-3(B) • This applies only to products distributed by Yamaha Canada Music Ltd. • Ceci ne s’applique qu’aux produits distribués par Yamaha Canada Musique Ltée. (can_b_01) Explanation of Graphical Symbols The lightning flash with arrowhead symbol within an equilateral triangle is intended to alert the user to the presence of uninsulated “dangerous voltage” within the product’s enclosure that may be of sufficient magnitude to constitute a risk of electric shock to persons. CAUTION RISK OF ELECTRIC SHOCK DO NOT OPEN CAUTION: TO REDUCE THE RISK OF ELECTRIC SHOCK, DO NOT REMOVE COVER (OR BACK). NO USER-SERVICEABLE PARTS INSIDE. REFER SERVICING TO QUALIFIED SERVICE PERSONNEL. The exclamation point within an equilateral triangle is intended to alert the user to the presence of important operating and maintenance (servicing) instructions in the literature accompanying the product. The above warning is located on the rear of the unit. IMPORTANT SAFETY INSTRUCTIONS 1 2 3 4 5 6 7 8 9 10 Read these instructions. Keep these instructions. Heed all warnings. Follow all instructions. Do not use this apparatus near water. Clean only with dry cloth. Do not block any ventilation openings. Install in accordance with the manufacturer’s instructions. Do not install near any heat sources such as radiators, heat registers, stoves, or other apparatus (including amplifiers) that produce heat. Do not defeat the safety purpose of the polarized or grounding-type plug. A polarized plug has two blades with one wider than the other. A grounding type plug has two blades and a third grounding prong. The wide blade or the third prong are provided for your safety. If the provided plug does not fit into your outlet, consult an electrician for replacement of the obsolete outlet. Protect the power cord from being walked on or pinched particularly at plugs, convenience receptacles, and the point where they exit from the apparatus. 11 12 13 14 Only use attachments/accessories specified by the manufacturer. Use only with the cart, stand, tripod, bracket, or table specified by the manufacturer, or sold with the apparatus. When a cart is used, use caution when moving the cart/ apparatus combination to avoid injury from tip-over. Unplug this apparatus during lightning storms or when unused for long periods of time. Refer all servicing to qualified service personnel. Servicing is required when the apparatus has been damaged in any way, such as power-supply cord or plug is damaged, liquid has been spilled or objects have fallen into the apparatus, the apparatus has been exposed to rain or moisture, does not operate normally, or has been dropped. WARNING TO REDUCE THE RISK OF FIRE OR ELECTRIC SHOCK, DO NOT EXPOSE THIS APPARATUS TO RAIN OR MOISTURE. (UL60065_03) S4 MX49 MX61 MX88 Owner’s Manual Explication des symboles graphiques L'éclair avec une flèche à l'intérieur d'un triangle équilatéral est destiné à attirer l'attention de l'utilisateur sur la présence d'une « tension dangereuse » non isolée à l'intérieur de l'appareil, pouvant être suffisamment élevée pour constituer un risque d'électrocution. ATTENTION RISQUE D'ÉLECTROCUTION NE PAS OUVRIR ATTENTION : POUR RÉDUIRE LES RISQUES D'ÉLECTROCUTION, NE PAS RETIRER LE CAPOT (OU LE DOS). NE CONTIENT PAS DE PIÈCES NÉCESSITANT L'INTERVENTION DE L'UTILISATEUR. POUR TOUTE INTERVENTION, FAIRE APPEL À DES PROFESSIONNELS QUALIFIÉS. Le point d'exclamation à l'intérieur d'un triangle équilatéral est destiné à attirer l'attention de l'utilisateur sur la présence d'instructions importantes sur l'emploi ou la maintenance (réparation) de l'appareil dans la documentation fournie. L'avertissement ci-dessus se trouve à l'arrière de l'instrument. CONSIGNES DE SÉCURITÉ À LIRE ATTENTIVEMENT 1 2 3 4 5 6 7 8 9 10 Lisez les instructions ci-après. Conservez ces instructions. Tenez compte des avertissements. Suivez toutes les instructions. N'utilisez pas cet instrument dans un milieu humide. Employez uniquement un chiffon sec pour nettoyer l'instrument. N'obstruez pas les ouvertures prévues pour la ventilation. Installez l'instrument conformément aux instructions du fabricant. N'installez pas l'instrument près d'une source de chaleur, notamment un radiateur, une bouche de chaleur, un poêle ou autres (y compris les amplificateurs). Ne modifiez pas les caractéristiques de la fiche avec mise à la terre polarisée. Une fiche polarisée est dotée de deux broches (l'une est plus large que l'autre). Une fiche avec mise à la terre comprend deux broches, ainsi qu'une troisième qui relie l'instrument à la terre. La broche la plus large (ou troisième broche) permet de sécuriser l'installation électrique. Si vous ne pouvez pas brancher le cordon d'alimentation dans la prise d'alimentation, demandez à un électricien de la remplacer. Protégez le cordon d'alimentation. Cela permet d'éviter de marcher dessus ou de le tordre au niveau de la fiche, de la prise d'alimentation et des points de contact sur l'instrument. 11 12 13 14 N'employez que les dispositifs/accessoires indiqués par le fabricant. Utilisez uniquement le chariot, le socle, le trépied, le support ou le plan indiqués par le fabricant ou livrés avec l'instrument. Si vous utilisez un chariot, soyez prudent si vous le déplacez avec l'instrument posé dessus pour éviter de le renverser. Débranchez l'instrument en cas d'orage ou lorsque vous ne l'utilisez pas pendant des périodes prolongées. Confiez toutes les réparations à des techniciens qualifiés. Des réparations sont nécessaires lorsque l'instrument est endommagé, notamment dans les cas suivants : cordon d'alimentation ou fiche défectueuse, liquides ou objets projetés sur l'appareil, exposition aux intempéries ou à l'humidité, fonctionnement anormal ou chute. AVERTISSEMENT N'UTILISEZ PAS L'INSTRUMENT SOUS LA PLUIE OU DANS UN ENVIRONNEMENT HUMIDE, FAUTE DE QUOI VOUS RISQUEZ DE PROVOQUER UN INCENDIE OU DE VOUS ÉLECTROCUTER. (UL60065_03) MX49 MX61 MX88 Owner’s Manual S5 PRECAUTIONS PLEASE READ CAREFULLY BEFORE PROCEEDING Please keep this manual in a safe and handy place for future reference. For AC adaptor WARNING CAUTION • This AC adaptor is designed for use with only Yamaha electronic instruments. Do not use for any other purpose. • When setting up, make sure that the AC outlet is easily accessible. If some trouble or malfunction occurs, immediately turn off the power switch of the instrument and disconnect the AC adaptor from the outlet. When the AC adaptor is connected to the AC outlet, keep in mind that electricity is flowing at the minimum level, even if the power switch is turned off. When you are not using the instrument for a long time, make sure to unplug the power cord from the wall AC outlet. • Indoor use only. Do not use in any wet environments. For Instrument WARNING Always follow the basic precautions listed below to avoid the possibility of serious injury or even death from electrical shock, short-circuiting, damages, fire or other hazards. These precautions include, but are not limited to, the following: Power supply/AC adaptor Fire warning • Do not place the power cord near heat sources such as heaters or radiators. Also, do not excessively bend or otherwise damage the cord, or place heavy objects on it. • Do not put burning items, such as candles, on the unit. A burning item may fall over and cause a fire. • Only use the voltage specified as correct for the instrument. The required voltage is printed on the name plate of the instrument. If you notice any abnormality • Use the specified adaptor (page 40) only. Using the wrong adaptor can result in damage to the instrument or overheating. • When one of the following problems occur, immediately turn off the power switch and disconnect the electric plug from the outlet. Then have the device inspected by Yamaha service personnel. • Check the electric plug periodically and remove any dirt or dust which may have accumulated on it. - The power cord or plug becomes frayed or damaged. - It emits unusual smells or smoke. - Some object has been dropped into the instrument. Do not open - There is a sudden loss of sound during use of the instrument. • This instrument contains no user-serviceable parts. Do not open the instrument or attempt to disassemble or modify the internal components in any way. If it should appear to be malfunctioning, discontinue use immediately and have it inspected by qualified Yamaha service personnel. Water warning • Do not expose the instrument to rain, use it near water or in damp or wet conditions, or place on it any containers (such as vases, bottles or glasses) containing liquids which might spill into any openings. If any liquid such as water seeps into the instrument, turn off the power immediately and unplug the power cord from the AC outlet. Then have the instrument inspected by qualified Yamaha service personnel. • Never insert or remove an electric plug with wet hands. DMI-5 S6 MX49 MX61 MX88 Owner’s Manual 1/2 CAUTION Always follow the basic precautions listed below to avoid the possibility of physical injury to you or others, or damage to the instrument or other property. These precautions include, but are not limited to, the following: Power supply/AC adaptor Connections • Do not connect the instrument to an electrical outlet using a multiple-connector. Doing so can result in lower sound quality, or possibly cause overheating in the outlet. • Before connecting the instrument to other electronic components, turn off the power for all components. Before turning the power on or off for all components, set all volume levels to minimum. • When removing the electric plug from the instrument or an outlet, always hold the plug itself and not the cord. Pulling by the cord can damage it. • Be sure to set the volumes of all components at their minimum levels and gradually raise the volume controls while playing the instrument to set the desired listening level. • Remove the electric plug from the outlet when the instrument is not to be used for extended periods of time, or during electrical storms. Handling caution • Do not insert a finger or hand in any gaps on the instrument. Location • Do not place the instrument in an unstable position where it might accidentally fall over. • Never insert or drop paper, metallic, or other objects into the gaps on the panel. This could cause physical injury to you or others, damage to the instrument or other property, or operational failure. • Before moving the instrument, remove all connected cables, to prevent damage to the cables or injury to anyone who might trip over them. • Do not rest your weight on, or place heavy objects on the instrument, and do not use excessive force on the buttons, switches or connectors. • When setting up the product, make sure that the AC outlet you are using is easily accessible. If some trouble or malfunction occurs, immediately turn off the power switch and disconnect the plug from the outlet. Even when the power switch is turned off, electricity is still flowing to the product at the minimum level. When you are not using the product for a long time, make sure to unplug the power cord from the wall AC outlet. • Do not use the instrument/device or headphones for a long period of time at a high or uncomfortable volume level, since this can cause permanent hearing loss. If you experience any hearing loss or ringing in the ears, consult a physician. Yamaha cannot be held responsible for damage caused by improper use or modifications to the instrument, or data that is lost or destroyed. Always turn the power off when the instrument is not in use. Even when the [ ] (Standby/On) switch is in standby status (display is off), electricity is still flowing to the instrument at the minimum level. When you are not using the instrument for a long time, make sure you unplug the power cord from the wall AC outlet DMI-5 2/2 MX49 MX61 MX88 Owner’s Manual S7 PRÉCAUTIONS D'USAGE PRIÈRE DE LIRE ATTENTIVEMENT AVANT DE PROCÉDER À TOUTE MANIPULATION Rangez ce manuel en lieu sûr et à portée de main afin de pouvoir le consulter ultérieurement. Adaptateur secteur AVERTISSEMENT ATTENTION • L'adaptateur secteur est conçu pour être utilisé exclusivement avec les instruments de musique électroniques Yamaha. Ne l'affectez pas à un autre usage. • Utilisation en intérieur uniquement. N'utilisez pas l'adaptateur dans un environnement humide. • Lors de l'installation, assurez-vous que la prise secteur est facilement accessible. En cas de problème ou de dysfonctionnement, désactivez immédiatement l'interrupteur d'alimentation de l'instrument et retirez l'adaptateur secteur de la prise de courant. Lorsque l'adaptateur secteur est branché dans la prise secteur, gardez à l'esprit qu'une faible dose d'électricité circule toujours dans l'instrument, même si l'interrupteur d'alimentation est désactivé. Lorsque vous n'utilisez pas l'instrument pendant une période prolongée, veillez à débrancher le cordon d'alimentation de la prise murale. Instrument AVERTISSEMENT Veillez à toujours observer les précautions élémentaires énumérées ci-après pour éviter de graves blessures, voire la mort, en raison d'une électrocution, d'un court-circuit, de dégâts, d'un incendie ou de tout autre risque. La liste de ces précautions n'est pas exhaustive : Alimentation/Adaptateur secteur Prévention contre l'eau • Ne laissez pas le cordon d'alimentation à proximité de sources de chaleur telles que les radiateurs ou les éléments chauffants. Évitez également de le plier de façon excessive ou de l'endommager de quelque manière que ce soit ou de placer dessus des objets lourds. • Utilisez uniquement la tension requise pour l'instrument. Celle-ci est indiquée sur la plaque du fabricant de l'instrument. • Utilisez uniquement l'adaptateur spécifié (page 40). L'utilisation d'un adaptateur inapproprié peut endommager l'instrument ou entraîner une surchauffe. • Vérifiez périodiquement l'état de la fiche électrique, dépoussiérez-la et nettoyez-la. Ne pas ouvrir • L'instrument ne contient aucune pièce nécessitant l'intervention de l'utilisateur. N'ouvrez pas l'instrument et ne tentez pas d'en démonter les éléments internes ou de les modifier de quelque façon que ce soit. Si l'appareil présente des signes de dysfonctionnement, mettez-le immédiatement hors tension et faites-le contrôler par un technicien Yamaha qualifié. DMI-5 • N'exposez pas l'instrument à la pluie et ne l'utilisez pas près d'une source d'eau ou dans un milieu humide. Ne déposez pas dessus des récipients (tels que des vases, des bouteilles ou des verres) contenant des liquides qui risqueraient de s'infiltrer par les ouvertures. Si un liquide, tel que de l'eau, pénètre à l'intérieur de l'instrument, mettez immédiatement ce dernier hors tension et débranchez le cordon d'alimentation de la prise secteur. Faites ensuite contrôler l'instrument par un technicien Yamaha qualifié. • N'essayez jamais de retirer ou d'insérer une fiche électrique avec les mains mouillées. Prévention contre les incendies • Ne déposez pas des objets présentant une flamme, tels que des bougies, sur l'instrument. Ceux-ci pourraient se renverser et provoquer un incendie. En cas d'anomalie • Si l'un des problèmes suivant survient, coupez immédiatement l'alimentation et retirez la fiche électrique de la prise. Faites ensuite contrôler l'appareil par un technicien Yamaha. - Le cordon électrique s'effiloche ou est endommagé. - L'instrument dégage une odeur inhabituelle ou de la fumée. - Un objet est tombé à l'intérieur de l'instrument. - Une brusque perte de son est intervenue durant l'utilisation de l'instrument. 1/2 MX49 MX61 MX88 Mode d'emploi S3 ATTENTION Observez toujours les précautions élémentaires reprises ci-dessous pour éviter tout risque de blessures corporelles, pour vous-même ou votre entourage, ainsi que la détérioration de l'instrument ou de tout autre bien. La liste de ces précautions n'est pas exhaustive : Alimentation/Adaptateur secteur Connexions • N'utilisez pas de connecteur multiple pour brancher l'instrument sur une prise secteur. Cela risque d'affecter la qualité du son, voire de provoquer la surchauffe de la prise. • Veillez à toujours saisir la fiche, et non le cordon, pour débrancher l'instrument de la prise d'alimentation. Si vous tirez sur le cordon, vous risquez de l'endommager. • Débranchez la fiche électrique de la prise secteur lorsque vous n'utilisez pas l'instrument pendant un certain temps ou en cas d'orage. • Avant de raccorder l'instrument à d'autres appareils électroniques, mettez ces derniers hors tension. Avant de mettre ces appareils sous ou hors tension, réglez tous les niveaux de volume sur le son minimal. • Veillez également à régler tous les appareils sur le volume minimal et à augmenter progressivement les commandes de volume tout en jouant de l'instrument pour obtenir le niveau sonore souhaité. Précautions de manipulation • Ne glissez pas les doigts ou la main dans les fentes de l'instrument. Emplacement • Ne placez pas l'instrument dans une position instable afin d'éviter qu'il ne tombe accidentellement. • Avant de déplacer l'instrument, débranchez-en tous les câbles afin d'éviter de les endommager ou de blesser quiconque risquerait de trébucher dessus. • Lors de la configuration de l'instrument, assurez-vous que la prise secteur que vous utilisez est facilement accessible. En cas de problème ou de dysfonctionnement, coupez immédiatement l'alimentation et retirez la fiche de la prise. Même lorsque l'interrupteur d'alimentation est en position d'arrêt, du courant électrique de faible intensité continue de circuler dans l'instrument. Si vous n'utilisez pas l'instrument pendant une période prolongée, veillez à débrancher le cordon d'alimentation de la prise murale. • Évitez d'insérer ou de laisser tomber des morceaux de papier, des pièces métalliques ou tout autre objet dans les interstices du panneau. Vous pourriez vous blesser ou provoquer des blessures à votre entourage, endommager l'instrument ou un autre bien ou causer des dysfonctionnements au niveau de l'instrument. • Ne vous appuyez pas sur l'instrument et ne déposez pas d'objets lourds dessus. Ne manipulez pas trop brutalement les touches, les sélecteurs et les connecteurs. • N'utilisez pas l'instrument ou le casque de manière prolongée à des niveaux sonores trop élevés ou inconfortables qui risqueraient d'entraîner des troubles définitifs de l'audition. Si vous constatez une baisse d'acuité auditive ou que vous entendez des sifflements, consultez un médecin. Yamaha ne peut être tenu responsable des détériorations causées par une mauvaise manipulation de l'instrument ou par des modifications apportées par l'utilisateur, ni des données perdues ou détruites. Mettez toujours l'instrument hors tension lorsque vous ne l'utilisez pas. Notez que même lorsque l'interrupteur [ circule toujours dans l'instrument. ] (Veille/Marche) est en position de veille (l'écran est éteint), une faible quantité de courant électrique Lorsque vous n'utilisez pas l'instrument pendant une période prolongée, veillez à débrancher le cordon d'alimentation de la prise murale. DMI-5 S4 MX49 MX61 MX88 Mode d'emploi 2/2 The model number, serial number, power requirements, etc., may be found on or near the name plate, which is at the bottom of the unit. You should note this serial number in the space provided below and retain this manual as a permanent record of your purchase to aid identification in the event of theft. Model No. OBSERVERA! Apparaten kopplas inte ur växelströmskällan (nätet) så länge som den ar ansluten till vägguttaget, även om själva apparaten har stängts av. ADVARSEL: Netspændingen til dette apparat er IKKE afbrudt, sålænge netledningen sidder i en stikkontakt, som er tændt — også selvom der er slukket på apparatets afbryder. VAROITUS: Laitteen toisiopiiriin kytketty käyttökytkin ei irroita koko laitetta verkosta. Serial No. (standby) (bottom_en_01) Information for users on collection and disposal of old equipment: This symbol on the products, packaging, and/or accompanying documents means that used electrical and electronic products should not be mixed with general household waste. For proper treatment, recovery and recycling of old products, please take them to applicable collection points, in accordance with your national legislation. By disposing of these products correctly, you will help to save valuable resources and prevent any potential negative effects on human health and the environment which could otherwise arise from inappropriate waste handling. For more information about collection and recycling of old products, please contact your local municipality, your waste disposal service or the point of sale where you purchased the items. For business users in the European Union: If you wish to discard electrical and electronic equipment, please contact your dealer or supplier for further information. Information on Disposal in other Countries outside the European Union: This symbol is only valid in the European Union. If you wish to discard these items, please contact your local authorities or dealer and ask for the correct method of disposal. (weee_eu_en_02) S8 MX49 MX61 MX88 Owner’s Manual NOTICE To avoid the possibility of malfunction/ damage to the product, damage to data, or damage to other property, follow the notices below. Handling and Maintenance • Do not use the instrument in the vicinity of a TV, radio, stereo equipment, mobile phone, or other electric devices. Otherwise, the instrument, TV, or radio may generate noise. When you use the instrument along with an application on your iPad, iPhone or iPod touch, we recommend that you set “Airplane Mode” to “ON” on that device in order to avoid noise caused by communication. • Do not expose the instrument to excessive dust or vibrations, or extreme cold or heat (such as in direct sunlight, near a heater, or in a car during the day) to prevent the possibility of panel disfiguration, damage to the internal components or unstable operation. • Do not place vinyl, plastic or rubber objects on the instrument, since this might discolor the panel or keyboard. • When cleaning the instrument, use a soft, cloth. Do not use paint thinners, solvents, alcohol, cleaning fluids, or chemical-impregnated wiping cloths. Saving data • The data in the instrument’s Edit Buffer (memory location for edited data) is lost when you turn off the power to the instrument. Save the data to the user memory (internal storage memory), or to USB flash drive/an external device such as a computer. However, the data saved to the user memory may be lost due to some failure, an operation mistake, etc. Save your important data onto USB flash drive/an external device such as a computer. • To protect against data loss through USB flash drive damage, we recommend that you save your important data onto spare USB flash drive or an external device such as a computer as backup data. Information About copyrights • Copying of the commercially available musical data including but not limited to MIDI data and/or audio data is strictly prohibited except for your personal use. • This product incorporates and bundles contents in which Yamaha owns copyrights or with respect to which Yamaha has license to use others’ copyrights. Due to copyright laws and other relevant laws, you are NOT allowed to distribute media in which these contents are saved or recorded and remain virtually the same or very similar to those in the product. * The contents described above include a computer program, Accompaniment Style data, MIDI data, WAVE data, voice recording data, a score, score data, etc. * You are allowed to distribute medium in which your performance or music production using these contents is recorded, and the permission of Yamaha Corporation is not required in such cases. About functions/data bundled with the instrument • This device is capable of using various types/formats of music data, and automatically optimizes that data to the proper format before use. As a result, this device may not play back the data exactly as the producers or composers of the data originally intended. About this manual • The illustrations and LCD screens as shown in this manual are for instructional purposes only, and may appear somewhat different from those on your instrument. • Windows is a registered trademark of Microsoft® Corporation in the United States and other countries. • Apple, iTunes, Mac, Macintosh, iPhone, iPad and iPod touch are trademarks of Apple Inc., registered in the U.S. and other countries. • IOS is a trademark or registered trademark of Cisco in the U.S. and other countries and is used under license. • The company names and product names in this manual are the trademarks or registered trademarks of their respective companies. Yamaha may from time to time update firmware of the product without notice for improvement in functions and usability. To take full advantage of this instrument, we recommend that you upgrade your instrument to the latest version. The latest firmware can be downloaded from the website below: http://download.yamaha.com/ MX49 MX61 MX88 Owner’s Manual S9 Introduction Thank you for purchasing the Yamaha MX49, MX61, or MX88 (hereafter referred to in this Owner’s Manual as this instrument) Music Synthesizer. Please read this owner’s manual carefully before using the instrument in order to take full advantage of its various features. When you have finished reading the manual keep it in a safe, accessible place, and refer to it when you need to better understand an operation or function. Accessories • Owner’s Manual (this book) • CUBASE AI DOWNLOAD INFORMATION • AC adaptor* *May not be included in your area. Please check with your Yamaha dealer. 2 MX49 MX61 MX88 Owner’s Manual About the Manuals This instrument has the following documents and instructional materials. Included Documents Owner’s Manual (this book) Describes how to set up your instrument and how to perform basic operations. This is the document you should read first when you start playing and using the instrument. Online Materials (PDF) Reference Manual Describes the internal design of your instrument, how to use a connected computer, and all parameters that can be adjusted and set. The manual includes the following contents. Basic Structure Using a Connected Computer • • • • • • • • • Connecting to a computer • Creating a Song with a computer Structure of the MX49, MX61, or MX88 Controller block Tone Generator block Effect block Arpeggio block Song/ Pattern playing block Internal memory MIDI/Audio signal flow Using iOS Applications Reference • • • • • Performance Song/Pattern settings File Utility Remote mode Synthesizer Parameter Manual This general, cross-product document explains parameters, effect types, effect parameters, and MIDI messages that are used for all synthesizers. Read the Owner’s Manual and Reference Manual first and then use this parameter manual if necessary to learn more about parameters and terms that relate to Yamaha synthesizers in general. Data List Provides lists such as the Voice List, Performance List, Arpeggio Type List, Effect Type List, as well as reference materials such as the MIDI Data table and MIDI Implementation Chart. How to use the PDF manuals The Reference Manual, the Synthesizer Parameter Manual, and the Data List are provided as data documents in PDF format. The PDF manuals listed above can be obtained from the Yamaha Downloads web page. To do so, go to the web page using the following URL, enter “MX49,” “MX61,” or “MX88” into the “Model Name” field, and then click “Search.” Yamaha Downloads: http://download.yamaha.com/ These PDF files can be viewed and read on a computer. When using Adobe® Reader® to view a PDF file, you can search for specific words, print a specific page or link to open a desired section in the manual. The term search and link functions are especially convenient methods of navigating through a PDF file, and we recommend that you use them. The latest version of Adobe Reader can be downloaded from the following URL. http://www.adobe.com/products/reader/ MX49 MX61 MX88 Owner’s Manual 3 Main Features Dynamic, MOTIF-based Sounds This instrument contains a wide range of dynamic and authentic waveforms derived directly from the world famous Yamaha MOTIF (including the realistic instrument sounds of acoustic piano, electric piano, synthesizer, drums, and many others). These give you exceptionally high-quality sound for playing and recording in various musical genres. Moreover, you can easily play back phrases of each instrument—even complex phrases impossible to play live—by using the Arpeggio function. The instrument also features an extensive effect system—including VCM (Virtual Circuitry Modeling) Effects, REV-X (high grade Reverb) Effects, and Master EQ. In a wide variety of ways, this instrument truly enhances and inspires your music performance and creation. Easy-to-use user interface This instrument has been designed for easy playability and simple, intuitive operation. For example, the Category buttons let you quickly select a desired Voice from easy-to-understand groups, based on the general instrument type or sound characteristics. The useful and popular Layer function (playing two Voices together) and Split function (playing two separate Voices with your left and right hands) can also be set instantly. What’s more, four Knobs are available on the panel—letting you control twelve aspects of the sound, and tweak them in real time as you play. Highly portable, with easy-to-carry design This instrument can go virtually wherever you go, thanks to its light weight and compact size. The MX49 is designed slim and trim, so that it easily fits on your desk or in front of your computer. The MX61 has a indented handle at the bottom, allowing you to easily carry it with one hand. Jam along with the Rhythm Patterns and Songs This instrument features a wealth of dynamic Rhythm Patterns in wide variety of musical genres. You can play the keyboard along with Rhythm Pattern playback—a truly inspiring way to perform! The instrument also conveniently lets you play back MIDI and Audio data contained in USB flash memory—letting you easily use Song data created on computer during live performance, without needing a computer! Plus, an [AUX IN] jack allows you to connect a portable music player, so that you can play the keyboard along with your favorite songs. Full music production capabilities—with just this instrument! Both MIDI and audio data can be transferred to and from a computer via USB—without the need for a separate audio interface or a MIDI interface. You can record and play MIDI data, record digital audio data from this instrument directly, and monitor the DAW sound from the OUTPUT [L/MONO] jack/ [PHONES] jack. Integration with Cubase This instrument is specially designed to work seamlessly with Cubase, Steinberg’s full-featured DAW software—giving you a comprehensive, all-in-one music production system, in which hardware and software are fully integrated. USB audio and MIDI Class-Compliant for easy connection to iOS applications This instrument can connect to iOS by using USB Audio/MIDI Class Compliant. You can use Stereo Audio In/Out and MIDI In/Out with iPhone and iPad through Apple’s Lightning - USB Camera Adapter. Combining the instrument with an iOS audio application, you can get a mobile audio recording solution. 4 MX49 MX61 MX88 Owner’s Manual Contents PRECAUTIONS ................................................... S6 Using the Arpeggio function ................................. 18 Introduction .............................................................2 Playing back the Arpeggio ...................................... 18 Changing the Arpeggio tempo ................................ 19 Changing the Arpeggio type ................................... 19 Accessories.............................................................2 About the Manuals ..................................................3 Included Documents.................................................. 3 Online Materials (PDF) ............................................... 3 Main Features .........................................................4 Controls and Functions 6 Keyboard Octave/Transpose settings .................. 20 Octave...................................................................... 20 Transpose ................................................................ 20 Storing the edited settings.................................... 20 Playing the Performances .................................... 20 Playing back Rhythm Patterns ............................. 21 Front Panel .............................................................6 Rear Panel ..............................................................8 Setting Up 9 Playing the keyboard with the Rhythm Pattern ........ 21 Changing the Rhythm Pattern type and sound........ 22 Changing the tempo for the Rhythm Pattern ........... 22 Playing the keyboard along with Songs ............... 23 Powering up the system..........................................9 Songs compatible with this instrument .................... 23 Playing back MIDI data of the USB flash memory... 23 Playing back audio data of the USB flash memory 24 Playing back song data of a portable music player 25 Auto Power Off function ........................................10 Creating an original Performance......................... 25 Adjusting the volume and the brightness of the display ...................................................................10 Selecting the Reverb/Chorus type (Common Edit/Part Edit) .......................................... 25 Changing the Insertion Effect of the Voice (Voice Edit)............................................................... 27 Changing the Controller Set for the Voice (Voice Edit)............................................................... 28 Storing a Voice (Voice Store) ................................... 29 Storing a Performance (Performance Store)............ 29 Power supply...........................................................9 Connecting speakers or headphones .....................9 Playing the Demo Songs.......................................10 Resetting User Memory to the initial factory settings..................................................................11 Basic Operation and Displays 12 Moving the cursor..................................................12 Changing (editing) parameter values ....................12 Selecting an item from a List.................................12 Selecting a page ...................................................13 Note settings .........................................................13 Naming (inputting characters) ...............................13 Leaving the current display ...................................13 Quick Guide 14 Playing the Voices.................................................14 Selecting a Voice for Part 1...................................... 14 Selecting a Voice for Part 2...................................... 15 Combining Voices (Layer) ....................................... 15 Playing separate Voices with your left and right hands (Split)........................................................................ 16 Changing the tonal qualities of the Voice with the controllers..............................................................17 Controllers on the front panel................................... 17 External Controllers ................................................. 18 Changing Voices smoothly while performing ....... 30 Making Global System Settings (Utility settings).. 31 Changing the Master Tune setting........................... 31 Adjusting the brightness of the display (LCD Contrast) ......................................................... 31 Saving/loading files on USB flash memory (File settings)........................................................ 31 Formatting the USB flash memory ........................... 31 Saving settings to USB flash memory...................... 32 Loading the settings from a USB flash memory ...... 32 Connecting an external MIDI instrument .............. 33 Controlling the instrument from an external MIDI keyboard or synthesizer........................................... 33 Controlling an external MIDI keyboard or synthesizer from the instrument .................................................. 34 Appendix 35 Shift Function List................................................. 35 Display Messages ................................................ 35 Troubleshooting.................................................... 37 Specifications ....................................................... 40 Index .................................................................... 41 MX49 MX61 MX88 Owner’s Manual 5 Controls and Functions Front Panel (The illustration is of the MX49; however, the controls and terminals of the MX61 and MX88 are the same.) 1 2 4 5 8 9 ! @ 6 7 ) # %$ G2 A2 B2 C3 ^ * & 3 C2 D2 E2 F2 1 [MASTER VOLUME] knob (page 10) Adjusts the volume of the overall sound. 2 Pitch Bend Wheel (page 17) Bends the pitch of the notes up or down while playing the keyboard. 3 Modulation Wheel (page 17) Controls vibrato applied to the sound. 4 Knobs [A] – [D] (page 17) These four highly versatile knobs let you adjust various aspects or parameters of Parts 1 and 2. 5 [KNOB FUNCTION] button (page 17) Changes the functions assigned to Knobs [A] – [D]. 6 [PART 1-2 LINK] button (page 17) Determines the sound which is applied to the Knob effects. 7 [DAW REMOTE] button (See Reference Manual) Turning on this button enters the Remote mode. The Remote mode lets you control DAW software on your computer from the panel controls of the instrument. 8 TRANSPOSE [-]/[+] buttons (page 20) Use these buttons to raise or lower the pitch of the notes in semitone steps. 9 OCTAVE [-]/[+] buttons (page 20) Use these buttons to change the note range of the keyboard. ) Transport buttons (pages 21 and 23) [J] (Stop) button Press to stop playback of Rhythm Pattern or Song data. [R/K] (Play/Pause) button Press to alternately start/pause playback of a Rhythm Pattern or Song data from the current point. ! [FILE] button (page 31) Calls up the File display from which you can transfer files between this instrument and USB flash memory. @ [UTILITY] button (page 31) Calls up the Utility display from which you can set parameters that apply to the entire system of this instrument. # [EDIT] button Calls up the display from which you can edit a Performance (page 20). Also, pressing this button while editing lets you switch between the just-edited sound and its original, unedited condition, allowing you to hear how your edits affect the sound (Compare function). $ [JOB] button (Refer to the Reference Manual) Calls up the Performance Job or Utility Job display. % [STORE] button Stores the Performance/Voice/Utility settings. 6 MX49 MX61 MX88 Owner’s Manual C4 Controls and Functions ( B F G H I J A D C K C5 ^ [PERFORMANCE NUMBER] display Indicates the number of the selected Performance. & [SELECT] button (page 20) Calls up the display from which you can select a Performance. * LCD (Liquid Crystal Display) (page 10) The backlit LCD indicates the parameters and values related to the currently selected operation or function. ( [DATA] dial (page 12) Changes the selected value in the display. A [SHIFT] button (page 35) Pressing this button along with another button enables you to execute various alternate commands of the respective buttons. B [INC/YES]/[DEC/NO] buttons (page 12) For increasing/decreasing the value of the currently selected parameter. C Cursor buttons (page 12) These move the “cursor” around the display, and scroll through the pages of the edited display. D [EXIT] button The menus and displays of the instrument are organized according to a hierarchical structure. Press this button to exit from the current display and return to the previous level in the hierarchy. L C6 E [ENTER] button Use this button to select the display to be edited, to define the value, and to execute a Job or a Store operation. F [LAYER] button (page 15), [SPLIT] button (page 16) These buttons respectively layer different Voices of Parts 1 and 2, and split the keyboard into left and right parts. G [ARP] button (page 18) Determines whether the Arpeggio function is applied to the entire Performance or not. H [RHYTHM PATTERN] button (page 21) Calls up the display from which you can select a Rhythm Pattern. I [EXT. SONG] (External Song) button (page 23) Calls up the display from which you can select Song data of the USB flash memory connected to the USB [TO DEVICE] terminal. J [TEMPO] button (pages 19, 22 and 23) Calls up the display from which you can set the tempo for the Arpeggio/ Rhythm Pattern/ Song. K Voice Category button (page 14) Selects a Voice category for Part 1/Part2. L [PART SELECT] button Calls up the display from which you can select a Part from Parts 1 – 16 and play it. MX49 MX61 MX88 Owner’s Manual 7 Controls and Functions Rear Panel MX49, MX61 1 2 3 4 5 6 7 8 9 MX88 2 3 4 5 6 7 8 9 1 1 DC IN jack (page 9) Connect the supplied power adaptor to this connector. 2 P (Standby/On) switch (page 9) Press to turn the power On (O) or set to Standby (N). 3 MIDI [IN]/[OUT] terminals (page 33) MIDI [IN] is for receiving control or performance data from another MIDI device. MIDI [OUT] is for transmitting all control, performance and playback data from this instrument to another MIDI device. 4 USB terminals There are two different types of USB terminals, and the rear panel of the instrument features both. The USB [TO HOST] terminal is used to connect this instrument to the computer via a USB cable and allows you to transfer MIDI data and audio data between the devices. For information about the Port handled by the instrument, refer to the “Reference Manual” PDF document. The USB [TO DEVICE] terminal is used to connect this instrument to a USB flash memory via a USB cable. For details, see pages 23 and 31. 5 [SUSTAIN] jack (page 18) For connection of an optional FC3A, FC4A, or FC5 Footswitch. When connecting an FC4A or FC5, this also enables footswitch control over various other functions. 6 [FOOT CONTROLLER] jack (page 18) For connection of an optional FC7 Foot controller. This jack lets you continuously control one of various different assignable functions—including volume, tone, pitch, or other aspects of the sound. 8 MX49 MX61 MX88 Owner’s Manual 7 [AUX IN] (Auxiliary Input) jack (page 25) The Auxiliary Input stereo mini-jack is used to input audio from an external audio device. For example, you can use this jack to connect a portable music player and play along with your favorite music. NOTE Use the external device’s volume control to adjust the desired level balance with this instrument. 8 OUTPUT [L/MONO]/[R] jacks Line level audio signals are output via these phone jacks. For monophonic output, use only the [L/MONO] jack. 9 [PHONES] (Headphone) jack This standard stereo phones jack is for connection to a set of stereo headphones. The audio output is identical to that of the OUTPUT [L/MONO]/[R] jack. Setting Up Power supply Make connections for the supplied power adaptor (page 40) in the following order. Before you connect the power adaptor, make sure that the power of this instrument is set to Standby status (N). 1 Wrap the DC output cable of the power adaptor around the cable clip (as shown below), then connect the plug of the adaptor to the DC IN jack on the rear panel. MX49, MX61 Connecting speakers or headphones Since this instrument has no built-in speakers, you will need to monitor the sound of the instrument by using external equipment. Connect a set of headphones, powered speakers, or other playback equipment as illustrated below. When making connections, be sure that your cables have the appropriate ratings. Powered speaker (Left) Powered speaker (Right) MX88 Headphones OUTPUT [L/MONO] OUTPUT [R] [PHONES] NOTE Use of the cable clip prevents accidental unplugging of the Standard stereo phone plug Standard mono phone plugs cable during operation. Make sure to avoid tightening the cord more than necessary or pulling on the cord strongly while it is wrapped around the cable clip to prevent wear on the cord or possible breakage of the clip. 2 Connect the other end of the power adaptor to an AC outlet. AC outlet Power adaptor MX49, MX61, or MX88 NOTICE Before connecting this instrument to external devices, turn off the power to all the devices. Powering up the system NOTE Follow this procedure in reverse order when disconnecting the power adaptor. WARNING • Use only the specified adaptor (page 40). The use of other adaptors may result in irreparable damage to both the adaptor and the instrument. • When using the AC adaptor with a removable plug, make sure to keep the plug attached to the AC adaptor. Using the plug alone can cause electric shock or fire. Plug Slide the plug as indicated • Never touch the metallic section when attaching the plug. To avoid electric shock, short circuit or damage, also be careful that The shape of the plug differs there is no dust between the AC depending on your area. adaptor and plug. Make sure the volume settings of this instrument and external devices such as powered speakers are turned down to the minimum before turning the power on. When connecting this instrument to the powered speakers, turn on the power switch of each device in the following order. When turning the power on: First, turn the power of the instrument on with the P (Standby/On) switch, then turn the power of the connected powered speakers on. When turning the power off: First, turn the power of the connected powered speakers off, then turn the power of the instrument off with the P (Standby/On) switch. Standby/On switch DC IN CAUTION Even when the power of this instrument is in the Standby status, electricity is still flowing to the instrument at the minimum level. When you are not using the instrument for a long time, make sure you unplug the power adaptor from the wall AC outlet. MX49, MX61, or MX88 MX49 MX61 MX88 Owner’s Manual 9 Setting Up Auto Power Off function To prevent unnecessary power consumption, this instrument features an Auto Power Off function that automatically turns the power off if the instrument is not operated for a specified period of time. In the default settings, the power will be turned off if this instrument is not operated for 30 minutes. If you wish to disable the Auto Power Off function, turn the power on while holding down the lowest key on the keyboard. An “Auto power off disabled” message appears briefly and Auto Power Off is disabled. The setting is retained even if the power is turned off. Adjusting the volume and the brightness of the display Adjust the volume levels of this instrument and the connected amplifier/speaker system. NOTE When connecting to a set of powered speakers or PA equipment, set the Master Volume to about 70%, then raise the volume of the powered speakers or PA equipment to the appropriate level. CAUTION Do not listen with the headphones at high volume for long periods of time. Doing so may cause hearing loss. If the display is not easily visible, while holding down [UTILITY], press [INC/YES]/[DEC/NO] to adjust for optimum visibility. Adjust the volume with the [MASTER VOLUME] knob. Adjust the display contrast. The amount of time that elapses before the power is automatically turned off can be set by the following operation. [UTILITY] Select “01:General” with Cursor [u] button [ENTER] Select “AutoOff” with Cursor [d] button, then change the value with [DATA] dial [STORE] NOTICE • Depending on the instrument status (for example, the settings have been modified but not yet stored), the power may not turn off automatically, even after the elapse of the specified period of time. Always turn off the power manually when the instrument is not in use. • When the instrument is not operated for a specified period of time while connected to an external device such as an amplifier, speaker or computer, make sure to follow the instructions in the Owner’s Manual to turn off the power to the instrument and the connected devices, in order to protect the devices from damage. If you do not want the power to turn off automatically when a device is connected, disable Auto Power Off. • When Auto Power Off is set to “off,” the value will be retained even if the backup data saved on another device is loaded to the instrument. When Auto Power Off is set to something other than “off,” the value will be overwritten with loaded data. • Keep in mind that the amount of time that elapses before the power automatically turns off is reset to 30 minutes if you execute the Factory Set function (page 11). MX49, MX61, or MX88 Playing the Demo Songs The instrument features a variety of Demo Songs, showcasing its dynamic sound and sophisticated functions. Here’s how to play them back. 1 Press [FILE] and [UTILITY] at the same time. The DEMO display is called up. 2 Rotate the [DATA] dial to select a Demo Song. 3 Press [F/ K] (Play/Pause) to play back the Demo Song. The Demo Song currently shown on the display starts. NOTE • The setting time is approximate. • To turn the power on after Auto Power Off has been executed, press the Standby/On switch once to set it to Standby, and then press it again to set to On. NOTE To adjust the volume level of the Demo Songs, use the [MASTER VOLUME] Knob. 10 MX49 MX61 MX88 Owner’s Manual 4 Press [J] (Stop) to stop the Demo Song. 5 In order to leave the DEMO display, press [EXIT]. Setting Up Resetting User Memory to the initial factory settings The original factory settings of this synthesizer’s User Memory can be restored as described here. The Performances, User Voices, and Utility settings of the User Memory will be reset to the initial factory settings. This operation is especially handy when you’ve unintentionally deleted or overwritten the Performances or Utility settings. NOTICE When the factory settings are restored, all the Performance, User Voice, and system settings in the Utility display you created will be erased. Make sure you are not overwriting any important data. Be sure to save all important data to your USB flash memory before executing this procedure (page 32). 1 Press [UTILITY], then press [JOB]. The Utility Job Select display is called up. 2 Use the Cursor [u]/[d] buttons to select the “02:FactrySet,” then press [ENTER]. The Factory Set display is called up. JOB*Factory*Set ****PowerOn*Auto=off 3 Press [ENTER]. The display prompts you for confirmation. To cancel this operation, press [DEC/NO] here. In this case, in order to return to the top display, press [EXIT] repeatedly if necessary after canceling. q**Are*you*sure?***w e****[NO]/[YES]**** r NOTICE When setting the “Power On Auto” to on and executing Factory Set, the Factory Set operation will automatically be executed each time you turn the power on. Keep in mind that this also means that your original data in the User Memory will be erased each time you turn on the power. Therefore, the parameter normally is set to off. If you set it to off and execute Factory Set, the Factory Set operation will not be executed when turning the power on the next time. 4 Press [INC/YES]. The Factory Set operation is executed. NOTICE For Factory Set operations that take longer to process, you will see a message during processing. While such a message is shown on the display, do not turn off the power. Turning the power off in this state results in loss of all user data and may cause the system to freeze (due to corruption of data in the User Memory). This could also result in the instrument not being able to start up properly, even when turning the power on next time. 5 Press [EXIT] several times to return to the top display. MX49 MX61 MX88 Owner’s Manual 11 Basic Operation and Displays Moving the cursor The display cursor indicates a selected item and is shown in the three following types. Arrow type Selected item AP c001:CncrtGrand STR:081:Amb*Pizza This flashing triangular cursor indicates the selected item’s line. You can move the cursor up or down by using the Cursor [u]/[d] buttons. Flash type Changing (editing) parameter values Rotating the [DATA] dial to the right (clockwise) increases the value, while rotating it to the left (counter-clockwise) decreases it. Pressing the [INC/YES] button increases a parameter value by one step, and pressing [DEC/NO] decreases it. Pressing and holding either button continuously increases or decreases the value. For parameters with large value ranges, you can increase the value by 10 by while holding down the [SHIFT] button and pressing the [INC/YES] button. To decrease by 10, simultaneously hold down the [SHIFT] button and press the [DEC/NO] button. Increases number DrumKit*Insert*Eff*2 a***REV:****SPX*Hall Decreases number Increases number Selected item The selected item itself flashes. You can move the cursor indication up/down/left/right by using the Cursor [u]/[d]/ [l]/[r] buttons. Decreases number Underline type Selecting an item from a List AP*:*001:CncrtGrand a000123456789 tyuiop@ 3 Selected item This flashing underline indicates the selected item. This display actually has two cursor indicators: the underline and the flash type. You can move the flash type cursor by using the Cursor [u]/[d] buttons in this display, and move the underline type cursor by using the Cursor [l]/ [r] buttons. When there are multiple displays to be edited, the name of each display is indicated in a scrollable list as a selected item. Common a01:Chorus*Eff Number of the selected item 2 Name of the selected item (display to be edited) In order to switch the selected item, use the Cursor [u]/ [d] buttons, then press [ENTER] to define the selection. The icon displayed to the left of number indicates that other items are available up (s) or down (a) in the list. 12 MX49 MX61 MX88 Owner’s Manual a Other selected item(s) available further down d Other selected items available either up or down s Other selected item(s) available further up Basic Operation and Displays Selecting a page The display to be edited may consist of multiple pages. In this case, the upper (s)/ lower (a) icons are indicated at the bottom left of the display. You can select a page by using the Cursor [u]/[d] buttons. Leaving the current display If you wish to return to the previous display from the current display, press [EXIT]. In order to return to the top display, press [EXIT] repeatedly. DrumKit*Insert*Eff*2 a***REV:****SPX*Hall Indicates availability of other pages Parameter which can be edited NOTE If you wish to leave the Remote mode (refer to the “Reference Manual” PDF document), you need to press [DAW REMOTE] instead of [EXIT]. Note settings Pressing a key lets you set a note value for the Split Point parameter (page 16). You can set the desired Split Point by holding down [SPLIT] and pressing the corresponding key (only when [SPLIT] is set to on; the lamp lights). Split Point + Naming (inputting characters) You can freely name the data you’ve created, such as that of Voices and Performances. First, move the cursor to the desired location in the name with the Cursor [l]/ [r] buttons, and select the character by using the [DATA] dial or the [INC/YES]/[DEC/NO] buttons. 2 Common*Name a*******[Simple*Bld] Selected location flashes MX49 MX61 MX88 Owner’s Manual 13 Quick Guide Playing the Voices Selecting a Voice for Part 1 The instrument consists of 16 Parts. Voices, which are the basic sounds and building blocks of the instrument, are assigned to each Part. After the instrument is turned on, the top display which appears shows the Voices of only Parts 1 and 2. With the default settings, playing the keyboard will sound only the Voice for Part 1. Select the desired Voice from the various preset Voices and play it. The Voices of the instrument are conveniently divided into specific categories, each based on a general instrument type or sound characteristic. In order to select a Voice, first select a category. Here, you’ll learn how to change Voices and play a Voice while Part 1 is selected. NOTE For lists of the Voices and categories, see the “DATA LIST” PDF document. Top display Voice for Part 1 Voice for Part 2 Voice Category AP c001:CncrtGrand STR:081:Amb*Pizza 1 Press the desired Voice Category button. Cursor indicates that Part 1 is selected Voice number Voice name Category of Part 1 is changed. AP c001:CncrtGrand KB c001:Vintage'74 STR:081:Amb*Pizza HINT The instructions of the “Playing the Voices” section assume that you are starting from the top display with the default settings immediately after turning this instrument on. If the instrument is in a different status, or for some reason you cannot return to the top display with the default settings, simultaneously hold down [SHIFT] and press [SELECT]. This is the Quick Reset function and allows you to return operation to the same top display as when the instrument is first turned on. 2 Rotate the [DATA] dial to select the desired Voice in the selected category. Voice for Part 1 is changed. + KB c004:Soft*Case STR:081:Amb*Pizza 3 Play the keyboard. 4 Repeat steps 1 – 3 to play the various Voices. NOTICE Executing the Quick Reset function above erases any edited data. Be sure to store important data to internal memory (page 29). NOTE For details about this function, see the “Shift Function List” (page 35). 14 MX49 MX61 MX88 Owner’s Manual Quick Guide Selecting a Voice for Part 2 Combining Voices (Layer) Here, you’ll learn how to select a Voice for Part 2 as well as Part 1. By setting the Voices of Part 1 and Part 2 in the top display, you can alternate between the two Voices as you play without the sound unnaturally cutting off. You can select separate Voices for Parts 1 and 2, and play both Voices together in a layer. 1 Voice for Part 1 Press the Cursor [d] button to select Part 2. Only Part 2 can now be sounded. Voice for Part 2 KB :004:Soft*Case c *Pizza STR:081:Amb 2 Press the desired Voice Category button. 3 Rotate the [DATA] dial to select a specific desired Voice in the selected category. 1 KB :004:Soft*Case c ORG:001:16+8+5&1/3 2 Press [LAYER]. Part 1 and Part 2 can now be sounded at the same time (Layer). In the display, Part 2 is selected. Use the Category buttons and the [DATA] dial to select a Voice for Part 2, and check the sound by playing the keyboard. Voice for Part 2 is changed. 4 KB :004:Soft*Case c ORG:002:Jz2Perc+C3 Play the keyboard. Voice for Part 2 is changed. NOTE To change the Voice for Part 1, press the Cursor [u] button to select Part 1, then use the Category buttons and the [DATA] dial to select a different Voice. 5 While playing the keyboard, press the Cursor [u] button to select Part 1. The Part 2 sound is maintained for the last key played, and the Voice changes to that of Part 1, which plays from the next key and after. HINT Stopping Arpeggio playback Depending on the selected Voice, you can trigger Arpeggio playback by playing the keyboard. To stop Arpeggio playback at any time, press [ARP]. To enable the Arpeggio function again, press [ARP] so that the lamp lights. 3 Adjust the volume for Part 1 and Part 2 as desired, checking the sound as you play the keyboard. Make sure that the lamp of [PART 1-2 LINK] is off, then press the [KNOB FUNCTION] repeatedly to turn on the third lamp. Then adjust the volume for the selected Part with Knob [A]. After returning to the top display, select the other Part with the Cursor [u]/[d] buttons, then adjust the volume with Knob [A] again. NOTE If the Knob [A] value has brackets, rotating Knob [A] will not change the value until displayed value is reached. MX49 MX61 MX88 Owner’s Manual 15 Quick Guide 4 To cancel the Layer function, press [LAYER] again. 3 To change the Split Point, simultaneously hold down [SPLIT] and press the desired key. The [LAYER] lamp turns off, and only the Part 1 Voice sounds. Split Point + HINT Creating a thick, textured sound by layering Voices By slightly increasing/decreasing the value of the “Detune” parameter for one Part after assigning synthesizer Voices to Parts 1 and 2, you can create a powerful lead synthesizer sound. Experiment with other Voices and the Detune parameter (called up as described below) to create other warm, organic sounds. [EDIT] Select “02:Part” [ENTER] Select “01:Play Mode” [ENTER] Cursor [u]/[d] buttons 4 Adjust the volume for Part 1 and Part 2 as desired, checking the sound as you play the keyboard. Make sure that the lamp of [PART 1-2 LINK] is off, then press the [KNOB FUNCTION] repeatedly to turn on the third lamp. Then rotate Knob [A]. The volume for the selected Part is changed. After returning to the top display, select the other Part by using the Cursor [u]/[d] buttons, then adjust the volume by rotating Knob [A] again. Playing separate Voices with your left and right hands (Split) This function lets you play different Voices with your left and right hands. To use this, assign the Voice for Part 1 to the right part of the keyboard, and Voice for Part 2 to the left. The point (or key) at which the keyboard is split between left and right parts is called the “Split Point.” You can freely set the Split Point to any desired key. Voice for Part 2 Voice for Part 1 Split Point 1 Press [SPLIT]. The Voices of Part 1 and Part 2 are split to the left and right of the keyboard, and Part 2 is selected. 2 Select a Voice for Part 2, using the Category buttons and the [DATA] dial, and check the sound while playing the keyboard. NOTE To change the Voice for Part 1, press the Cursor [u] button to select Part 1, then use the Category buttons and the [DATA] dial to select a different Voice. 16 MX49 MX61 MX88 Owner’s Manual 5 To cancel the Split function, press [SPLIT] again. The [SPLIT] lamp turns off, and only the Part 1 Voice sounds. HINT Changing the octave range for a Part It may be musically useful to change the pitch of the Split Part—for example, setting it to a higher or lower octave. To do this, set the “NoteShift” parameter for the Part to +12 or -12. You can change the pitch of the Part in semitone steps. You can call up NoteShift as follows. [EDIT] Select “02:Part” [ENTER] Select “01:Play Mode” [ENTER] Cursor [u]/[d] button Quick Guide Changing the tonal qualities of the Voice with the controllers Knobs [A] – [D] The instrument features various controllers which let you change the sound of the instrument in real time. These include the Knobs, Pitch Bend Wheel, and Modulation Wheel. You can also control various functions by using external controllers connected to the corresponding jacks on the rear panel. 1 You can change the brightness and tone characteristics of Part 1/Part 2 in realtime by turning the Knobs while you play. Three functions are assigned to each Knob, alternatively selected via the [KNOB FUNCTION] button. Press [KNOB FUNCTION] repeatedly if necessary, so that the lamp corresponding to the desired functions lights. The Knob Function display which shows the current functions and current values for Knobs [A] – [D] is called up. The values in brackets indicate that the Knob indication is different from the current actual value. Controllers on the front panel Function 3 Function 2 Function 1 Knobs [A] – [D] Pitch Bend Wheel Modulation Wheel *Cut**Rez**Cho**Rev ] (+34)*:02***40***12 Pitch Bend wheel Use the Pitch Bend wheel to bend notes up or down while playing the keyboard. This wheel is self-centering and automatically returns to normal pitch when released. Try out the Pitch Bend wheel while pressing a note on the keyboard. [A] [B] [C] Function names Values [D] NOTE You can instantly reset Knobs [A] – [D] to Function 1 by holding down [SHIFT] and pressing [KNOB FUNCTION]. 2 Press [PART 1-2 LINK] to determine whether the Knob functions are applied to both Part 1 and Part 2 (on), or only the selected Part (off). 3 While playing the keyboard, rotate one of the Knobs. Raises the pitch Lowers the pitch NOTE You can change the maximum pitch bend range by calling up the “PB Upper”/ “PB Lower” parameters as follows and change the values of these parameters. [EDIT] Select “02:Part” [ENTER] Select “01:Play Mode” [ENTER] Cursor [u]/[d] buttons Modulation wheel This controller is used to apply vibrato to the keyboard sound. Try out the Modulation wheel with various Preset Voices while playing the keyboard. Maximum The function assigned to the Knob you’re currently operating and the function value appear in the Knob Function display. If the value is shown in brackets, rotating the corresponding Knob has no effect on the value until the Knob indication reaches the current value. q ***Part01*Cutoff*** w Minimum ********+30******** r e NOTE For details about each function, see the “Reference Manual” PDF document. MX49 MX61 MX88 Owner’s Manual 17 Quick Guide External Controllers The Arpeggio function lets you create arpeggios (broken chords) by simply playing the appropriate notes on the keyboard. For example, you could play the notes of a triad—the root, third, and fifth—and the Arpeggio function will automatically create a variety of interesting arpeggio-type phrases. You can set different Arpeggio types for each Part, and apply the Arpeggio function up to two Parts simultaneously. The most suitable Arpeggio type is automatically selected for each part when you select a voice, but you can easily select any other Arpeggio type. Rear Panel FC3A, FC4A, FC5 Using the Arpeggio function FC7 Footswitch An optional Footswitch (FC3A, FC4A or FC5) connected to the [SUSTAIN] jack on the rear panel lets you control sustain. Notes played while the Footswitch is pressed are sustained longer than normal after you release the corresponding keys, like a damper pedal on an acoustic piano (Sustain function). If you connect an FC3A, you can use the half-damper function for some Voices of the PIANO and KEYBOARD categories. When using the halfdamper function, the degree to which the pedal is pressed can control how long the notes are sustained. Change the setting as follows according to the connected Footswitch. [UTILITY] Select “03:Controller” [ENTER] Select “FS Pedal” parameter Set “FS Pedal” to connected Footswitch Return to top display by pressing [EXIT] twice Part 2 Arpeggio switch = on Part 1 Arpeggio switch = on Voice Voice Arpeggio switch = on NOTE If you wish to use the half-damper function, set the “FS Pedal” to “FC3 Half On.” Foot controller You can connect an optional Foot Controller (FC7) to the [FOOT CONTROLLER] jack on the rear panel. This conveniently lets you use your foot to control volume (like the volume pedal of an organ), freeing your hands for playing. Playing back the Arpeggio NOTE You can also control other functions than sustain or volume 1 Press [EDIT]. 2 Select “02:Part” by pressing the Cursor [d] button, then press [ENTER]. by using a foot pedal connected to the [SUSTAIN] jack or [FOOT CONTROLLER] jack. For details, see the explanation of the Utility Controller display in the “Reference Manual” PDF document. HINT When Sustain is applied only to specific Parts If you wish to apply the sustain effect only to Part 1, set the receive switch of the “Sustain” for Part 2 to off as follows. [EDIT] Select “02:Part” [ENTER] [KEYBOARD] (2) Select “04:Receive Switch” [ENTER] “Sustain” = “off” 18 MX49 MX61 MX88 Owner’s Manual EDIT s02:Part Quick Guide 3 Select “03:Arp Select” with the Cursor [u]/ [d] buttons, then press [ENTER]. Changing the Arpeggio tempo This calls up the Edit display related to the Arpeggio for the Part. 1 Press [TEMPO]. 2 While playing back the Arpeggio from the keyboard, change the tempo with the [DATA] dial. Part01 d 03:Arp*Select 4 Press [PIANO] (1). This calls up the Edit display for Part 1. (Other Parts can be selected by pressing the appropriate number button 1 – 16.) 5 Select the “Switch” parameter with the Cursor [u] button, then set it to “on” with the [DATA] dial. 3 q *******Tempo w **********90 v e r Press [EXIT] to leave the Tempo display. Tap Tempo function The Arpeggio for Part 1 is enabled. The tempo can also set by “playing” or tapping the [TEMPO] button several times repeatedly at the desired tempo. Part01*Arp*Select Switch=*on a Changing the Arpeggio type 6 If necessary, press [ARP] on the panel so that the lamp lights. 1 Make desired settings according to the instructions of steps 1 – 4 in “Playing back the Arpeggio.” 2 Select the Arpeggio type parameter in page 3 of the Arp Select display with the Cursor [u]/ [d] buttons, then change the Arpeggio type while playing the keyboard. Move the flashing cursor to the Arpeggio category or Arpeggio number with the Cursor [l]/[r] buttons, then change the setting with the [DATA] dial. 7 Part01*Arp*Select d ApKb:036:BalladEP2 Play the keyboard to sound the Arpeggio. The sound of the Arpeggio produced changes according to the number of notes you play and the area of the keyboard you play in. Arpeggio category 3 8 If Arpeggio playback does not stop after you quit playing, press [ARP] to stop it. 9 If desired, play back the Arpeggio for Part 2 as well as Part 1. Press [KEYBOARD] (2) (similar to step 4 above), then execute from steps 5 to 8 again. Arpeggio number Arpeggio name If desired, select the “Hold” parameter with the Cursor [u] button, then change the setting with the [DATA] dial. This parameter determines whether the Arpeggio continues cycling after the keys are released. For details about this parameter, see the “Synthesizer Parameter Manual” PDF document. Part01*Arp*Select Hold=******on a MX49 MX61 MX88 Owner’s Manual 19 Quick Guide Keyboard Octave/ Transpose settings Octave The OCTAVE [-]/[+] button lets you shift the pitch of the keyboard in octaves, up to a maximum of three. For example, you may want to shift the pitch down lower to get extra bass notes, or shift up to get higher notes for leads and solos. Pressing the [-] and the [+] buttons together at the same time will return the setting to the initial value (0). The current octave range can be confirmed via the status of the lamp of the OCTAVE [-]/[+] buttons. When set to one octave down or up, the corresponding lamp lights. When set to two octaves down or up, the corresponding lamp flashes slowly. When set to three octaves down or up, the corresponding lamp flashes quickly. Playing the Performances A program in which multiple Voices (parts) are combined is referred to as a “Performance,” and the instrument has a total of 128 Performances. A Performance consists of up to 16 Parts. The Parts which you normally use for playing the keyboard are Parts 1 and 2. When turning on this instrument with the factory settings, Performance 1 is called up. In the instructions covered so far (pages 14 – 20), you’ve played and edited Parts 1 and 2 of Performance 1, which is simply designed for playing one or two Voices. Performances 2 – 128 are provided for enjoying a powerful and thick sound which consists of multiple various Voices. In the instructions below, we’ll change the Performance to one of Performances 2 – 128 and play it. Performance 128 Performance 1 Normally used Parts Voice Part 1 Transpose Part 3 Voice Part 10 Voice Part 2 The TRANSPOSE [-]/[+] button lets you shift the pitch of the keyboard in semitones (up to 11 semitones). This function allows you to play in the same position and with the same fingering, even if the Song data or another instrument player is playing in a different key. Pressing the [-] and the [+] buttons together at the same time will return the setting to the initial value (0). When set to one semitone down or up, the corresponding lamp lights. Part 16 Voice Voice 1 Press [SELECT]. The Performance Select display is called up. Storing the edited settings When you are satisfied with the results, store the settings you’ve made to internal memory (as a Performance) so that they can be recalled after turning off the power. Press [STORE], then press [ENTER]. Finally, press [INC/ YES] to store the settings to Performance 1. NOTE For detailed instructions on the Store operation, see “Storing the Performance” (page 29). 2 Rotate the [DATA] dial to select a Performance. The selected Performance number is shown in the [PERFORMANCE NUMBER] display. Performance Select display Performance*Select c 001(A01):MXCategory Performance number Performance group Performance name NOTE For a detailed list of all Performances, see the “Performance List” of the “Data List” PDF document. 20 MX49 MX61 MX88 Owner’s Manual Quick Guide NOTE The 128 Performances are divided into eight groups (A – H), each of which consist of sixteen Performances. To select these groups of Performances, simultaneously hold down [SHIFT] and use the [DATA] dial or [INC/ YES]/[DEC/NO] buttons. 3 Play the keyboard. If the lamp of the [R/K] (Play/Pause) button flashes before playing the keyboard, playing the keyboard starts the Rhythm Pattern (Key On Start function). In this case, play the keyboard with the Rhythm Pattern. To stop the Rhythm Pattern, press [J] (Stop). Also, if the Arpeggio playback continues after you’ve finished playing, press [ARP] to stop the Arpeggio. 4 When you’re done trying out the various Performances, press [EXIT] to return to the Top display. The display showing the currently selected Part 1 and Part 2 is called up. PAD:003:AmbSyn*pad CMP:065:TranceLine Playing back Rhythm Patterns The instrument features a wide variety of Rhythm Patterns. An appropriate Rhythm Pattern is assigned to each Performance. Playing the keyboard with the Rhythm Pattern 1 After selecting a Performance, with the [R/K] (Play/Pause) lamp flashing, play the Keyboard. If the [R/K] (Play/Pause) lamp is turned off, press [R/K] (Play/Pause), then play the keyboard. The lamp of [R/K] (Play/Pause) flashes quickly and the Rhythm Pattern plays back. 2 To pause the Rhythm Pattern, press [R/K] (Play/Pause). To resume playback, press [R/ K] (Play/Pause) again. 3 Press [J] (Stop) to stop the Rhythm Pattern. HINT You can switch the Performance number directly by pressing the [SHIFT] button and the Voice Category button simultaneously in the Performance Select display (Performance Direct Select function). While this function is enabled, you can change the performance number simply by pressing the Voice Category button, without needing to press the [SHIFT] button. HINT You can select Performances in sequence with a footswitch by connecting an FC4A/FC5 to the [SUSTAIN] jack and setting as follows. Keep in mind that the sustain function cannot be used in this case. [UTILITY] Select “03:Controller” [ENTER] “FS” = “PC inc” / “PC dec.” HINT Using the Key On Start function The Key On Start function automatically starts a Rhythm Pattern when you play a key on the keyboard. Especially convenient in live performance situations, this allows you to start playing the keyboard and have the Rhythm Pattern instantly start playback at the same time. There are some Performances which are automatically set to standby condition for the Key On Start function. In this case, you can automatically use the Key On Start function simply by playing the keyboard. For other Performances, enable the function as described below. 1 While holding down [J] (Stop) press [R/ K] (Play/Pause). The lamp of [R/K] (Play/Pause) flashes slowly, and the selected Performance is set to standby status for the Key On Start function. MX49 MX61 MX88 Owner’s Manual 21 Quick Guide 4 + NOTE If you wish to cancel this standby status, press [J] (Stop). 2 Play the keyboard. The Rhythm Pattern starts at the same time. 3 When you have finished making the desired Rhythm Pattern settings, press [J] (Stop) to stop the Rhythm Pattern. Changing the tempo for the Rhythm Pattern 1 Press [TEMPO]. 2 Press [R/K] (Play/Pause) to play back the Rhythm Pattern, then rotate the [DATA] dial to change the tempo. Press [J] (Stop) to stop the Rhythm Pattern. NOTE For details about resetting the Key On Start function, see the “Reference Manual” PDF document. Changing the Rhythm Pattern type and sound You can select a different Rhythm Pattern to be assigned to the Performance, and even change the Drum Voice used for the Pattern. q *******Tempo w **********90 v e r NOTE This tempo setting is automatically reflected to the 1 Arpeggio tempo and can be set for each Performance. Press [RHYTHM PATTERN]. Tap Tempo function The tempo can also set by “playing” or tapping the [TEMPO] button several times repeatedly at the desired tempo. 2 Press the Cursor [u] button repeatedly if necessary to call up the 1st page (similar to the one shown below), then press [R/K] (Play/Pause) and change the Rhythm Pattern type. Move the cursor to the category or number of the Rhythm Pattern with the Cursor [l]/[r] buttons. PATTERN*****01:01/04 a *R&B:091:Smooth*2 Category 3 Number Name Press the Cursor [d] button to call up the 2nd page, then rotate the [DATA] dial to change the Drum Voice. PATTERN*****01:01/04 d *DR*:061:SFX*Kit NOTE You can set additional parameters related to the Rhythm Pattern in other pages. For details about these parameters, see the “Reference Manual” PDF document. 22 MX49 MX61 MX88 Owner’s Manual Storing the Rhythm Pattern You can store the changed Rhythm Pattern settings as Performance data. For instructions on storing a Performance, see page 29. Quick Guide Playing the keyboard along with Songs 3 Press [EXT. SONG]. 4 Press the Cursor [u] button repeatedly if necessary to call up the 1st page, then rotate the [DATA] dial to select the desired MIDI data. MIDI data and audio data contained in the USB flash memory can be played back as a “Song” on the instrument. MIDI and audio data MIDI data is comprised of your keyboard performance information and is not a recording of the actual sound itself. The performance information refers to which keys are played, at what timing, and at what strength—just as in a musical score. Based on the recorded performance information, the tone generator outputs the corresponding sound. Audio data, on the other hand, is a recording of the performed sound itself. This data is recorded in the same way as that used in recording with voice recorders, etc. This data can be played with a portable music player, etc., allowing you to easily let other people hear your performance. Current measure and beat for the MIDI data SONG**********001:01 a **File=MYSONG01.MID Name of the MIDI data 5 Press [R/K] (Play/Pause). The lamp of [R/K] (Play/Pause) flashes and the selected MIDI data is played back with the selected Performance sounds. Songs compatible with this instrument Data formats of MIDI data and audio data that can be played on this instrument are as follows. MIDI data 6 Play the keyboard along with the MIDI data. The selected Part is sounded. To change the Part for playing, press [PART SELECT] to select one of the 16 Parts with the numbered Category buttons. Only SMF (Standard MIDI File) MIDI data of format 0 can be used for playback on this instrument. The file extension is “.MID.” This instrument is equipped with a 16-track sequencer for playback and a 16-part multitimbral tone generator, allowing you to play back MIDI data of up to 16 tracks. Audio data Only 44.1kHz/16-bit stereo Wave file audio data can be used for playback on this instrument. The file extension is “.WAV.” Playing back MIDI data of the USB flash memory 1 Connect the USB flash memory in which the MIDI data is stored. 7 To pause the MIDI data, press [R/K] (Play/ Pause). To resume playback, press [R/K] (Play/Pause) again. 8 If you wish to change the tempo, press [TEMPO], then rotate the [Data] dial to select the desired value. q *******Tempo w **********90 v e r NOTE Make sure that the desired MIDI data is stored in the root directory (which is called up when you first open the memory location) of the USB flash memory. 2 Press [SELECT], then select an appropriate Performance for playing back the MIDI data. Performance*Select c 001(A01):MXCategory NOTE This tempo setting is automatically reflected to the Arpeggio tempo and Rhythm Pattern tempo, and can be set for each Performance. Tap Tempo function The tempo can also set by “playing” or tapping the [TEMPO] button several times repeatedly at the desired tempo. MX49 MX61 MX88 Owner’s Manual 23 Quick Guide 9 Press [J] (Stop) to stop the MIDI data. 7 To pause the audio data, press [R/K] (Play/ Pause). To resume playback, press [R/K] (Play/Pause) again. 8 Press [J] (Stop) to stop the audio data. Playing back audio data of the USB flash memory 1 Connect the USB flash memory in which the audio data is stored. Precautions when using the USB [TO DEVICE] terminal NOTE Make sure that the desired audio data is stored in the This instrument features a built-in USB [TO DEVICE] terminal. When connecting a USB flash memory to the terminal, be sure to handle the USB flash memory with care. Follow the important precautions below. root directory (which is called up when you first open the memory location) of the USB flash memory. 2 Press [EXT. SONG]. NOTE For more information about the handling of USB flash memories, refer to the owner’s manual of your particular USB flash memory. Compatible USB devices 3 Press the Cursor [u] button repeatedly if necessary to call up the 1st page, then rotate the [DATA] dial to select the desired audio data. Current elapsed time of audio data (in minutes and seconds) SONG***********00:00 a **File=BACK_001.WAV Name of the audio data 4 Press the Cursor [d] button repeatedly if necessary to call up the 2nd page, then rotate the [DATA] dial to adjust the volume for the audio data. SONG********** s *****WAV*Volume=100 5 Press [R/K] (Play/Pause). The lamp of [R/K] (Play/Pause) flashes and the selected audio data is played back. Only USB memory devices of the flash-memory variety can be used with the instrument. Furthermore, the instrument does not necessarily support all commercially available USB flash memories, nor can Yamaha guarantee operation of USB devices that you purchase. Before purchasing a USB flash memory for use with this instrument, please visit the following web page: http://download.yamaha.com/ Connecting USB flash memories When connecting a USB flash memory to the USB [TO DEVICE] terminal, make sure that the connector on the device is appropriate and that it is connected in the proper direction. NOTICE • Avoid connecting or disconnecting the USB flash memory during playback, file management (such as Save, Copy, Delete and Format operations) or while the instrument is accessing the USB flash memory in any way. Failure to do so may result in “freezing” of the operation of the instrument or corruption of the USB flash memory and the data. • When connecting then disconnecting the USB flash memory (and vice versa), make sure to wait a few seconds between the two operations. NOTE • When connecting a USB cable, make sure that the length is less than 3 meters. • Though the instrument supports the USB 1.1 standard, you can connect and use a USB 2.0 flash memory with the instrument. However, note that the transfer speed is that of USB 1.1. • The rating of the USB [TO DEVICE] terminal is a 6 24 Play the keyboard along with the audio data. MX49 MX61 MX88 Owner’s Manual maximum of 5V/500mA. Do not connect USB devices having a rating above this, since this can cause damage to the instrument itself. Quick Guide Using USB flash memories 2 By connecting the instrument to a USB flash memory, you can save data you’ve created to the connected device, as well as read data from the connected device. Press the play button on the connected music player. The song data of the music player is played back from the instrument. NOTE Use the external device’s volume control to adjust the desired level balance with this instrument. Number of USB flash memories that can be used 3 Play the keyboard along with the song data. Only one USB flash memory can be connected to the [USB TO DEVICE] terminal simultaneously. 4 After finishing, press the stop button on the music player. Formatting USB flash memories When a USB flash memory is connected, a message may appear prompting you to format the device/ media. If so, execute the Format operation (page 31). HINT You can use the convenient Tap Tempo function to match Arpeggio tempo to the song data being played back from the portable music player. To do this, simply “play” or tap the [TEMPO] button several times repeatedly with the song data. NOTICE The Format operation overwrites any previously existing data. Make sure that the media you are formatting does not contain important data. To protect your data (write-protect) To prevent important data from being inadvertently erased, apply the write-protect provided with the flash memory device. If you want to save data to the USB flash memory, make sure to disable writeprotect. Turning off the instrument When turning off the instrument, make sure that the instrument is NOT accessing the USB flash memory by playback or file management (such as during Save, Copy, Delete and Format operations). Failure to do so may corrupt the USB flash memory and the data. Creating an original Performance In Performance Edit, you can edit both the parameters unique to each Part (Part Edit) and parameters common to all Parts (Common Edit). You can also edit the Voice parameters which are assigned to each Part of the Performance (Voice Edit). Edit these parameters to create an original Performance. NOTE For details about all parameters, see the “Reference Manual” PDF document. NOTE Preset Performances have their default settings such as Voice settings and the note range limits. Initializing Performances is useful when creating a completely new Performance from scratch. For details, see the “Reference Manual” PDF document. Playing back song data of a portable music player 1 Connect a portable music player to the [AUX IN] jack of this instrument. Selecting the Reverb/Chorus type (Common Edit/Part Edit) NOTE • Whenever connecting other devices, ensure that the • cables you use have plugs that match the input or output connectors on those devices. Before making connections, you should also turn the volume on the other devices to the minimum. 1 Press [EDIT]. 2 Press the Cursor [u] button if necessary to select “01: Common,” then press [ENTER]. Rear Panel 1/8" stereo-mini cable The Performance Common Edit display is called up. Portable music player, etc. EDIT a01:Common MX49 MX61 MX88 Owner’s Manual 25 Quick Guide 3 NOTE You can also edit each effect parameter in the 3rd or Press the Cursor [u] button if necessary to select “01:Chorus Eff,” then press [ENTER]. later pages. For details about each parameter, see the “Synthesizer Parameter Manual” PDF document. The Chorus effect setting display is called up. 4 Press the Cursor [u] buttons repeatedly if necessary to call up the 1st page, then use the Cursor [l]/[r] buttons and the [DATA] dial to change the Chorus effect category/ type. 2 Common*Chorus*Eff a***CHO:****G*Chorus Effect category 5 2 Common*Reverb*Eff dPreset=*******Basic 2 Common a01:Chorus*Eff 9 When you have finished making Reverb effect settings, press [EXIT] two times, then press the Cursor [d] button to select “02:Part.” Finally, press [ENTER]. The Performance Part Edit display is called up. EDIT s02:Part 10 Press the Cursor [u] button repeatedly if Effect type necessary to select “01:Play Mode,” then press [ENTER]. Press the Cursor [d] button to call up the 2nd page, then rotate the [DATA] dial to select a preset for the effect parameters of the selected effect type. Each preset type contains optimum settings for various parameters, letting you select a general “feel” you want and have the parameters set accordingly. NOTE You can also edit each effect parameter in the 3rd or later pages. For details about each parameter, see the “Synthesizer Parameter Manual” PDF document. Part01 a01:Play*Mode 2 11 Press the desired Category button to select the edited Part. The selected Part number is shown in the upper left corner of the display. 2 Common*Chorus*Eff dPreset=*******Basic 6 When you have finished making Chorus effect settings, press [EXIT], then press the Cursor [d] button to select “02:Reverb Eff.” Finally, press [ENTER]. The Reverb effect display is called up. Common d02:Reverb*Eff 7 2 Press the Cursor [u] button to call up the 1st page, then rotate the [DATA] dial to change the Reverb effect type 2 Common*Reverb*Eff a****Type=Rev]X*Hall 8 26 Press the Cursor [d] button to call up the 2nd page, then rotate the [DATA] dial to select a preset for the effect parameters of the selected effect type. MX49 MX61 MX88 Owner’s Manual 12 Use the Cursor [u]/[d] buttons to select “ChoSend” and “RevSend” in 5th and 6th pages, then rotate the [DATA] dial to adjust the parameter settings. These parameters set the depth of Chorus/Reverb effects applied to the selected Part sound. HINT Performance Edit indicator When editing Performance parameters, a dot (.) is shown in the lower right of the [PERFORMANCE NUMBER] display. This provides a quick confirmation that the current Performance has been modified but not yet stored. When you want to store the current status, execute the Performance store function (page 29). After storing, this indication will be gone. Quick Guide Changing the Insertion Effect of the Voice (Voice Edit) 6 The Insertion effect display of the Voice Edit is called up. You can edit parameters of the Voice assigned to each Part. The Voice parameters are in the Voice Edit displays (those having “Voice” or “DrumKit” indications in the display names). In this example, we’ll change the Insertion effect settings. 1 Press [EXIT], then use the Cursor [u]/[d] buttons to select “05:Voice Insert Eff”/ ”06:Drumkit Ins Eff.” Finally, press [ENTER]. 2 Part01 d05:Voice*Insert*Eff Press [EDIT]. 7 Press the Cursor [u] button repeatedly if necessary to call up the 1st page, then use the Cursor [l]/[r] buttons and the [DATA] dial to change the effect type. 2 Voice*Insert*Eff a***MSC:*Damper*Reso 2 Effect category Press the Cursor [d] button to select “02:Part,” then press [ENTER]. The Part Edit display is called up. 8 EDIT s02:Part Effect type Press the Cursor [d] button to call up the 2nd page, then select a preset for the Effect parameters of the selected Effect type. Each preset type contains optimum settings for various parameters, letting you select a general “feel” you want and have the parameters set accordingly. NOTE You can also edit each effect parameter in the 3rd or 3 later pages. For details about each parameter, see the “Synthesizer Parameter Manual” PDF document. Press a Category button to select the desired Part. The selected Part number is shown in the upper left of the display. 2 Voice*Insert*Eff dPreset=*******Basic 9 4 5 Press the Cursor [u] button to select “01:Play Mode,” then press [ENTER]. Use the Cursor [u]/[d] buttons to select “InsSw,” then rotate the [DATA] dial to set the parameter to on. If you want to change the Insertion effect of another Part, press a numbered Category button to select the desired Part (as in step 3 above), then follow steps 4 to 8 again after pressing [EXIT]. NOTE You can also change Parts by pressing a numbered Category button on the Insertion effect display of Voice Edit. NOTE This instrument features four Insertion Effects, which can be applied to up to four Parts of the Performance. 2 Part01*Play*Mode d**********InsSw=*on MX49 MX61 MX88 Owner’s Manual 27 Quick Guide Changing the Controller Set for the Voice (Voice Edit) You can assign different functions for the controllers (Knobs, Modulation Wheel, etc.) to each Voice. Each Voice can have up to six sets which determine the available controllers for the Voice and their functions. The controller assignments are called a “Controller Set.” In this example, we’ll change the Controller Set of the Voice assigned to the Part. 1 5 Use the Cursor [u]/[d] buttons to select a Controller Set from Controller Sets 1 – 6, then press [ENTER]. Voice*Ctrl*Set a01:Set1 6 Press [EDIT]. 2 Press the Cursor [u] button repeatedly if necessary to call up the 1st page, then rotate the [DATA] dial to select the desired Controller. NOTE For details about the settings, see the “Reference Manual” PDF document. 2 Voice*Ctrl*Set1 a*****Source=*MW(01) 7 2 Press the Cursor [d] button to select “02:Part,” then press [ENTER]. The Performance Part Edit display is called up. 2 Voice*Ctrl*Set1 a**Dest=*****ELFO]PM EDIT s02:Part 3 Press a Category button to select the desired Part. The selected Part number is shown in the upper left of the display. Press the Cursor [d] button to call up the 2nd page, then rotate the [DATA] dial to select the desired function to be assigned to the selected Controller. 8 Press the Cursor [d] button to call up the 3rd page, then adjust the depth for the Controller’s function. 9 If you wish to change other Controller Sets, repeat steps 5 to 8 above after pressing [EXIT]. 10 If you wish to change Controller Sets for 4 other Parts, press a numbered Category button to select the desired Part, then follow steps 5 to 9 above again. Use the Cursor [u]/[d] buttons to select “07:Voice Ctrl Set” or ”06:Drumkit Ctrl Set,” then press [ENTER]. The Voice Edit Controller Set display is called up. 2 Part01 d07:Voice*Ctrl*Set 2 Part10 d06:DrumKit*Ctrl*Set 28 MX49 MX61 MX88 Owner’s Manual HINT Voice Edit indicator 2 Voice*Insert*Eff a***MSC:*Damper*Reso When editing Voice parameters, an E (Edit) indicator is shown in the upper right of the display. This provides a quick confirmation that the Voice assigned to a Part has been modified but not yet stored. When you want to store the current status, execute the Voice Store function (page 29). After storing, this indication disappears. Quick Guide Storing a Voice (Voice Store) The edited Voice parameters can be stored as a User Voice separately from a Performance. Moreover, these stored User Voices can be assigned to a different Part or Performance. Storing a Performance (Performance Store) When you are satisfied with the Performance you’ve created, store the new settings to internal memory (as a Performance). NOTE If you execute Performance Store, the edited Voice data will not be stored; make sure to store the Voice using Voice Store. 1 When the Voice Edit display is shown, press [EXIT], then press the Cursor [d] button to select “08:Voice Name.” After that, press [ENTER]. When the top display is shown, follow the instructions below. [EDIT] Select “02:Part” [ENTER] Select “08:Voice Name” [ENTER] Part01 s08:Voice*Name 2 NOTICE If you execute Performance Store while the Voice has been modified but not yet stored, the edited Voice and all recent changes you made to it will be erased. Make sure to store important Voice data as a User Voice (Voice Store) before storing the Performance. 1 Press [EDIT] to select “01:Common,” then press [ENTER]. After that, select “06:Name,” then press [ENTER]. 2 Enter an original name for the Performance before storing it. 2 For instructions on entering a name, see “Naming” (page 13) in “Basic Operations and Displays.” 2 Common*Name a*******[MXPerf01**] Enter an original name for the Voice before storing it. For instructions on entering a name, see “Naming” (page 13) in “Basic Operations and Displays.” 3 Press [STORE]. 4 Determine the Performance number as the store destination, and press [ENTER]. 2 Voice*Name a*******[CncrtGrand] 3 Press [STORE]. NOTICE Keep in mind that the destination Performance will be overwritten and lost by executing Performance Store. Performance Store display 4 Determine the User Voice number as the store destination, and press [ENTER]. 2 STORE*Performance *001(A01):MXCategory Voice Store display 2 STORE*Voice *****U001:Initialize 5 5 Press [INC/YES]. The Performance data is stored, and operation returns to the top display. To cancel the Store operation, press [DEC/NO]. Press [INC/YES]. The Voice data is stored, and operation returns to the Part Edit display. To return to the top display, press [EXIT] several times. To cancel the Store operation, press [DEC/NO]. q**Are*you*sure?***w e****[NO]/[YES]**** r q**Are*you*sure?***w e****[NO]/[YES]**** r MX49 MX61 MX88 Owner’s Manual 29 Quick Guide Changing Voices smoothly while performing When you change a Voice assigned to a Part or select a different Performance, the sound of the previous Voice/ Performance will be cut off, replaced abruptly by the newly selected Voice/Performance. In live performance situations, you probably want to avoid this. To change Voices as you play without having them cut off, assign the Voices you intend to play beforehand to Parts 1 – 16 of a Performance, then select the corresponding Part (with the numbered Category buttons) as you play. 1 2 Press the Cursor [u] button several times to call up the 1st page. Voice number Voice name AP*:*001:CncrtGrand a000123456789 tyuiop@ 3 Part 1 – 16 Use the Category buttons or the Cursor [l]/ [r] buttons to select the desired Part from Parts 1 – 16. AP*:*001:CncrtGrand a000123456789 tyuiop@ 3 Cursor indicates the selected Part 4 Rotate the [DATA] dial to change the Voice category for the selected Part. 5 Press the Cursor [d] button to call up the 2nd page, then rotate the [DATA] dial to select the Voice from the current Voice category. AP*:*001:CncrtGrand d000123456789 tyuiop@ 3 NOTE You can also edit other Part parameters in the 3rd or subsequent pages. For details about each parameter, see the “Reference Manual” PDF document. 30 To change Voices for other Parts, repeat steps 2 to 5 above. NOTE You can also change Parts with the Category buttons or the Cursor [l]/[r] button in pages other than the 1st page. 7 When you have finished making settings for the Parts, select different Voices (Parts) by using the Category buttons or the Cursor [l]/ [r] buttons, while playing the keyboard. 8 Store the Voice assignments as a Performance to internal memory so you can instantly call them up whenever you want. Press [PART SELECT]. Voice category 3 6 MX49 MX61 MX88 Owner’s Manual For details about storing, see the “Storing the Performance” (page 29). HINT Applying Insertion effects to desired Parts Insertion effects can be independently applied to up to four Parts (maximum) to which the desired Voices for live performance are assigned. For details about the settings, see “Changing the Insertion Effect of the Voice” (page 27). Quick Guide Making Global System Settings (Utility settings) NOTE Adjusting the display brightness To adjust the brightness of the display, simultaneously hold down [UTILITY] and press [INC/YES]/[DEC/NO]. Pressing [UTILITY] calls up the Utility display, from which you can make global system settings. For details about the Utility settings, see the “Reference Manual” PDF document. Saving/loading files on USB flash memory (File settings) Changing the Master Tune setting You can save the created Performances and Voices to USB flash memory, and load data from the USB flash memory. This function sets the overall tuning of the instrument. 1 2 Press the Cursor [u] button repeatedly if necessary to select “01:General,” then press [ENTER]. Use the Cursor [u]/[d] buttons to select the “Tune” parameter, then rotate the [DATA] dial to change the value. The pitch is changed in cent increments. NOTE The frequency of the basic pitch (note A3) is 440 Hz. An increase of 3 or 4 cents corresponds to a frequency increase of about 1 Hz. 2 UTILITY*General dTune=+**0.0/440.0Hz 3 Formatting the USB flash memory Some USB flash memories may not be supported by this instrument. In this case, follow the instructions below to format the memory before using it. NOTICE If data is already saved to the USB flash memory, be careful not to format it. If you format the device, all previously recorded data will be deleted. Make sure to check beforehand whether or not the device contains important data. 1 Connect the USB flash memory to the USB [TO DEVICE] terminal. 2 Press [FILE] to call up the File display. 3 Use the Cursor [u]/[d] buttons to select “05: Format,” then press [ENTER]. Press [STORE]. All Utility settings are stored. Adjusting the brightness of the display (LCD Contrast) 1 2 Press the Cursor [u] button repeatedly if necessary to select “01:General,” then press [ENTER]. Use the Cursor [u]/[d] buttons to select the “LCD Contrast” parameter, then rotate the [DATA] dial to change the value. 2 UTILITY*General d*****LCD*Contrast=5 3 A confirmation message appears. If you wish to cancel the Format operation, press [EXIT]. 4 Press [INC/YES] to execute the Format operation. After formatting has been completed, a “Completed” message appears and operation returns to the original display. NOTICE While formatting is in process, do not remove or disconnect the USB flash memory from the instrument. Also, make sure to keep the power of the instrument on until the operation is finished. NOTE By executing the Format operation in the File mode, the USB flash memory will be formatted to MS-DOS or Windows format. The formatted device may not be compatible with other devices, such as a Mac computer or digital camera. Press [STORE]. All Utility settings are stored. MX49 MX61 MX88 Owner’s Manual 31 Quick Guide Saving settings to USB flash memory Loading the settings from a USB flash memory You can save all data of the User memory—containing Performances, created User Voices, and Utility settings— to USB flash memory as an “All” file (extension: .X5A). 1 Connect the USB flash memory to the USB [TO DEVICE] terminal. 1 Connect a USB flash memory to the USB [TO DEVICE] terminal. 2 Press [FILE]. 2 Press [FILE]. 3 Use the Cursor [u]/[d] buttons to select “02:Load,” then press [ENTER]. 3 FILE a01:Save 4 Any “All” files that are contained in the USB flash memory appear in the display. Press the Cursor [u] buttons several times to select “01:Save,” then press [ENTER]. NOTE If no “All” files are stored in the root directory of the USB flash memory, a “File not found” message appears and the Load display cannot be called up. 2 FILE d02:Load Assign a name to the file. For instructions on entering a name, see “Naming” (page 13) in “Basic Operations and Displays.” 4 5 Press [ENTER]. 6 Press [INC/YES]. The file is saved to the USB flash memory. To cancel the Save operation, press [EXIT] while the “Now saving...” message is still displayed. q**Are*you*sure?***w e****[NO]/[YES]**** r 7 32 Press [EXIT] several times to exit from the File display. MX49 MX61 MX88 Owner’s Manual Select the desired file, then press [ENTER]. FILE*Load *******File=MX01 2 FILE*Save *****Name=[********] 5 2 2 Select the desired data type of the selected “All” file, then press [ENTER]. Select the desired type: all data (All), all data except for the Utility settings (All without Sys), or Performance data only (Performance). 2 FILE*Load Type=****Performance Quick Guide 6 If you’ve set “Type” to “Performance” in step 5, select the desired Performance number, then press [ENTER]. Connecting an external MIDI instrument If you’ve set “Type” to something other than “Performance” in step 5, go on to step 8. With a standard MIDI cable (available separately), you can connect an external MIDI instrument, and transmit MIDI data between the instrument and the connected instrument. Either the MIDI connectors or the USB [TO HOST] terminal can be used for MIDI data transmission/ reception; however, they cannot be used at the same time. Select the desired connector for use in the “MIDI IN/ OUT” parameter of the [UTILITY] “02:MIDI” display. As you work through the explanations in this chapter, set “MIDI IN/OUT” to “MIDI” since MIDI is used as the example connection here. 2 Src*Performance 001(A01):MXCategory 7 Select the destination Performance number (for loading), then press [ENTER]. Dst*Performance 003(A03):Sirius 8 2 Press [INC/YES]. The data is loaded from the USB flash memory. To cancel the Load operation, press [EXIT] while the “Now loading...” message is still displayed. q**Are*you*sure?***w e****[NO]/[YES]**** r 9 Controlling the instrument from an external MIDI keyboard or synthesizer Here, we’ll use an external keyboard or synthesizer to remotely select and play the Voices of the instrument. MIDI [IN] Press [EXIT] repeatedly if necessary to exit from the File display. MX49, MX61, or MX88 MIDI OUT External MIDI keyboard (for example, an 88-key synthesizer) MX49 MX61 MX88 Owner’s Manual 33 Quick Guide HINT MIDI Transmit and Receive channels – Changing the Performances remotely HINT MIDI Transmit and Receive Channels – Sounding only an external tone generator The MIDI Receive channels for Parts 1 – 16 of the instrument are fixed to 1 – 16. Make sure to match the MIDI Transmit channels of the external MIDI instrument with the MIDI Receive channels of the instrument. For details on setting the MIDI Transmit channels of the external MIDI instrument, refer to the owner’s manual of that instrument. You can also use an external MIDI instrument to change this instrument’s Performances with the proper program change messages. To do this, you’ll need to match the MIDI Transmit channel of the external MIDI instrument with the basic MIDI Receive channel of the instrument. For details on setting the basic MIDI Receive channel of the instrument, follow the instructions below. The MIDI Receive channels for Parts 1 – 16 of the instrument are fixed to 1 – 16. Make sure to match the MIDI Receive channels of the external MIDI instrument with the MIDI Transmit channels of the instrument. For details on setting the MIDI Transmit channels of the external MIDI instrument, refer to the owner’s manual of that instrument. You can also control an external tone generator from the instrument and have only that device sound. To do this, set the [MASTER VOLUME] knob to “0” or set the Local Control to “off” with the following operation: [UTILITY] Select “02:MIDI” [ENTER] “LocalCtrl” = “off.” 1 Press [UTILITY]. 2 Use the Cursor [u]/[d] buttons to select “02:MIDI,” then press [ENTER]. 3 Use the Cursor [u]/[d] buttons to select “BasicCh (Basic Channel),” then check the channel. If necessary, change the channel to the same channel as the MIDI transmit channel of the external MIDI instrument. Controlling an external MIDI keyboard or synthesizer from the instrument This connection lets you sound an external MIDI tone generator (synthesizer, tone generator module, etc.) by playing the instrument or playing back a Song or Pattern of the instrument. Use this connection when you wish to sound the other instrument along with the instrument. MIDI [OUT] MX49, MX61, or MX88 MIDI IN External MIDI tone generator (for example, MOTIF-RACK XS) 34 MX49 MX61 MX88 Owner’s Manual Appendix Shift Function List Some of the important functions and operations on the instrument can be executed with convenient panel control shortcuts. Simply hold down the [SHIFT] button and press the indicated button (as described below). Operation Function [SHIFT] + [INC]/[DEC]/[DATA] dial Increases/decreases the value by 10. (Program number in the Play mode; parameter value in the Edit mode) In the Performance Select display, this switches among the Performance groups. [SHIFT] + [SPLIT] In the Performance top display, this replaces Part 1 with Part 2 (Invert function). [SHIFT] + [LAYER] In the Performance top display, this copies a selected Part (Part 1 or Part 2) to the other Part (Unison function). [SHIFT] + [EXIT] Calls up the Performance top display. [SHIFT] + [SELECT] Resets Performance 1 to the factory settings, and calls up the top display of Performance 1 (Quick Reset function). [SHIFT] + [KNOB FUNCTION] Instantly resets Knobs [A] – [D] to Function 1. [SHIFT] + [PART 1-2 LINK] Resets [PART 1-2 LINK] to on. [SHIFT] + [ARP] Calls up the Arpeggio display of Performance Part Edit. [SHIFT] + desired Category button In the Performance top display, this instantly calls up the Voice in the next Sub Category of the selected Category. Perform this operation with the same Category button repeatedly to select the subsequent Sub Categories. In the Performance Select display, this selects the corresponding Performance among Performances 1 – 16 in the selected Performance group. NOTE For details about Sub Categories, see the “DATA LIST” PDF document Display Messages LCD indication Description All remote templates stored. Appears when you store the Control Template in the Remote mode. Are you sure? Confirms whether you want to execute a specified operation or not. Auto power off disabled. Appears when Auto Power Off is disabled (by simultaneously holding down the lowest key on the keyboard and turning the power on). Bulk protected. Bulk data cannot be received because of the Utility setting. Clear edit Voice? Appears when executing Performance Store while modifying but not yet having stored a Voice. Make sure to confirm whether the edited Voice data should be erased or not. Completed. The specified load, save, format, or other Job has been completed. Connecting USB device . . . Currently recognizing the USB flash memory connected to the USB [TO DEVICE] terminal. Device number is off. Bulk data cannot be transmitted/received since the device number is off. Device number mismatch. Bulk data cannot be transmitted/received since the device numbers don’t match. Executing . . . A Format operation or Job is being executed. Please wait. FactorySet . . . The Factory Set operation is automatically being executed when you turn the power on. File already exists. A file having the same name as the one you are about to save already exists. File not found. The file of the specified type cannot be found. Illegal file name. The specified file name is invalid. Try entering a different name. MX49 MX61 MX88 Owner’s Manual 35 Appendix LCD indication 36 Description Illegal file. The file specified for loading is unusable by this instrument or cannot be loaded in the current status. Illegal format. The format of the file specified for playback is SMF Format 1 or an audio data format other than WAV. Use SMF Format 0 MIDI data or WAV format audio data. Incompatible USB device. A USB device which cannot be used with this instrument has been connected to the USB [TO DEVICE] terminal. Invert Appears when replacing Part 1 with Part 2 by while holding down [SHIFT] and pressing [SPLIT] (Invert function). MIDI buffer full. Failed to process the MIDI data because too much data was received at one time. MIDI checksum error. An error occurred when receiving bulk data. MIDI data error. An error occurred when receiving MIDI data. No response from USB device. There is no response from the USB device connected to the USB [TO DEVICE] terminal. Now loading . . . [EXIT] to cancel Indicates that a file is being loaded. If you wish to cancel this operation, press [EXIT] while this message appears. Now saving . . . [EXIT] to cancel Indicates that a file is being saved. If you wish to cancel this operation, press [EXIT] while this message appears. Now working. . . Canceling the Load/Save operation, after the [EXIT] button has been pressed. Overwrite? A Save operation will overwrite data on the USB flash memory, and this message prompts you to confirm whether it is OK to continue or not. Please keep power on . . . The data is being written to User memory. Never attempt to turn off the power while data is being written to User memory. Turning the power off while this message is shown results in loss of all user data and may cause the system to freeze (due to corruption of data in the User memory). This may also result in this instrument being unable to properly start up the next time the power is turned on. Please stop sequencer. The operation you have attempted to execute cannot be done during Song/Pattern playback. Quick reset Appears when while holding down [SHIFT] and pressing [SELECT]. Performance 1 is set to the factory settings, and the top display of Performance 1 is called up (Quick Reset function). Receiving MIDI bulk . . . This instrument is receiving MIDI bulk data. System memory crashed. Failed to write the data to the internal memory of this instrument. This Performance uses User Voices. Appears when the Performance specified for loading contains User Voices. User Voices cannot be loaded with the Performance. Make sure that the same User Voices used when you saved the Performance are stored at the same User Voice numbers or not, since the User Voices are not loaded with the Performance. Transmitting MIDI bulk . . . This instrument is transmitting MIDI bulk data. Unison Appears when copying Part 1/Part 2 to another Part by while holding down [SHIFT] and pressing [LAYER] (Unison function). USB connection terminated. A break in the connection with the USB flash memory has occurred because of an abnormal electric current. Disconnect the device from the USB [TO DEVICE] terminal, then press the [ENTER] button. USB device full. The USB flash memory is full and no more data can be saved. Use a new USB flash memory, or make space by erasing unwanted data from the device. USB device not ready. A USB flash memory is not properly inserted in or connected to the USB [TO DEVICE] terminal. USB device read/write error. An error occurred while reading or writing to/from a USB flash memory or attempting to delete or overwrite a read-only file. USB device unformatted. Appears when the connected USB flash memory is either unformatted or formatted in a way that this instrument does not support. In such a case, check the content of the USB flash memory. USB device write protected. The USB flash memory is write protected, or you have attempted to write to read-only media. USB power consumption exceeded. Appears when the current being drawn by the USB flash memory exceeds the level supported by this instrument. USB transmission error. An error occurred while communicating with a USB flash memory. Utility stored. The Utility settings have been stored. MX49 MX61 MX88 Owner’s Manual Appendix Troubleshooting No sound? Wrong sound? When a problem like this occurs, please check the following points before assuming that the product is faulty. Many problems can be solved by executing the Factory Set operation (page 11), after backing up your data to an USB flash memory (page 32). If the problem persists, consult your Yamaha dealer. No Sound. Is this instrument properly connected to related external equipment (e.g., amplifier, speaker, headphone) via audio cables? Since this instrument has no built-in speakers, you will need an external audio system or a set of stereo headphones to properly monitor it (page 9*). Is the power of this synthesizer and any external equipment connected to it turned on? Have you made all the appropriate level settings—including the Master Volume on this instrument and the volume settings on any connected external equipment? If a Foot Controller is connected to the [FOOT CONTROLLER] jack, operate the Foot Controller and check the sound volume. Check the Local Control parameter in the Utility display. When this instrument is used by itself and this parameter is set to off, no sound is produced even if you play the keyboard. [UTILITY] Select “02:MIDI” [ENTER] “LocalCtrl” Check the Direct Monitor Switch parameter in the Utility display. When this instrument is used by itself and this parameter is set to off, no sound is produced even if you play the keyboard. [UTILITY] Select “01:General” [ENTER] “DirectMonitor” Are the MIDI volume or MIDI expression settings too low when using an external controller? Are the effect and filter settings appropriate? If you are using the filter, try changing the cutoff frequency. Some cutoff settings may filter out all of the sound. [EDIT] Select “02:Part” [ENTER] Select “02:Filter/EG” [ENTER] [EDIT] Select “02:Part” [ENTER] Select “05:Voice Insert Eff”/“05:DrumKit Insert Eff” [ENTER] Are the volume or expression settings too low? [UTILITY] Select “01:General” [ENTER] “MasterVolume” [EDIT] Select “01:Common” [ENTER] Select “05:General” [ENTER] “Volume” [PART SELECT] “Volume” No sound from the [AUX IN] jack. Is the volume of the connected audio device set to a value other than “0”? Cannot play audio data. Is the volume for the audio data set to a value other than “0”? [UTILITY] Select “01:General” [ENTER] “WAV Volume” Is the format of the audio data correct? This instrument can play only stereo WAVE (.wav) files of 44.1kHz/16-bit. Playback continues without stopping. When the [ARP] button is turned on, press it so that its lamp is turned off. When playing back Rhythm Pattern or Song data of the USB flash memory, press the [J] (Stop) button. The instrument is automatically turned off even if no operation is done. Is the Auto Power Off function enabled? If necessary, disable this function or change the amount of time that elapses before the power is automatically turned off. [UTILITY] Select “01:General” [ENTER] “AutoOff” MX49 MX61 MX88 Owner’s Manual 37 Appendix Distorted sound. Are the effect settings appropriate? Use of certain effects at certain settings may produce distortion. [EDIT] Select “02:Part” [ENTER] Select “05:Voice Insert Eff”/“05:DrumKit Insert Eff” [ENTER] Are the filter settings appropriate? Excessively high filter resonance settings can cause distortion. [EDIT] Select “02:Part” [ENTER] Select “02:Filter/EG” [ENTER] Are any of the following volume parameters set so high that clipping is occurring? [UTILITY] [EDIT] Select “01:Common” [ENTER] Select “05:General” [ENTER] “Volume” [PART SELECT] “Volume” [UTILITY] Select “01:General” [ENTER] “WAV Volume” Sound is cut off. Is the entire amount of notes played (via your keyboard playback and Song/Pattern/Arpeggio playback) exceeding the maximum polyphony of this instrument? The maximum number of simultaneous notes may be less than 128 depending on the Voices used. Only one note sounds at a time. When this situation occurs, the Mono/Poly parameter in the current mode is set to “mono.” If you wish to play chords, set this parameter to “poly.” [EDIT] Select “02:Part” [ENTER] Select “01:PlayMode” [ENTER] “Mono/Poly” Pitch or intervals are wrong. Is the Master Tune parameter in the Utility display set to a value other than “0”? [UTILITY] Select “01:General” [ENTER] “Tune” Is the Note Shift parameter in the Utility display set to a value other than “0”? [UTILITY] Select “01:General” [ENTER] “NoteShift” Are the Note Shift and Detune parameters of each Part set to values other than “0”? [EDIT] Select “01:Part” [ENTER] Select “01:PlayMode” [ENTER] “NoteShift”/“Detune” No effect is applied. Check the on/off status of the Insertion Effect switch. [EDIT] Select “02:Part” [ENTER] Select “01:PlayMode” [ENTER] “InsSw” [PART SELECT] “InsSw” Is the Reverb Send or Chorus Send set to a value other than “0”? [EDIT] Select “02:Part” [ENTER] Select “01:PlayMode” [ENTER] “ChoSend”/“RevSend” Has the Insertion Effect type for the Part been set to “thru”? [EDIT] Select “02:Part” [ENTER] Select “05:Voice Insert Eff”/“05:DrumKit Insert Eff” [ENTER] The Edit Indicator appears, even when parameters are not being edited. Keep in mind that even though the Edit mode is not active, simply moving a Knob or playing back the MIDI data of the USB flash memory may cause the Edit Indicator to appear. 38 MX49 MX61 MX88 Owner’s Manual Appendix Cannot start the Arpeggio. Check whether [ARP] is turned on or off. Are the Arpeggio switches for both Part and Common set to on? [EDIT] Select “02:Part” [ENTER] Select “03:Arp Select” [ENTER] “Switch” [EDIT] Select “01:Common” [ENTER] Select “04:Arp Switch” [ENTER] “Switch” Is the MIDI Sync parameter set to “internal” or “auto” (using internal clock)? [UTILITY] Select “02:MIDI” [ENTER] “MIDI Sync” Cannot stop the Arpeggio. When Arpeggio playback does not stop even if you release the key, set the Arpeggio Hold parameter to “off.” [EDIT] Select “02:Part” [ENTER] Select “03:Arp Select” [ENTER] “Hold” The Voice produces a different sound depending on the assign destination Part or Performance. Depending on the effect (and other) settings for the Performance or Part, the Voice assigned to the Performance or Part may produce a different sound. If necessary, change the following parameter settings. [EDIT] Select “02:Part” [ENTER] Select “01:PlayMode” [ENTER] “ChoSend”/“RevSend” [EDIT] Select “01:Common” [ENTER] Select “01:Chorus Eff”/“02:Reverb Eff” [ENTER] [PART SELECT] “InsSw” [EDIT] Select “02:Part” [ENTER] Select “02:Filter/EG” [ENTER] The Song/Pattern cannot be started even when pressing the [R/K] (Play/Pause) button. When you attempt to play back the Song data, is the USB flash memory containing the data connected to this instrument? Is the [DAW REMOTE] button turned off? Is the current display something other than Utility or File? Is the MIDI Sync parameter set to “internal” or “auto” (using internal clock)? [UTILITY] Select “02:MIDI” [ENTER] “MIDI Sync” Data communication between the computer and this instrument does not work properly. Check whether the Port settings on the computer are appropriate or not. Check whether the MIDI IN/OUT parameter is set to the appropriate value or not. [UTILITY] Select “02:MIDI” [ENTER] “MIDI IN/OUT” MIDI bulk data transmission/reception does not work properly. Is the Receive Bulk parameter set to on? [UTILITY] Select “02:MIDI” [ENTER] “RcvBulk” When receiving MIDI bulk data transmitted via the Bulk Dump function and recorded to the external MIDI device, you need to set the MIDI Device Number to the same value as when transmitting. [UTILITY] Select “02:MIDI” [ENTER] “DeviceNo.” When transmission does not work properly, is the device number of the MIDI instrument connected to this instrument set to match the Device Number Parameter in the Utility display? [UTILITY] Select “02:MIDI” [ENTER] “DeviceNo.” Cannot save data to the USB flash memory. Is the USB flash memory being used write protected? (Write-protect should be set to off for saving data.) Is the USB flash memory being used properly formatted? [FILE] Select “05:Format” [ENTER] [INC/YES] MX49 MX61 MX88 Owner’s Manual 39 Appendix Specifications Keyboard Tone Generator block Sequencer block Others MX49 49 keys (Initial touch) MX61 61 keys (Initial touch) MX88 88 keys, GHS keyboard (Initial touch) Tone Generator AWM2 Polyphony 128 (max.) Multi-timbral Capacity 16 parts (Internal) Wave Approx.166 MB (when converted to 16-bit linear format) Voice Preset: 1,106 Normal Voices + 61 Drum Kits (GM: 128 Normal Voices + 1 Drum Kit) User: 128 Normal Voices + 8 Drum Kits Performance User: 128 (16 parts) Effect System Reverb x 9 types (42 presets), Chorus x 17 types (88 presets), Insertion Effect x 48 types (267 presets) x 4, Master EQ (5 bands) Sequence Play SMF Format 0 (playback only) Tempo (BPM) 5 – 300 Rhythm Pattern 208 Patterns Song 27 Demo Songs Arpeggio 999 types Sequence software compatible with the Remote Control function For Windows®: Cubase 8 or later, SONAR X2 Producer For Mac®: Cubase 8 or later, Logic Pro X, Digital Performer 9 Controllers Pitch Bend Wheel x 1, Modulation Wheel x 1, Assignable Knob x 4, [DATA] dial x 1 Display 3 digit LED + 20 x 2 line character LCD (backlit) Connectors OUTPUT [L/MONO]/[R] (6.3 mm, standard phone jack), [PHONE] (6.3 mm, standard stereo phone jack), [FOOT CONTROLLER], [SUSTAIN], MIDI [IN]/[OUT], USB [TO HOST]/[TO DEVICE], [AUX IN], DC IN Power Consumption 9W (When using PA-150 AC adaptor) Dimensions, Weight MX49: 830(W) x 298(D) x 91(H) mm (32-11/16" x 11-3/4" x 3-9/16"), 3.8kg (8 lbs., 6 oz.) MX61: 984(W) x 299(D) x 112(H) mm (38-3/4" x 11-3/4" x 4-7/16"), 4.8kg (10 lbs., 9 oz.) MX88: 1320(W) x 405(D) x 168(H) mm (52" x 15-15/16" x 6-5/8"), 13.9kg (30 lbs., 10 oz.) Accessories AC adaptor (PA-150 or an equivalent recommended by Yamaha), Owner’s Manual (this book), Cubase AI Download Information *Functions to be controlled differ depending on the software The contents of this manual apply to the latest specifications as of the publishing date. To obtain the latest manual, access the Yamaha website then download the manual file. Since specifications, equipment or separately sold accessories may not be the same in every locale, please check with your Yamaha dealer. GM Voice GM (General MIDI) is a worldwide standard for Voice organization and MIDI functions of synthesizers and tone generators. It was designed primarily to ensure that any Song data created with a specific GM device would sound virtually the same on any other GM device—no matter the manufacturer or the model. The GM Voice bank on this synthesizer is designed to appropriately play back GM Song data. However, keep in mind that the sound may not be exactly the same as played by the original tone generator. 40 MX49 MX61 MX88 Owner’s Manual Appendix Index A J [ARP] button ....................................................................... 7, 19 [JOB] button ..............................................................................6 Arpeggio ................................................................................. 18 Audio data .............................................................................. 23 Auto Power Off function .......................................................... 10 [AUX IN] jack ...................................................................... 8, 25 K Key On Start function ..............................................................21 [KNOB FUNCTION] button ..................................................6, 17 Knobs [A] – [D] ....................................................................6, 17 B Brightness of the display .................................................. 10, 31 L Layer .......................................................................................15 C [LAYER] button ....................................................................7, 15 Category ................................................................................. 14 LCD ...........................................................................................7 Chorus .................................................................................... 25 LCD Contrast .....................................................................10, 31 Common Edit .......................................................................... 25 List ...........................................................................................12 Connection (External MIDI instrument) ................................... 33 Load ........................................................................................32 Controller Set .......................................................................... 28 Controllers ............................................................................... 17 M Cursor ..................................................................................... 12 Master Tune .............................................................................31 Cursor buttons .................................................................... 7, 12 [MASTER VOLUME] knob ...................................................6, 10 MIDI data .................................................................................23 D MIDI [IN]/[OUT] terminals ....................................................8, 33 [DATA] dial ......................................................................... 7, 12 MIDI Transmit and Receive channels .....................................34 [DAW REMOTE] button ............................................................. 6 Modulation wheel ................................................................6, 17 DC IN jack ............................................................................. 8, 9 [DEC/NO] button ................................................................. 7, 12 N Demo Song ............................................................................. 10 Naming ....................................................................................13 E [EDIT] button ........................................................... 6, 25, 27, 28 Edit indicator ..................................................................... 26, 28 O OCTAVE [-]/[+] buttons .......................................................6, 20 OUTPUT [L/MONO]/[R] jacks ................................................8, 9 Effect ................................................................................. 25, 27 [ENTER] button ......................................................................... 7 [EXIT] button ....................................................................... 7, 13 [EXT. SONG] button ............................................................ 7, 23 P Page ........................................................................................13 Part ..........................................................................................20 F Factory settings ...................................................................... 11 [FILE] button ....................................................................... 6, 31 File settings ............................................................................. 31 Foot controller ......................................................................... 18 [FOOT CONTROLLER] jack ................................................ 8, 18 Footswitch ............................................................................... 18 Formatting the USB flash memory .......................................... 31 H Half-damper function .............................................................. 18 [PART 1-2 LINK] button .......................................................6, 17 Part Edit ...................................................................................25 [PART SELECT] button ........................................................7, 30 Pedal .......................................................................................18 Performance ............................................................................20 [PERFORMANCE NUMBER] display ...................................7, 20 Performance Select display ....................................................20 Performance Store ...................................................................29 [PHONES] jack ......................................................................8, 9 Pitch Bend wheel .................................................................6, 17 [R/K] (Play/Pause) button ............................................6, 21, 23 Power supply .............................................................................9 Headphones ............................................................................. 9 Q I Quick Reset function .........................................................14, 35 [INC/YES] button ................................................................. 7, 12 Initial factory settings .............................................................. 11 Inputting characters ................................................................ 13 Insertion Effect ........................................................................ 27 Invert function ......................................................................... 35 R Reverb .....................................................................................25 Rhythm Pattern ........................................................................21 [RHYTHM PATTERN] button ...............................................7, 22 MX49 MX61 MX88 Owner’s Manual 41 Appendix S Save ........................................................................................ 32 [SELECT] button ................................................................. 7, 20 [SHIFT] button ..................................................................... 7, 35 SMF ......................................................................................... 23 Song ........................................................................................ 23 Speaker ..................................................................................... 9 Split ......................................................................................... 16 [SPLIT] button ..................................................................... 7, 16 Standby/On switch ................................................................ 8, 9 [J] (Stop) button ...................................................................... 6 Stopping Arpeggio playback .................................................. 15 Store ........................................................................................ 29 [STORE] button ................................................................... 6, 29 Storing the Rhythm Pattern ..................................................... 22 Sustain function ...................................................................... 18 [SUSTAIN] jack ................................................................... 8, 18 T Tap Tempo function .................................................... 19, 22, 23 Tempo ......................................................................... 19, 22, 23 [TEMPO] button ...................................................... 7, 19, 22, 23 Transport buttons ...................................................................... 6 TRANSPOSE [-]/[+] buttons ................................................ 6, 20 U Unison function ....................................................................... 35 USB flash memory ...................................................... 23, 24, 31 USB [TO DEVICE] terminal ........................................... 8, 24, 31 [UTILITY] button .................................................................. 6, 31 Utility settings .......................................................................... 31 V Voice ....................................................................................... 14 Voice Category ....................................................................... 14 Voice Category button ........................................................ 7, 14 Voice Edit .......................................................................... 27, 28 Voice Store .............................................................................. 29 Volume .................................................................................... 10 W WAV Volume ........................................................................... 24 Wave file ................................................................................. 23 42 MX49 MX61 MX88 Owner’s Manual Yamaha Web Site (English only) https://www.yamahasynth.com/ Yamaha Downloads https://download.yamaha.com/ Manual Development Group © 2012 Yamaha Corporation Published 02/2017 MW##*.*-**E0 Printed in China ZV90250-
 1
1
-
 2
2
-
 3
3
-
 4
4
-
 5
5
-
 6
6
-
 7
7
-
 8
8
-
 9
9
-
 10
10
-
 11
11
-
 12
12
-
 13
13
-
 14
14
-
 15
15
-
 16
16
-
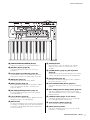 17
17
-
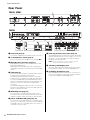 18
18
-
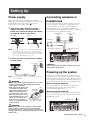 19
19
-
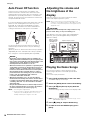 20
20
-
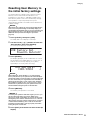 21
21
-
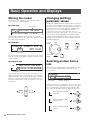 22
22
-
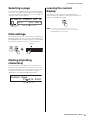 23
23
-
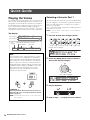 24
24
-
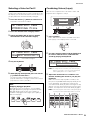 25
25
-
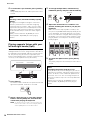 26
26
-
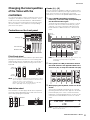 27
27
-
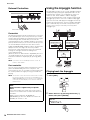 28
28
-
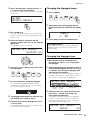 29
29
-
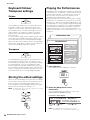 30
30
-
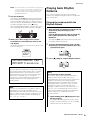 31
31
-
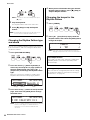 32
32
-
 33
33
-
 34
34
-
 35
35
-
 36
36
-
 37
37
-
 38
38
-
 39
39
-
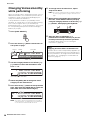 40
40
-
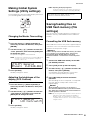 41
41
-
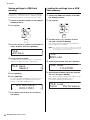 42
42
-
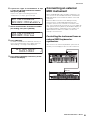 43
43
-
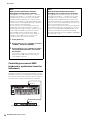 44
44
-
 45
45
-
 46
46
-
 47
47
-
 48
48
-
 49
49
-
 50
50
-
 51
51
-
 52
52
-
 53
53
-
 54
54
-
 55
55
-
 56
56


Yamaha MX49 Handleiding
- Categorie
- Synthesizer
- Type
- Handleiding
- Deze handleiding is ook geschikt voor
in andere talen
- English: Yamaha MX49 User manual
- italiano: Yamaha MX49 Manuale utente
- русский: Yamaha MX49 Руководство пользователя
- français: Yamaha MX49 Manuel utilisateur
- español: Yamaha MX49 Manual de usuario
- Deutsch: Yamaha MX49 Benutzerhandbuch
- português: Yamaha MX49 Manual do usuário
- dansk: Yamaha MX49 Brugermanual
- suomi: Yamaha MX49 Ohjekirja
- čeština: Yamaha MX49 Uživatelský manuál
- svenska: Yamaha MX49 Användarmanual
- Türkçe: Yamaha MX49 Kullanım kılavuzu
- polski: Yamaha MX49 Instrukcja obsługi
- română: Yamaha MX49 Manual de utilizare