
EN GUIDE TO INSTALLATION AND USE
NL INSTALLATIE- EN GEBRUIKSHANDLEIDING
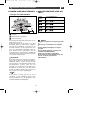
Cooking Hob
Kogebord
99641781_A_ML.qxp 23/01/2007 11:37 Page 1

2
As part of our commitment to constantly improving our products, we reserve the right to make
changes to them based on technological advances to their technical, functional and/or aes-
thetic properties.
Attention
BBeeffoorree iinnssttaalllliinngg aanndd uussiinngg yyoouurr aapppplliiaannccee,, pplleeaassee ccaarreeffuullllyy rreeaadd tthhiiss GGuuiiddee ttoo
IInnssttaallllaattiioonn aanndd UUsse
e,, wwhhiicchh wwiillll aallllooww yyoouu ttoo qquuiicckkllyy ffaammiilliiaarriissee yyoouurrsseellff wwiitthh iittss ooppeerraattiioonn..
99641781_A_ML.qxp 23/01/2007 11:37 Page 2

EN
3
TABLE OF CONTENTS
• Safety Guidelines
____________________________________________________
04
• Environmental Protection
_____________________________________________
04
• Description of Your Appliance
_________________________________________
• Proper positioning
___________________________________________________
05
1 / INSTALLING YOUR APPLIANCE
• Building in
__________________________________________________________
06
• Hook-up
___________________________________________________________
07
2 / USING YOUR APPLIANCE
• Description of the top
_________________________________________________
08
• Cookware for induction
_______________________________________________
• Which cooking zone should you use based on your cookware?
_____________
• Description of control panel
___________________________________________
10
• Powering on
________________________________________________________
• Stop
_______________________________________________________________
• Adjusting the power
_________________________________________________
• Keypad beep
_________________________________________________________
• Bringing upto temperatur quickly
________________________________________
• Setting the timers
____________________________________________________
• Using the "child safety device"
_________________________________________
• Safeties during operation
_____________________________________________
12
3 / DAILY CARE OF YOUR APPLIANCE
• Protecting your appliance
_____________________________________________
13
• Maintaining your appliance
____________________________________________
13
4 / SPECIAL MESSAGES, DIFFICULTIES
• During initial use
____________________________________________________
14
• When powering on
___________________________________________________
14
• During operation
____________________________________________________
14
5 / COOKING CHART
• Cooking chart for food types
__________________________________________
15
99641781_A_ML.qxp 23/01/2007 11:37 Page 3

4
This appliance's packaging material is recy-
clable. Help recycle it and protect the environ-
ment by dropping it off in the municipal recep-
tacles provided for this purpose.
Your appliance also contains a
great amount of recyclable mate-
rial. It is marked with this label to
indicate the used appliances that
should not be mixed with other
waste. This way, the appliance recy-
cling organised by your manufactu-
rer will be done under the best possible
conditions, in compliance with European
Directive 2002/96/EC on Waste Electrical and
Electronic Equipment. Contact your town hall
or your retailer for the used appliance collec-
tion points closest to your home.
We thank you doing your part to protect the
environment.
FFoorr AAuussttrraalliiaa oonnllyy ::
- Young children should be supervised to ensure that they do not play with the appliance.
- The appliance is not intended for use by young children or infirm person without supervision.
- If the supply cord is damaged, it must be replaced by the manufacturer or its service agent or
a similarly qualified person in order to avoid hazard.
- Do not install the product if you see any damage on it.
FFoorr SSeerrvviiccee iissssuueess,, pphhoonnee nnuummbbeerr :: 11330000 555533 772200,, ffaaxx nnuummbbeerr :: 11330000 555533 771199
SAFETY GUIDELINES
We have designed this cooking hob for use by
private persons in their homes.
These cooking hobs are meant to be used
exclusively for cooking beverages and foods-
tuffs and do not contain any asbestos-based
materials.
••
Residual heat
A cooking zone can remain hot for several
minutes after use.
An
""HH""
is displayed during this period.
Avoid touching the hot areas during this time.
••
Child safety device
Your hob is equipped with a child safety
device that locks its operation after use or
during cooking (See "Using the Child
Safety Device" section).
Do not forget to unlock it before using the
hob again.
••
For users of pacemakers and
active implants
The functioning of the hob conforms to cur-
rent electromagnetic interference standards
and thus is in total compliance with legal
requirements (89/336/CEE directives).
In order to avoid interference between your
cooking hob and a pacemaker, your pacema-
ker must be designed and programmed in
compliance with the regulations that apply to
it.
Consequently, we can only guarantee that our
own product is compliant.
With regard to the compliance of the pacema-
ker or any potential incompatibility, you can
obtain information from the manufacturer or
your attending physician.
Electrical Danger
Ensure that the power cables of any
electrical appliances plugged in close to
the hob are not in contact with the cooking
zones.
If a crack appears in the glass worktop,
immediately disconnect your appliance to
avoid the risk of electric shock.
To do this, remove the fuses or use the cir-
cuit breaker.
Do not use your hob until you have repla-
ced the glass worktop.
••
ENVIRONMENTAL PROTECTION
••
99641781_A_ML.qxp 23/01/2007 11:37 Page 4

5
4 cm
4 cm
4 cm
4 cm
A
ventilation
space
5511
5588//7777
66..44
4499
5566//7755
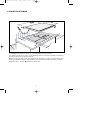
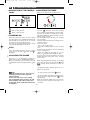
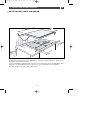
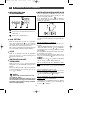
Your appliance should be positioned so that the plug-in unit is accessible.
The distance between the edge of your appliance and the side and rear walls (or partitions)
must be at least four centimetres (area A).
Glue the foam seal underneath your appliance by following the outline of the worktop upon
which your appliance will rest. This will allow you to achieve an airtight seal with the worktop.
Attach the clips to the hob
((
depending on the model)
PROPER POSITIONING
••
99641781_A_ML.qxp 23/01/2007 11:37 Page 5

EN
6
11
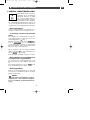
/ INSTALLING YOUR APPLIANCE
Tip
If your oven is located below your hob,
the hob's thermal safety measures forbid
the simultaneous use of the hob and the
pyrolysis program of your oven.
Your hob is equipped with an anti-overhea-
ting safety device.
This safety can be activated, for example,
when the hob is installed over an oven that
is not sufficiently insulated. If this occurs, a
series of small lines appear in the control
panel. In this case, we recommend that you
increase the ventilation of your hob by crea-
ting an opening in the side of your cabinet
(8 cm x 5 cm) and/or that you install the
oven insulation kit (reference 75X1652) that
is available from the Post-Sales Service
Department.
Warning
You must ensure that the air intakes
located under your cooking appliance
remain clear at all times.
••
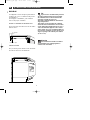
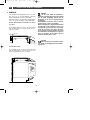
4 cm mini
ventilation space
MINI 4 mm
BUILD-IN
ABOVE A CUPBOARD OR DRAWER UNIT
The positioning must allow a fresh air intake
and air outlet.
ABOVEANOVEN
The positioning must allow a fresh air intake
and an air outlet of 4 mm minimum
Your appliance can be easily integrated above
a cabinet, an oven or a build-in-ready house-
hold appliance.
For all types of installation, your induction
hob needs proper ventilation.
99641781_A_ML.qxp 23/01/2007 11:37 Page 6

EN
7
11
/ INSTALLING YOUR APPLIANCE
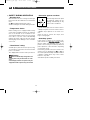
•
400 V 2N triphase hook-up
1166
-amp fuse.
Separate the two phase wires (L1 and L2)
before hooking up.
NNeeuuttrraall
GGrroouunndd
PPhhaassee
NN
LL
Green/yellow
Blue
Brown
NNeeuuttrraall
GGrroouunndd
PPhhaassee 22
PPhhaassee 11
NN
LL11
LL22
Blue
Green/yellow
Brown
•
220-240 V monophase hook-up
3322
- amp fuse.
Warning
If the power cable is damaged, it
should be replaced by the manufacturer, its
after-sales service department or by a per-
son with similar qualifications to avoid dan-
ger.
For a 400 V 2N triphase hook-up, if your hob
malfunctions, check that the neutral conduc-
tor is properly connected.
These hobs must be connected to the power
grid via an electrical outlet that complies with
EIC publication 60083 or an all-pole cut-off
device that complies with installation regula-
tions in effect.
When power is first supplied to your hob, or
after an extended power outage, an indicator
light will appear on the control panel. It auto-
matically disappears after approximately 30
seconds, or as soon as any touch control on
the control panel is pressed. This display is
normal and, if needed, serves as an indication
to the after-sales service staff. In all cases, the
user of the hob should disregard it.
HOOK-UP
••
••
IT IS IMPERATIVE that you mount the protec-
tive flue with a cable clip.
Black or grey
Black or grey
99641781_A_ML.qxp 23/01/2007 11:37 Page 7

EN
8
22
/ USING YOUR APPLIANCE
DESCRIPTION OF THE TOP
••
IFH-4R
IFH-84R
1166 ccmm
50 W - 2000 W
1188 ccmm
50 W - 2800 W
2211 ccmm
50 W - 3
11
00 W
1188 ccmm
50 W - 2800 W
1188 ccmm
50 W - 2800 W
2211 ccmm
50 W - 3
11
00 W
1188 ccmm
50 W - 2800 W
2211 ccmm
50 W - 3
11
00 W
99641781_A_ML.qxp 23/01/2007 11:37 Page 8

EN
9
22
/ USING YOUR APPLIANCE
Tip
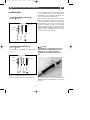
To check the suitability of your cook-
ware:
Place the vessel on a cooking zone at
power level 4.
If the display remains on, your cookware is
compatible.
If the display flashes, your cookware cannot
be used with induction cooking.
You can also use a magnet to test the cook-
ware.
If a magnet "sticks" to the bottom of the
cookware, it is compatible with induction.
••
WHICH COOKING ZONE
SHOULD YOU USE BASED ON
YOUR COOKWARE?
••
COOKWARE FOR INDUCTION
••
The induction principle
The principle of induction is based on a
magnetic phenomenon.
When you place your cookware on a cooking
zone and you turn it on, the electronic boards
in your cooking hob produce "induced" cur-
rents in the bottom of the cookware and ins-
tantly raise its température. This heat is then
transferred to the food, which is simmered or
seared depending on your settings.
••
Cookware
Most cookware is compatible with induction.
Only glass, terra cotta, aluminium without a
special finish on the bottom, copper and
some non-magnetic stainless steels do not
work with induction cooking.
We recommend that you select cookware
with a thick, flat bottom. The heat will be dis-
tributed better and cooking will be more uni-
form.
By choosing cookware that displays this logo
on its bottom or on its packaging, you can be
certain that it is perfectly compatible with
your hob under normal operating conditions.
+
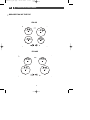
-
C
B
A
Inductor
Electronic board
Induced electric current
A
B
C
Cooking Cookware to use
zone
1166 ccmm 1100 .......... 1188 ccmm
1188 ccmm 1122 .......... 2222 ccmm
2211 ccmm 1188 .......... 2244 ccmm
2233 ccmm 1122............ 2266 ccmm
2288 ccmm 1122 .......... 3322 c
cmm
99641781_A_ML.qxp 23/01/2007 11:38 Page 9

EN
10
ADJUSTING THE TIMER
There is one timer for all cooking zones.
Use the button to select the cooking
zone on which you would like to use the timer.
If you press this button several times, a rotat-
ing symbol will show which cooking zone the
timer is being used for.
The timer may only be used for one cooking
zone at a time.
The timer functions when the cooking zone in
question is in use.
To use the timer:
- turn on the cooking zone
- select the rotating symbol for this cooking
zone.
The timer only operates if there is something
on the cooking zone.
- adjust the timing by pressing “
+
“ on the
timer (or “
--
” adjusting from 99,98,97,...min).
As soon as you release the button, the power
display will show the power of the cooking
zone or a
“
t
”
.
When you have finished cooking, the cooking
zone turns itself off, the timer shows
00
and a
bbeeeepp
sounds. Press any button to stop the
beep.
- To change the timer settings, press the - or +
buttons on the timer.
- To stop the timer, press the button.
- To use the timer on a different cooking zone,
choose a new use by pressing the button
several times.
When the previous timing stops, set your tim-
ing for the new cooking zone using the "+" or
"-" buttons.
22
/ USING YOUR APPLIANCE
POWERING ON
Press the start/stop button for the cooking
zone you want to use. A flashing 0 and a beep
indicate that the cooking zone is on. You can
then choose the desired power level.
If you do not select a power level, the cooking
zone will automatically turn itself off.
STOP
Press the start/stop button for the cooking
zone used or the power "
--
" button until
00
is
displayed.
ADJUSTING THE POWER
Press the + or - power button to adjust the
power level from 1 to P (maximum power).
When it is switched on you can move directly
to maximum power "P" by pressing the "
--
" but-
ton.
••
••
DESCRIPTION OF THE CONTROL
PANEL
••
Start/stop touch control.
Power touch controls.
Timer touch controls.
••
A
B
C
C
A
B
••
Tip
For simultaneous use, favour the use
of cooking zones located on opposite
sides of the hob.
On the same side, the use of a cooking
zone at maximum power results in an auto-
matic limitation of the other cooking zone
on that side, which is indicated in the power
level display.
99641781_A_ML.qxp 23/01/2007 11:38 Page 10

EN
11
22
/ USING YOUR APPLIANCE
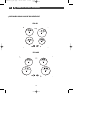
USING THE "CHILD SAFETY DEVICE"
Your cooking hob is equipped
with a child safety device that
locks its operation after use
(e.g. so the hob can be cleaned)
or during cooking (e.g. to guard
your settings).
For safety reasons, the "off" touch control is
always active and allows you to shut off a hea-
ting zone, even if it is locked.
••
How do you lock the hob?
Keep the lock button pressed until the LED
above lights up and a “BIP” is heard .
- hob locked in use
the led above the key lights up
The symbol is displayed when you press
power or timer buttons on the cooking zone in
use .
The symbol
is displayed when you press
on ON/OFF button on a unused cooking zone.
- unused hob locked
The symbol
is displayed when you press
on ON/OFF button on a unused cooking zone.
••
How do you unlock?
Press the lock button until the LED goes out
and dobble beep is heard.
Warning
Remember to unlock your hob before
using it again (See the "Using the Child
Safety Device" section).
99641781_A_ML.qxp 23/01/2007 11:38 Page 11

EN
12
22
/ USING YOUR APPLIANCE
SAFETY DURING OPERATION
•Residual heat
After intensive use, the cooking zone that you
have just used can remain hot for several min-
utes.
An
""HH""
is displayed during this period.
Avoid touching the hot areas during this time.
•Temperature limiter
Each cooking zone is equipped with a safety
sensor that constantly monitors the tempera-
ture of the bottom of the cookware. In the
event that an empty vessel is left on a cooking
zone that is on, this sensor automatically
adjusts the power output of the hob, thereby
avoiding any risk of damage to the cookware
or the hob.
•"Small Items" safety
A small object (such as a fork, a spoon, a ring,
etc.) left alone on the hob is not detected as a
piece of cookware.
The display flashes and no heat is produced.
Warning
Several small objects together on a
cooking zone may be detected as cook-
ware.
If the display remains on: power may be
supplied and the objects may be heated.
•Protection against overflows
The hob may shut down (with
the adjacent symbol in the
display) automatically in any
of these three situations:
--
Overflow that spills onto the touch controls.
- Damp towel placed over the touch controls.
- Metallic object placed on the touch con-
trols.
Clean the hob or remove the object, then
begin cooking again.
•Auto-Stop system
If you forget to switch off a cooking zone,
your hob has an "
AAuuttoo--SSttoopp ssyysstteemm
" safety
function which automaticallty cuts off the
power to the cooking zone, after a predefined
period (between 1 and 10 hours depending
on the power used).
If this safety system is used, the cutoff to the
cooking zone is displayed as "
AASS
" or "
AA
" on
the control panel and a "bip" sounds for about
2 minutes. Simply press any of the control
buttons to stop this.
A double beep will confirm your action.
••
99641781_A_ML.qxp 23/01/2007 11:38 Page 12

EN
13
33
/ DAILY CARE OF YOUR APPLIANCE
PROTECTING YOUR APPLIANCE
Avoid hard shocks from cookware:
The vitroceramic glass worktop is very sturdy;
however, it is not unbreakable.
Do not place any hot lids flat on your cooking
hob. A suction effect may damage the vitroce-
ramic surface.
Avoid dragging cookware across the surface,
which may in the long-term result in the
degradation of the decorative finish of the
vitroceramic top.
Avoid placing cookware on the frame or cover
(depending on the model).
Avoid using cookware with rough or bumpy
bottoms: they can capture and transfer parti-
cles that may produce stains or scratches on
your hob.
These defects that do not result in
appliance malfunction or do not make it
unsuitable for use are not covered by the
warranty.
MAINTAINING YOUR APPLIANCE
Do not store cleaning products or flammable
products in the cabinet underneath your coo-
king hob.
Do not heat unopened canned goods; they
may burst.
Of course, this precaution applies to all types
of cooking.
Never use a sheet of aluminium for cooking.
Never place items wrapped in aluminium foil
or packaged in aluminium dishes on your coo-
king hob.
The aluminium will melt and permanently
damage your cooking appliance.
Objects not intended for cooking should
never be placed on the hob (risk of powering
on, scratches, etc.).
Steam cleaning should never be used. The
steam jet could damage your hob.
TTYYPPEE OOFF SSTTAAIINNSS//SSPPOOTTSS
Light.
Accumulation of baked-
on soil.
Overflow of sugary pre-
parations, melted plastic.
Rings and hard water
residue.
Shiny metallic streaks.
Weekly maintenance.
WWHHAATT TTOO DDOO
Thoroughly moisten the zone to be clea-
ned with hot water, then wipe off.
Thoroughly moisten the zone to be clea-
ned with hot water. Use a scraper for
glass to remove the large bits, follow with
the rough side of a disinfectant sponge,
and then wipe off.
Apply warm white vinegar to the stain, let
stand, then wipe with a soft cloth.
Apply a cleaning agent for vitroceramic
glass (preferable one with silicone for its
protective properties) to the surface.
UUSSEE
Disinfectant spon-
ges.
Disinfectant spon-
ges.
Scraper for glass.
White spirit vinegar.
Cleaning agent for
vitroceramic glass.
Cream
Special disinfectant sponge
for delicate dishes
Scouring sponge
Powder
••
••
99641781_A_ML.qxp 23/01/2007 11:38 Page 13

EN
14
44
/ SPECIAL MESSAGES, DIFFICULTIES
Warning
In the event that there is a break, crack or opening--even minor--in the vitroceramic
glass, immediately disconnect your appliance to avoid the risk of electric shock.
Contact the After-Sales Service Department.
YOU OBSERVE THAT: POSSIBLE CAUSES: WHAT SHOULD YOU DO:
An indicator light appears.
Your installation blows a fuse.
Only one side works.
The hob produces an odour
during the first cooking ses-
sions.
Working normally.
The electrical hook-up of your
hob is incorrect.
New appliance.
Nothing.
Verify the connections.
See the "Hook-Up" sec-
tion.
Operate each cooking
zone for 30 minutes with a
saucepan full of water.
The hob stops working and it
emits a beep approximately
every 10 seconds and a or
"F7" is displayed.
A series of small or "F7" is
displayed.
After turning on a heating zone,
the indicator lights on the
control panel continue to flash.
The saucepans make noise
during cooking.
Your hob makes a clicking
sound during cooking.
The fan continues to function a
few minutes after your hob is
turned off.
There was an overflow or an
object is in contact with the
control panel.
The electronic boards heated
up.
The cookware used is not sui-
table for induction or is less
than 12 cm in diameter (10 cm
for the 16-cm cooking zone).
This is normal with some types
of cookware. This is caused by
the transfer of energy from the
hob to the cookware.
Cooling of the electronic com-
ponents.
Working normally.
Clean the hob or remove
the object, then begin
cooking again.
See "Built-In" section.
See section on cookware
for induction.
Nothing. There is no risk,
neither to your hob nor to
your cookware.
Nothing.
•During operation
•During initial use
YOU OBSERVE THAT: POSSIBLE CAUSES: WHAT SHOULD YOU DO:
The hob is not working and the
indicator lights on the control
panel are not on.
The table is not working and
another message is displayed.
The hob does not function, the
information
is displayed.
The appliance is not receiving
electricity. The electrical sup-
ply is defective or the hook-up
is incorrect.
The electronic board is func-
tioning poorly.
The hob is locked.
Inspect the electrical cir-
cuit breaker and fuses.
Call the After-Sales
Service Department.
See chapter on using the
child safety system.
•When powering on
YOU OBSERVE THAT: POSSIBLE CAUSES: WHAT SHOULD YOU DO:
99641781_A_ML.qxp 23/01/2007 11:38 Page 14

EN
15
66
/ COOKING CHART
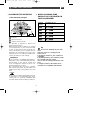
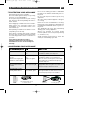
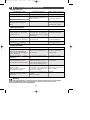
COOKING CHART
••
BROTHS
THICK SOUPS
COURT BOUILLON
FROZEN FOODS
THICK, FLOUR
-BASED
BUTTER-BASED WITH EGGS
(BEARNAISE, HOLLANDAISE)
PREPARED SAUCES
ENDIVES, SPINACH
DRIED BEANS
BOILED POTATOES
GOLDEN BROWN POTATOES
SAUTEED POTATOES
DEFROSTING VEGETABLES
MEAT, NOT TOO THICK
STEAKS
, IN SKILLET
GRILLED MEATS
(CAST IRON GRILL
)
FROZEN FRENCH FRIES
FRESH FRENCH FRIES
PRESSURE COOKER
(ONCE IT STARTS WHISTLING
)
COMPOTES
CRÊPES
CRÈME ANGLAISE
MELTED CHOCOLATE
JAMS
MILK
EGGS, FRIED
PASTA
JARS OF BABY FOOD
(
DOUBLE BOILER)
MEAT STEW
SPANISH RICE
RICE PUDDING
FFRRYY CCOOOOKK//BBRROOWWNN CCOOOOKK//SSIIMMMMEERR KKEEEEPP
BRING TO RETURN TO BOILING
WWAARRMM
A BOIL BOILING LIGHT BROTHS
SOUPS
FISH
SAUCE
VEGETABLES
MEAT
FRYING
MISCELLA-
NEOUS
PP 99 88 77 66 55 44 33 22 11
PP 99 88 77 66 55 44 33 22 11
PP 99 88 77 66 55 44 33 2
2 11
99641781_A_ML.qxp 23/01/2007 11:38 Page 15

16
Wij streven immer naar verbetering van onze produkten en behouden ons dan ook het recht
voor de technische, functionele en esthetische kenmerken van onze produkten te wijzigen
om deze aan de nieuwste technische evolutie aan te passen.
Belangrijk
AAllvvoorreennss hheett aappppaarraaaatt ttee iinnssttaalllleerreenn eenn iinn ggeebbrruuiikk ttee nneemmeenn vvrraaggeenn wwiijj uu eeeerrsstt ddeezzee
iinnssttaallllaattiiee-- eenn
ggeebbrruuiikksshhaannddlleeiiddiinngg aaaannddaacchhttiigg ttee lleezzeenn oomm uu ssnneell mmeett ddee wweerrkkiinngg vveerrttrroouuwwdd ttee
mmaakkeenn..
99641781_A_ML.qxp 23/01/2007 11:38 Page 16

INHOUD NL
17
• Veiligheidsaanwijzingen 04
•
Veiligheids aanwijzingen
______________________________________________
18
• Respect voor het milieu
_______________________________________________
18
• Beschrijving van het apparaat
_________________________________________
18
• Keuze van de plaats
__________________________________________________
19
1 / INSTALLATIE VAN HET APPARAAT
•
Inbouw
____________________________________________________________
20
• Aansluiting
_________________________________________________________
21
2 / GEBRUIK VAN HET APPARAAT
• Beschrijving van de bovenzijde
________________________________________
22
• Pannen voor inductiekoken
____________________________________________
23
• Welke kookzone voor uw pan
__________________________________________
24
• Beschrijving van de bedieningen
_______________________________________
24
• Aanzetten
__________________________________________________________
24
• Stop
______________________________________________________________
24
• Instellen van het vermogen
____________________________________________
24
• Pieptoon
____________________________________________________________
24
• Snelle temperatuurinstelling
____________________________________________
24
• Instellen van schakelklok
______________________________________________
25
• Gebruik “kinderbeveiliging”
____________________________________________
25
• Beveiliging
_________________________________________________________
26
3 / PERIODIEK ONDERHOUD VAN HET APPARAAT
• Behoud van het apparaat
______________________________________________
27
• Onderhoud van het apparaat
__________________________________________
27
4 / SPECIALE MEDEDELINGEN, INCIDENTEN
• Bij de inwerkingstelling
_______________________________________________
28
• Bij het aanzetten
____________________________________________________
28
• Tijdens gebruik
______________________________________________________
28
5 /SERVICE DIENST
5 / AANTEKENINGEN
5 / KOOK TABEL
• Kooktabel per gerecht
________________________________________________
29
99641781_A_ML.qxp 23/01/2007 11:38 Page 17

NL
18
VEILIGHEIDS AANWIJZINGEN
Deze kookplaat is bestemd voor huishoudelijk
gebruik.
Deze kookplaten zijn uitsluitend bestemd
voor het koken van vaste of vloeibare levens-
middelen en bevatten geen asbesthoudende
onderdelen.
••
Restwarmte
Een kookzone kan na gebruik nog enkele mi-
nuten heet blijven.
Dit wordt weergegeven met een “
HH
”.
Raak de betreffende zones dan niet aan.
••
Kinderbeveiliging
Uw kookplaat is voorzien van een kinderbevei-
liging voor vergrendeling van de functies tij-
dens het koken of wanneer de plaat niet aan
staat (zie hoofdstuk: gebruik van de kin-
derbeveiliging).
Vergeet niet de kinderbeveiliging te ontgren-
delen wanneer u de kookplaat opnieuw wilt
gebruiken.
••
Voor dragers van hartstimulatoren
en actieve implanten
.
De werking van de kookplaat is overeenkom-
stig de geldende normen voor elektromagne-
tische interferentie en beantwoordt aldus aan
de wettelijke normen (richtlijnen 89/336/CEE).
Om interferentie tussen uw kookplaat en een
pacemaker te vermijden, is het belangrijk dat
de pacemaker is ontworpen en afgesteld in
overeenstemming met de betreffende regle-
mentering.
Wij kunnen u in dit opzicht enkel garanderen
dat ons eigen product aan de geldende nor-
men voldoet.
Wat betreft de technische specificatie van uw
pacemaker of eventuele incompatibiliteit, kunt
u inlichtingen inwinnen bij de fabrikant van de
pacemaker of bij uw behandelend arts.
Elektrisch gevaar
Zorg ervoor dat de voedingskabel van een
elektrisch apparaat dat in de nabijheid van
de tafel is aangesloten, niet in contact komt
met de kookzones.
Als er een barstje verschijnt in het opper-
vlak van de glasplaat dient u het apparaat
onmiddellijk uit te schakelen om de kans op
een elektrische schok uit te sluiten.
Verwijder daartoe de zekeringen of schakel
de hoofdschakelaar uit.
Gebruik de kookplaat niet meer voordat de
glazen bovenplaat is vervangen
.
••
RESPECT VAN HET MILIEU
••
— Het verpakkingsmateriaal van dit apparaat is
recyclebaar. Doe mee aan de recycling en
draag bij aan de bescherming van het milieu
door dit materiaal in de hiervoor bestemde
gemeentecontainers te deponeren.
— Uw apparaat bevat tevens vele
recyclebare materialen Daarom is
het voorzien van dit logo wat aan-
geeft dat de gebruikte apparaten
van ander afval dienen te worden
gescheiden. De recycling van de
apparaten die door uw fabrikant
wordt georganiseerd wordt op deze manier
onder de beste omstandigheden uitgevoerd,
overeenkomstig de Europese richtlijn
2002/96/CE betreffende elektrisch en elektro-
nisch afval. Informeer bij uw gemeente of bij
uw verkoper naar de dichtstbijzijnde inzamel-
plaats voor uw oude apparaten.
— Wij danken u voor uw bijdrage aan de
bescherming van het milieu.
1 / INSTALLATIE VAN HET APPARAAT
99641781_A_ML.qxp 23/01/2007 11:38 Page 18

NL
1 / INSTALLATIE VAN HET APPARAAT
19
4 cm
4 cm
4 cm
4 cm
A
ruimte
5511
5588//7777
66,,44
4499
5566//7755
••
Het apparaat dient zo te worden geplaatst dat het stopcontact toegankelijk blijft.
De afstand tussen de rand van het apparaat en de muur (of wand) erachter of ernaast moet
minimaal 4 cm bedragen (zone A).
Lijm de schuimplastic afdichtingstrip volledig rond de onderzijde van de kookplaatrand, daar
waar deze op uw werkblad rust. Dit zorgt voor een goede afdichting met het werkblad.
Bevestig de clips op de plaat (naar gelang model)
KEUZE VAN DE PLAATS VAN INBOUW
99641781_A_ML.qxp 23/01/2007 11:38 Page 19

20
1 / INSTALLATIE VAN HET APPARAAT
NL
••
Advies
Als uw oven onder de kookplaat is
geplaatst, maakt de thermische beveiliging
van de plaat gelijktijdig gebruik van de
kookplaat en de oven in pyrolysemodus
onmogelijk.
Uw kookplaat is voorzien van een beveili-
gingssysteem tegen oververhitting.
Deze beveiliging kan bijvoorbeeld worden
geactiveerd als de kookplaat boven een
onvoldoende geïsoleerde oven is geïnstal-
leerd. Er verschijnen dan kleine streepjes
op het display. In dit geval raden wij u aan
de ventilatie van de kookplaat te vergroten
door een opening aan de zijkant van het
meubel te maken (8cm x 5cm).,en/of u kunt
ook de isolatiekit voor ovens installeren,
verkrijgbaar bij de servicedienst.
Let op
Het is van groot belang dat de luchtin-
voer onder het kookapparaat nooit wordt
afgesloten.
4 cm mini
ruimte
MINIMUM 4 mm
INBOUW
BOVEN EEN MEUBEL VOORZIEN VAN DEUR
OF LADE
De installatie dient een invoer van verse lucht
aan de achterkant en een afvoer aan de voor-
kant te voorzien.
BOVEN EEN OVEN
De installatie dient een invoer van verse lucht
aan de achterkant en een afvoer aan de voor-
kant van minimum 4 mm te voorzien
Het apparaat kan makkelijk boven een meu-
bel, een oven of een inbouwbaar elektrisch
huishoudapparaat worden ingebouwd.
Ongeacht waar u de inductiekookplaat instal-
leert, een goede ventilatie is altijd belangrijk.
99641781_A_ML.qxp 23/01/2007 11:38 Page 20

21
11 //
INSTALLATIE VAN HET APPARAAT NL
•
Aansluiting 400 V 2N driefasig
Zekering
1166
ampère.
Scheid vóór de aansluiting de 2 fasedraden
L1 en L2.
•
Aansluiting 220-240 V monofasig
Zekering
3322
ampère.
Let op
Indien de voedingskabel is bescha-
digd moet deze veiligheidshalve door de
fabrikant, de servicedienst of ander
gekwalificeerd persoon worden vervan-
gen.
Indien bij een aansluiting van 400 V 2N drie-
fasig, de kookplaat niet functioneert, contro-
leer dan of de nulleider goed is aangesloten.
Deze kookplaten moeten worden aangesloten
op het elektriciteitsnet via een stopcontact
CEI 60083 of een omnipolaire schakelaar vol-
gens de geldende installatieregels.
Bij het onder spanning zetten van de kook-
plaat, of in geval van een lange stroomstoring,
verschijnt een lichtcodering op het bedienings-
paneel. Wacht ongeveer 30 seconden tot deze
informatie verdwijnt voordat u de kookplaat
gebruikt (Deze weergave is normaal en indien
nodig voorbehouden aan de servicedienst. De
gebruiker van de kookplaat dient hier in geen
geval rekening mee te houden).
AANSLUITING
••
De montage van de buisbescherming dient
VERPLICHT met een kabelklem te worden uit-
gevoerd.
Nulleider
Aarding
Fase
NN
LL
Groen/geel
Blauw
Zwart of grijs
Bruin
Nulleider
Aarding
Fase 2
Fase 1
NN
LL11
LL22
Blauw
Groen/geel
Zwart of grijs
Bruin
99641781_A_ML.qxp 23/01/2007 11:38 Page 21

22
22 //
GEBRUIK VAN HET APPARAATNL
BESCHRIJVING VAN DE BOVENZIJDE
••
IFH-4R
IFH-84R
1166 ccmm
50 W - 2000 W
1188 ccmm
50 W - 2800 W
2211 ccmm
50 W - 3
11
00 W
1188 ccmm
50 W - 2800 W
1188 ccmm
50 W - 2800 W
2211 ccmm
50 W - 3
11
00 W
1188 ccmm
50 W - 2800 W
2211 ccmm
50 W - 3
11
00 W
99641781_A_ML.qxp 23/01/2007 11:38 Page 22

23
22 //
GEBRUIK VAN HET APPARAAT NL
Advies
Om te controleren of uw pan geschikt
is:
Zet u het op een kookzone op vermogen
4.
Als het display niet knippert, is uw pan
geschikt.
Als het display knippert, is uw pan niet
geschikt voor inductiekoken.
U kunt ook een magneet gebruiken.
Als de magneet aan de bodem van de pan
“kleeft”, is de pan geschikt voor
inductiekoken.
Kook Te gebruiken pan
zone*
1166 ccmm 1100 .......... 1188 ccmm
1188 ccmm 1122 .......... 2222 ccmm
2211 ccmm 1188 .......... 2244 ccmm
2288 ccmm 1122 .......... 3322 ccmm
••
WELKE KOOKZONE VOOR UW
PAN ?
••
PANNEN VOOR INDUCTIEKOKEN
••
Principe van inductiekoken
Het principe van inductiekoken berust op een
magnetisch fenomeen.
Zodra u uw pan op een kookzone zet en deze
inschakelt, gaan de elektronische schakelin-
gen van uw kookplaat in de bodem van uw
kookpan “inductie” stromen produceren, het-
geen de temperatuur onmiddellijk verhoogt.
Deze warmte wordt doorgegeven aan de
levensmiddelen in de pan die u zo, afhankelijk
van uw instelling, zachtjes kunt laten pruttelen
of snel kunt dichtschroeien.
••
De pannen
De meeste pannen zijn geschikt voor inductie-
koken. Alleen glazen en aarden kookpannen,
aluminium pannen zonder speciale bodem,
koperen pannen en bepaalde kookpannen van
niet-magnetisch roestvrij staal zijn niet
geschikt voor inductiekoken. Wij adviseren u
kookpannen te kiezen met een dikke platte
bodem. De warmte wordt beter verspreid en
het kookproces verloopt gelijkmatiger.
Door pannen te kiezen met dit logo op de
onderkant of op de verpakking, weet u zeker
dat zij geschikt zijn voor de kookplaat, onder
normale gebruiksomstandigheden.
+
-
C
B
A
**
naar gelang model
Inductor
Elektronische schakeling
Inductiestromen
A
B
C
99641781_A_ML.qxp 23/01/2007 11:38 Page 23

24
22 //
GEBRUIK VAN HET APPARAATNL
••
AAN ZETTEN
Druk op de aan/uit toets van de te gebruiken
zone. Een knipperende
00
en een pieptoon
geven aan dat de zone aan staat. U kunt nu
het gewenste kookvermogen instellen.
Als u geen kookvermogen instelt zal de kook-
zone automatisch worden uitgeschakeld.
STOP
Druk op de aan/uit toets van de gebruikte
zone of op de toets
“
--
”
van het vermogen tot
00
wordt weergegeven.
INSTELLEN VAN HET
VERMOGEN
Druk op de toets “+” ou “-” om het vermogen-
niveau van 1 tot P (maximaal vermogen) in te
stellen.
Bij het inschakelen kunt u direct het maxima-
le vermogenniveau “P” instellen door op de
toets
“
--
”
te drukken
BESCHRIJVING VAN
DE BEDIEN
INGEN
••
Aan/uit toets.
Toetsen voor het instellen van het kook-
vermogen - +.
Toetsen voor schakelklok - +.
A
B
C
Advies
Gebruik bij voorkeur kookzones aan
verschillende zijden.
Het gebruik van maximaal vermogen op één
van de kookzones brengt een automatische
beperking van de andere teweeg, zichtbaar
op het vermogendisplay.
••
••
C
A
B
INSTELLEN VAN DE SCHAKELKLOK
Er is één draaiende schakelklok voor de totali-
teit van de kookzones. Deze wordt voor één
kookzone tegelijk gebruikt.
Door meermaals op toets te drukken,
selecteert u de kookzone waarvoor u de scha-
kelklok wilt gebruiken.
Het draaiende symbool en de schakelklok kun-
nen alleen worden gebruikt voor ingeschakelde
zones.
Om de sc
hakelklok te gebruiken:
- Schakelt u de kookzone in en regelt u het ver-
mogen.
- Zet u het draaiende symbool op deze kookzone.
- Stelt u de duur in door op
“
++
”
of
“
--
”
te drukken;
een lichtpunt op het vermogendisplay bevestigt
uw handeling.
De schakelklok telt alleen af indien de kookzo-
ne bedekt is met een pan.
Aan het einde van de kookcyclus gaat de zone
uit, geeft de schakelklok
00
weer en hoort u een
ppiieeppttoooonn
.
- Druk op de toets
“
++
”
of
“
--
”
van de schakelklok
om een einde te maken aan de pieptoon.
Om de ins
tellingen van de schakelklok te wijzi-
gen:
Drukt u op de toetsen
“
++
”
of
“
--
”
van de schakel-
klok.
Om de sc
hakelklok stop te zetten:
Drukt u gelijktijdig enkele seconden op de toet-
sen
“
++
”
en
“
--
”
van de schakelklok of op de toets
“
--
”
van de schakelklok tot
00
verschijnt.
Om de schakelklok op een andere kookzone
over te zetten:
- Stopt u de lopende schakelklok.
- Verplaatst u de schakelklok naar een andere
ingeschakelde kookzone door meermaals op
de toets te drukken.
••
99641781_A_ML.qxp 23/01/2007 11:38 Page 24

25
22 //
GEBRUIK VAN HET APPARAAT NL
GEBRUIK “KINDER BEVEILIGING”
Uw kookplaat heeft een kinder-
beveiliging die de bedieningen
vergrendelt wanneer de plaat
niet is ingeschakeld (bijvoor-
beeld bij het reinigen) of tijdens
het koken (om de instellingen niet te wijzigen).
Uit veiligheidoverwegingen blijft alleen de
“stop” toets altijd actief. U kunt zo zelfs tijdens
vergrendeling een verwarmingszone uitzetten.
•Hoe vergrendelen
Houd de vergrendelingstoets ingedrukt tot de
led erboven oplicht en u een pieptoon hoort.
•In werking zijnde vergrendelde
plaat
Het display van ingeschakelde kookzones
geeft afwisselend het vermogen en het ver-
grendelingssymbool aan.
Wanneer u op de toetsen van het
vveerrmmooggeenn
of
van de
sscchhaakkeellkkllookk
van de ingeschakelde
zones drukt, gaat de led van de vergrendeling
aan. Deze
gaat na enkele seconden weer uit
.
Alleen de “stop” toets blijft actief
Op de kookzones die niet zijn ingeschakeld
gaan het symbool en de led aan wanneer u
op de “
aaaann//uuiitt
” toetsen drukt.
Deze weergave verdwijnt na enkele seconden
,
•De kookplaat is vergrendeld wan-
neer deze niet is ingeschakeld
De led boven de vergrendelingstoets is uit.
Door kort op deze toets te drukken licht de led
op.
D
e led
licht op wanneer u op een
aaaann//uuiitt
toets
van een willekeurige zone drukt.
•Hoe ontgrendelen
Druk op de vergrendelingstoets
: de led gaat
uit
en u hoort een dubbele pieptoon. De kook-
plaat is ontgrendeld
.
Advies
Denk eraan uw kookplaat te ontgren-
delen wanneer u deze opnieuw wilt gebrui-
ken (zie hoofdstuk “gebruik kinderbeveili-
ging”).
••
99641781_A_ML.qxp 23/01/2007 11:38 Page 25

26
VEILIGHEIDS AANWIJZINGEN
NL
BEVEILIGING
•Restwarmte
Na intensief gebruik kan de door u gebruikte
kookzone nog enkele minuten heet blijven.
Dit wordt weergegeven met een “
HH
”.
Raak de betreffende zones dan niet aan.
•Temperatuurbegrenzer
Elke kookzone is uitgerust met een veilig-
heidssensor die voortdurend de temperatuur
van de bodem van de pan controleert. Als u
een lege pan op een ingeschakelde kookzo-
ne laat staan, zal deze sensor automatisch
de temperatuur van de kookplaat aanpassen
zodat uw keukengerei of de kookplaat niet
wordt beschadigd.
•Veiligheid “kleine voorwerpen”
Een klein voorwerp (zoals een vork, lepel of
ring …,) dat alleen op de kookplaat wordt
gelegd, wordt niet als pan herkend.
Het display knippert en de kookplaat wordt
niet ingeschakeld.
Let op
Meerdere kleine voorwerpen kunnen
op een kookplaat als een pan worden her-
kend.
Het display geeft het kookvermogen aan:
deze voorwerpen worden verwarmd als
een kookvermogen wordt ingesteld.
•Bescherming bij overkoken
Het stopzetten van de kook-
plaat, een speciale weergave
(symbool hiernaast) en een
pieptoon (naar gelang model)
kunnen in één van de volgen-
de 3 gevallen in werking wor-
den gezet:
--
Overkoken waarbij de bedieningstoetsen
worden bedekt.
--
Natte doek op de toetsen.
--
Metalen voorwerp op de bedieningstoetsen.
Nadat u de kookplaat en de toetsen schoon
hebt gemaakt of het voorwerp weg hebt
gehaald, kunt u verder gaan met koken.
•Auto-Stop systeem
In geval u vergeet de pan van de kookzone te
halen, dan is uw kookplaat uitgerust met een
veiligheidsfunctie
““AAuuttoo--SSttoopp ssyysstteeeemm””
die
de vergeten kookzone automatisch uitzet na
een vooraf bepaalde tijd (tussen 1 en 10 uur
naar gelang het gebruikte vermogen).
Wanneer deze veiligheidsfunctie wordt
gestart wordt de onderbreking van de kook-
zone aangekondigd met de weergave “
AASS
” of
“
AA
” in de bedieningszone en hoort u onge-
veer 2 minuten lang een pieptoon. Door op
een willekeurige toets van de bedieningen te
drukken maakt u hier een einde aan.
Een dubbele pieptoon bevestigt uw handeling.
PIEP... PIEP
••
99641781_A_ML.qxp 23/01/2007 11:38 Page 26

27
33 //
PERIODIEK ONDERHOUD VAN HET APPARAAT
NL
BEHOUD VAN HET APPARAAT
De kookpannen niet te hard op de kookplaat
neerzetten
De vitrokeramische plaat is zeer stevig, maar
niet onbreekbaar.
Leg geen warme deksel plat op de kook-
plaat. Een ‘zuignap’ effect kan het vitrokera-
mische oppervlak beschadigen.
Schuif de pannen niet over de glasplaat, dat
kan op den duur beschadiging veroorzaken
van het motief op de glaskeramische plaat.
Zet geen pannen op de lijst of kap (afhankelijk
van het model).
Gebruik geen pannen met ruwe of oneffen
bodem: er kunnen stoffen onder blijven ste-
ken die vlekken of krassen op de kookplaat
kunnen veroorzaken.
Beschadigingen die de werking van de kook-
plaat niet storen of onmogelijk maken, vallen
niet onder de garantie van dit apparaat.
ONDERHOUD VAN HET APPARAAT
Geen onderhouds- en ontvlambare produc-
ten in het meubel onder de kookplaat opber-
gen.
Verwarm geen gesloten conservenblikken;
die zouden kunnen ontploffen.
Dat geldt uiteraard voor alle kookstanden.
Gebruik voor het koken nooit aluminiumfo-
lie. In aluminium verpakte producten of pro-
ducten in een aluminium bakje nooit recht-
streeks op de kookplaat zetten.
Het aluminiumfolie smelt en brengt onher-
stelbare schade toe aan uw kookapparaat.
Laat nooit allerhande dingen op de kookplaat
staan (onverwacht aanzetten, krassen ...).
Gebruik geen stoomreiniger. De met kracht
ontsnappende stoom kan de kookplaat
schade toebrengen.
SSOOOORRTT VVUUIILL
Lichte vlekken.
Ingebakken vlekken.
Overkoken van zoete
gerechten, gesmolten
plastic.
Kringen en kalkaanslag.
Glanzend metalen kleu-
ringen.
Wekelijks onderhoud.
RREEIINNIIGGIINNGGSS MMEETTHHOODDEE
Het te reinigen gebied met warm water
doorweken, daarna afvegen.
Het te reinigen gebied met warm water
doorweken, een speciaal glaskrabbertje
gebruiken om het ergste vuil te verwijde-
ren, daarna met de schuurzijde van een
huishoudsponsje het resterende vuil ver-
wijderen en afvegen.
Warme schoonmaakazijn op de vlekken
aanbrengen, in laten werken en afvegen
met een zachte doek.
Een speciaal product voor vitrokeramisch
glas aanbrengen op de glasplaat, bij voor-
keur met silicone (beschermend effect).
GGEEBBRRUUIIKK
Huishoudsponzen.
Huishoudsponzen.
Speciaal glaskrab-
bertje.
Schoonmaakazijn.
Speciaal product
voor vitrokeramisch
glas.
crème
huishoudsponsje
voor fijn vaatwerk
schuursponsje
poeder
••
••
99641781_A_ML.qxp 23/01/2007 11:38 Page 27

28
44 //
SPECIALE MEDEDELINGEN EN INCIDENTEN
NL
Let op
In geval van breuken, barsten of spleten, zelfs licht, van de vitrokeramische plaat,
dient u onmiddellijk de stekker uit het stopcontact te halen om een elektrische schok te
vermijden. Neem contact op met de Servicedienst.
De kookplaat werkt niet en
de lichtgevende displays op het
bedieningspaneel blijven uit.
De kookplaat werkt niet en er
verschijnt een ander bericht.
De kookplaat werkt niet,
de
informatie wordt weergege-
ven.
Het apparaat krijgt geen
stroom. Defecte voeding of
foute aansluiting.
De elektronische schakeling
werkt slecht.
De kookplaat is vergrendeld
Controleer de zekerin-
gen en de elektrische
hoofdschakelaar.
Neem contact op met
de Servicedienst.
Zie hoofdstuk gebruik
kinderbeveiliging
De kookplaat stopt met werken
tijdens het gebruik en er klinkt
om de 10 seconden een piep-
toon en een of F7 wordt
weergegeven.
Een serie kleine of F7
wordt weergegeven.
Na een kookzone in werking te
hebben gesteld, blijft het dis-
play van het bedieningspaneel
knipperen.
De pannen maken lawaai tij-
dens het koken.
Uw kookplaat maakt een tik-
kend geluid tijdens het koken.
De ventilator blijft enkele minu-
ten doorwerken na uitschake-
ling van de kookplaat.
Er is iets overgekookt of er ligt
een voorwerp op het bedie-
ningspaneel.
De elektronische schakelingen
zijn warm geworden.
De pan die u gebruikt is niet
geschikt voor inductiekoken of
heeft een diameter van minder
dan 12 cm (10 cm op kookzone
van 16 cm).
Normaal voor sommige soorten
pannen.
Dit wordt veroorzaakt
door de energie die van de kook-
plaat naar de pan gaat.
Afkoeling van de elektronica.
Normale werking.
Reinig het voorwerp of
verwijder het en ga ver-
der met koken.
Zie hoofdstuk inbouw.
Zie hoofdstuk pannen
voor inductiekoken.
Niets. Er is geen
gevaar, noch voor uw
kookplaat noch voor uw
pan.
Niets.
•Tijdens gebruik
•Bij de inwerkingstelling
U CONSTATEERT HET VOLGENDE:
MOGELIJKE OORZAKEN: OPLOSSINGEN:
U CONSTATEERT HET VOLGENDE:
MOGELIJKE OORZAKEN: OPLOSSINGEN:
U CONSTATEERT HET VOLGENDE:
MOGELIJKE OORZAKEN: OPLOSSINGEN:
Er verschijnt een lichtgevend
display.
De installatie is doorgeslagen.
Slechts één zijde werkt.
Bij het eerste gebruik komt er
een vreemde geur van de kook-
plaat af.
Normale werking.
Verkeerde aansluiting van de
kookplaat.
Nieuw apparaat.
Niets, de weergave ver-
dwijnt na 30 seconden.
Controleer of de aanslui-
ting conform is.
Zie hoofd-
stuk aansluiting.
Verwarm een pan vol
water een half uur lang
op elke zone.
•Bij de inwerkingstelling
99641781_A_ML.qxp 23/01/2007 11:38 Page 28

29
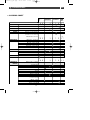
KOOK TABEL NL
BOUILLON
MAALTIJDSOEPEN
COURT-BOUILLON
DIEPGEVROREN PRODUCTEN
DIK OP BASIS VAN BLOEM
MET BOTER EN EIEREN
(BEARNAISE, HOLLANDAISE)
BEREIDE SAUZEN
WITLOF, SPINAZIE
PEULVRUCHTEN
GEKOOKTE AARDAPPELEN
GEBAKKEN AARDAPPELEN
GESAUTEERDE AARDAPPELEN
ONTDOOIEN VAN GROENTEN
WEINIG DIK VLEES
GEBAKKEN BIEFSTUK
GRILLGERECHTEN
(
GIETIJZEREN GRILL
)
DIEPVRIES PATAT
VERSE PATAT
SNELKOOKPAN
(VANAF HET MOMENT
DAT HET BEGINT TE SISSEN
)
MOES
PANNENKOEKEN
VANILLEPUDDING
GESMOLTEN CHOCOLA
JAM
MELK
GEBAKKEN EI
PASTA
BABYPOTJES
(BAIN MARIE)
RAGOUT
RIJST
RIJSTEBRIJ
PP 99 88 77 66 55 44 33 22 11
PP 99 88 77 66 55 44 33 22 11
PP 99 88 77 66 55 44 33 2
2 11
BBAAKKKKEENN BBAAKKKKEENN// KKOOKKEENN// WWAARRMM
AAN DE KOOK
GGOOUUDDBBRRUUIINN SSTTOOVVEENN HHOOUUDDEENN
BRENGEN OPNIEUW AAN DE KOOK
BRENGEN
ZACHT KOKEN
SOEPEN
VIS
SAUS
GROENTE
VLEES
FRITUUR
Varianten
KKOOOOKK TTAABBEELL PPEERR GGEERREECCHHTT
••
99641781_A_ML.qxp 23/01/2007 11:38 Page 29

30
99641781_A_ML.qxp 23/01/2007 11:38 Page 30

31
99641781_A_ML.qxp 23/01/2007 11:38 Page 31

32
99996644 11778811
12/06
99641781_A_ML.qxp 23/01/2007 11:38 Page 32
-
 1
1
-
 2
2
-
 3
3
-
 4
4
-
 5
5
-
 6
6
-
 7
7
-
 8
8
-
 9
9
-
 10
10
-
 11
11
-
 12
12
-
 13
13
-
 14
14
-
 15
15
-
 16
16
-
 17
17
-
 18
18
-
 19
19
-
 20
20
-
 21
21
-
 22
22
-
 23
23
-
 24
24
-
 25
25
-
 26
26
-
 27
27
-
 28
28
-
 29
29
-
 30
30
-
 31
31
-
 32
32


