
www.inaca.com
Prenox 25/22
350
STELA 350

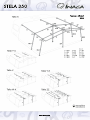
ENGLISH - 1. Lay out the components of the frame over a protective sheet. 2. Take the roof section of the awning and slide the
beading around your caravan’s awning channel. Ensure the canvas is equidistant from the ground at either side. 3. Slide the
Fix-Ons onto the secondary bead in accordance with the diagram. Take the central roof pole and hook it into the Fix-On, then
push the eyelet in the awning roof onto the spiked central leg. Lock the roof and leg poles together. Extend the roof pole for
stability (set the leg at a height you can reach easily). 4. Take the front awning pole and connect the centre to the side joint. Then
repeat the previous point with the roof and leg pole to assemble one side.
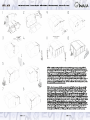
repeat the previous point with the roof and leg pole to assemble one side. 5. Repeat process on other side to finish frame for the
2.5 metre depth section. 6, 7, 8. Now assemble the frame for the extra metre of projection. This is assembled in the same way as
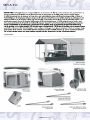
the rest of the awning, starting with the central leg and the central roof pole. 9. Place short canopy poles (‘F’) into centre and side
joints. Push the long canopy poles (‘G’) through corresponding sleeves on awning canvas. 10. Connect the ‘F’ and ‘G’ poles (via
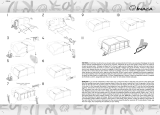
plastic lugs on end of ‘G’ poles), pushing the eyelets on the canvas over the hooks on the ‘F’ poles. 11. Zip all of the awning
panels into place. Apply tension to the central roof pole. Next, tension the front awning poles, then the remaining roof poles and
panels into place. Apply tension to the central roof pole. Next, tension the front awning poles, then the remaining roof poles and
canopy. Before extending the leg poles, place the feet onto the second step of the corresponding rubber ladders attached to the
bottom of the awning. Apply tension. To set the correct height for the extra metre of depth, zip the front panels in at 2.5 metres
and adjust the leg accordingly. 12. Peg the awning on both sides at the rear, then the front corners. Working from the caravan
outwards, peg the remainder of the side panels. Finally, peg the front edge, thus completing the assembly of your awning.
ESPAÑOL - 1. Distribuir la estructura en el suelo sobre una lona protectora frente a su caravana. 2. Desplegar la lona del
avance. Pasarla cuidadosamente por la guía de su caravana. Asegúrese de que la lona queda al mismo nivel con respecto al
suelo en ambos lados. 3. Coloque los soportes Fix-On por la guía acorde al diagrama. Montar la estructura por la parte central.
Primero el tubo del techo, la cruceta y la pata después. 4. Seguir por uno de los lados. Primero el tubo enlace centro-lado,
después la pata con cruceta, y después el tubo lateral del techo. 5. Misma operación al otro lado. 6,7,8. Dar tensión. Repetir
pasos “3,4 y 5” con la estructura del segundo frontal. Tensar los tubos, primero el central del techo, luego los tubos laterales.
pasos “3,4 y 5” con la estructura del segundo frontal. Tensar los tubos, primero el central del techo, luego los tubos laterales.
9. Colocar los tubos de la visera. Subir la pata central y después las laterales, enganchando el tope de plástico sobre el
segundo escalón de la goma escaleta cosida a la lona. 10. A continuación tensar los tubos frontales hacia los lados. Repetir en
ambos lados. 11. Colocar los paneles laterales, y los frontales en el interior. Cerrar las cremalleras completamente. Clavar las
esquinas traseras, y después las frontales interiores y centro. 12. Colocar los frontales en el frontal exterior y repetir la operación.
Clavar completamente el avance dando tensión adecuada.
www.inaca.com www.inaca.com
Instrucciones de montaje - Erection instructions - Aufbauanleitung - Monteringsanvisning - Instruction de montage
STELA 350

www.inaca.com
NEDERLANDS 1. Verwijder bramen of ongerechtigheden in de caravan rail. Zet de caravan waterpas. Een grondzeil voor uw
caravan voorkomt het vuil worden van uw nieuwe voortent. De frame delen op de juiste plaats voor de caravan leggen.
2.
2. Schuif de voortent door de caravan rail. Zorg dat er aan beide zijkanten even veel slikrand op de grond ligt. 3. Plaats de
Fix-On blokjes op de aangegeven plaatsen. Begin met de opbouw van het frame in het midden. Monteer de nokstang aan het
middenhoekstuk en zet de staander rechtop (op werk hoogte). 4. Ga verder aan de zijkant. Eerst de verbinding maken in de
breedte (voorwand), daarna de staander rechtop zetten en de nokstang monteren. 5. Zelfde volgorde aan de andere kant.
6.7.8. Span nu het frame in de breedte uit. Herhaal de stappen “3,4 en 5” met het frame in het voorste gedeelte. 9. Monteer
eerst de petluifelstokjes en de nokstangen in de breedte van de petluifel. Plaats nu de staander (begin in het midden) in de
eerst de petluifelstokjes en de nokstangen in de breedte van de petluifel. Plaats nu de staander (begin in het midden) in de
tweede opening van de ladder spanner. 10. Span het frame in de breedte uit. 11. Monteer de panelen in de voorwand (binnen
gedeelte) en zijwanden. Sluit alle ritssluitingen. Indien nodig de nokstangen in de zijwand uitspannen. Plaats de haringen. Begin
op de hoeken bij de caravan, daarna bij de buitenste nokstangen, nu in het midden. Daarna de rest van de haringen plaatsen.
12. De front panelen kunnen naar eigen voorkeur geplaatst worden. Eventueel de rest van de haringen plaatsen.
STELA 350
Documenttranscriptie
STELA 350 Prenox 25/22 350 www.inaca.com STELA 350 Instrucciones de montaje - Erection instructions - Aufbauanleitung - Monteringsanvisning - Instruction de montage ESPAÑOL - 1. Distribuir la estructura en el suelo sobre una lona protectora frente a su caravana. 2. Desplegar la lona del avance. Pasarla cuidadosamente por la guía de su caravana. Asegúrese de que la lona queda al mismo nivel con respecto al suelo en ambos lados. 3. Coloque los soportes Fix-On por la guía acorde al diagrama. Montar la estructura por la parte central. Primero el tubo del techo, la cruceta y la pata después. 4. Seguir por uno de los lados. Primero el tubo enlace centro-lado, después la pata con cruceta, y después el tubo lateral del techo. 5. Misma operación al otro lado. 6,7,8. Dar tensión. Repetir pasos “3,4 y 5” con la estructura del segundo frontal. Tensar los tubos, primero el central del techo, luego los tubos laterales. 9. Colocar los tubos de la visera. Subir la pata central y después las laterales, enganchando el tope de plástico sobre el segundo escalón de la goma escaleta cosida a la lona. 10. A continuación tensar los tubos frontales hacia los lados. Repetir en ambos lados. 11. Colocar los paneles laterales, y los frontales en el interior. Cerrar las cremalleras completamente. Clavar las esquinas traseras, y después las frontales interiores y centro. 12. Colocar los frontales en el frontal exterior y repetir la operación. Clavar completamente el avance dando tensión adecuada. ENGLISH - 1. Lay out the components of the frame over a protective sheet. 2. Take the roof section of the awning and slide the beading around your caravan’s awning channel. Ensure the canvas is equidistant from the ground at either side. 3. Slide the Fix-Ons onto the secondary bead in accordance with the diagram. Take the central roof pole and hook it into the Fix-On, then push the eyelet in the awning roof onto the spiked central leg. Lock the roof and leg poles together. Extend the roof pole for stability (set the leg at a height you can reach easily). 4. Take the front awning pole and connect the centre to the side joint. Then repeat the previous point with the roof and leg pole to assemble one side. 5. Repeat process on other side to finish frame for the 2.5 metre depth section. 6, 7, 8. Now assemble the frame for the extra metre of projection. This is assembled in the same way as the rest of the awning, starting with the central leg and the central roof pole. 9. Place short canopy poles (‘F’) into centre and side joints. Push the long canopy poles (‘G’) through corresponding sleeves on awning canvas. 10. Connect the ‘F’ and ‘G’ poles (via plastic lugs on end of ‘G’ poles), pushing the eyelets on the canvas over the hooks on the ‘F’ poles. 11. Zip all of the awning panels into place. Apply tension to the central roof pole. Next, tension the front awning poles, then the remaining roof poles and canopy. Before extending the leg poles, place the feet onto the second step of the corresponding rubber ladders attached to the bottom of the awning. Apply tension. To set the correct height for the extra metre of depth, zip the front panels in at 2.5 metres and adjust the leg accordingly. 12. Peg the awning on both sides at the rear, then the front corners. Working from the caravan outwards, peg the remainder of the side panels. Finally, peg the front edge, thus completing the assembly of your awning. www.inaca.com www.inaca.com STELA 350 NEDERLANDS 1. Verwijder bramen of ongerechtigheden in de caravan rail. Zet de caravan waterpas. Een grondzeil voor uw caravan voorkomt het vuil worden van uw nieuwe voortent. De frame delen op de juiste plaats voor de caravan leggen. 2. Schuif de voortent door de caravan rail. Zorg dat er aan beide zijkanten even veel slikrand op de grond ligt. 3. Plaats de Fix-On blokjes op de aangegeven plaatsen. Begin met de opbouw van het frame in het midden. Monteer de nokstang aan het middenhoekstuk en zet de staander rechtop (op werk hoogte). 4. Ga verder aan de zijkant. Eerst de verbinding maken in de breedte (voorwand), daarna de staander rechtop zetten en de nokstang monteren. 5. Zelfde volgorde aan de andere kant. 6.7.8. Span nu het frame in de breedte uit. Herhaal de stappen “3,4 en 5” met het frame in het voorste gedeelte. 9. Monteer eerst de petluifelstokjes en de nokstangen in de breedte van de petluifel. Plaats nu de staander (begin in het midden) in de tweede opening van de ladder spanner. 10. Span het frame in de breedte uit. 11. Monteer de panelen in de voorwand (binnen gedeelte) en zijwanden. Sluit alle ritssluitingen. Indien nodig de nokstangen in de zijwand uitspannen. Plaats de haringen. Begin op de hoeken bij de caravan, daarna bij de buitenste nokstangen, nu in het midden. Daarna de rest van de haringen plaatsen. 12. De front panelen kunnen naar eigen voorkeur geplaatst worden. Eventueel de rest van de haringen plaatsen. www.inaca.com-
 1
1
-
 2
2
-
 3
3


in andere talen
- English: Inaca STELA 350
Gerelateerde papieren

Andere documenten
-
Dometic REVO ZIP 350 Handleiding
-
 Raclet Minto (610.10) de handleiding
-
-
Dometic Rally AIR, Rally AIR DA, Club AIR, Grande AIR, Ace AIR, Leggera AIR Handleiding
-
Dometic Leggera AIR Handleiding
-
-
