Inventum KV1880R de handleiding
- Categorie
- Koelkasten
- Type
- de handleiding

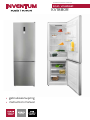
koel- vrieskast
REFRIGERATOR FREEZER COMBINATION
KV1880R
• gebruiksaanwijzing
• instruction manual

2 •

1. Veiligheidsvoorschriften pagina 4
2. Product omschrijving pagina 7
3. Ingebruikname pagina 8
4. Gebruik pagina 8
5. Tips pagina 8
6. Reiniging & onderhoud pagina 9
7. Storingen zelf oplossen pagina 9
8. Draairichting deur wijzigen pagina 10
9. Productkaart pagina 11
Garantie & Service pagina 12
1. Safety instructions page 14
2. Appliance description page 16
3. Before first use page 17
4. Usage page 17
5. Tips page 18
6. Cleaning & maintenance page 18
7. Troubleshooting page 18
8. Reversing the door opening page 19
9. Product fiche page 20
Guarantee & After sales service page 21
Nederlands
English
• 3

• Lees eerst de gebruiksaanwijzing aandachtig en geheel door
voordat u het apparaat gaat gebruiken en bewaar deze zorgvuldig
voor latere raadpleging.
• Gebruik dit apparaat uitsluitend voor de in de gebruiksaanwijzing
beschreven doeleinden. Het apparaat is geschikt voor het
bewaren van levensmiddelen. In het vriesgedeelte kunt u ook verse
levensmiddelen invriezen.
• Sluit het apparaat alleen aan op wisselstroom, op een randgeaarde
wandcontactdoos, met een netspanning overeenkomstig met de
informatie aangegeven op het typeplaatje van het apparaat.
• Maak geen gebruik van enkele/meerdere adapters of verlengsnoeren.
• Gebruik het apparaat niet wanneer de stekker, het snoer of het
apparaat beschadigd is, of wanneer het apparaat niet meer naar
behoren functioneert of wanneer het gevallen of op een andere
manier beschadigd is. Raadpleeg dan de winkelier of onze technische
dienst. In geen geval de stekker of het snoer zelf vervangen.
• Het apparaat moet worden verplaatst en geïnstalleerd door twee of
meer personen.
• Wees voorzichtig met het verplaatsen van het apparaat om te
voorkomen dat de vloer beschadigd raakt.
• Let op dat tijdens de installatie de voedingskabel niet beschadigd
raakt.
• Controleer of het apparaat niet te dicht bij een warmtebron geplaatst
wordt.
• Om een goede ventilatie te garanderen, moet er een ruimte van 10 cm
rondom het apparaat vrij gehouden worden.
• De ventilatieopeningen nooit afdekken.
• Zorg dat de koelleidingen niet beschadigd raken.
• Installeer het apparaat op een stevige, vlakke en stabiele ondergrond.
Nederlands
veiligheidsvoorschriften
1
4 • Nederlands

Nederlands • 5
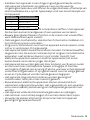
• Installeer het apparaat in een droge en goed geventileerde ruimte.
Het apparaat is bedoeld voor gebruik in een ruimte waar de
omgevingstemperatuur valt binnen de volgende klasse, afhankelijk van
de klimaatklasse die u op het typeplaatje vindt aan de achterzijde van
het apparaat.
Klimaatklasse Omgevingstemperatuur
SN Van 10°C tot 32°C
N Van 16°C tot 32°C
ST Van 18°C tot 38°C
T Van 18°C tot 43°C
• Bewaar geen explosieve of licht ontvlambare stoffen in het apparaat.
De dampen kunnen brandgevaar of een explosie veroorzaken.
• Bewaar geen glazen flessen of potten in de vriezer met vloeistoffen,
want deze kunnen kapot vriezen.
• Gebruik geen mechanische, elektrische of chemische middelen om
het ontdooiproces te versnellen.
• Zorg ervoor dat kinde ren niet met het apparaat kunnen spelen, zoals
zich er in verstoppen. Dit is gevaarlijk.
• Het apparaat buiten bereik van kinderen houden. Kinderen beseffen
de gevaren niet, die kunnen ontstaan bij het omgaan met elektrische
apparaten. Laat kinde ren daarom nooit zonder toezicht met
elektrische apparaten werken. Houd het apparaat en het snoer
buiten bereik van kinderen jonger dan 8 jaar.
• Het apparaat kan worden gebruikt door kinderen van 8 jaar en ouder
en door personen met beperkte fysieke, zintuiglijke of mentale
vermogens of gebrek aan ervaring of kennis, wanneer zij het apparaat
onder toezicht gebruiken of zijn geïnstrueerd over het veilige gebruik
ervan en zij de daaruit voortkomende gevaren begrijpen.
• Het apparaat mag niet door kinderen worden gereinigd of
onderhouden, tenzij dit onder toezicht gebeurt.
• Reparaties aan elektrische apparaten dienen uitsluitend door
vakmensen uitge voerd te worden. Het is gevaarlijk om een reparatie
uit te voeren waarbij de behuizing van het apparaat geopend moet
worden.
• Het apparaat uitsluitend binnenshuis gebruiken en opbergen.
• Het netsnoer nooit scherp buigen of over hete delen laten lopen.
• Verwijder de stekker altijd uit het stopcontact als het apparaat
gereinigd of gerepareerd wordt.

• Het apparaat nooit gebruiken met onderdelen die niet door de
fabrikant zijn aanbevolen of geleverd.
• Niet aan het snoer c.q. het apparaat trekken om de stekker uit de
wandcontactdoos te halen. De stekker nooit met natte of vochtige
handen aanraken.
• Let op met ijsklontjes en ijsjes. Als deze direct uit de vriezer
geconsumeerd worden dan bestaat de kans op vrieswonden.
• Dompel het apparaat, het snoer of de stekker nooit onder in water.
• Het apparaat is niet geschikt om gebruikt te worden met een timer of
een aparte afstandsbediening.
• Dit apparaat is uitsluitend geschikt voor huishoudelijk gebruik.
Wanneer het apparaat oneigenlijk gebruikt wordt, kan er bij eventuele
defecten geen aanspraak op schadevergoeding worden gemaakt en
vervalt het recht op garantie.
• Als u besluit het apparaat, vanwege een defect, niet langer
te gebruiken, adviseren wij u, nadat u de stekker uit de
wandcontactdoos heeft verwijderd, het snoer af te knippen.
Huishoudelijke apparaten horen niet bij het vuilnis. Breng het
apparaat naar de betreffende afvalverwerkingafdeling van uw
gemeente.
6 • Nederlands

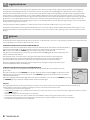
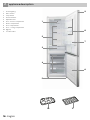
1. Binnenverlichting
2. Glazen schappen
3. Groentelade
4. Vrieslades
5. Stelvoetjes
6. Deur - vriesgedeelte
7. Flessenvak
8. Deurvakken
9. Deur - koelgedeelte
10. Eierrekje
11. IJsblokjeshouder
product omschrijving
2
10 11
Nederlands • 7
6
4
1
3
5
7
9
2
8

ingebruikname
3
Voordat u het apparaat voor de eerste maal in gebruik neemt, dient u als volgt te werk te gaan: pak het apparaat voorzichtig uit en
verwijder al het verpakkingsmateriaal en eventueel promotionele stickers. De verpakking (plastic zakken, piepschuim en karton)
buiten het bereik van kinderen houden. Controleer na het uitpakken het apparaat zorgvuldig op uiterlijke schade, mogelijk ontstaan
tijdens transport. Plaats het apparaat op een stevige, vlakke ondergrond en let op dat er genoeg ruimte omheen is voor voldoende
ventilatie. Er is minimaal 10 cm rondom nodig tussen het apparaat en de muren. Op deze wijze kan het apparaat de warmte goed kwijt,
goed koelen en energiezuinig functioneren. Met de stelvoetjes kunt u het apparaat waterpas zetten. Plaats het apparaat niet in de
buurt van warmtebronnen zoals verwarming of fornuis. Let op de klimaatklasse van het apparaat. Bij plaatsing in een te koude ruimte
zal de koelkast niet goed functioneren.
Laat het apparaat nadat het geplaatst is, minimaal 3 uur staan voordat u de stekker in het stopcontact steekt.
Reinig eerst de binnenkant van het apparaat. Gebruik hiervoor een warm sopje met bijvoorbeeld afwasmiddel, allesreiniger of soda.
Neem de binnenkant van het apparaat na het schoonmaken af met schoon water en droog alles goed na. Laat het apparaat 1 à 2 uur
drogen.
gebruik
4
De bediening van het apparaat bevindt zich aan de binnen- en buitenzijde. Controleer of de spanning overeenkomt met die vermeld is
op het typeplaatje en steek de stekker in het stopcontact.
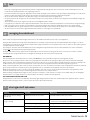
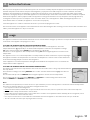
TEMPERATUUR INSTELLEN VAN HET KOELGEDEELTE
De thermostaat van het koelgedeelte bevindt zich aan de buitenzijde van de koelkast. Druk herhaaldelijk op
de temperatuurknop [1] om de gewenste temperatuur in te stellen. Er zijn zes temperatuurstanden.
2°C is het koudst en de stand SUPER zorgt ervoor dat het apparaat snel koud wordt.
Wij adviseren u het apparaat in te stellen op de temperatuurstand 4°C bij gebruik van het apparaat in een
ruimte met kamertemperatuur.
Het apparaat zal nu continue koelen tot de ingestelde temperatuur is bereikt. Laat het apparaat
op temperatuur komen zonder levensmiddelen. Dit duurt meestal 2 tot 3 uur. Daarna kunt u de
thermostaatknop op de gewenste stand zetten en het apparaat vullen met levensmiddelen.
Indien de omgevingstemperatuur stijgt, zet u het apparaat op een lagere temperatuur stand om de
binnentemperatuur te kunnen waarborgen.
TEMPERATUUR INSTELLEN VAN HET VRIEZERGEDEELTE
De thermostaat van het vriezergedeelte bevindt zich aan de binnenzijde van de koelkast achter de
groentelade.
Er zijn drie standen. De stand WINTER is het koudst. Draai de thermostaatknop [2] op de gewenste stand.
Wij adviseren u het apparaat in te stellen op de stand NORMAL bij gebruik van het apparaat in een ruimte
met kamertemperatuur.
Indien de omgevingstemperatuur stijgt, draait u de thermostaatknop tussen de standen NORMAL (normaal)
en SOMMER (zomer) om de binnentemperatuur te kunnen waarborgen.
Attentie:
De omgevingstemperatuur, de frequentie van het openen van de deur en de positie van het apparaat hebben invloed op de
temperatuur in het apparaat. Houd hier rekening mee met het instellen van de thermostaat.
• Plaats geen heet voedsel in het apparaat.
• Plaats nooit gevaarlijke, licht ontvlambare of explosieve stoffen zoals alcohol, aceton of benzine in het apparaat omdat er een kans
op explosiegevaar is.
• Pak vlees en vis goed in om nare geuren te voorkomen.
• Laat voldoende ruimte tussen de verschillende levensmiddelen om de lucht goed te kunnen laten circuleren.
• Plaats geen voedsel tegen de achterwand van het apparaat. De schappen hebben een stop om dit te vermijden.
• Laat de deur niet langer open dan noodzakelijk.
8 • Nederlands
1
2

reiniging & onderhoud
6
Zet voordat u het apparaat wilt reinigen deze uit door de stekker uit de wandcontactdoos te verwijderen.
Reinig de binnenkant van het apparaat. Gebruik hiervoor een warm sopje met bijvoorbeeld afwasmiddel, allesreiniger of soda om
vieze geuren te voorkomen. Neem de binnenkant van het apparaat na het schoonmaken af met schoon water en droog alles goed na.
Laat het apparaat 1 à 2 uur drogen.
De schappen, de lades en de deurvakken kunt u eenvoudig uit het apparaat nemen en met de hand afwassen. Deze onderdelen
mogen niet in de vaatwasmachine gereinigd worden.
Reinig de buitenkant van het apparaat en de deurrubbers met een zachte vochtige doek. Het rooster van de condensor aan de
achterzijde van het apparaat kan men stofzuigen met behulp van het zachte borstelopzetstuk.
ONTDOOIEN
Het vriezergedeelte van dit apparaat is vorstvrij - no-frost. Bij correct gebruik zal er geen ijsvorming plaatsvinden.
Mocht er toch een ijslaag ontstaan, ontdooi het vriesgedeelte dan wanneer de ijslaag een dikte van 3 mm heeft bereikt. Verwijder
alle producten uit het vriesgedeelte. Bewaar de bevroren producten op een koele plaats ingepakt in kranten en dekens. Verwijder de
stekker uit het stopcontact en houd tijdens het ontdooien van het vriesgedeelte de deur van het koelgedeelte gesloten.
Ontdooi het vriesgedeelte. Het ontdooien kunt u versnellen door een schaal met heet water in het vriesgedeelte te plaatsen. Gebruik
geen scherpe metalen voorwerpen om het vriesgedeelte schoon te krabben, maar gebruik een plastic ijsschraper.
Maak het vriesgedeelte schoon en droog. Steek de stekker in het stopcontact en zet de thermostaat weer op de gewenste stand.
Plaats de bevroren producten pas in het vriesgedeelte als deze weer op temperatuur is.
Waarschuwing: Verwijder ijsaanslag nooit met scherpe voorwerpen, ontdooisprays, een föhn, een straalkacheltje of iets dergelijks.
Dit kan leiden tot onveilige situaties en onherstelbare schade veroorzaken aan het apparaat
HET VERVANGEN VAN DE LED LAMP
Dit apparaat is voorzien van een LED lamp. Deze lamp gaat langere tijd mee. Wanneer de LED lamp in het apparaat kapot is, kunt u
deze niet zelf vervangen. Neem contact op met de servicedienst van Inventum.
storingen zelf oplossen
7
Storing Oorzaak Oplossing
Apparaat doet niets; lampje
brandt niet
Stekker niet in het stopcontact Steek de stekker in het stopcontact
Temperatuur in de koelkast te
hoog of te laag
Thermostaat verkeerd ingesteld - Zet de thermostaat op de juiste stand
- Controleer of de ZOMER of WINTER stand ingesteld is.
Ventilatie-openingen zijn geblokkeerd Reinig de ventilatie-openingen
Apparaat maakt lawaai Is het apparaat goed geïnstalleerd? Controleer de installatie
Raakt de achterkant van de koelkast
iets?
Controleer dit en plaats de koelkast verder naar voren
Opmerking: het borrelen en het maken van expansiegeluiden in het koelcircuit is normaal.
Nederlands • 9
tips
5
• Een hoge omgevingstemperatuur beïnvloedt het energieverbruik nadelig. Ook direct zonlicht en andere warmtebronnen in de
buurt van het apparaat hebben een ongunstige invloed.
• Houd de ventilatieopeningen vrij. Afgedekte en vervuilde openingen veroorzaken een hoge energieverbruik. Zorg voor voldoende
ruimte rondom de koelkast zodat een goede ventilatie en luchtstroming rondom het apparaat mogelijk is.
• Open de deur van het apparaat niet vaker dan nodig is en laat de deur zo kort mogelijk open.
• De afstand tussen de schappen en de achterwand zorgt voor een vrije luchtcirculatie. Plaats dus geen levensmiddelen tegen de
achterwand.
• Zet de thermostaat op een lagere stand als de omstandigheden dat toelaten.
• Laat gekookt voedsel wat u in het apparaat wilt bewaren eerst afkoelen tot kamertemperatuur voordat u het in het apparaat legt.
• Rijp of ijs zorgen ervoor dat het stroomverbruik toeneemt. Verwijder deze daarom regelmatig zodra ze 3 tot 5 mm dik zijn.
• Een deurrubber die niet goed sluit kan het stroomverbruik verhogen. Laat het daarom op tijd en door een vakman vervangen.
• Als de instructies niet worden nageleefd dan kan dat leiden tot een hoger stroomverbruik.

draairichting deur wijzigen
8
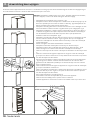
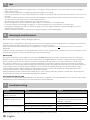
De deuren van het apparaat kan aan de rechter- of linkerkant worden geopend. Om de draairichting van de deuren te wijzigen volgt u
de onderstaande instructies. Het beste kunt u dit met twee personen doen.
Attentie: verwijder de stekker uit het stopcontact. Haal alle spullen uit de koelkast,
ook de schappen, voordat u de draairichting van de deuren wijzigt.
• Verwijder de beschermkap op het scharnier - fig.1.
• Verwijder aan de rechter bovenzijde het scharnier met de drie boutjes (let op de
kunststof opvulbusjes tussen het scharnier en de deur) - fig.2. Verwijder aan de
linker bovenzijde van het apparaat de twee boutjes.
• Verwijder voorzichtig de bovenste deur door deze naar u toe te bewegen en dan
van het middelste scharnier te tillen. Leg deze deur op een veilige plek - fig. 3.
• Verwijder het middelste scharnier aan de rechterzijde door de twee boutjes los
te draaien en leg deze even apart. Verplaats meteen de witte beschermdopjes
van de linkerkant naar de rechterkant en plaats deze op de plek waar het
middelste scharnier is verwijderd - fig. 4.
• Verwijder voorzichtig de onderste deur door deze naar u toe te bewegen en dan
van het onderste scharnier te tillen - fig. 5. Leg deze deur op een veilige plek.
• Zet aan de onderzijde van de deur het kunststof blokje om van de rechterzijde
naar de linkerzijde.
• Kantel vervolgens de koelkast maximaal 45° achterover.
• Verwijder aan de linker onderzijde het stelvoetje en de twee boutjes.
• Verwijder aan de rechter onderzijde het scharnier en de drie boutjes - fig. 6.
Plaats vervolgens het scharnier aan de linker onderzijde met de boutjes.
• Plaats het stelvoetje aan de rechter onderzijde en draai daar ook de boutjes weer
in.
• Plaats de onderste deur tegen het apparaat en zorg ervoor dat de onderzijde
goed op het onderste scharnier zit. Let erop dat de deur recht staat ten opzichte
van de buitenzijde van de koelkast.
• Monteer nu het middelste scharnier en bijbehorende bouten aan de linkerzijde
- fig. 7. Zorg ervoor dat het scharnier in de bovenkant van de onderste deur
geplaatst wordt. Gebruik de opvulbusjes en draai de boutjes vast. De onderste
deur is nu gemonteerd.
• Plaats nu de bovenste deur tegen het apparaat en zorg ervoor dat de onderzijde
goed op het middelste scharnier zit.
• Plaats op de linker bovenzijde het scharnier met de kunststof opvulbusjes en zet
deze met de boutjes vast - fig. 8. Let erop dat de deur recht staat ten opzichte
van de buitenzijde van de koelkast.
• Zet het apparaat weer voorzichtig rechtop.
• Draai aan de rechter bovenzijde de boutjes weer in het apparaat.
• Plaats het beschermkapje weer op het bovenste scharnier.
• Laat het apparaat 2 à 3 uur rusten voordat u de stekker in het stopcontact doet.
10 • Nederlands
fig. 1
fig. 2fig. 2
fig. 3
losdraaien
fig. 4
fig. 5
fig. 6
Middelste scharnier
fig. 7
fig. 8

INVENTUM
Typenummer
KV1880R
Type koel-/vrieskast
koel- vriescombinatie
Categorie
7
Energie-efficiëntieklasse
A++
Energieverbruik [Aec] in kWh per jaar
224 kWh
Netto inhoud - totaal
295 liter
Netto inhoud - koelgedeelte
219 liter
Netto inhoud - vriesgedeelte ****
76 liter
Max. bewaartijd bij stroomuitval (aantal uur)
15
Vriesvermogen (kg/24 uur)
4,0
Klimaatklasse
N/T
Geluidsemissie dB(A)
40 dB
Type apparaat
vrijstaand
Ontdooisysteem
no-frost
Uitvoering
Kleur
roestvrijstaal
Aantal deuren
2
Draairichting deur omkeerbaar
�
Eierrekje aanwezig
1
IJsblokjeshouder
1
Aantal glazen draagplateaus
4
Aantal vriesladen
3
Totaal aantal deurvakken/flessenrekken
5
Aantal groentelades
1
CFK/HFK vrij
vrij
Soort koelmiddel
R600a
Aantal compressoren
1
Technische gegevens
Afmeting (bxdxh) in mm
595 x 630 x 1880
Netto gewicht in kg 68 kg
Bruto gewicht in kg
75 kg
Elektrische aansluitwaarde [W]
170 w
Netspanning [V] / netfrequentie [Hz]
220-240V/ 50Hz
Lengte aansluitsnoer [m]
1,7
Stekkertype
VDE plug 90°
Opmerking: Op het typeplaatje - welke aan de binnenzijde aan de linkerkant geplaatst is - vindt u de de technische gegevens van het
apparaat ook vermeld.
product kaart
9
Nederlands • 11

Hoe belangrijk service is, hoeven we je niet te vertellen. We ontwikkelen onze producten zodat je er jarenlang onbezorgd
plezier van kan hebben. Ontstaat er toch een probleem, dan vinden we dat je direct een oplossing mag verwachten. Daarom
bieden we je op onze producten een omruilservice, bovenop de rechten en vorderingen die je op grond van de wet toekomen.
Door een product of onderdeel om te ruilen, besparen we je tijd, moeite en kosten.
2 jaar volledige fabrieksgarantie
1. Op alle producten van Inventum krijg je als consument standaard 2 jaar volledige fabrieksgarantie. Binnen deze periode
wordt een defect product of onderdeel altijd gratis omgeruild voor een nieuw exemplaar. Om aanspraak te maken op de 2
jaar volledige fabrieksgarantie, kun je teruggaan naar de winkel waar je het product hebt gekocht of contact opnemen met de
consumentenservice van Inventum via het contactformulier op www.inventum.eu/service-aanvraag.
2. De garantieperiode van 2 jaar begint te lopen op de datum van aankoop van het product.
3. Voor het recht op garantie dien je een kopie van het originele aankoopbewijs te kunnen overleggen.
4. De garantie geldt uitsluitend bij normaal huishoudelijk gebruik van de Inventum producten binnen Nederland.
5 jaar Inventum garantie
1. Op de meeste groot huishoudelijke apparatuur en een selectie klein huishoudelijke producten biedt Inventum de 5 jaar Inventum
garantie. Deze 5 jaar Inventum garantie bestaat uit de 2 jaar volledige fabrieksgarantie en daarna 3 jaar aanvullende garantie. Het
enige dat je hoeft te doen voor het recht op 3 jaar aanvullende garantie is het product te registreren binnen 45 dagen na aankoop.
In de volgende paragraaf lees je meer over het registreren van het product.
2. Voor de 5 jaar Inventum garantie geldt dat een defect product of onderdeel gedurende de eerste 2 jaar altijd gratis wordt omgeruild
voor een nieuw exemplaar. Gedurende het 3e tot en met het 5e jaar betaal je alleen de omruilkosten. De actuele omruilkosten kun
je terugvinden op www.inventum.eu/omruilkosten.
3. Om aanspraak te maken op de 5 jaar Inventum garantie kun je teruggaan naar de winkel waar je het product hebt gekocht of
contact opnemen met de consumentenservice van Inventum via het formulier op www.inventum.eu/service-aanvraag.
4. De garantieperiode van 5 jaar begint te lopen op de datum van aankoop van het product.
5. Voor het recht op garantie dien je een kopie van het originele aankoopbewijs te kunnen overleggen.
6. De garantie geldt uitsluitend bij normaal huishoudelijk gebruik van de Inventum producten binnen Nederland.
Productregistratie
1. De 3 jaar aanvullende garantie is eenvoudig en kosteloos te regelen door het product binnen 45 dagen na aankoop te registreren
via de website www.inventum.eu/garantieregistratie. Wanneer je het product niet binnen 45 dagen na aankoop hebt geregistreerd,
heb je nog tot 2 jaar na aankoop de tijd om dit te regelen. Er zijn dan wel kosten aan deze registratie verbonden. De eenmalige
registratiekosten bedragen € 89,- voor elk afzonderlijk product. Registreren is alleen mogelijk voor producten waar de 5 jaar
Inventum garantie op van toepassing is. Of het product in aanmerking komt voor de 5 jaar Inventum garantie vind je in de
gebruiksaanwijzing van het product en bij de informatie over het product op de website van Inventum.
2. De garantieperiode begint steeds te lopen vanaf de datum van aankoop van het product. Ook wanneer het product pas later voor
aanvullende garantie wordt geregistreerd, wordt de garantieperiode vanaf de originele aankoopdatum berekend.
3. De 3 jaar aanvullende garantie kun je alleen aanvragen als je beschikt over een kopie van het originele aankoopbewijs en het
Inventum 5 jaar garantiecertificaat.
Groot huishoudelijke apparatuur
1. Storingen of defecten aan groot huishoudelijke apparatuur (vrijstaand- en inbouw witgoed) kunnen worden gemeld via het
formulier op www.inventum.eu/service-aanvraag, telefonisch bij de consumentenservice van Inventum of via de winkel waar je de
apparatuur hebt gekocht. Het telefoonnummer van de consumentenservice vind je op www.inventum.eu.
2. Bij gemelde storingen of defecten aan groot huishoudelijke apparatuur heeft Inventum de mogelijkheid om ter plaatse bij de
consument in Nederland een witgoedmonteur het defecte apparaat te laten onderzoeken en vervolgens een reparatie uit te laten
voeren. De consumentenservice van Inventum kan ook besluiten dat het apparaat wordt omgeruild.
3. Als je een storing of defect aan groot huishoudelijke apparatuur meldt in de eerste 2 jaar vanaf de datum van aankoop, brengt
Inventum geen kosten in rekening voor omruilen, voorrijden, onderdelen, materiaalgebruik en arbeidsloon.
4. Als je het product op de hiervoor beschreven wijze hebt geregistreerd op www.inventum.eu/garantie-registratie en je vervolgens
een storing aan groot huishoudelijke apparatuur meldt in het 3e t/m 5e jaar vanaf de datum van aankoop, dan is de 5 jaar Inventum
garantie van toepassing en wordt het apparaat kosteloos gerepareerd of omgeruild. Je bent dan bij reparatie of omruiling van het
apparaat alleen omruilkosten verschuldigd. De actuele omruilkosten kun je terugvinden op www.inventum.eu/omruilkosten. Indien
je het product niet hebt geregistreerd, dan is de 3 jaar aanvullende garantie niet van toepassing.
5. Bij een melding van een storing of defect zal een monteur binnen 1 werkdag contact opnemen voor het maken van een
bezoekafspraak. Bij melding in het weekend of op feestdagen is dit de eerstvolgende werkdag.
6. Indien je een storing of defect meldt via het formulier op www.inventum.eu/service-aanvraag, word je via mobiele berichten en
e-mail op de hoogte gehouden van de voortgang.
7. De garantieperiode begint te lopen op de datum van aankoop van het product.
8. Voor het recht op garantie dien je een kopie van het originele aankoopbewijs en het Inventum 5 jaar garantiecertificaat te kunnen
overleggen.
9. De garantie geldt uitsluitend bij normaal huishoudelijk gebruik van de Inventum producten binnen Nederland.
algemene service- en garantievoorwaarden
12 • Nederlands

Storingen of defecten buiten de garantieperiode
1. In geval van storingen of defecten aan klein huishoudelijke apparatuur of groot huishoudelijke apparatuur buiten de
garantieperiode, kan hiervan melding worden gemaakt bij de consumentenservice via het contactformulier www.inventum.eu/
service-aanvraag of door te bellen met de consumentenservice.
2. De consumentenservice kan je vragen het product voor onderzoek of reparatie op te sturen. De kosten van verzending zijn voor
jouw rekening.
3. Aan het onderzoek naar de mogelijkheid tot repareren zijn kosten verbonden. Je moet hier vooraf toestemming voor geven.
4. Bij groot huishoudelijke apparatuur kan Inventum op jouw verzoek een witgoedmonteur sturen. De voorrijkosten, onderdeel- en
materiaalkosten en arbeidsloon worden dan aan je in rekening gebracht.
5. In geval van opdracht tot reparatie moeten de reparatiekosten vooraf worden voldaan. Bij reparatie door een witgoedmonteur,
dienen de kosten van de reparatie ter plaatse bij de monteur, bij voorkeur via pinbetaling, te worden afgerekend.
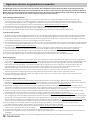
Uitgesloten van garantie
1. De hiervoor genoemde garanties gelden niet in geval van:
• normale slijtage;
• onoordeelkundig of oneigenlijk gebruik;
• onvoldoende onderhoud;
• het niet in acht nemen van de bedienings- en onderhoudsvoorschriften;
• ondeskundige montage of reparatie door derden of door de consument zelf;
• door de consument toegepaste niet originele onderdelen;
• zakelijk of bedrijfsmatig gebruik;
• het serienummer en/of rating-label is verwijderd.
2. Tevens geldt de garantie niet voor normale verbruiksartikelen, zoals:
• kneedhaken, bakblikken, (koolstof)filters, etc.;
• batterijen, lampjes, koolstoffilters, vetfilters enz.;
• externe verbindingskabels;
• glazen accessoires en glazen delen zoals ovendeuren;
• en soortgelijke zaken.
3. Buiten de garantie vallen transportschades, voor zover deze niet door Inventum zijn veroorzaakt. Controleer daarom je nieuwe
apparatuur voordat je deze in gebruik neemt. Als je beschadigingen aantreft, dien je deze binnen 5 werkdagen na aankoop te
melden bij de winkel waar je het product hebt gekocht, of bij de consumentenservice van Inventum via het contactformulier op
de website www.inventum.eu/service-aanvraag. Indien transportschades niet binnen deze termijn worden gemeld, aanvaardt
Inventum geen enkele aansprakelijkheid ter zake.
4. Van garantie en/of vervanging zijn uitgesloten: defecten aan, verlies en beschadiging aan het apparaat als gevolg van een
gebeurtenis die gewoonlijk verzekerd is onder de inboedelverzekering.
Van belang om te weten
1. Vervanging of herstel van een defect product of een onderdeel daarvan leidt niet tot verlenging van de oorspronkelijke
garantietermijn.
2. Vervangen onderdelen, verpakkingsmateriaal en omgewisselde apparaten worden meegenomen door de witgoedmonteur en
worden eigendom van Inventum.
3. Indien een klacht ongegrond is, komen alle kosten die daardoor zijn ontstaan voor rekening van de consument.
4. Na verloop van de garantietermijn worden alle kosten voor herstel of vervanging, inclusief administratie-, verzend- en voorrijkosten
aan de consument in rekening gebracht.
5. Inventum is niet aansprakelijk voor schade die is ontstaan als gevolg van onjuiste inbouwsituaties.
6. Inventum is niet aansprakelijk voor schade veroorzaakt door van buiten het apparaat ontstane oorzaken, tenzij deze
aansprakelijkheid voortvloeit uit dwingendrechtelijke bepalingen.
7. Op deze garantie- en servicevoorwaarden is Nederlands recht van toepassing. Geschillen zullen uitsluitend worden berecht door
de bevoegde Nederlandse rechter.
Nederlands • 13

• Please read these instructions before operating the appliance
and retain for future use.
• The appliance is intended solely for domestic use within the home.
The appliance is suitable for keeping food.
• Before plugging into a socket, check that the voltage in your home
corresponds with the voltage printed on the bottom of the appliance.
• Do not use single/multiple adapters or extension cables.
• Always carry out regular checks of the appliance and the power
cord to ensure no damage is evident. Should there be any signs that
the appliance or the power cord is damaged in the slightest degree,
the entire appliance should be returned to the Customer Service
Department. For your own safety, only use the accessories and spare
parts from the manufacturer which are suitable for the appliance.
• The appliance must be handled and installed by two or more persons.
• Be careful not to damage the floor when you move the appliance.
• During installation, make sure the appliance does not damage the
power cable.
• Check the appliance is not positioned near a heat source.
• Make sure that there is sufficient ventilation, leave a space of 10 cm
around the appliance.
• Keep the vent outlets of the appliance free.
• Do not damage the refrigerant circuit pipes of the appliance.
• Install the appliance on a firm and stable surface.
• Install the appliance in a dry and well ventilated area. The appliance is
intended for operation in environments where ambient temperatures
fall within the following ranges, depending on the climatic class
indicated on the rating label at the back of the appliance. The
appliance may not work properly if it is left for a long time at a
temperature outside the specified range.
Climatic class Ambient temperature
SN From 10°C to 32°C
N From 16°C to 32°C
ST From 18°C to 38°C
T From 18°C to 43°C
• Do not store or use petrol, flammable liquids or gas in the vicinity of
this or other electrical appliances. The fumes can create a fire hazard
or explosion.
English
safety instructions
1
14 • English

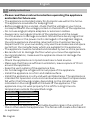
• Do not use mechanical, electric or chemical means to speed up the
defrost process.
• Do not allow children to play or hide inside the appliance - there is a
risk of becoming trapped and suffocating.
• This appliance shall not be used by children from 0 to 8 years. This
appliance can be used by children over the age of 8 and above if
they are continuously supervised. This can be used by people with
reduced physical, sensory or mental capabilities or lack of experience
or knowledge, if they have been given supervision or instruction
concering use of the appliance in a safe way and understand the
hazards involved. Keep the appliance and its cord out of reach of
children aged less than 8 years.
• Cleaning and maintenance shall not be made by children.
• Children must not play with the appliance.
• It is hazardous for anyone other than a competent person to carry out
any service or repairs that involve the removal of the housing.
• Only use and place the appliance indoors.
• Do not let the cord hang over the edge of the table or counter and
keep it away from the heated surface.
• Before moving or cleaning the appliance, make sure it is switched of
and unplugged.
• For your own safety, only use the accessories and spare parts from the
manufacturer which are suitable for the appliance.
• Never unplug it from the socket by pulling on the cable. Always ensure
that your hands are dry before handling the plug or power cord.
• Should you decide not to use the appliance anymore, make it
inoperative by cutting the power cord after removing the plug from
the socket. We also recommend making all potentially dangerous
parts of the appliance harmless, particularly for children who might be
tempted to play with it.
• Never immerse any part of the main body, lid, power cord and plug in
water or any other liquid to protect against electrical hazards.
• If the appliance is used for other purposes than intended, or is it
not handled in accordance with the instruction manual, the full
responsibility for any consequences will rest with the user. Any
damages to the product or other things are not covered by the
warranty.
• Legislation requires that all electrical and electronic equipment
must be collected for reuse and recycling. Electrical and
electronic equipment marked with the symbol indicating
separate collection of such equipment must be returned to a
municipal waste collection point.
English • 15

appliance description
2
16 • English
1. Interior lighting
2. Glass shelves
3. Crisp drawer
4. Freezer drawers
5. Adjustable feet
6. Door - freezer compartment
7. Bottle compartment
8. Door compartments
9. Door - cooling compartment
10. Egg tray
11. Icecube holder
10 11
6
4
1
3
5
7
9
2
8

before the first use
3
Before you use the appliance for the first time, please do as follows: Carefully unpack the appliance and remove all the packaging
material and promotional stickers. Keep the material (plastic, polystyrene and cardboard) out of reach of children. Check the
appliance after unpacking for any damage, possible from transportation. Place the appliance on a flat and stable surface. Make
sure there is enough open space around the appliance for the intake and/or outlet vents. A minimum clearance of 10 cm is required
between the appliance and any adjacent walls. The appliance needs good ventilation for easy dissipation of heat, high efficiency
of refrigeration and low power consumption. Note: check the climat class of the appliance. When installing the appliance in a
environment that is not suitable, the appliance can not function properly.
Leave the appliance to stand for at least 3 hours before you insert the plug into the socket.
First clean the interior of the appliance. Use warm water and a neutral detergent. After cleaning, rinse the interior with clean water and
rub dry. Leave the appliance to dry for 1 to 2 hours.
usage
4
English • 17
The appliance features both internal and external controls. Check that the voltage in your home corresponds with the voltage printed
on the back of the appliance and plug it in a socket.
SETTING THE TEMPERATURE OF THE COOLING COMPARTMENT
The thermostat for the cooling compartment is placed on the exterior of the appliance. Press the
temperature button [1] repeatedly to set the desired temperature. There are six temperature settings.
2°C is the coldest and the setting SUPER turns the appliance cold rapidly.
We advise to set the appliance on the temperature setting 4°C when using the appliance at normal room
temperature.
The appliance now cools continuously until the set temperature has been reached. Do not place anything in
the appliance until the set temperature is reached. This usually takes 2 or 3 hours. Then set the thermostat
at the desired setting and place food into the refrigerator.
Set the appliance on a lower temperature setting when the ambient air temperature rises to maintain the
temperature inside the appliance.
SETTING THE TEMPERATURE OF THE FREEZER COMPARTMENT
The thermostat of the freezer compartment can be found on the inside of the cooling compartment behind
the crisp drawer.
There are three settings. The setting WINTER is the coldest. Turn the thermostat knob [2] to the desired
setting.
The recommended position is NORMAL when using the appliance at normal room temperature.
The recommended position is between NORMAL and WINTER for colder working environments and
between NORMAL and SOMMER for hotter environments.
Note:
The ambient air temperature, how often the door is opened and the position of the appliance can affect the internal temperature.
These factors must be taken into account when setting the thermostat.
• Do not put hot food into the refrigerator.
• Never introduce volatile, inflammable or explosive fluids such as alcohol, acetone or petrol because of the risk of explosion.
• It is advisable to wrap meat and fish to avoid odours.
• Leave sufficient space between the food to enable air to circulate correctly between them. Similarly, when storing them, avoid
puttin food items in contact with each other.
• Do not place food items in contact with the cold wall at the back of the appliance. The shelves have a stop to avoid this.
• The door should not be left open any longer than necessary.
1
2

tips
5
• High ambient temperatures have a negative effect on energy use. Keep the appliance in a position away from direct sunlight or
other sources of heat.
• Keep ventilation openings free. Clogged openings lead to higher use of energy.
• Try not to open the door too often, especially when the weather is wet and hot. Once you open the door, mind to close it as soon as
possible.
• The space between the shelves and the rear wall of the refrigerator compartment must be unobstructed to allow the cool air to
circulate. Therefore don’t place any food items against the back.
• Turn the thermostat to a lower setting when the circumstances allow it.
• Before storing fresh cooked food, make sure the food has cooled at least to room temperature.
• Ice and frost layer increase energy consumption, so clean the appliance as soon as the layer is 3 to 5 mm thick.
• If the gasket is damaged or if it turns out that the sealing is poor, the energy consumption is substantially higher. To restore
efficiency, replace the gasket.
• Always consider the instructions, otherwise the energyconsumption is substantially higher.
cleaning & maintenance
6
Before cleaning the appliance always unplug the appliance.
Clean the interior of the appliance. Use warm water and a neutral detergent to prevent any bad smells occurring. After cleaning, rinse
the interior with clean water and rub dry. Leave the appliance to dry for 1 to 2 hours.
Simply remove the shelves, drawer and door compartments to clean them by hand. Do not clean the interior accessories in the
dishwasher.
Clean the outside of the appliance and the gasket with a soft moist cloth. The grille of the condenser at the back of the appliance and
the adjacent components can be vacuumed using a soft brush attachment.
DEFROSTING
The freezer compartment of the appliance is frost-free - no-frost. With proper use, there should not be any frost accumulated.
However, in case of improper use of the freezer compartment, frost might build up in the freezer compartment after the appliance
has been used for a period of time. Defrost the freezer compartment when the layer of ice reaches a thickness of 3 mm. Keep
the contents of the freezer in a cool place and wrapped in blankets or newspapers. Switch the thermostat off. Defrost the freezer
compartment. You can speed up the defrosting process by placing a bowl of hot water in the freezer. Do not use sharp metal objects
for this operation. They could puncture the refrigerator circuit and cause irreparable damage to the unit. Use a plastic scraper.
Clean and dry the freezer. Plug the appliance in and set the thermostat to the desired temperature setting. When the freezer
compartment reaches its correct temperature, replace the food items.
Warning: Never remove the ice with the aid of sharp objects, defrost sprays, a hair-drier, a heater, or similar items. This may lead to
unsafe situations and may cause irreparable damage to the appliance
REPLACING THE LED LIGHTING
This appliance is equipped with a LED light bulb. It can be used for a long time. In case, the LED bulb is blown, it must be replaced by a
qualified person to avoid any hazard. Contact the Inventum service department.
troubleshooting
7
Problem Cause Solution
Appliance is not functioning;
light does not work
Appliance is not plugged in Plug the appliance in the socket
Temperature inside the
larder is too high or too low
Thermostat has been set incorrectly - Set the thermostat correctly
- Check the freezer thermostat. Is it set to
SOMMER or WINTER?
Air circulation vents are blocked Clean the ventilation openings
Appliance is excessively noisy Has the appliance been installed correctly? Check the installation
Are the pipes at the back touching or vibrating? Check it and move the appliance forwards
Note: gurgling and hissing noises due to expansion in the refrigerant circuit are normal.
18 • English

reversing the door opening
8
fig. 1
fig. 2fig. 2
fig. 3
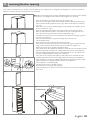
It is possible to change the door opening from either the left or the right side. To change the opening direction, please follow these
instructions. We recommend you have someone assist you.
Note: Before reversing the door swing, unplug the appliance from the mains. Empty
the appliance, including the shelves before reversing the door opening.
• Remove the plastic covering from the top door hinge - fig.1.
• Remove from the right top side the hinge with the three bolts (mind the plastic
parts between the hinge and the door). - fig.2. Remove two bolts from the left
top side.
• Remove the top door by carefully lifting it from the hinge in the middle. Put the
door in a safe place - fig. 3.
• Remove the hinge in the middle on the right side by losening the two bolts.
Remove and fit the white plastic caps from the left side to the right side and
place these where you have removed the middle hinge - fig. 4.
• Carefully remove the bottom door by lifting it from the bottom hinge- fig. 5. Put
the door in a safe place.
• Remove and fit the plastic nog from the right side to the left side.
• Tilt the appliance 45°.
• Remove the front leg on the left side and the two bolts.
• Unscrew the two bolts and remove the bottom hinge - fig. 6. Install the bottom
hinge on the opposite side und replace the bolts in the provided holes.
• Replace the front leg on the right side with the bolts.
• Place the bottom door against the appliance and make sure it is well fitted on the
bottom hinge. Make sure the door is alligned with the outside of the appliance.
• Refit the middle hinge (mind the plastic parts) with the bolts - fig. 7. Make sure
the door is alligned with the outside of the appliance.
• Place the top door against the appliance and make sure it is well fitted on the
middle hinge. Make sure the door is alligned with the outside of the appliance.
• Refit the hinge on the left top side (mind the plastic parts) with the bolts - fig. 8.
Make sure the door is alligned with the outside of the appliance.
• Set the appliance carefully upright.
• Screw the bolts back on the right top side.
• Refit the plastic covering on the top hinge.
• Leave the appliance to stand for at least 3 hours before you insert the plug into
the socket.
unscrew
fig. 4
fig. 5
fig. 6
Middle hinge
fig. 7
fig. 8
English • 19

product fiche
9
INVENTUM
Model number
KV1880R
Type of appliance
refrigerator/freezer
Category
7
Energy-efficiency class
A++
Annual energy consumption [Aec]
224 kWh
Nett capacity - total
295 liter
Nett capacity - cooling compartment
219 liter
Nett capacity - freezer compartment ****
76 liter
Max. storage time in case of power failure
15 hours
Freezing capacity (kg/24 hour)
4,0
Climate class
N/T
Noise level dB(A)
40 dB
Type of appliance
freestanding
Defrost system
no-frost
Execution
Color
stainless steel
Number of doors
2
Door opening reversible
�
Eggholder included
1
Ice cube holder included
1
Number of glass shelves
4
Number of freezers drawers/ compartment
3
Total amount of door compartments/ bottle racks
5
Number of crisper drawers
1
CFK/HFK free
free
Type of cooling agent
R600a
Number of compressors
1
Technical specifications
Dimensions (wxdxh) in mm
595 x 630 x 1880
Nett weight in kg 68 kg
Gross weight in kg
75 kg
Power consumption [W]
170 w
Rated voltage [V] / frequency [Hz]
220-240V/ 50Hz
Lenght of power cord [m]
1,7
Type of plug
VDE plug 90°
Note: On the rating label - which you can find on the left inside the appliance - you can also find the technical specifications.
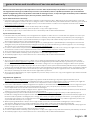
20 • English

We do not need to remind you of the importance of service. After all, we develop our products to a standard so that you
can enjoy them for many years, without any concerns. If, nevertheless, there is a problem, we believe you are entitled to a
solution straight away. Hence our products come with an exchange service, on top of the rights and claims you are entitled to
by law. By exchanging a product or part, we save you time, effort and costs.
2-year full manufacturer’s warranty
1. Customers enjoy a 2-year full manufacturer’s warranty on all Inventum products. Within this period, a faulty product or part will
always be exchanged for a new model, free of charge. In order to claim under the 2-year full manufacturer’s warranty, you can either
return the product to the shop you bought it from or contact the Inventum costumer service department via the form at www.
inventum.eu/service-aanvraag.
2. The 2-year warranty period starts from the date the product is bought.
3. In order to claim under the warranty, you must produce a copy of the original receipt.
4. The warranty applies only to normal domestic use of Inventum products within the Netherlands.
5-year Inventum warranty
1. Inventum offers a 5-year warranty on most large domestic appliances and a selection of small domestic appliances. This 5-year
Inventum warranty consists of a 2-year full manufacturer’s warranty, extended by a further 3-year warranty. The only thing you
need to do to qualify for the 3-year extended warranty is to register the product within 45 days of purchase. You can read more
about registering the product in the following paragraph.
2. In accordance with the 5-year Inventum warranty provisions, a faulty product or part will always be exchanged for a new model
during the first 2 years under the warranty. During the 3rd to 5th year under the warranty, you will only pay the costs of exchange.
The current costs of exchange are listed at www.inventum.eu/omruilkosten.
3. In order to claim under the 5-year Inventum warranty, you can either return the product to the shop you bought it from or contact
the Inventum costumer service department via the form at www.inventum.eu/service-aanvraag.
4. The 5-year warranty period starts from the date the product is bought.
5. In order to claim under the warranty, you must produce a copy of the original receipt.
6. The warranty applies only to normal domestic use of Inventum products within the Netherlands.
Product registration
1. The 3-year extended warranty is easy to obtain, free of charge, by registering the product within 45 days of purchase, via the
website www.inventum.eu/garantie- registratie. If you did not register the product within 45 days of purchase, you can still do so
up to 2 years after the purchase date. However, there will be a charge. The one-off registration charge is € 89 for each separate
product. Registration is possible only for products that are subject to the 5-year Inventum warranty. Whether the product qualifies
for the 5-year Inventum warranty is stated in the product user manual and in the product information sheet, on Inventum’s website.
2. The warranty period always starts from the date the product is bought. If the product is registered for the extended warranty at a
later date, the warranty period still starts from the original date of purchase.
3. The 3-year extended warranty can only be applied for if you are in the possession of a copy of the original receipt and the Inventum
5-year warranty certificate.
Large domestic appliances
1. Breakdowns or faults in large domestic appliances (separate and built-in white goods) can be registered via the form at
www.inventum.eu/service-aanvraag, by calling the Inventum costumer service department or in the store where you bought the
device. The telephone number of the costumer service department can be found at www.inventum.eu.
2. In the event of breakdowns or faults in large domestic appliances, Inventum will have the option to have a service engineer inspect
the faulty device onsite at the customer in the Netherlands and to carry out repairs, there and then. The Inventum customer
service department can also decide to have the device exchanged.
3. If you suffer a breakdown or fault in a large domestic appliance during the first 2 years from the date of purchase, Inventum will not
charge any costs for the exchange, call-out or for parts and labour.
4. If you registered the product as described before at www.inventum.eu/garantie-registratie and you subsequently report a
breakdown of a large domestic appliance in the 3rd to 5th year of the date of purchase, the 5-year Inventum warranty applies and
the device will be repaired or exchanged, free of charge. In the event of a repair or exchange of the device, you only pay the costs
of exchange. The current costs of exchange are listed at www.inventum.eu/omruilkosten. If you did not register the product, the
3-year extended warranty does not apply.
5. When reporting a breakdown or fault, a service engineer will contact the customer within 1 working day in order to make an
appointment. When the report is made in a weekend or during a public holiday, this will be the next working day.
6. If you report a breakdown or fault via the form at www.inventum.eu/service-aanvraag, you will be kept informed of the progress via
mobile messages and e-mail.
7. The warranty period starts from the date the product is bought.
8. In order to claim under the warranty, you must produce a copy of the original receipt and the Inventum 5-year warranty certificate.
9. The warranty applies only to normal domestic use of Inventum products within the Netherlands.
general terms and conditions of service and warranty
English • 21

Breakdowns or faults outside the warranty period
1. Breakdowns or faults in small or large domestic appliances outside the warranty period, can be reported to the costumer services
department via the form at www.inventum.eu/service-aanvraag or by calling the costumer services department.
2. The costumer services department may ask you to send the product for inspection or repair. The costs of dispatch will be at your
expense.
3. The inspection to establish whether repair is possible involves a charge. You need to grant your permission for this, in advance.
4. In the event of a large domestic appliance, Inventum, at your request, can send out a service engineer. In that case, you will be
charged the call-out costs, as well as parts and labour.
5. In the event of an instruction to repair, the repair costs must be paid in advance. In the event of a repair by a service engineer, the
costs of the repair must be settled with the engineer onsite, preferably by means of PIN payment.
Warranty exclusions
1. The following is excluded from the aforesaid warranties:
• normal wear and tear;
• improper use or misuse;
• insufficient maintenance;
• failure to comply with the operating and maintenance instructions;
• unprofessional installation or repairs by third parties or the customer himself;
• non-original parts used by the customer;
• use for commercial or business purposes;
• removal of the serial number and/or rating label.
2. In addition, the warranty does not apply to normal consumer goods, such as:
• dough hooks, baking tins, (carbon) filters, etc.;
• batteries, bulbs, carbon filters, fat filters etc.;
• external connection cables;
• glass accessories and glass parts such as oven doors;
• and similar items.
3. Transport damage not caused by Inventum is also excluded. Therefore, inspect your new device before starting to use it. If you
detect any damage, you must report this to the store where you purchased the product within 5 working days, or to the Inventum
customer service department via the form at www.inventum.eu/service-aanvraag. If transport damage is not reported within this
period, Inventum does not accept any liability in this respect.
4. The following are excluded from warranty and/or replacement: faults, loss of and damage to the device as a result of an event that
is normally insured under the home contents insurance.
Important to know
1. The replacement or repair of a faulty product, or a part thereof, does not lead to an extension of the original warranty period.
2. Parts that have been replaced, packaging material and exchanged devices are taken back by the service engineer and become the
property of Inventum.
3. If a complaint is unfounded, all costs arising from it will be at the customer’s expense.
4. Following expiry of the warranty period, all costs of repair or replacement, including administration costs, dispatch and call-out
charges, will be charged to the customer.
5. Inventum cannot be held liable for damage as a result of devices built in incorrectly.
6. Inventum cannot be held liable for damage caused by external events, unless this liability arises from mandatory statutory
provisions.
7. These warranty and service provisions are governed by Dutch law. Disputes will be settled exclusively by the competent Dutch
court.
22 • English

• 23

KV1880R/01.0317V
Wijzigingen en drukfouten voorbehouden/ Änderungen und Druckfehler vorbehalten/
Sous réserve de modification / Modifications and printing errors reserved
Inventum Huishoudelijke
Apparaten B.V.
Meander 861
6825 MH Arnhem
Tel: 0800-4583688
info@inventum.eu
www.inventum.eu
twitter.com/inventum1908
facebook.com/inventum1908
youtube.com/inventum1908
persoonlijke verzorgingklein huishoudelijk witgoed inbouwwitgoed vrijstaand
-
 1
1
-
 2
2
-
 3
3
-
 4
4
-
 5
5
-
 6
6
-
 7
7
-
 8
8
-
 9
9
-
 10
10
-
 11
11
-
 12
12
-
 13
13
-
 14
14
-
 15
15
-
 16
16
-
 17
17
-
 18
18
-
 19
19
-
 20
20
-
 21
21
-
 22
22
-
 23
23
-
 24
24


Inventum KV1880R de handleiding
- Categorie
- Koelkasten
- Type
- de handleiding
in andere talen
- English: Inventum KV1880R Owner's manual