Pagina wordt geladen...

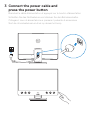
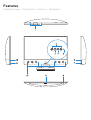
1 Connect the keyboard and mouse
Connectez le clavier et la souris | Schließen Sie die Tastatur und Maus an.
Collegare la tastiera e il mouse | Sluit het toetsenbord en de muis aan
NOTE: If you are connecting a wireless keyboard or mouse, see the documentation that
shipped with it.
REMARQUE: si vous connectez un clavier et une souris sans fil, reportez-vous à la
documentation fournie avec ce matériel.
HINWEIS: Wenn Sie eine Wireless-Tastatur und -Maus anschließen, finden Sie weitere
Informationen in der mitgelieferten Dokumentation.
NOTE: per collegare una tastiera e un mouse wireless, consultare la documentazione fornita
insieme a tali prodotti.
OPMERKING: als u het draadloze toetsenbord en de draadloze muis wilt aansluiten, raadpleegt
u de bijgeleverde documentatie.
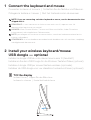
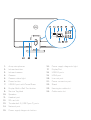
2 Install your wireless keyboard/mouse
USB dongle — optional
Installez le dongle USB de votre clavier/souris sans fil (facultatif)
Installieren Sie den USB-Dongle für die Wireless-Tastatur/Maus (optional).
Installare il dongle USB per mouse/tastiera wireless (opzionale).
Installeer de USB-dongle voor uw draadloze toetsenbord/muis (optioneel)
1
Tilt the display
Inclinez l’écran | Kippen Sie den Bildschirm.
Inclinare lo schermo | Kantel het beeldscherm

2
3
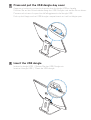
Press and pull the USB dongle-bay cover
Appuyez et retirez le couvercle de protection du dongle USB en façade
Drücken Sie auf die Schachtabdeckung des USB-Dongles und ziehen Sie an dieser.
Premere ed estrarre il coperchio dell’alloggiamento del dongle USB
Druk op het klepje van het USB-dongle-compartiment en trek het klepje open
Insert the USB dongle
Insérez le dongle USB | Setzen Sie den USB-Dongle ein.
Inserire il dongle USB | Plaats de USB-dongle

4
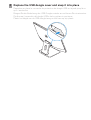
Replace the USB dongle cover and snap it into place
Remettez en place le couvercle de protection du dongle USB en façade jusqu’à ce
qu’il s’enclenche
Bringen Sie die Abdeckung des USB-Dongles wieder an und lassen Sie sie einrasten.
Ricollocare il coperchio del dongle USB e farlo scattare in posizione
Plaats het klepje van de USB-dongle terug en klik hem op zijn plaats
Pagina wordt geladen...
Pagina wordt geladen...

4
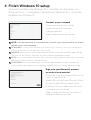
Finish Windows 10 setup
Terminez l’installation de Windows10 | Schließen Sie das Setup von
Windows 10 ab. | Completare l’installazione di Windows 10 |
Voltooi de
installatie van Windows 10
Connect to your network
Connectez-vous à votre réseau
Verbinden mit dem Netzwerk
Collegarsi alla rete
Maak verbinding met uw netwerk
NOTE: If you are connecting to a secured wireless network, enter the password for the wireless
network access when prompted.
REMARQUE: si vous vous connectez à un réseau sans fil sécurisé, saisissez le mot de passe
d’accès au réseau sans fil lorsque vous y êtes invité.
HINWEIS:Wenn Sie sich mit einem geschützten Wireless-Netzwerk verbinden, geben Sie das
Kennwort für das Wireless-Netzwerk ein, wenn Sie dazu aufgefordert werden.
NOTA: se si sta effettuando la connessione a una rete wireless protetta, immettere la password
per l’accesso alla rete wireless quando richiesto.
OPMERKING: als u verbinding maakt met een beveiligd draadloos netwerk, voer dan het
wachtwoord in voor toegang tot het draadloze netwerk wanneer u hierom wordt gevraagd.
Sign in to your Microsoft account
orcreate alocal account
Connectez-vous à un compteMicrosoft ou
créez un compte local
Melden Sie sich bei Ihrem Microsoft-Konto
an oder erstellen Sie ein lokales Konto.
Effettuare l’accesso all’account Microsoft
o creare un account locale
Meld u aan bij uw Microsoft-account of
maak een lokaal account aan
Pagina wordt geladen...
Pagina wordt geladen...
Pagina wordt geladen...
Pagina wordt geladen...

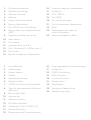
1. Microfoni array
2. Trasfmettitori a infrarossi
3. Fotocamera a infrarossi
4. Fotocamera
5. Indicatore di stato della fotocamera
6. Pulsante di alimentazione
7. Porta USB 3.0 con PowerShare
8. Pulsante di autotest incorporato dello
schermo
9. Etichetta Numero di servizio
10. Altoparlanti
11. Porta per cuffia auricolare
12. Alloggiamento per scheda SD
13. Porte Thunderbolt 3 (USB Tipo-C)
14. Porta di rete
15. Pulsante di diagnostica
dell’alimentatore
16. Indicatore di diagnostica
dell’alimentatore
17. DisplayPort
18. Porte USB 3.0
19. Porta HDMI
20. Porta con linea in uscita
21. Porta del connettore di alimentazione
22. Supporto
23. Slot per cavo Kensington
24. Slot per instradamento del cavo
1. Arraymicrofoons
2. Infraroodzenders
3. Infraroodcamera
4. Camera
5. Statuslampje voor camera
6. Aan-uitknop
7. USB 3.0-poort met PowerShare
8. Ingebouwde zelftestknop voor
beeldscherm
9. Servicetaglabel
10. Luidsprekers
11. Headsetpoort
12. SD-kaartsleuf
13. Thunderbolt 3-poorten (USB-type C)
14. Netwerkaansluiting
15. Diagnostische knop voeding
16. Diagnostisch lampje voeding
17. DisplayPort
18. USB 3.0-poorten
19. HDMI-poort
20. Lijnuitgang-poort
21. Stroomconnectorpoort
22. Standaard
23. Sleuf voor Kensington-kabel
24. Kabelroutesleuf
Documenttranscriptie
1 Connect the keyboard and mouse Connectez le clavier et la souris | Schließen Sie die Tastatur und Maus an. Collegare la tastiera e il mouse | Sluit het toetsenbord en de muis aan NOTE: If you are connecting a wireless keyboard or mouse, see the documentation that shipped with it. REMARQUE : si vous connectez un clavier et une souris sans fil, reportez-vous à la documentation fournie avec ce matériel. HINWEIS: Wenn Sie eine Wireless-Tastatur und -Maus anschließen, finden Sie weitere Informationen in der mitgelieferten Dokumentation. NOTE: per collegare una tastiera e un mouse wireless, consultare la documentazione fornita insieme a tali prodotti. OPMERKING: als u het draadloze toetsenbord en de draadloze muis wilt aansluiten, raadpleegt u de bijgeleverde documentatie. 2 Install your wireless keyboard/mouse USB dongle — optional Installez le dongle USB de votre clavier/souris sans fil (facultatif) Installieren Sie den USB-Dongle für die Wireless-Tastatur/Maus (optional). Installare il dongle USB per mouse/tastiera wireless (opzionale). Installeer de USB-dongle voor uw draadloze toetsenbord/muis (optioneel) 1 Tilt the display Inclinez l’écran | Kippen Sie den Bildschirm. Inclinare lo schermo | Kantel het beeldscherm 2 Press and pull the USB dongle-bay cover Appuyez et retirez le couvercle de protection du dongle USB en façade Drücken Sie auf die Schachtabdeckung des USB-Dongles und ziehen Sie an dieser. Premere ed estrarre il coperchio dell’alloggiamento del dongle USB Druk op het klepje van het USB-dongle-compartiment en trek het klepje open 3 Insert the USB dongle Insérez le dongle USB | Setzen Sie den USB-Dongle ein. Inserire il dongle USB | Plaats de USB-dongle 4 Replace the USB dongle cover and snap it into place Remettez en place le couvercle de protection du dongle USB en façade jusqu’à ce qu’il s’enclenche Bringen Sie die Abdeckung des USB-Dongles wieder an und lassen Sie sie einrasten. Ricollocare il coperchio del dongle USB e farlo scattare in posizione Plaats het klepje van de USB-dongle terug en klik hem op zijn plaats 4 Finish Windows 10 setup Terminez l’installation de Windows 10 | Schließen Sie das Setup von Windows 10 ab. | Completare l’installazione di Windows 10 | Voltooi de installatie van Windows 10 Connect to your network Connectez-vous à votre réseau Verbinden mit dem Netzwerk Collegarsi alla rete Maak verbinding met uw netwerk NOTE: If you are connecting to a secured wireless network, enter the password for the wireless network access when prompted. REMARQUE : si vous vous connectez à un réseau sans fil sécurisé, saisissez le mot de passe d’accès au réseau sans fil lorsque vous y êtes invité. HINWEIS:Wenn Sie sich mit einem geschützten Wireless-Netzwerk verbinden, geben Sie das Kennwort für das Wireless-Netzwerk ein, wenn Sie dazu aufgefordert werden. NOTA: se si sta effettuando la connessione a una rete wireless protetta, immettere la password per l’accesso alla rete wireless quando richiesto. OPMERKING: als u verbinding maakt met een beveiligd draadloos netwerk, voer dan het wachtwoord in voor toegang tot het draadloze netwerk wanneer u hierom wordt gevraagd. Sign in to your Microsoft account or create a local account Connectez-vous à un compte Microsoft ou créez un compte local Melden Sie sich bei Ihrem Microsoft-Konto an oder erstellen Sie ein lokales Konto. Effettuare l’accesso all’account Microsoft o creare un account locale Meld u aan bij uw Microsoft-account of maak een lokaal account aan 16. Indicatore di diagnostica dell’alimentatore Fotocamera a infrarossi 17. DisplayPort Fotocamera 18. Porte USB 3.0 5. Indicatore di stato della fotocamera 19. Porta HDMI 6. Pulsante di alimentazione 20. Porta con linea in uscita 1. Microfoni array 2. Trasfmettitori a infrarossi 3. 4. 7. Porta USB 3.0 con PowerShare 21. 8. Pulsante di autotest incorporato dello schermo 22. Supporto 9. Etichetta Numero di servizio 24. Slot per instradamento del cavo 10. Altoparlanti 11. Porta per cuffia auricolare 12. Alloggiamento per scheda SD 13. Porte Thunderbolt 3 (USB Tipo-C) 14. Porta di rete 15. Pulsante di diagnostica dell’alimentatore 23. Porta del connettore di alimentazione Slot per cavo Kensington 1. Arraymicrofoons 16. Diagnostisch lampje voeding 2. Infraroodzenders 17. DisplayPort 3. Infraroodcamera 18. USB 3.0-poorten 4. Camera 19. HDMI-poort 5. Statuslampje voor camera 20. Lijnuitgang-poort 6. Aan-uitknop 21. 7. USB 3.0-poort met PowerShare 22. Standaard 8. Ingebouwde zelftestknop voor beeldscherm 23. 9. Servicetaglabel 10. Luidsprekers 11. Headsetpoort 12. SD-kaartsleuf 13. Thunderbolt 3-poorten (USB-type C) 14. Netwerkaansluiting 15. Diagnostische knop voeding Stroomconnectorpoort Sleuf voor Kensington-kabel 24. Kabelroutesleuf-
 1
1
-
 2
2
-
 3
3
-
 4
4
-
 5
5
-
 6
6
-
 7
7
-
 8
8
-
 9
9
-
 10
10
-
 11
11
-
 12
12


